Welcome to RennTech.org Community, Guest
There are many great features available to you once you register at RennTech.org
You are free to view posts here, but you must log in to reply to existing posts, or to start your own new topic. Like most online communities, there are costs involved to maintain a site like this - so we encourage our members to subscribe or donate. All subscriptions and donations go to the costs operating and maintaining this site. We prefer that guests take part in our community and we offer a lot in return to those willing to join our corner of the Porsche world. This site is 99 percent member supported (less than 1 percent comes from advertising) - so please consider an annual subscription or donation to keep this site running.
Here are some of the features available - once you subscribe RennTech.org
- View Classified Ads
- DIY Tutorials
- Porsche TSB Listings (limited)
- VIN Decoder
- Special Offers
- Paint Codes
- Registry
- Videos System
- View Reviews
- and get rid of this welcome message
It takes just a few minutes to register, and it's quality Porsche information at a low cost.
Contributing Members also get these additional benefits:
(you become a Contributing Member by subscribing or donating money to the operation of this site)
- No ads - advertisements are removed
- Access the Contributors Only Forum
- Contributing Members Only Downloads
- Send attachments with PMs
- All image/file storage limits are substantially increased for all Contributing Members
- Option Codes Lookup
- VIN Option Lookups (limited)


1schoir
-
Posts
2,739 -
Joined
-
Last visited
-
Days Won
9
Content Type
Profiles
Events
Forums
Exterior Paint Colors
Downloads
Tutorials
Links Directory
Collections
Classifieds
Store
Everything posted by 1schoir
-
Dan: I was able to see the photos on Tinypic. Thanks for posting them there. It does not look like it needs a big adjustment, so you may actually be able to adjust the starting position of the top to clear the bottom of the roll bar. Put the top in the service position and loosen (no need to remove them completely, just break them loose and go another 1/2 turn) the three 15mm(IIRC) bolts that hold the convertible top frame onto the body on each side. I would start with the side that is binding and then, if that doesn't work, also loosen the other side before making the adjustment and then tightening them down. When the bolts are loose, have someone pull back hard on the underside of the frame and tighten one bolt, then test the top. If it fixes the problem, tighten the other two bolts on that side. Here is a link to a DIY I wrote up on replacing the top and frame http://sites.google....frameona'97 Go to the Part I PDF, specifically to the text at pages 11 and 12 and the photos at page 12 and 15 for a good look at the location of the the bolts. Good luck! Regards, Maurice.
-
996 Rotors Replace or Resurface?
1schoir replied to Johnny-5's topic in 996 Series (Carrera, Carrera 4, Carrera 4S, Targa)
These are not necessarily the correct specs for your 996, but they will give you an idea of the wear values from new to replace. From the Bentley manual for a 986 Boxster: The brake rotor machining limit is 22mm for the fronts and 18mm for the rears. New rotors are 24mm thick for the fronts and 20 mm thick for the rears. The brake rotor wear limit (before machining) is 22.6mm for the fronts and 18.6mm for the rears. Since your rotors are OEM (they are "good" quality), you should be able to see the minimum values stamped on the side of the outside circumference of the rotor. Sunset and Suncoast are for online purchases (unless you find yourself in Florida or Colorado, IIRC). Regards, Maurice. -
996 Rotors Replace or Resurface?
1schoir replied to Johnny-5's topic in 996 Series (Carrera, Carrera 4, Carrera 4S, Targa)
Whether to replace or to resurface rotors is not based on whether or not they have been resurfaced before ("Others are stating resurfacing is no issue at least once before replacing them..." As long as the rotors are of good quality, the only criteria should be whether they are worn down past their stated minimum thickness and whether they are out of round so much that they have to be resurfaced to a degree that will have them end up thinner than the minimum thickness. If there is a thick lip around the outer edge of the rotor, that is an indication that you should measure the thickness of the rotors to make sure they are still within spec. I don't have the minimum thickness specs in front of me, but many rotors even have the minimum thickness specs stamped on the outer edge of the rotor itself or on the rotor "hat". Board sponsor Sunset Porsche (see the link under "Special Offers" at the top of every page) and also Suncoast Porsche in Florida usually have much better prices than the local dealer. They also have very good service. Regards, Maurice. -
It looks VERY excellent already! :thumbup: Regards, Maurice.
-
Dan: Could you post the photos on TinyPic or another image hosting website. I "unfriended" facebook a long time ago. Also, I forgot to ask... Is the portion of the canvas that gets stuck under the rollbar the same on both edges (i.e., the left front corner of the leading edge and the right front corner), or is it more on one side than the other? Regards, Maurice.
-
Those cool red Porsche calipers...
1schoir replied to boldstep's topic in 996 Series (Carrera, Carrera 4, Carrera 4S, Targa)
Considering the ease with which the calipers can be painted the $850.00 quote to repaint them once they have been removed is ludicrous. The materials cost less than $50. Cleaning them thoroughly and prepping the calipers for paint should take a professional less than an hour. Applying two stage paint with a spray gun should take about 15 minutes per coat for all four calipers. So, for less than 2 hours of labor, that works out to about $400 per hour. Nice work if you can get it. :o Regards, Maurice. -
Is there an instruction manual that shows how to operate and understand the PST2 (Porsche Systems Tester), or is it included somewhere in one of the chapters of the factory manual? Regards, Maurice.
-
Dan: The photos did not post. When you say the leading edge of the top gets caught on the bottom of the back of the roll bar, how much of the leading edge is actually under the back of the roll bar...In other words, how much (in inches) is the leading edge too far forward at that point? Regards, Maurice.
-
What could cause this (top push rods)?
1schoir replied to johnjack11's topic in 987-1 Series (Boxster, Boxster S)
The V-levers exert a tremendous amount of force when driven by the transmissions. A partially latched top, where the latch catches in the receptacle as opposed to releasing completely, could possibly cause the front pushrods to bend, but more likely would cause the plastic ball cup on the end of the pushrod to break apart, as in your photo. More often, after the plastic ball cup breaks, if you continue to operate the top, the pushrod will bend when it is jammed against the foam drain tray (and the body panel underneath), tearing the drain tray in the process. Before you install new pushrods, be sure to inspect your foam drain trays very carefully for any rips, holes or tears. If that has happened, you will get water into the cabin the next time it rains or you wash your Boxster. The water will find its way under the driver's seat, where it will promptly fry your central immobilizer unit. Although Porsche only sells the pushrods as complete assembly, there is a guy in the Netherlands who has had the plastic ball cups manufactured. PM me for the info if you need it. You can probably straighten out the bent pushrod in the photo and it will work as good as new with a new plastic ball cup. If you get new pushrods, be careful to match the overall length of the new ones to the old ones as that length affects how the leading edge of the top meets the windshield frame. Regards, Maurice. -
:beer: Here is a link to a good DIY that includes door panel removal for a Boxster: http://www.bombaydigital.com/boxster/projects/window/ Here's a link to another thread here where the original poster had "too much play" in his window regulator: http://www.renntech.org/forums/topic/35825-window-regulator-has-too-much-play/page__p__189868__hl__+window%20+regulator%20+bicycle#entry189868 Keep us posted. Regards, Maurice.
-
The window moving up and down slightly means that there is slack in your window regulator cable. That may be what is preventing it from dropping the 1/2" needed (because the normal movement is absorbed taking up the slack). The window staying up all the way and not dropping the 1/2 inch while the door is open usually means that one of the microswitches INSIDE the door lock assembly is faulty. This is especially true if you are getting the same reaction whether you pull on the inner or the outer door handle. In your case, I would first open the door panel and inspect the window regulator, and, if necessary, replace it. Once you have done that, see if the window behaves normally when you pull on the outer (or inner) door handle. Do a search here, you will find DIY's for removing the door panel and for replacing the window regulator. Regards, Maurice.
-
1. No detrimental issues in the long run. If you forget to lower the window and slam the door you may end up with a shattered window, so be careful. 2. http://www.pelicanparts.com/boxster/boxster_tech.htm Regards, Maurice.
-
Top it off with distilled water. A quart or less will not affect the mixture sufficiently to have any adverse effects on the temperature at which it will freeze. Just keep an eye on the level, inspect the hoses and look under the car to try to determine the cause of coolant loss. Regards, Maurice.
-
The overall length of your front pushrods is not set correctly. First lengthen the driver's side pushrod incrementally by unscrewing the plastic ball cup by one full turn at a time. That should move the frame enough to clear the top of the driver's side rollbar. That should also have the effect of bringing the leading edge of the top closer to the horizontal upper part of the windshield frame. If you don't get enough adjustment by that method, screw the plastic ball cup back to its original position and lengthen the pushrod by loosening the 10mm bolt with fat washer and pull the two sections apart incrementally before tightening that bolt again. This method will provide more gross adjustment than the finer adjustments provided by unscrewing the plastic ball cup one turn at a time. Also, note that this is not strictly linear effect. Once you get past a certain length, the leading edge of the top will start to retract when it reaches its final position before latching. Regards, Maurice.
-
The B-Pillar microswitch gets depressed (i.e., closes) when the top is nearing its fully closed position. As the convertible top frame travels towards the fully closed position, the B-pillar part of the frame presses the switch closed. As the top opens, and the convertible top frame travels back, the switch is open. The closing of the switch tells the double relay that the top is almost closed, then the black lever microswitch gets pressed down by the clamshell and, following what Porsche calls the "after-running time", power to the electric motor is cut off and the idiot light goes out at the same time. On the later Boxsters (i.e., 2000 and later) those two switches were moved to the INSIDE of the transmission on the driver's side. Regards, Maurice.
-
It sounds like a malfunction of your B-Pillar microswitch. You can trip it manually to see if the "back and forth" cycling goes away. You can find the switch at the very bottom of the B-Pillar on the driver's side, just below the rim of the half-cylindrical, carpet-covered trim piece behind your left shoulder as you sit in the driver's seat. Here is a pic: Regards, Maurice.

-
red lamp water flashing every second
1schoir replied to yanpat's topic in 996 Series (Carrera, Carrera 4, Carrera 4S, Targa)
"right behind cats" = directly behind the catalytic converters. Regards, Maurice. -
For aftermarket tops, it's a tossup between GAHH and Robbins, with more preferring the GAHH. You could also go the route of a used OEM 2003-2004 glass-windowed top and that would provide you with less restricted access to the engine compartment as a bonus. On your 2001, it's a straightforward replacement: http://sites.google.com/site/mikefocke2/installinga'03-'04glasstopandframeona'97 Regards, Maurice.
-
Top trim popping off
1schoir replied to johnjack11's topic in 987-1 Boxster Convertible Top Issues and Solutions
Those black trim pieces on the rear edge of the clamshell can be fastened better if you remove them and slightly squeeze each of the two clips on each trim piece with a pair of pliers. Put some tape over the plier jaws so that you don't damage the finish on the clips. You only have to squeeze them closed very slightly and they will then grab onto the underside of the clamshell and not come off. Regards, Maurice. -
Code P1124, P1126, P0446
1schoir replied to questforbalance's topic in 986 Series (Boxster, Boxster S)
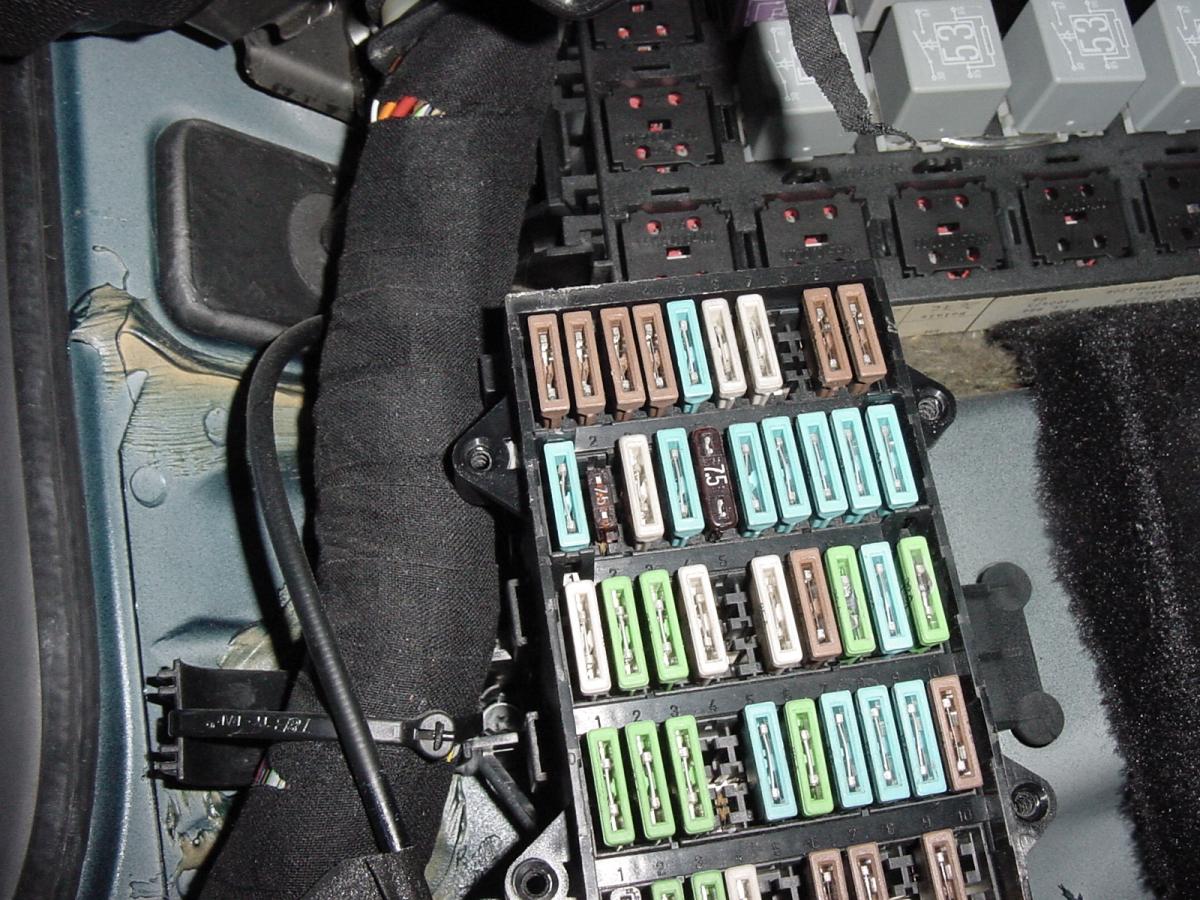
The left side is the driver's side (except in the UK, where the driver's side is on the right :eek: ). So, when you are standing behind the car, looking into the rear trunk, that relay tray is on the left, behind the carpeted trim. Here is a photo where you can actually see the numbers above each row of fuses: (Click on the photo for a better look). Regards, Maurice.
-
At the link you provided, the column for "Quantity" is offset a little for some reason. But it definitely says that you need 9 screws of item #20 on the diagram. Maybe the sections of your part that is chewed up had holes for some of the 9 screws required. The edges on your part are eaten away and the screws do attach along the edges of the part, not further in towards the middle. Regards, Maurice.
-
Item 9 is a "self-tapping screw" , with updated part number N906.487.04. The parts diagram shows that there are nine of these screws needed to hold the front air duct in place. Regards, Maurice.
-
Code P1124, P1126, P0446
1schoir replied to questforbalance's topic in 986 Series (Boxster, Boxster S)
If that fuse (D7) is good, check the two relays in the rear trunk (i.e., on the left side of the trunk, behind the carpeted trim panel). In the top row of relays in that location, the third relay (from the rear of the car) is for spoiler extension (relay #3). Just below it (in the bottom row), relay #9 is for spoiler retraction. Regards, Maurice. -
Phillip: I have a pretty good idea as to who is to blame, and it certainly is not you. Your only contractual relationship is with the dealer, and that is the party with whom you placed the order, in whom you placed your trust, and to whom you paid your money. You have no privity of contract with the party who was "supposed to do the flash." It is entirely the responsibility of your (independent) dealer, who also had a responsibility to let you know that he was going to "farm out the work." Since you had no input on the choice of which shop was going to do the work, the responsibility falls squarely on the shoulders of the dealer. Somebody committed a textbook case of fraud here, and it wasn't you. I would make sure that the dealer understands that what he did (as it did not "happen" by itself) is a serious matter and not merely an inconvenience. :cursing: :cursing: :cursing: Glad that you are getting it done right this time. If the dealer wants to "try to make things right", at a minimum he should be paying for what you were supposed to have in the first place. Regards, Maurice.
-
If it doesn't offer any resistance, is it possible that the screw head itself is not stripped, but rather the threads inside which it screws are damaged? If that's the case, you may be able to get it to unscrew by applying some pulling pressure on the housing as you turn the fastener counterclockwise. Put some sort of lever in between the steering wheel hub and the airbag housing and apply some pressure so that the parts are being pulled away from each other, and then turn the fastener CCW. Regards, Maurice.