Welcome to RennTech.org Community, Guest
There are many great features available to you once you register at RennTech.org
You are free to view posts here, but you must log in to reply to existing posts, or to start your own new topic. Like most online communities, there are costs involved to maintain a site like this - so we encourage our members to donate. All donations go to the costs operating and maintaining this site. We prefer that guests take part in our community and we offer a lot in return to those willing to join our corner of the Porsche world. This site is 99 percent member supported (less than 1 percent comes from advertising) - so please consider an annual donation to keep this site running.
Here are some of the features available - once you register at RennTech.org
- View Classified Ads
- DIY Tutorials
- Porsche TSB Listings (limited)
- VIN Decoder
- Special Offers
-
OBD II P-Codes - Paint Codes
- Registry
- Videos System
- View Reviews
- and get rid of this welcome message
It takes just a few minutes to register, and it's FREE
Contributing Members also get these additional benefits:
(you become a Contributing Member by donating money to the operation of this site)
- No ads - advertisements are removed
- Access the Contributors Only Forum
- Contributing Members Only Downloads
- Send attachments with PMs
- All image/file storage limits are substantially increased for all Contributing Members
- Option Codes Lookup
- VIN Option Lookups (limited)


1schoir
-
Posts
2,739 -
Joined
-
Last visited
-
Days Won
9
Content Type
Profiles
Events
Forums
External Paint Colors
Downloads
Tutorials
Links Directory
Collections
Classifieds
Store
Everything posted by 1schoir
-
on DRIVE LINKS panel says that i can reset some thinks with the engine running but it is very complicated . Does this function of the software works on my model and what functions can i regulate with this? thanks michael Michael, I would call Durametric and I'm sure they can step you through the diagnostic steps using the drive links function. I have the Durametric myself, but have not had to use this function ( yet!!). Demosan Michael, I second that. The folks at Durametric are very, very helpful and concerned that you get the most out of your unit. Regards, Maurice.
-
Top replacement about to take place
1schoir replied to jimyboyle's topic in 986 Boxster Convertible Top Issues and Solutions
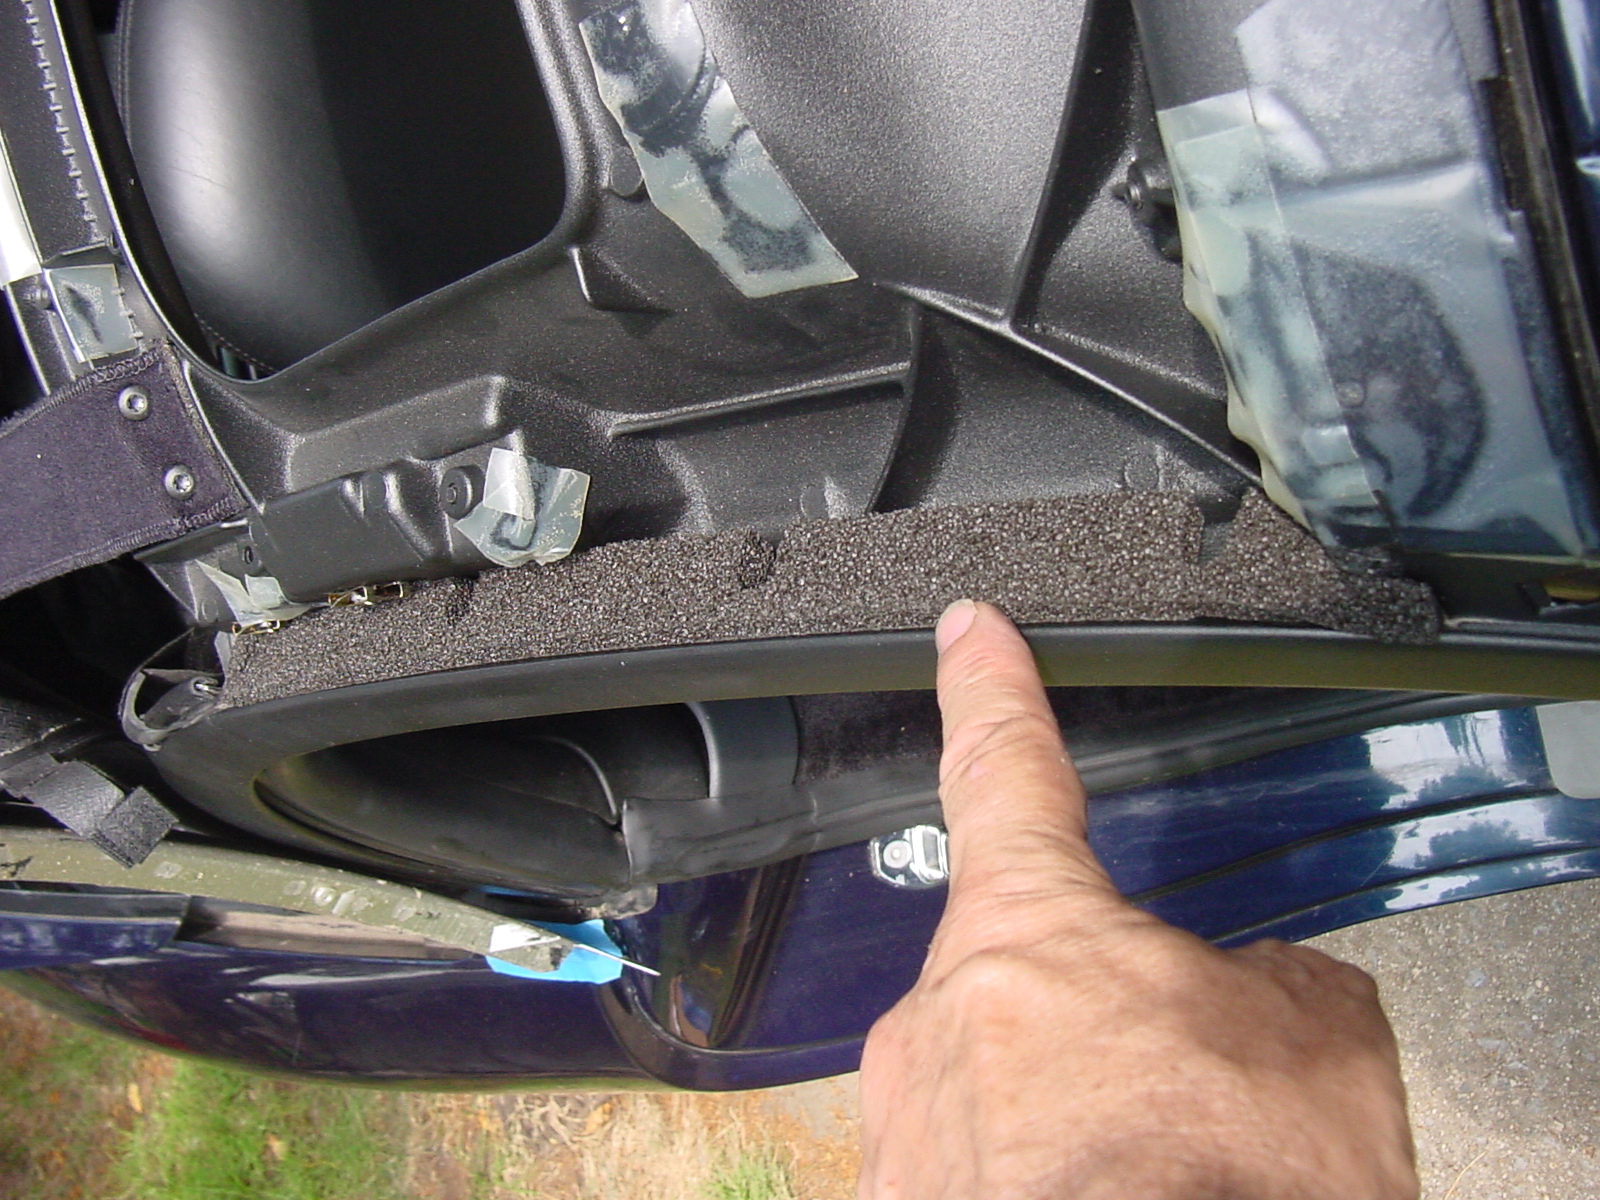
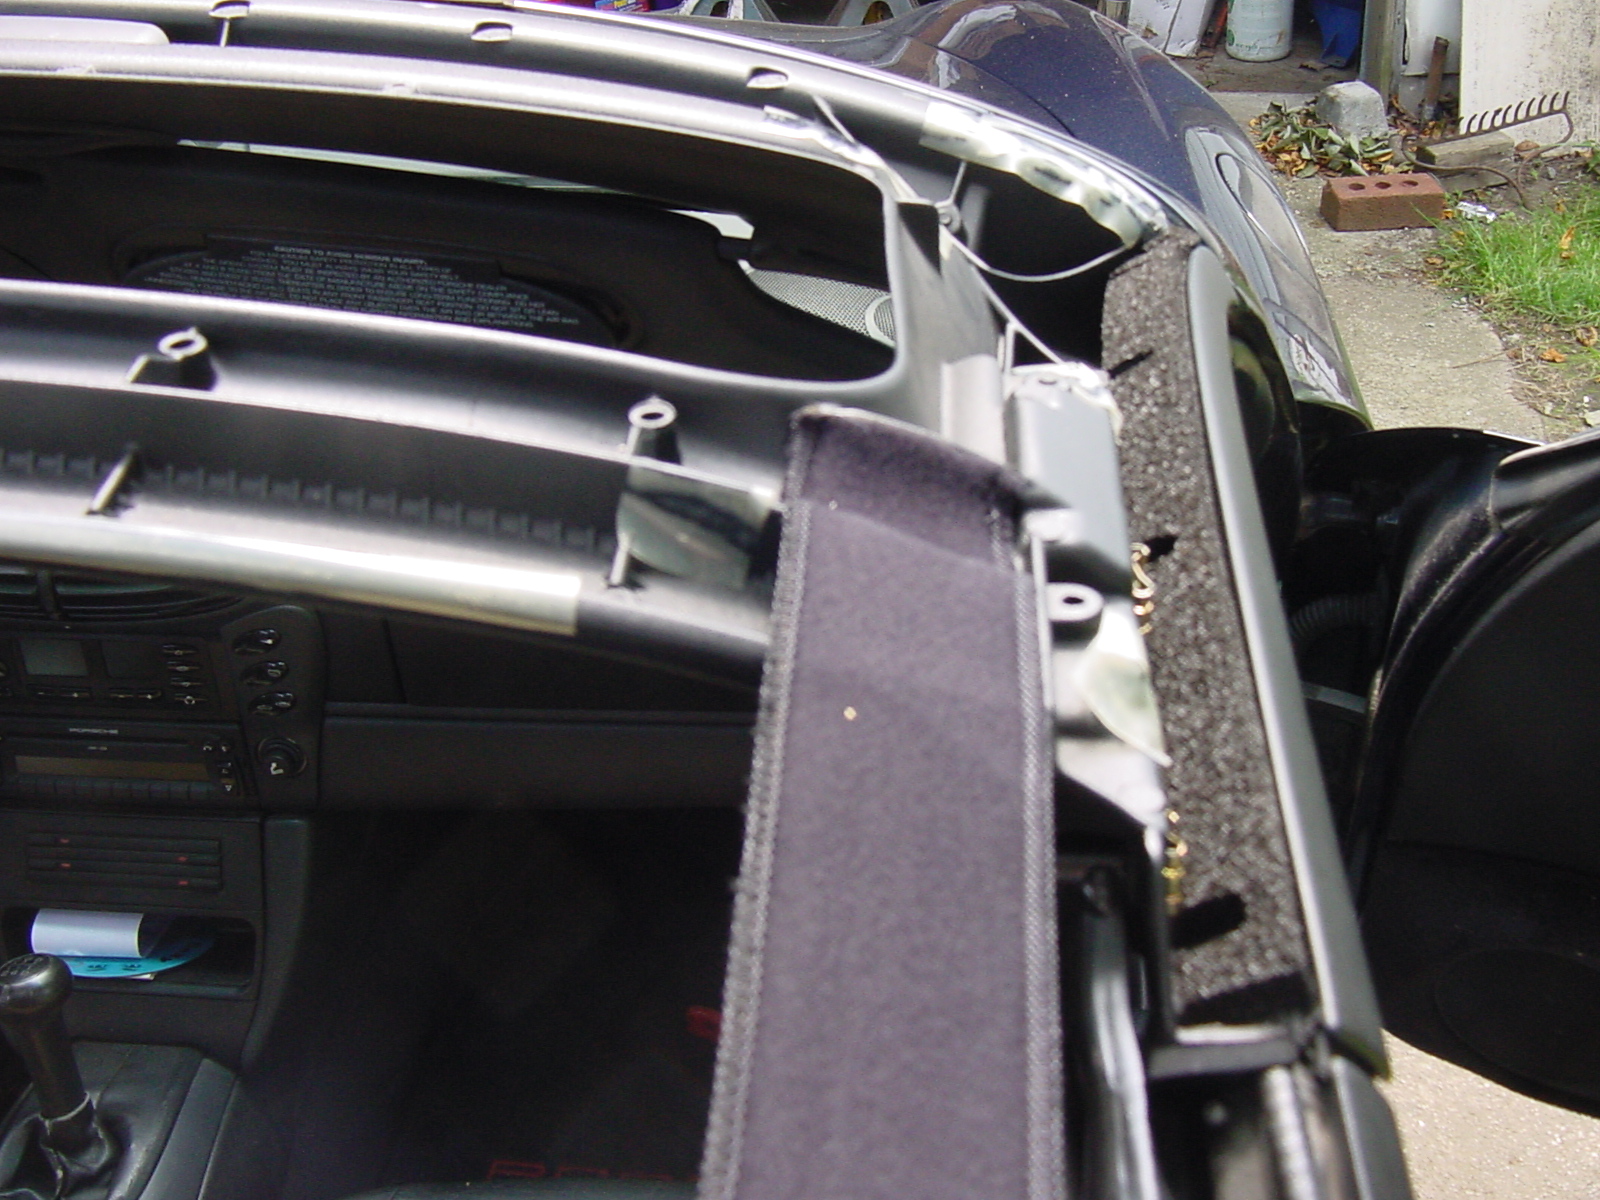
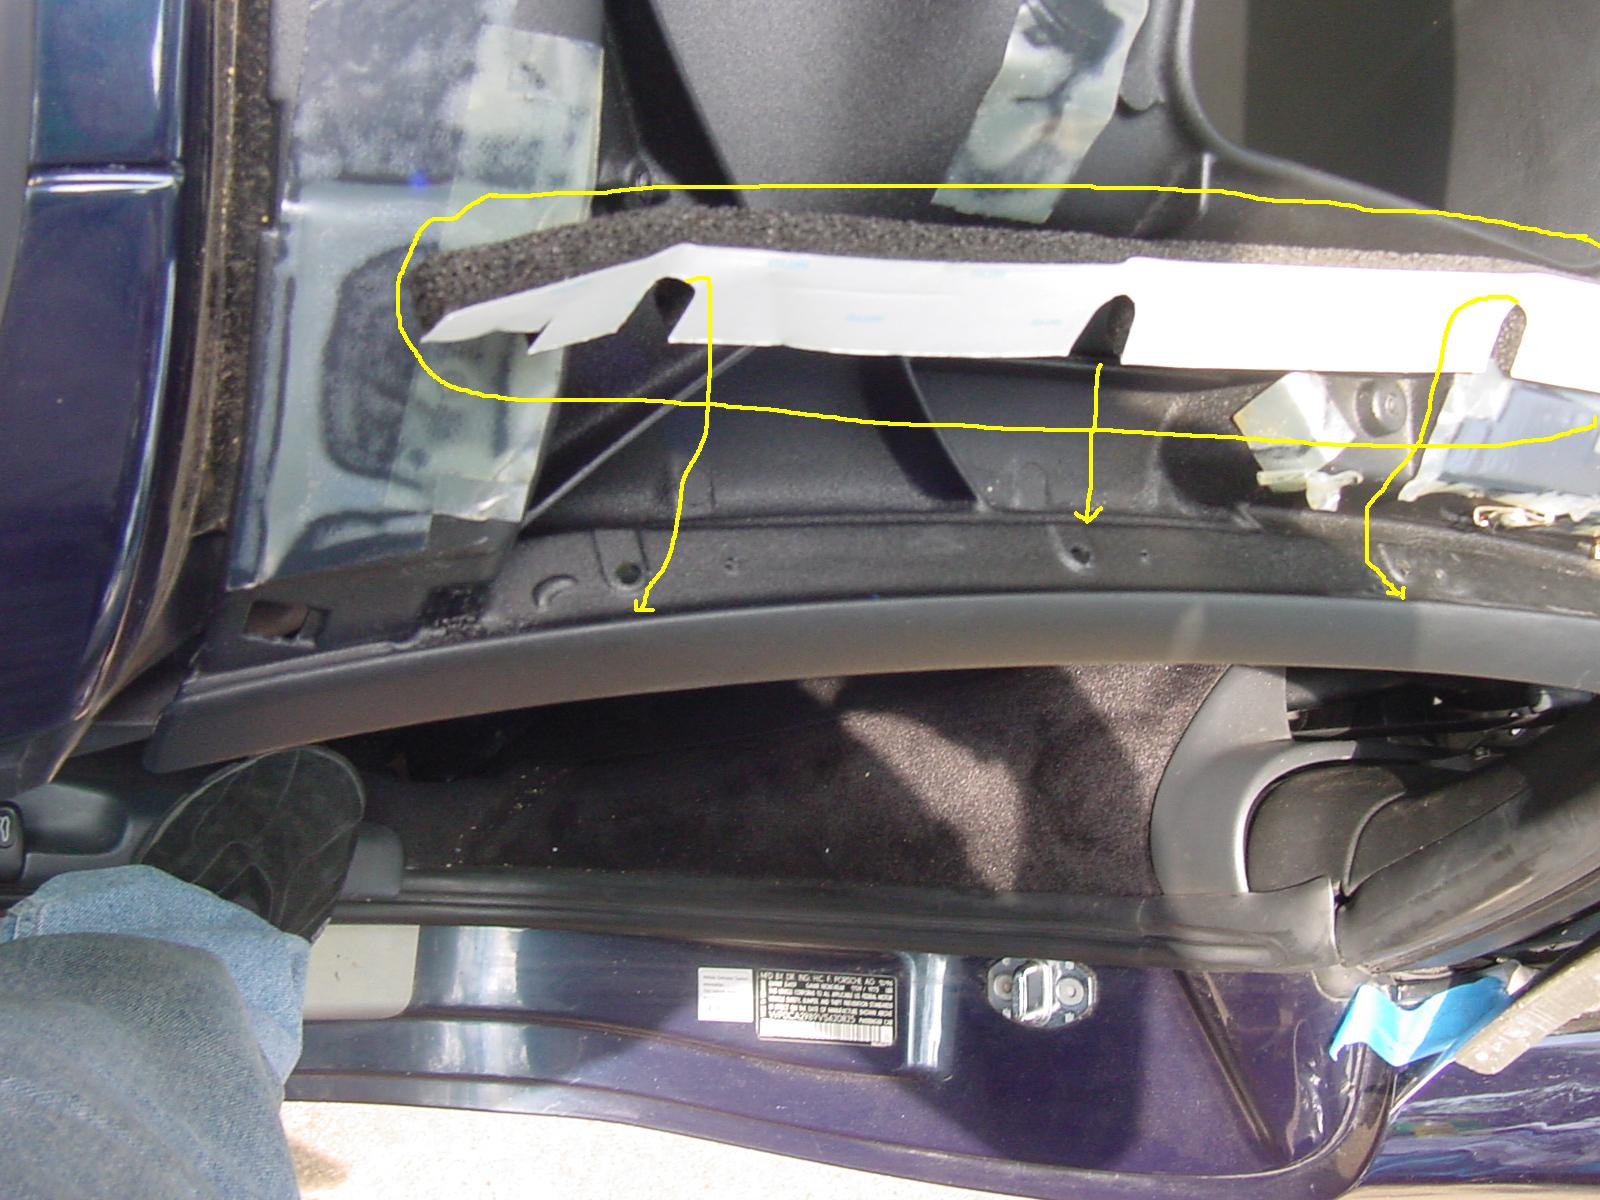
Jim: Thanks for the part numbers. Perhaps when you actually get the parts you can post photos of them here. I have done a thorough DIY write up that deals with the problem of the plastic-covered cable not falling cleanly into the guide channel, and I will post it in a few days if you need it. Also, since you are doing your own foam seals, I will look for any photographs I may have of the seals and post them here as well later tonight, so that you can copy the shape, etc. Regards, Maurice. Jim: Since you are going to make your own seals, here are the photos of the seals that I was able to find. These should give you a good idea of size, shape and location. Be sure to scrape away the (squashed) residue of the old seals and adhesive and clean the surfaces before applying your seals. (Click on the photos to blow them up to full size) These first two show the seal installed on the passenger's (right side) side. This third one shows the seal for the driver's (left side) side before it is installed. You can see the white wax paper that is still attached to the underside of the seal with the adhesive. The yellow arrows show where those particular points end up when installed on top of the roof frame. Be careful to leave a decent amount of space around each of the holes to avoid having the foam getting caught up and wound up in each of the four screws that will pull down the aluminum shoulder plate in place. If the cutouts are too small, the screws will rip up the foam in those spots. If your car has the steering wheel on the right side, disregard the designations of "passenger" and "driver" and refer only to the designations that specify "right" and "left" sides. Regards, Maurice.
-
Top replacement about to take place
1schoir replied to jimyboyle's topic in 986 Boxster Convertible Top Issues and Solutions
Jim: Thanks for the part numbers. Perhaps when you actually get the parts you can post photos of them here. I have done a thorough DIY write up that deals with the problem of the plastic-covered cable not falling cleanly into the guide channel, and I will post it in a few days if you need it. Also, since you are doing your own foam seals, I will look for any photographs I may have of the seals and post them here as well later tonight, so that you can copy the shape, etc. Regards, Maurice. -
Window has a mind of it's own
1schoir replied to 2Fast996's topic in 996 Series (Carrera, Carrera 4, Carrera 4S, Targa)
Jared: Sorry to hear you are giving up. In removing the door panel, you had accomplished the toughest part of the job. The motors very rarely go bad, even on very high mileage cars. I started out on BMW's too (still have my 72 2002 tii that I bought new), and find these Porsches different to work on, but with a little persistence and the help from these boards, almost any of these jobs is doable...and rewarding. Maybe you'll have a change of heart after you've been away from it for a couple of days. Considering it should only take about an hour now to change out the regulator, plus the time to re-install the door panel, it's a shame the dealer is going to be making out like a bandit. You've done all the hard work for him. Regards, Maurice. -
Window has a mind of it's own
1schoir replied to 2Fast996's topic in 996 Series (Carrera, Carrera 4, Carrera 4S, Targa)
Jared: Airbag and speaker assembly should be removed for easier access. That will facilitate removal of the old window regulator assembly and installation of the new one. Do not cut the gray liner. It's easy to remove it, especially if you heat it up around its perimeter with a heat gun (or a hair dryer). Don't apply too much heat as you may burn through. Once it's softened up, it will pull off the metal easily with slow and steady pulling pressure. I found it easiest to just pull off the top edge and the left and right sides, while leaving it attached along the bottom edge. If you do it that way, you won't have to struggle to line it up exactly right again, it will naturally attach back exactly where it was. Be careful not to get any tears in the liner, as rain water can migrate into the passenger compartment from behind the door panel and cause you small headaches from a wet carpet or big headaches from a flooded Alarm Conrol Unit ($$$$$) under the driver's seat. Also, be sure to disconnect the battery (negative terminal) AND pull the key out of the ignition, then wait at least one minute before disconnecting the airbag. DO NOT PUT THE KEY BACK IN THE IGNITION or reconnect the battery until the airbag is reconnected and everything is closed up, or you will get the dreaded airbag light (which can only be reset with PST2, PIWIS, or Durametric). Regards, Maurice. -
Removal of steering wheel
1schoir replied to elliotts's topic in 996 Series (Carrera, Carrera 4, Carrera 4S, Targa)
Elliotts: Always, ALWAYS, disconnect the battery whenever working on or near the airbags. Also, be sure to wait at least one minute after disconnecting the battery AND pulling the key out of the ignition before starting any work in that area. As an additional precaution, be careful when handling the airbag and when you put it aside, always assume that it can go off so put it in a safe place (and out of the reach of anyone else, especially kids). There is a proper way to put them aside, and I believe they are supposed to be stored with the airbag facing up (perhaps someone else can verify this). Here is a link to a site that includes steering wheel removal instructions (It's for a Boxster, but I believe it's the same or a very similar procedure): http://www.whiteson.org/boxster/mods/obc/obc.stalk.pdf Regards, Maurice. -
"Pop" goes the wallet
1schoir replied to zodman's topic in 986 Boxster Convertible Top Issues and Solutions
Jim: Thanks for the update. Keep us posted. Regards, Maurice. -
Top replacement about to take place
1schoir replied to jimyboyle's topic in 986 Boxster Convertible Top Issues and Solutions
Jimmy: What is the part number for the "little ears to guide the top" that you ordered? Also, did you inquire about the "Convertible Top Retrofit Kit" that I mentioned above, which contains the foam seals (part #000 043 300 45). It shows that it's available from Pelicanparts.com at this link: http://www.pelicanparts.com/cgi-bin/ksearc...x=12&I1.y=5 If you decide to get it, you can get it from Suncoast or Sunset (board sponsor) for about 20% less. As far as the return leaf springs, if they provide too much tension, they can cause the plastic covered cable rib to be pulled too much towards the inboard side of the guide channel, so be careful there. Happy and Healthy New Year! Regards, Maurice. -
Michael: When you turn on the climate control, on the setting that blows air up onto the windshield, does the windshield fog up a little? or a lot? If so, and if it doesn't clear up, as WVicary said, your heater core may be starting to leak. If you are getting those symptoms, take a look around the area near the gas pedal for any signs of a drop (or a few drops) of antifreeze. If you see a couple of drops there, it's definitely the heater core. On the positive side, it's one of the easiest parts to access on the Boxster. On the not so positive side, a new heater core lists for about $350 from the dealer. There is a possibility that a VW Jetta Wagon heater core is the same part, for less than 1/3 the price, but I haven't been able to confirm that they are the exact same part yet. Regards, Maurice.
-
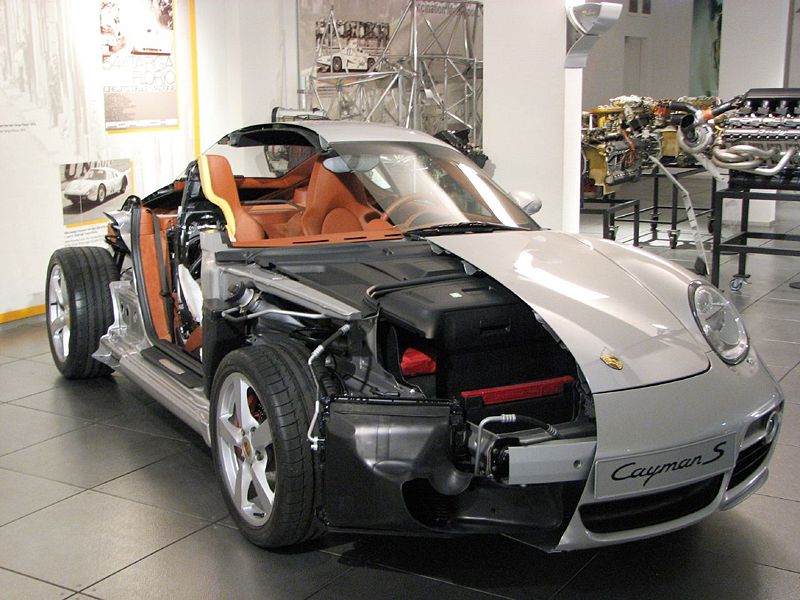
Here is one of a Cayman, for good measure: Regards, Maurice.
-
Some floor mats come with a plastic "bayonet-type" clip that is sewn to the rear corners of the floor mats and then clipped on to the small hole that is on the top surface of the very front of the seat frame rails. I guess you can either get new mats or get four of those clips from home depot and sew them on to your mats. Regards, Maurice.
-
<_< Michael: A slight delay is normal. Have you compared the operation of the driver's side window with what you are experiencing in the passenger's side window? That might give you reassurance that everything is "normal". Regards, Maurice.
-
Michael: Is it possible that the bulb for the seat belt light was loose and was jarred back enough to make a connection when you hit a bump? When did the seat belt light go back on? Was it while driving or upon a new start up of the car? It may be hard to pinpoint when it actually went back on (or made a good connection) because it would not show up as lit when you started wearing the seat belt again. Maybe try to tap lightly on the top of the gauge pod to see if that "dislodges" the bulb again. Regards, Maurice.
-
Invaluable advice for keeping the seals in the air conditioning system lubricated. Best insurance to avoid costly a/c repairs. Regards, Maurice.
-
It seems to be slightly on the low side, but nothing out of the ordinary. What is important though, is that you should monitor your fuel consumption as it is a good indicator that there is something that should be attended to if it changes drastically from what you have now. Regards, Maurice.
-
Good work! It's very difficult (if not impossible) to work on the top when the temperatures get down that low, because the top material is not as pliable. Maybe the sun beating down on your top on a sunny day will improve the bond. Regards, Maurice.
-
Another great source of information on everything you would ever want to know about your AOS, Mike Focke's Boxster Pages, here: http://mike.focke.googlepages.com/airoilseparatorreplacement Good explanation of how the AOS functions, how to differentiate between the old style and the updated (improved) version, and great photos to help you through the job. Good Luck! Regards, Maurice.
-
If your engine hydrolocked, it would be toast. I would not worry about what damage may have already been done and instead concentrate on [u]immediately[/u] replacing the AOS and not drive the car until the repair is completed. There are quite a few threads here showing how to replace your AOS and it's a fairly straightforward job which will give you peace of mind. Here is a thread that will guide you to a tool that will make the job much easier. Estimated replacement time is about two hours for that thread (with the hose pliers). http://www.renntech.org/forums/index.php?s...c=17392&hl= Regards, Maurice.
-
"Pop" goes the wallet
1schoir replied to zodman's topic in 986 Boxster Convertible Top Issues and Solutions
David: Not clear on what happened when you held your finger on the button for two seconds too long. Did the white plastic cups on the opposite end of the V-Levers pop or was there some other damage caused? Didn't your convertible top idiot light (on the dashboard, all the way to the right) not go out and thus the electric motor not turn off? With respect to your questions: A. There have been a few recent reports of people posting on this board with problems with the Robbins glass window top installations, where the biggest of the problems seemed to be separation of the glass from the top due to glue failure. Look at this thread for three such recent ones: http://www.renntech.org/forums/index.php?s...c=17023&hl= The GAHH tops had many such problems reported when they were first introduced, but since then, GAHH has reportedly fixed the problem. They originally had a similar problem of the glass windows separating. Do a search on here for earlier years and you will find a few threads discussing those problems. As far as going with a glass window top, nothing beats glass when you compare it to the plastic window. However, there are a couple of shortcomings you should be aware of going in. The glass window is smaller in size than the plastic window. There is also more restricted access to the engine when the top is put into the service position. Another plus for the glass window top is that your Boxster comes pre-wired for the rear defroster grid that is in the glass window. There were some objections to the appearance of the defroster grids on some of the earlier tops, so make sure you check that as well so that you don't get an unpleasant surprise. B. The headliner can be re-used. C. You will need to get some additional small parts before you start, so that you don't get delayed during the installation. You will very likely have to get replacement left and right clamping rails (Part numbers 986 561 559 01 and 986 561 560 01) as their small plastic protrusions almost always break off when you try to take them apart. To try to insure that you have the best chance to have the cables tuck into the edges of the where the top meets the top edges of the window frame, you should use updated sliders which have an extra 1 1/2 inch extension on their upper ends (part numbers 986 561 669 03 and 986 561 670 03). Someone recently reported having trouble getting the longer sliders so make sure to double check. Here is a photo of the old sliders with the extension drawn in in red: Aside from the double sided tape, you will also need black plastic foam strips that go under the aluminum shoulder plates but for which I have not been able to find a part number. For thiese side convertible top foam seals, there is a part number for a kit from a TSB which dealt with rectifying flapping noises between the covertible top and frame. Since that repair involved peeling back the top, they had a kit which consists of a plastic foam mat, a long velcro strip and seals for the convertible top and roof frame. The part number is 000 043 300 45. If it's not prohibitively expensive, it might be a good alternative to making your own foam strips. D. If you have some mechanical ability, some artistic ability, and a lot of patience, you can put the top on yourself. A professional can do the install in about 4 to six hours. The first time I did my top, it took me more than one day, but I ran into a couple of roadblocks that involved the factory replacement top, not an aftermarket top. Again, nothing that could not be overcome with persistence. It is a very rewarding DIY project. I don't know if you have already found this DIY, but if you haven't, definitely look over the instructions at this link: http://mike.focke.googlepages.com/replacingthetop-adiy Lots of good photos and instructions. Mike Focke also recently added to the DIY by including a page on Robbins Top replacement. E. Don't know the German word for Wheeeeeeeee! I'm located in Long Island, New York, so I can't help you personally, but I'd be glad to answer any questions you may come up with. Also, please report back with any new part numbers you may discover for the ones I listed. Good Luck! Regards, Maurice.
-
As many posters have stated, it all depends on the meticulousness, preparation and attention to detail of the individual painting your car. Your father's comments are accurate, but they apply more to true classics with limited production numbers. Documents everything that is being done to the car, make sure the job is done properly, and, whatever diminishment in the resale value of the car may exist after the job you will regain in spades in enjoyment from driving a pristine car. Everytime you look at the car it will bring you joy, and that is priceless! Regards, Maurice.
-
Potential 996 purchase
1schoir replied to sonnyshah's topic in 996 Series (Carrera, Carrera 4, Carrera 4S, Targa)
The Rear Main Seal is a part of the engine, not a part of the transmission, so there will be no difference as the engines for manual transmissions are the same as those for automatics. The RMS is a seal between the crankshaft and the engine case, not between the engine and the trannies. Regards, Maurice. -
Airbag Light due to Steering Column
1schoir replied to td873's topic in 996 Series (Carrera, Carrera 4, Carrera 4S, Targa)
Sorry, Loren, I didn't ask for the specific code. After some contemplation - I'm going to let the Ruf guys fix it. I'm a little nervous about fiddling with the airbag system. Thanks for your help! -tom Tom: If they fix it, could you post the fault number and the fix they implemented? It would help any members in the future, as this topic comes up fairly frequently. Regards, Maurice. -
Window has a mind of it's own
1schoir replied to 2Fast996's topic in 996 Series (Carrera, Carrera 4, Carrera 4S, Targa)
2fast: This is the only piece that is a little tricky to remove without breaking off a tab that helps to hold it in place. Looking from underneath the plastic cover, you'll notice a small indentation in the center, towards the front of that piece. You can work a small flathead screwdriver in there at the appropriate time, and, at that time, you can gently just separate it slightly from its contact surface with the door panel. First, though, put some significant pressure on the top (horizontal) rearmost surface of that plastic piece. Then, work the small flathead screwdriver in the indentation from underneath to separate it and then grab the whole plastic piece and rotate it upwards, pulling the bottom towards you and up, WHILE KEEPING THE DOWNWARD PRESSURE ON THE TOP REARMOST HORIZONTAL SURFACE OF THE PIECE. Note that the pressing down while rotating the piece is what keeps the small tab that is under that section from breaking. From what I have read, they break 50% of the time, but if you do it this way, they will not break. After you remove that piece and inspect it, you will see how the whole thing works. Regards, Maurice. -
Top replacement about to take place
1schoir replied to jimyboyle's topic in 986 Boxster Convertible Top Issues and Solutions
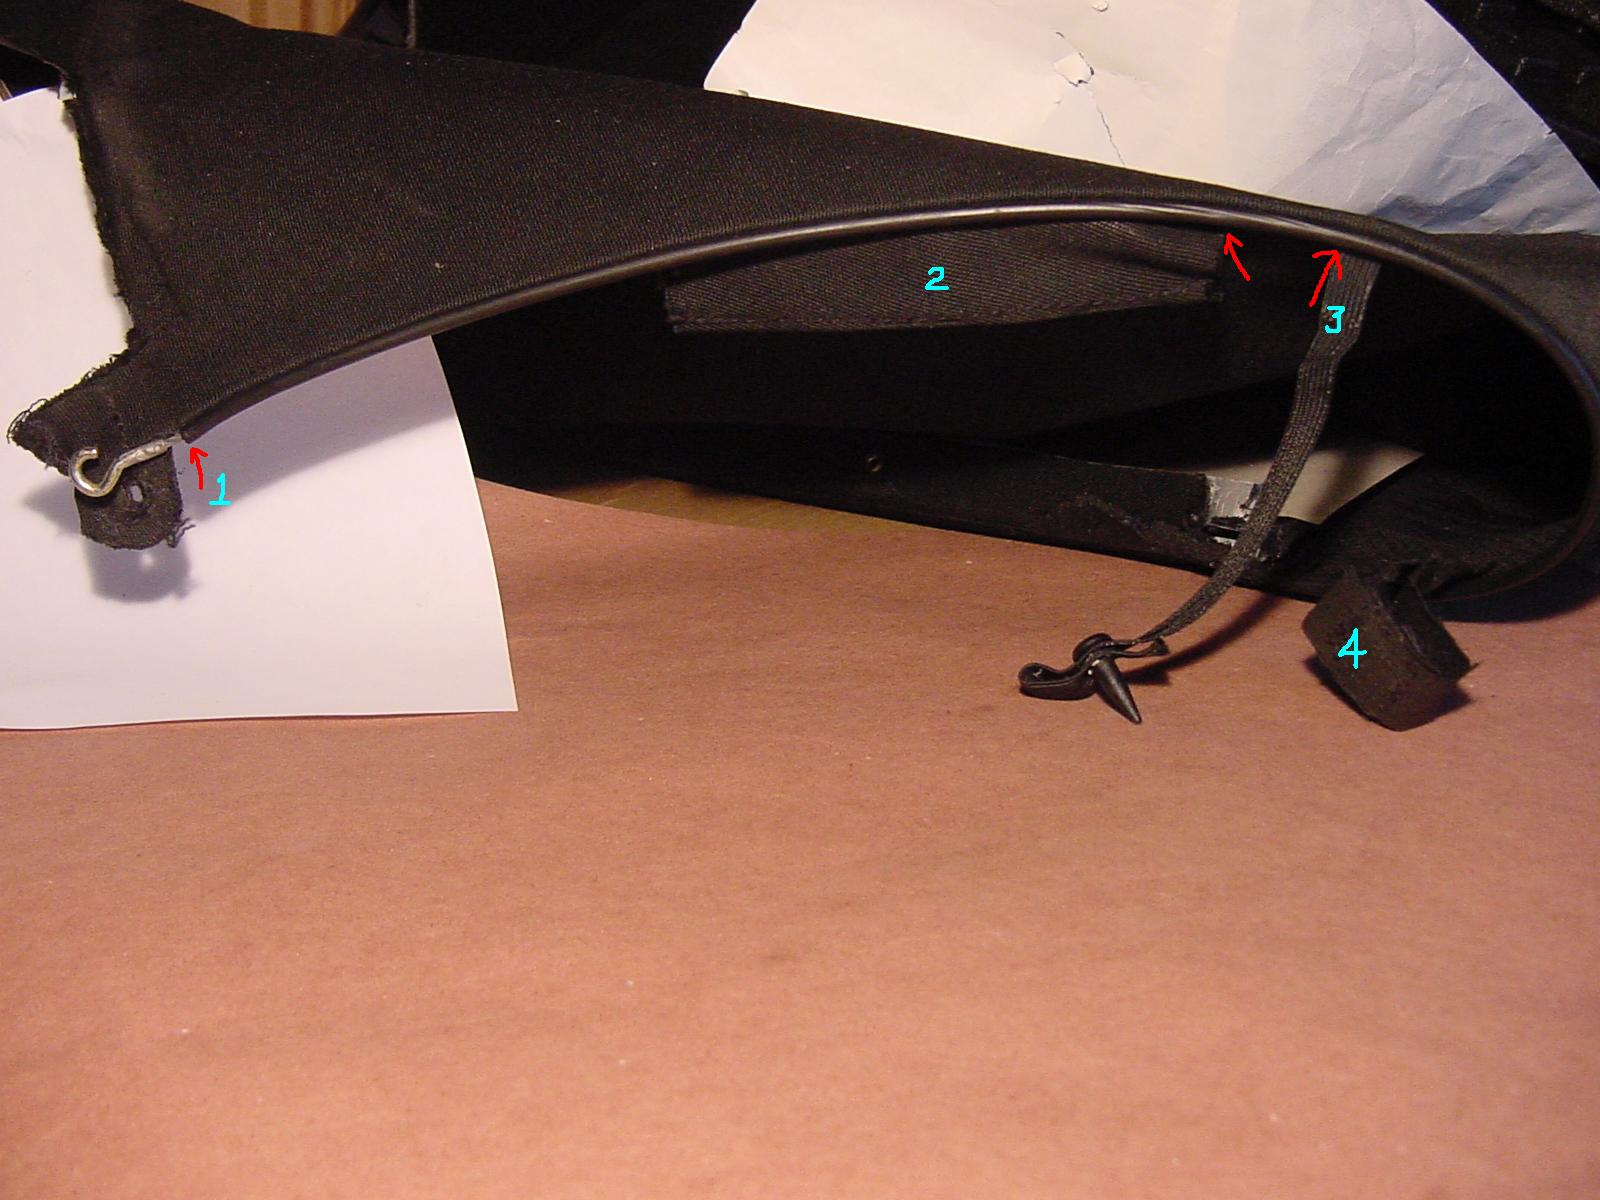
Jim: You are welcome, I just hope you can get it resolved completely because I know how frustrating it can be. If you can't get the updated sliders from your local dealer, you can call either Sunset Imports or Suncoast Motors (board sponsor) and I'm pretty sure you can get them from either one of them. The updated slider part numbers are 986 561 669 ?? (left side) and 986 561 670 ?? (right side). (It seems Porsche has changed the versions of these sliders back and forth, so I'm not sure of the last two numbers for the "extended" updated sliders [possibly 03]). If you absolutely cannot get the updated sliders, here is a photo of that section of the convertible top (off the car), which shows the location of the elastic strings (#3 in photo) in relation to the holding straps (#4) (velcro'd and wrap around the metal tube on the inside of the top mechanism) and the pulling strips (#2) (with the piping that slides into the clamping rails). The measurements are as follows: Arrow at #1 to arrow at #2 = 9 3/8 inches. Arrow at #2 to arrow at #3 = 1 inch (or 10 3/8" from #1) Arrow at #3 to start of edge of #4 = 4 3/4 inches. Note that on a new top, the 1" between #2 and #3 has been "filled in" with a 1" longer pulling strip whose piping slides into and fills in the extra tab in the new, elongated slider. So, if you are going to sew in new elastic strings (see below) you would sew it in right next to the edge of the pulling strip (which is longer than the old pulling strip). In that case, you would still end up with a total length of 10 3/8 from #1 to the arrow at #3. The elastic strips are 3/8" inch wide and 4 inches long from where they sew into the edge of the plastic piping to the center of where the plastic pin is inserted through the (doubled-up) elastic. If you want to, you can get some strong yarn (Porsche calls it "machine yarn #30, black) and sew on the elastic strings, according to the photo and measurements. (Note: there is no need for the elastic strips if you can get the "extended" sliders, and the new tops don't come with elastic strings.) If the top was going outside of the B-pillars, and you had the old sliders (and changing the little leaf springs didn't help), then the problem was probably caused by the lack of elastic strips which pull on the top to help guide it into place. You also have to make sure that the velcro'd holding straps (#4) are not torn and that they are firmly wrapped around the metal tube as they slide back and forth as the top goes up and down. Finally, back on the subject of the side convertible top foam seals, there is a part number for a kit from a TSB which dealt with rectifying flapping noises between the covertible top and frame. Since that repair involved peeling back the top, they had a kit which consists of a plastic foam mat, a long velcro strip and seals for the convertible top and roof frame. The part number is 000 043 300 45. If it's not prohibitively expensive, it might be a good alternative to making your own foam strips. If anything is unclear, feel free to ask away! Regards, Maurice.
-
International Shipping
1schoir replied to ivass's topic in 996 Series (Carrera, Carrera 4, Carrera 4S, Targa)
Ivass: There is a poster who goes by the handle of "Frogster" on PPBB.com. He lives and posts from Switzerland and has been doing so fo years. Not sure if he could give you any leads, but you might try to e-mail him or post your question on PPBB. Regards, Maurice.