Welcome to RennTech.org Community, Guest
There are many great features available to you once you register at RennTech.org
You are free to view posts here, but you must log in to reply to existing posts, or to start your own new topic. Like most online communities, there are costs involved to maintain a site like this - so we encourage our members to subscribe or donate. All subscriptions and donations go to the costs operating and maintaining this site. We prefer that guests take part in our community and we offer a lot in return to those willing to join our corner of the Porsche world. This site is 99 percent member supported (less than 1 percent comes from advertising) - so please consider an annual subscription or donation to keep this site running.
Here are some of the features available - once you subscribe RennTech.org
- View Classified Ads
- DIY Tutorials
- Porsche TSB Listings (limited)
- VIN Decoder
- Special Offers
- Paint Codes
- Registry
- Videos System
- View Reviews
- and get rid of this welcome message
It takes just a few minutes to register, and it's quality Porsche information at a low cost.
Contributing Members also get these additional benefits:
(you become a Contributing Member by subscribing or donating money to the operation of this site)
- No ads - advertisements are removed
- Access the Contributors Only Forum
- Contributing Members Only Downloads
- Send attachments with PMs
- All image/file storage limits are substantially increased for all Contributing Members
- Option Codes Lookup
- VIN Option Lookups (limited)


ar38070
-
Posts
544 -
Joined
-
Last visited
Content Type
Profiles
Events
Forums
Exterior Paint Colors
Downloads
Tutorials
Links Directory
Collections
Classifieds
Store
Everything posted by ar38070
-

5 Speed Tranny Problem
ar38070 replied to Jameslovesporsches's topic in 986 Series (Boxster, Boxster S)
You may want to try someone else's car and see if you feel the same things. That way you can tell if it is your car or just the way the transmission/shift linkage is. -
The porsche stock sizes are 90, 91, 92 (smallest to largest, there are three mounting holes in the tray). These correspond to sizes 47, 48, 49 where the length and the width are the same but the 40 series batteries are 1/2" taller. Cranking capacity increases by about 50CCA as you step up in size if you stay within brand/model. Weight increases by about 10# for each step in size.
-
Group 47 from costco. Comes with vent tube. $48. 3 year full replacement warranty, 100 month pro-rated warranty.
-
996 TT brakes on a Carrera 2 01
ar38070 replied to harris's topic in 996 Series (Carrera, Carrera 4, Carrera 4S, Targa)
No you cannot use the TT fronts as the strut mount is offset to the rear to accomodate the front drive shafts. -
Best Tires For My Everday Use
ar38070 replied to bradsjazz's topic in 986 Series (Boxster, Boxster S)
If you only have one set of tires and you have to drive in the snow then probably you want an all season tire. None of the high/max performance street tires are worth very much when the temperature drops. Go to www.tirerack.com. They have a decision guide that factors in weather, cost, handling, etc. -
Any reliable shop in the SF bay area
ar38070 replied to J9000's topic in 996 Series (Carrera, Carrera 4, Carrera 4S, Targa)
It seems that you are on the peninsula. Try Rennwerks. http://www.rennwerks.com/ -
On the off chance had you loosened the radiator cap at some time in the recent past (to check warer level or something)? If so you may not have screwed it back down tight enough. You really have to screw it down hard otherwise you will get the symtoms you reported. i.e. The car is fine until you stop it, then it spills its guts.
-
Understeer Question
ar38070 replied to X911CarreraX's topic in 996 Series (Carrera, Carrera 4, Carrera 4S, Targa)
Stock carrera's do understeer given factory alignments and tire pressures. Also given the fact that you have grippier tires in the rear will increase understeer. -
Adjusting the door window height
ar38070 replied to J9000's topic in 996 Series (Carrera, Carrera 4, Carrera 4S, Targa)
TP. Do you see any way to change the bottom stop point? It seems that the only way to get the glass to sit lower in the down position is to loosen the brass colored torx bolts that clamp on to the glass. In my car the glass is already at the bottom of the clamp so I cannot lower it that way. thanks -
Adjusting the door window height
ar38070 replied to J9000's topic in 996 Series (Carrera, Carrera 4, Carrera 4S, Targa)
A 5mm socket works too. -
How do I Release Hood With No Battery
ar38070 replied to porscheneer's topic in 986 Series (Boxster, Boxster S)
The allen screws require a 5mm allen wrench. You may or may not be able to get the wrench into the hole without removing the seat. You do not have to take the screws out as TP said, just loosen them 2-3 turns. Then grab the black plastic surround piece at one end and pull up. It is in tight as there are 3 or 4 plastic friction plugs holding it in. -
How do I Release Hood With No Battery
ar38070 replied to porscheneer's topic in 986 Series (Boxster, Boxster S)
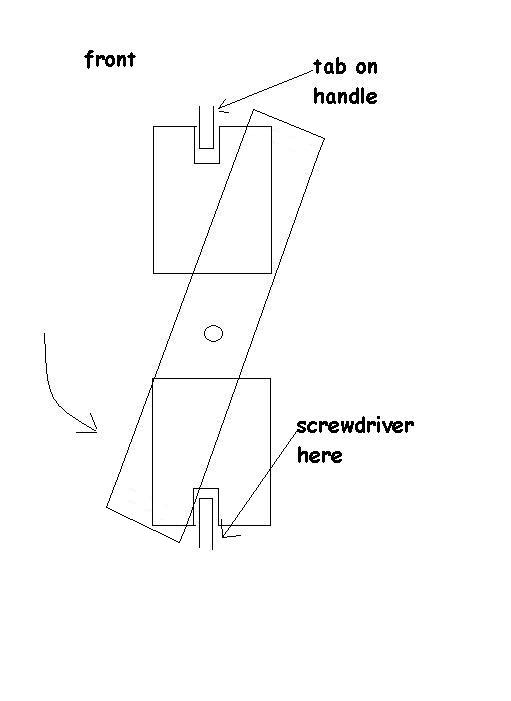
Look at the diagram (be sure to click on the diagram to enlarge it as some of the detail may be missing). The cam rotates. As you are looking toward the front of the car you rotate the part that is under the rear trunk lever from right to left to unlock (the diagram shows the unlocked position. The cam would be vertical in the locked position). If you are moving the cam from under the front lever then you move it left to right. Given that you can open the rear trunk you probably just neet to move the cam a little bit more to open the front trunk. -
How do I Release Hood With No Battery
ar38070 replied to porscheneer's topic in 986 Series (Boxster, Boxster S)
drawing
-
How do I Release Hood With No Battery
ar38070 replied to porscheneer's topic in 986 Series (Boxster, Boxster S)
second pic
-
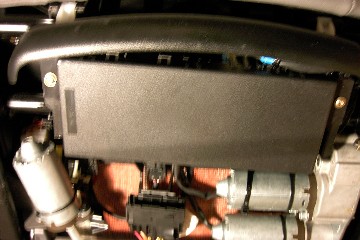
How do I Release Hood With No Battery
ar38070 replied to porscheneer's topic in 986 Series (Boxster, Boxster S)
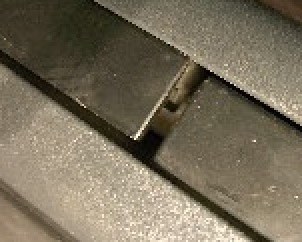
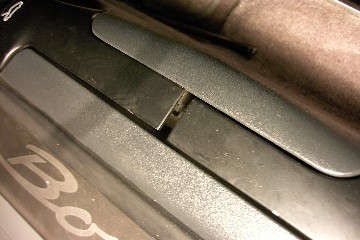
Okay I figured it out. There are two pictures and a drawing as the pictures are not very clear. Picture 1 looks forward into the gap between the levers. The second picture is an enlargement of the gap. The drawing hopefully shows what you see when you are looking into the gap. Looking forward into the gap you will see a metal plate that has a U-shaped cutout. You will see that a part of the handle sits in this cutout. The locking mechanism is a plate that rotates underneath the U-shaped cutouts thus preventing the handle from moving. To unlock the lever you rotate the plate out from underneath the U-shaped cutouts. It is easiest to do this under the trunk release lever. You reach in with a thin screwdriver or an awl and push the plate from right to left. This unlocks both levers.
-
How do I Release Hood With No Battery
ar38070 replied to porscheneer's topic in 986 Series (Boxster, Boxster S)
Sorry but I cannot duplicate the screwdriver trick. I pretty sure it will work but it appears that I am missing a step. Assuming you can find the plug then use your GF's car battery as your 12 volt source (or someone else's car. -
How do I Release Hood With No Battery
ar38070 replied to porscheneer's topic in 986 Series (Boxster, Boxster S)
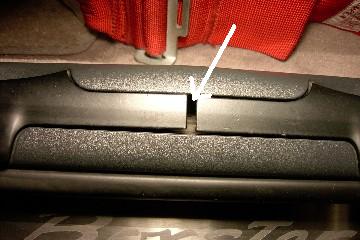
Loog at the attached picture and see the gap between the two levers. If you look on your car you should see a metal tab down in the gap. You can use a thin flat screwdriver and push the tab (I forget which way but I think it is sideways) and move it out of the way. Once you do that the trunk releases will be unlocked. To use the cigarette lighter go to radio shack and get a cigarette lighter plug. The center terminal is positive. Hook it to an appropriate battery and then plug it in to the car.
-
How do I Release Hood With No Battery
ar38070 replied to porscheneer's topic in 986 Series (Boxster, Boxster S)
Depends on the year 2002+ there is a jumper point in the fuse box where you can attach a 12 volt battery. 1997-1999 with mechanical releases. You can use a 1/8" screwdriver and push the metal locking tab that keeps the levers from moving that is in the gap below where the two levers meet in the middle (kind of hard to describe). All years - attach a 12 volt battery or a trickle charger to the cigarette lighter. There is also supposed to be a pull cable floating around in one of the fenders. ed -
Thanks for the pictures. This helps me as my driver's window, while it does not stick up, is just even with the rubber seal while the passenger side is just below the seal. This has always bugged me but was never enough of an issue to take the door apart. Now I know I can fix it simply. Thanks for the help.
-
GT3 Seats in C4S
ar38070 replied to NeverFastEnough's topic in 996 Series (Carrera, Carrera 4, Carrera 4S, Targa)
Is this what it looks like? If so then you can disconnect the harness from the control module underneath the seat. This is from memory so some of the details may be off First remove the front plastic bumper shaped piece. It slips on and is retained by two platics nubs that sit in holes in the metal bracket that is a part of the metal seat frame. Then undo the two brass colored torx screws that hold the module to the seat. There are two connectors that need to be disconnected. The first is a regular plastic 4-8 pin ( I do not remember exactly how many pins) one that comes out easily. The second is a 20 pin or so PC board type connector. I seem to remember there being a plastic U-shaped locking piece on this one but I could be wrong. This one pulls up from the module and is quite tight. If you need more details let me know. ed
-
Check with your auto insurance. Some cover replacement windshields with a small deductible ($100).
-
If PCNA hands out coupons at the end of the year, this is the sort of stuff that I use it for. That way you end up paying half price for this kind of stuff. Suncoast or Sunset both take the coupon so you save twice (Lower prices and half off).
-
Side View mirrors not working.
ar38070 replied to braincuttermd's topic in 996 Series (Carrera, Carrera 4, Carrera 4S, Targa)
Check your fuse box. -
I have two questions for you. 1) Are you saying that that the window was working fine then started stopping short. Then by removing the green stopper it was fine? While I am glad that fixed the problem it seems to me that something else it out of whack to require that large of an adjustment. 2) From your pictures of the adjustment mechanism it appears that small adjustments are doable without removing the panel. You should be able to remove the black rubber plug from beneath the door and use a 5mm hex key. Is this correct? Is the black rubber plug the one towards the rear of the door? thanks ed
-
Caliper cylinder seals
ar38070 replied to Jean-Marc's topic in 996 Series (Carrera, Carrera 4, Carrera 4S, Targa)
Second photo