Welcome to RennTech.org Community, Guest
There are many great features available to you once you register at RennTech.org
You are free to view posts here, but you must log in to reply to existing posts, or to start your own new topic. Like most online communities, there are costs involved to maintain a site like this - so we encourage our members to subscribe or donate. All subscriptions and donations go to the costs operating and maintaining this site. We prefer that guests take part in our community and we offer a lot in return to those willing to join our corner of the Porsche world. This site is 99 percent member supported (less than 1 percent comes from advertising) - so please consider an annual subscription or donation to keep this site running.
Here are some of the features available - once you subscribe RennTech.org
- View Classified Ads
- DIY Tutorials
- Porsche TSB Listings (limited)
- VIN Decoder
- Special Offers
- Paint Codes
- Registry
- Videos System
- View Reviews
- and get rid of this welcome message
It takes just a few minutes to register, and it's quality Porsche information at a low cost.
Contributing Members also get these additional benefits:
(you become a Contributing Member by subscribing or donating money to the operation of this site)
- No ads - advertisements are removed
- Access the Contributors Only Forum
- Contributing Members Only Downloads
- Send attachments with PMs
- All image/file storage limits are substantially increased for all Contributing Members
- Option Codes Lookup
- VIN Option Lookups (limited)


dphil66
-
Posts
67 -
Joined
-
Last visited
-
Days Won
1
Content Type
Profiles
Events
Forums
External Paint Colors
Downloads
Tutorials
Links Directory
Collections
Classifieds
Store
Everything posted by dphil66
-
996 cab 4 amp location
dphil66 replied to dgeatdg's topic in 996 Series (Carrera, Carrera 4, Carrera 4S, Targa)
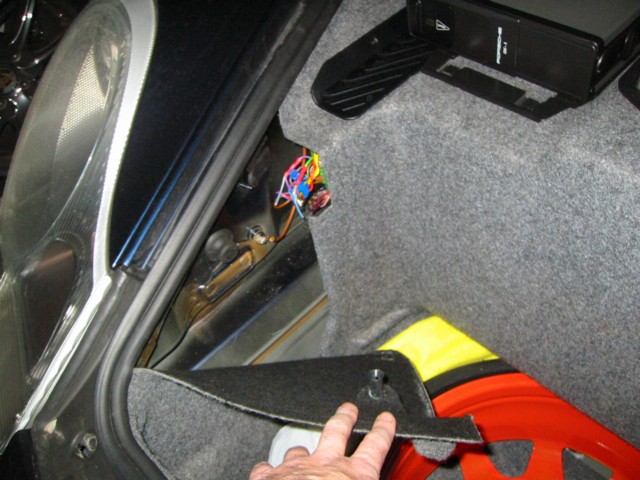
Here is a picture of the amp location on my '99 C4. The wires you see are the wiring harness that plugs into the front of the amplifier.
-
"N" tires
dphil66 replied to hindswillrox's topic in 996 Series (Carrera, Carrera 4, Carrera 4S, Targa)
The numbers after the N designation (N0, N3, etc.) indicate which generation their tire is vs the Porsche test program. For example, if Pirelli gets an N designation on a new tire, it's N0. If they make some revisions to that tire and has Porsche validate the revised tire, then the revised tire gets an N1 designation. And so on... But all this means is that Porsche has put these tires through their tests, and has approved them. Only insiders at Porsche might be able to tell you whether or not they tested any other tires that did NOT meet their test requirements, but my guess is that they test a couple of tires from their primary tire partners at the time, so they end up having at least one or two tires tested on a particular model that they'll designate as the OEM tires, and move on. What I'm saying is that Porsche may have tested the Michelin Pilot Sport Rib and the Pirelli P-Zero Nero on the 1995 C2, and then purchased those tires from those manufacturers and put them on those cars when new. It doesn't mean that they ALSO tested Toyos, Yokohamas, Bridgestones, Goodyears, etc. and those tires did NOT pass the tests. It probably means they were just not tested. Most likely due to time and resources, they just need to confirm that a couple of sets will work on their car in their test, and leave it at that. It's just not practical to test every tire from every manufacturer on every model, when all they need to do is establish that there is at least one or two makes/models in the marketplace that work on their car. There are most likely also exclusive agreements involved, like making a deal with Michelin or Pirelli to be the OEM supplier, and if you buy tires at your dealership, they can only sell Michelins or Pirellis, and recommend those tires only because of an exclusivity agreement. Kind of like when a place has an exclusive arrangement with one or two catering companies - if you want to use their facility, you have to use either caterer A or caterer B. That's not to say that caterer C would do just as good a job if not better, but they have arrangements with A or B, and that's what you're stuck with it you want to use their place. So if they tires you like are available in the sizes you need and are the compound and tread type you want, then go for it. If you're racing, then you may want to talk to some seasoned racers to find out what they use. You may find that the top winning guys prefer a particular type or model for some specific reasons. Or maybe they prefer tire A for dry tracks with no hairpins, tire B for oval tracks, and tire C for tracks with a lot of up-down grades or whatever. -
Preparing a Boxster for a Hardtop
dphil66 replied to dphil66's topic in DIY Articles - Boxster (986) - Accessories
Freezing the inserts, what a clever idea! I would highly recommend it if your inserts are tight fitting. Again, levering the die-cast part open just a touch with a screwdriver can help as well. Also, due to the effect of low temperatures on metal parts, be sure you do this job when the car (and the spinlock receivers on the car) are room temp. If your inserts have been sitting on thekitchen counter all night, and you go out into your freezing-cold garage to install them...they might fit very tightly, or not at all. Again, great call on the freezing! -
Check Engine Light Code P0102 Mass Air Flow Sensor
dphil66 replied to mmoore's topic in 986 Series (Boxster, Boxster S)
As said before, disconnect the battery and try it again. Leave it disconnected for at least 50 seconds to reset the ECU. -
996 02 Targa K & N Intake Question
dphil66 replied to cdsvenom's topic in 996 Series (Carrera, Carrera 4, Carrera 4S, Targa)
If you change to a K&N air filter, or swap out your factory air box for one of those cold air intake kits with the cone-type air filter, be sure to DISCONNECT THE BATTERY before you start the car again. Doing this can help prevent your CEL (Check Engine Light) from coming on. Why? Because disconnecting the battery "resets" the engine computer. When the battery is reconnected, the engine computer will start learning from scratch, with the new, higher-flow air intake. If you do not purge the computer's memory, it will detect a sudden change in the intake air, and this can trigger the CEL. You can disconnect the battery for up to 20 seconds and not have to re-input your radio codes. But for this type of change, be sure to leave the battery disconnected for at least 50 seconds. This will purge the machine. Be careful how much oil you put on the filter. You may want to oil the filter, and then leave it standing on end for 2-3 days. Wipe up any excess that collects under the filter, and blot the part of the filter closer to the ground to be sure you won't be dripping any filter oil into your intake. (If you stand the filter on end for a couple of days and you get some drips, you're using too much oil...) I've had a factory K&N installed in my '99 C4 for 15k miles so far. There may be a couple of HP there, but for me, I like the reduced cost and environmentally friendliness of a re-useable filter. Dan -
60K Maintenance
dphil66 replied to Davet18's topic in 996 Series (Carrera, Carrera 4, Carrera 4S, Targa)
I'd also recommend doing a lot of the 60k service yourself, but I'm DIY type. I simply enjoy doing it, and changing the oil and spark plugs yourself can save some real money. Mine is coming up, and I plan on having the dealer do some of the 60k servcie for me. I'll have them flush the brake fluid, replace the serpentine belt, read out the fault codes, and maybe some other checks/adjustments. But I don't need the dealer to replace my pollen filter, or change my oil or plugs. That stuff is very easy, especially with a good set of ramps and an angled driveway to get the car horizontal for the oil change. BTW, I just purchased FOUR of the charcoal-type pollen filters from www.drivewire.com for only $13 each. The paper standard pollen filters are like $11 and change, and made by Mahle. The dealer charges $75 for the charcoal one, and almost $40 for the standard one. DP -
Well Hell's bells...there they are, all of the dealer parts catalogs, right at your fingertips, free to download from the Porsche official website. Check it out: https://techinfo.porsche.com/techinfo/VFMod...pe=MainFrameSet Select "Workshop Information" at the bottom left, then click on "Genuine Parts - Catalogue".... Totally awesome. No more standing over the dealer parts guy's shoulder to look through the catalog for a part number.
-
I own a '99 Carrera 4, and it's a great car. As said previously, the only maintenance difference is the need to change the front differential oil, but it's once every 60k miles. There are some different part numbers - transmission, axles, etc., but for basic maintenance, 'tis the same. There were some differences in standard equipment. At least on a '99, here is what is standard equipment on a C4 that you'd have to pay extra for on a C2: - PSM (Porsche Stability Management), which in '99 was a little different than TC (Traction Control); but this was standard on all C4 models, and TC cost extra on C2 models - Sunroof - Brake calipers painted silver - 18" Technology (turbo-twist) wheels - Carrera 4 logo on rear deck is in silver - major loss of trunk space due to front AWD hardware; comes w/collapsible spare + air compressor instead of compact spare; different mouting of M490 amp and CD changer The weight penalty vs. a C2 is minimal - less than 100 lbs - and the performance difference is barely measurable, much less noticeable. As for fuel economy, I get about 21 mpg around town with my gentle feet. But on the highway, I get a stunning 33 mpg at a steady 72 mph. Cranking the speed up to a steady 85 mph drops that down to about 27.5 - 28.5 mpg range. One of the best things about the C4 is that it's a little more rare, and it has slightly better resale value. And if you're one of those crazy track nuts, it supposedly goes faster around the Nurburgring by like 2 seconds or whatever. I am not sure about any difference in the OEM spring/shock rates. I know that the brand-new 997 Targa 4 has a slightly softer suspension than other models, and even different than non-Targa C4 models. I don't know if the earlier (and regular non-Targa like mine) C4 models have any suspension differences. Anybody know the answer? One more thing - I drive mine year-round. You could drive a C2 year-round as well (like my wife's Boxster), but the AWD gives you an edge. But the best thing about it is that if I switch off PSM, the car does donuts like no car I've ever driven. It's a blast!!! Happy holidays, Dan
-
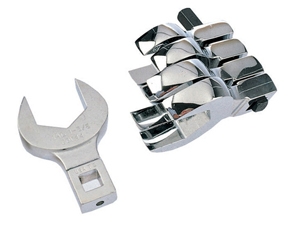
You could try one of those extra-short open-end wrenches, or even cut down an old one you might have. Otherwise, your best be might be a clawfoot wrench, which is made for just such a problem. It's basically an open end wrench head, with about 1 inch or less of the handle still attached, in which there is a square hole for your ratchet. Here's a link to some clawfoot, or crow's foot, wrenches: http://www.mactools.com/ProductsList.aspx?FamilyID=1314 Maybe those would work for the tight space?
-
Installing Spinlocks
dphil66 replied to cohiba1200's topic in 986 Boxster Convertible Top Issues and Solutions
Check this out, I think it will help you: http://www.renntech.org/forums/index.php?showtopic=10440 -
After completing this job myself in less than 20 minutes, I wrote up a how-to guide on installing spinlocks to prep your Boxster for a hardtop. It's in the 986 DIY section, under Accessories. Here's the post: http://www.renntech.org/forums/index.php?showtopic=10440 I hope this is helpful to those of you searching in vain for hardtop information. Dan
-
Preparing a Boxster for a Hardtop Preparing for and Installing a Boxster Hardtop Parts Required: 1. Porsche Boxster 2. Porsche Boxster Hardtop 3. LH Hardtop Spinlock Insert (p/n 986 563 713 03) 4. RH Hardtop Spinlock Insert (p/n 986 563 714 03) 5. Spinlock Retainer Bolts (qty=2) (p/n 999 219 041 00) Tools Required: 1. #2 Phillps-head screwdriver 2. Ratchet 3. Socket Extension 4. 5mm Allen-head socket 5. 3-5 mil plastic bag 6. 8mm wrench 7. Magnetic parts retriever Reference Materials: 1. Porsche hardtop parts lis Author dphil66 Category Boxster (986) - Accessories Submitted 08/17/2006 07:56 PM
-
Preparing for and Installing a Boxster Hardtop Parts Required: 1. Porsche Boxster 2. Porsche Boxster Hardtop 3. LH Hardtop Spinlock Insert (p/n 986 563 713 03) 4. RH Hardtop Spinlock Insert (p/n 986 563 714 03) 5. Spinlock Retainer Bolts (qty=2) (p/n 999 219 041 00) Tools Required: 1. #2 Phillps-head screwdriver 2. Ratchet 3. Socket Extension 4. 5mm Allen-head socket 5. 3-5 mil plastic bag 6. 8mm wrench 7. Magnetic parts retriever Reference Materials: 1. Porsche hardtop parts list (get from your dealer, or email me, I have it as a 1 MB pdf) 2. Porsche Technical Service Bulletin #6117 (hardtop preparation) tsb.6117.spinlocks.pdf Procedure: 1. Read the Porsche TSB above before proceeding. Consult the parts list above to help obtain the parts you need. 2. Lower the convertible top completely. 3. Locate the spinlock receivers on either side of the car. The are cast metal parts bolted onto the unibody structure of the car. 4. Insert the spinlock inserts into the openings of each receiver. Note that the inserts are handed, and are marked with an L or an R. (Left is from the point of view of the driver sitting in the car, thus the driver’s side is the left side of the car.) Align the bump on the lip of the receiver with the relief on the flange of the insert. Insert them fully so the flange of the insert is mated to the lip of the receiver. Note: these should slide in with ease. If they do not, try wiggling them as you gently push them in. There is very little clearance, so the right angle is important. If there is just not enough clearance, pull it out, and using a flat-blade screwdriver (or punch or slim pry bar) lever the die-cast metal receiver open just a hair more. Be careful not to break the receiver if you do this. (My spinlock receivers went in with two-finger pressure and a little wiggling.) 5. Remove the inside trim panels. First remove the screw at the bottom inside. Next, loosen, but do NOT remove, the 8mm hex bolt at the top, where the plastic portion sneaks behind the roll bar. Lift the trim panel up and out. The top 8mm bolt is merely a clamping bolt that threads into a receiver on the trim panel. The body of the bolt fits down inside a slot behind the roll bar, and when tightened, retains the top of the trim panel. Also note the orientation of the plastic hooks on the trim panel, and the locations into which they insert. 6. Raise the convertible top completely. 7. Using a flashlight, peer inside, behind and below the convertible top window pillar, to view the countersunk hole in the die-cast spinlock receiver that will receive the spinlock retainer bolts. Note how this is a straight shot in, and using an Allen socket on an extension will make this very easy to install. To keep from losing the spinlock retainer bolt if it falls off the end of the Allen socket, place the retainer bolt inside a 3-5 mil plastic bag. Push the threaded tip of the bolt through the corner of the bag. Place the retainer bolt in the countersunk opening of the spinlock receiver, and get the bolt started. Once the threads have started, pull your tool out (huh huh...huh huh...) and pull the plastic bag off the bolt. Re-insert the 5mm Allen socket into the head of the bolt, and torque as specified in the Porsche TSB (16.6 lb-ft, or 23 Nm). 8. Re-install the trim panels, being careful to engage both plastic retainer hooks before tightening the fasteners. While doing this job, I found it helpful to have an telescoping magnetic parts retriever. While I was loosening one of the 8mm bolts, I dropped my wrench, and retrieved it easily with this tool. 9. You are now ready to install your hardtop. Your hardtop may or may not require adjustment for a proper fit. First try installing it without making any adjustments. (Mine did not – tight, quiet, and waterproof on the first try!) If the 1/2-turn handles won’t turn all the way at first, gently turn them and un-turn them a couple of times, finesse them a little, you may find that after a couple of wiggles they find their way home. Tighten the handles completely, and latch the windshield header. Take the car for a drive. If the top requires adjustment, there are 5 Allen-head cap screws behind the triangular plastic covers on the interior of the hardtop, just above the spinlock handles. Adjust these until you’re happy with the fit. Happy motoring! tsb.6117.spinlocks.pdf
-
Aftermarket/Custom 986 Boxster Hardtop
dphil66 replied to dphil66's topic in 986 Series (Boxster, Boxster S)
Here's another one, although I couldn't find a web link to the company's website. The manufacturer is Zientec Suisse Automotive, or Z-tec. They supposedly make a Boxster hardtop for almost 4000 Euros. (So why not just buy the one designed and engineered by the folks who brought you the Boxster in the first place?) http://digiads.com.au/car-news/latest-Z%20...r_20060706.html -
I don't know if this has been posted here already, but check it out: http://www.boxster-hardtop.co.uk/index.asp
-
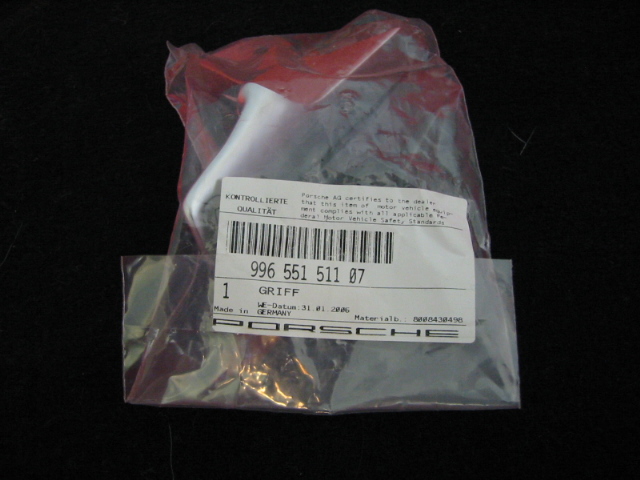
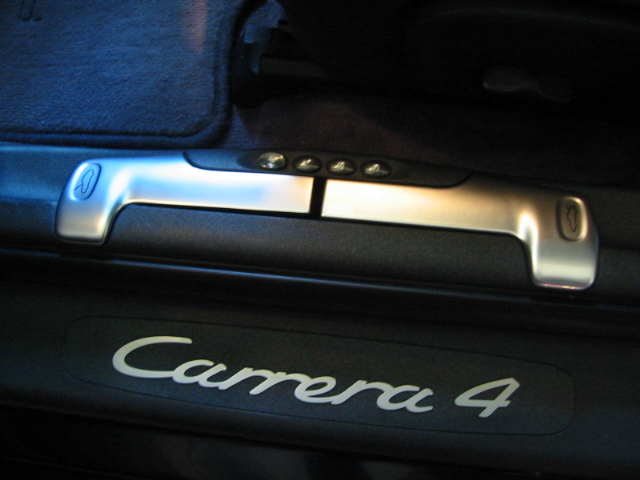
Thanks for this post, it was very helpful! My '99 C4 was a little different... I did not have any Torx screws. The three bolts holding the whole assembly down were 5 mm, and the bowden cable bolts were 3 mm. Both were allen-head cap screws. By the way, the part number for the front hood lever is: 996.551.511.07 I bought it on eBay, but I'm sure you can have your dealer order it. It's about $100. Here's a picture: It looks awesome once again!! Thanks!
-
Wheel Alignment Spec.s for Cayman
dphil66 replied to rsgl's topic in 987-1 Series (Boxster, Boxster S)
When I had my local dealer align my C4, they gave me a printout from their equipment indicating what all the specs were, and where my car was before and after the alignment, with respect to the specs and tolerance ranges. I'll bet your local dealer would be able to provide such information for you. It could also be found in a Cayman service manual, which I do not own... -
Chassis Stiffening
dphil66 replied to JimB's topic in 996 Series (Carrera, Carrera 4, Carrera 4S, Targa)
As a practicing Engineer, I can say that duplicating what the factory did on your older tub will be difficult at best. I would guess that Porsche could compile all the changes to components, assemblies, material specs, and processes from your MY to 2004, but this could be a week-long project for at least one Porsche engineer working full-time on it. I'm assuming you'd want specifics like whether they went from cold-rolled to HSLA on a particular component, what their material specs are, what their welding processes are, what adhesives at what temperatures and cure times they use...it could be done, but to truly duplicate an '04, you'd need access to all that kind of information. Knowing them, it would probably be much more than adding a couple of gussets made of hot-rolled steel here or there. -
Thanks, great post! My exhaust tips have been returned to their former glory. My girlfriend drives a 1985 (early) 944 with a chrome exhaust tip, and...her chrome tips has held up a LOT better than on my '99 C4. We both drive in the same environment (year-round in Michigan), and about the same miles per year. The chrome on her older car is WAY better than on the newer car, no doubt a result of cost reductions and more environmentally friendly processes...but it sure would be nice to have some higher quality chrome plating, it's disappointing to say the least.
-
Is it possible to obtain just the lever, and not the entire assembly? My painted plastic part is scratched/damaged, and I'd like to replace it, but my dealer only sells the entire assembly (large dark plastic housing, with both levers already attached). If the car has the memory seat option, the whole assembly sells for almost $500 and you can't get the levers separately. Any ideas? Thanks!
-
Smell of burning rubber
dphil66 replied to skyline's topic in 996 Series (Carrera, Carrera 4, Carrera 4S, Targa)
I have the same "issue" with my '99 C4, and here's why I think it is "normal": The rear camber (the amount that the rear wheels tip inward at the top) is specified by the factory as negative. The acceptable range is between -55 minutes and -1 degree 25 minutes. (Thus the total acceptable range spans 30 minutes, or 0.5 degrees.) So, the rear wheels, if "aligned properly", are tipped inboard at the tops of the wheels. They do this, in my estimation, to achieve a particular handling balance, a particular feel, a particular level of performance during hard cornering and accident-avoidance maneuvers. It essentially "pre-loads" the rear tires so that even before you start turning, the tires are already digging in for "ultimate grip". This setup also results in "ultimate tire wear", and this is why my dealership told me that, aside from driving their cars pretty hard, most 996 owners go through a set of tires every 10,000 to 12,000 miles. On my 18" rims, those rear tires, new, are about $600 a pair!! Your car, if "aligned properly", is literally grinding up the rear tires with every revolution. You can feel the heat on the insides of the rear tires, but it is not all from engine heat - they truly are being ground down to nothing with every turn of the wheels. If your tires wear unevenly - the inside edges go first - then your alignment is probably "correct". -
Building Your Own Car Ramps I've been disappointed by off-the-shelf car ramps from auto parts stores and even high-end specialty catalogs. They all seem to be too low to the ground, to narrow for big 'monster meats', too steep of an approach angle so they won't fit under a low air dam or exhaust, and generally flimsy. So I built my own, to my own specifications. My requirements were: 1) extra width and no side channels for enhanced stability and to accomodate extra-wide tires 2) shallow approach angle for vehicles with low ground clearance 3) extra height for more working space under vehicles with low ground clearance 4) very high strength for my own peace of mind Disclaimer: Following is a description and photos of my own design. I used brand-new, premium, non-treated lumber and an entire (small) box of 2-1/2" galvanized nails. I built them carefully and made sure every interface was joined by several nails for extra safety. I believe my ramps could hold up a semi truck. But, I make no claims as to their suitability for any such purpose, and if you build your own ramps based on my design using your own materials, techniques, tools, and ideas, you do so at your own risk. If you use such ramps to work on your car, you do so at your own risk. Safety first! There are many Porsches in the world, but only one you... Materials Required: 1. Four (4) industry-standard premium "2x10" boards, each measuring eight (8) feet in length 2. Two (2) industry-standard premium "2x4" boards, each measuring twelve (12) feet in length 3. One (1) industry-standard premium plywood, 3/4" thick, measuring approximately seven (7) feet by two (2) feet 4. One (1) box (approx qty=200-300) galvanized nails, 2-1/2" in length (drywall screws may be substituted) 5. Four (4) heavy-duty grab-handles (plated, galvanized, or painted) (optional, but recommended - these are heavy!) Tools Required: 1. Table saw or circular saw 2. Hand saw 3. Hammer 4. Square 5. Pencil 6. Measuring tape 7. Straightedge or chalk line 8. Screwdriver or power driver 9. Partner to help 10. Intermediate expertise in woodworking Basic Diagram: Procedure: 1. On each 8' section of 2x10, measure 24" from each end of the board, and draw a diagonal line between the points. Cut along this line to produce two (2) main boards from each single 8' 2x10 board. Each main board will have the shape of the side of the ramp. Each ramp will require at least four (4) main boards. (Optional - for increased strength and significantly increased weight, construct each ramp out of seven (7) main boards, thus making each ramp completely solid all the way through.) 2. If making the ramps as shown, cut 2x4 spacer blocks equal in length to the "10-inch" width of the 2x10 main boards. Create an alternating arrangement of main board 1, 2x4, main board 2, 2x4, main board 3, 2x4, then main board 4. 3. Cut smaller spacer blocks to fit between the main boards under the ramped section. These are critical to the long-term strength and stability of the ramp section, so do not leave these out. 4. Assemble the base sections with lots and lots of nails and/or drywall screws. Don't be afriad to use a lot. 5. Cut the facing out of your plywood. Mitre the ends of the plywood to make a smooth transition between the ground and the ramps. Mitre the joint between the facing on the ramp section and the facing on the top section. Assemble facing to base sections with plenty of nails/drywall screws. 5. VERY IMPORTANT: Cut end stop blocks out of your 2x4 stock to make "stop blocks" at the tops of the ramps. These act to give you notice that your tires are at the ends of the ramps. If you do not have these stop blocks, you may accidentally drive the vehicle right off the end of the ramps. If you have a hard time feeling when the tires contact the blocks, stack up two (2) thicknesses of 2x4s at the ends to make your stop blocks. Make sure the two thicknesses still clear the air dam/exhaust/etc. Assemble to ends of flat top sections as shown in the diagram with liberal use of nails and/or drywall screws. 6. Optional, but very very handy: Affix heavy-duty grab-handles in desired locations. Note the positions and orientations of the grab handles of my ramps. One set is to carry them around and move them when in storage (stored on their ends for minimal footprint), and the other is to move the ramps into position at the vehicle. Example Photos: Handles used to move/store ramps: Handles used to adjust position of ramps: You can either reply to this post or contact me directly at dphil66@hotmail.com if you have questions. Happy motoring!
-
Building Your Own Car Ramps Building Your Own Car Ramps I've been disappointed by off-the-shelf car ramps from auto parts stores and even high-end specialty catalogs. They all seem to be too low to the ground, to narrow for big 'monster meats', too steep of an approach angle so they won't fit under a low air dam or exhaust, and generally flimsy. So I built my own, to my own specifications. My requirements were: 1) extra width and no side channels for enhanced stability and to accomodate extra-wide tires 2) shallow appro Author dphil66 Category Carrera (996) - Maintenance Submitted 02/06/2006 07:11 PM Updated 07/23/2012 02:16 PM
-
16 bit pcm1 with no cd-rom
dphil66 replied to meb's topic in 996 Series (Carrera, Carrera 4, Carrera 4S, Targa)
I have what I believe to be a faulty CD-ROM drive for my PCM1 (8-bit) system, and back in November 2005 my dealer in Michigan quoted $1400, and they also offer a remanufactured unit for $1100. As for the part numbers, the first 9 digits are the same worldwide I think, but the different versions are differentiated by the suffix numbers, so if the part number ends in .01, I think that's the US version, 1st generation 8-bit unit. I'm pretty sure the .03 is the first 16-bit unit. I think the .12 Exx that Loren referred to may be the Euro version, and I'm not sure if it will work for the US. Does anybody know if US and Euro systems are compatible, i.e. do the hardware pieces work together, and will a Euro version link up to the satellites flying over the US? -
C4S Winter Wheels
dphil66 replied to a9jlu's topic in 996 Series (Carrera, Carrera 4, Carrera 4S, Targa)
I bought these wheels for my '99 C4. They are aftermarket replicas of the 2003-2004 Carrera wheels, made in Italy to exact factory specs: http://cgi.ebay.com/ebaymotors/18x8-18x10-...1QQcmdZViewItem They shipped them double-boxed with proper protection, I received them in mint brand-new condition. They look incredible, and are truly exact replicas of the factory wheels, including the correct offsets. My owner's manual specifies front ET50 offsets and rear ET65 offsets. These wheels have these exact same offseets. They fit on my car perfectly, and they look incredible. Just get yourself some decent snow tires and some center caps, and you're all set. If you want to see a picture of them on my car, go to the 996 DIY articles section and look at the article I wrote on replacing the reversing lights/back-up lights switch on the transmission. I have a pic of my car up on ramps with the winter wheels. They are cheap, and really look awesome. Perfectly balanced, high quality. The only thing I really noticed was that they seemed kinda heavy compared to my summer wheels. My summer wheels are the factory 18" Sport Design wheels, the 10-spoke with bolts around the perimeter. Those feel much lighter by comparison, but they were $3500 and they're made of titanium. So, the heavier wheels for winter use, for only $925 including shipping...not such a bad deal. Here's what I might do if I had to do it again: get the 17x7 and 17x9 wheels/tires instead. These can be found for less money (both wheels and especially tires are much cheaper), and they will do better in the snow because they are narrower. Not by much, and I haven't tried them so I can't say how much difference there is, but being more narrow, they will dig down into the snow better. My 18s keep this lightweight car up on top of the snow as if it were on snowshoes. I slide around quite a bit, and my car is a C4 with PSM. Best of luck! dan