Welcome to RennTech.org Community, Guest
There are many great features available to you once you register at RennTech.org
You are free to view posts here, but you must log in to reply to existing posts, or to start your own new topic. Like most online communities, there are costs involved to maintain a site like this - so we encourage our members to donate. All donations go to the costs operating and maintaining this site. We prefer that guests take part in our community and we offer a lot in return to those willing to join our corner of the Porsche world. This site is 99 percent member supported (less than 1 percent comes from advertising) - so please consider an annual donation to keep this site running.
Here are some of the features available - once you register at RennTech.org
- View Classified Ads
- DIY Tutorials
- Porsche TSB Listings (limited)
- VIN Decoder
- Special Offers
-
OBD II P-Codes - Paint Codes
- Registry
- Videos System
- View Reviews
- and get rid of this welcome message
It takes just a few minutes to register, and it's FREE
Contributing Members also get these additional benefits:
(you become a Contributing Member by donating money to the operation of this site)
- No ads - advertisements are removed
- Access the Contributors Only Forum
- Contributing Members Only Downloads
- Send attachments with PMs
- All image/file storage limits are substantially increased for all Contributing Members
- Option Codes Lookup
- VIN Option Lookups (limited)

Silver_TT
-
Posts
778 -
Joined
-
Last visited
-
Days Won
15
Content Type
Profiles
Events
Forums
External Paint Colors
Downloads
Tutorials
Links Directory
Collections
Classifieds
Store
Everything posted by Silver_TT
-
Regarding part# 996.575.161.01 (the air duct) do you have any information on what holds this piece in place under the vehicle? This part is item10 in Loren's second diagram and I see that item9 appears to be just one single screw which presumably is to hold the air duct in place. My question is, is this item9 screw the only thing that secures the air duct? And is this just one single screw? I would have expected that there were at least two screws (one on each side). Any information anyone has on installing this part would be greatly apprecaited. Thanks!
-

Cup Holder Question for 996
Silver_TT replied to barlowdo's topic in 996 Series (Carrera, Carrera 4, Carrera 4S, Targa)
My MY2002 C4S came with the OEM pop-out cup-holder. Before getting the car this was something I wanted after reading the backlash from earlier 996 owners' without it (eg. "How does a $100K car not have a cup holder??!!!"). However, after the fact, I have found that I never use it. The manual transmission requires both hands and the turbo suspension is too tight. Even a Starbucks lid, which almost completely covers the cup, spills drips of coffee when I hit bumps. Just my 2 cents. -
Take a look at the "Power Driver Seat" post over in the "996 Series (Carrera, Carrera 4, Carrera 4S, Targa)" section:
-
Thank you and good bye all...
Silver_TT replied to JamesD's topic in 996 Series (Carrera, Carrera 4, Carrera 4S, Targa)
Fair enough, you're entitled to your opinion and my sample size isn't big enough that I can really definitively say anything about the car (heck, I've never even owned one). However, most of the car reviews I've ever seen on the Range Rover corraborate a similar story. For example, Edmunds says it has world-class interior but "poor reputation for reliability". But if you know that going into the vehicle purchase and are ok with it, then so am I :) -
Thank you and good bye all...
Silver_TT replied to JamesD's topic in 996 Series (Carrera, Carrera 4, Carrera 4S, Targa)
. -
To follow-up...I took my car in yesterday and my indy fixed it in about 45 mins. Unfortunately I didn't get to watch him do it but we talked for a few minutes after he finished because I wanted to know what he did. It actually doesn't sound like he did any of the above: He said he didn't adjust any of the torx screws that you can access under the door, and he also said that he didn't have to adjust the window position by loosening the 2 clamps that hold it in place on the track. What he told me was that you will have to remove the door panel (easy) but do not have to remove the gray foam barrier that's attached to the door using adhesive. He told me that once the door panel is off there are some adjustments above the gray foam barrier near the top part of the door that you can use to adjust the window on the track. My door is now closing without the window hitting anymore. Next time I have the door panel off I will take a closer look at what he was talking about but I hope this information can help anyone with the same problem in the future avoid a trip to their mechanic. Either way, I wasn't disappointed I had to drive it to the shop since I took the afternoon off and it was 65 and sunny yesterday....and there was no traffic either way. Rolled down the windows and, man, the thing is just a beast on the open highway. The sound of the boxer engine at full thrust with the sport exhaust is amazing. Buying this car was one of the best decisions I ever made....but I digress....
-
Replacing the stalks in the cluster
Silver_TT replied to tccack's topic in 996 Series (Carrera, Carrera 4, Carrera 4S, Targa)
I've done this on my 996 and once you have the instument cluster off it's very easy to replace the stalks. Just a few screws in the instrument cluster on the back if I recall to take it further apart....and then you will be able to pull out the broken stalk and replace it. I think you will find that once you have the cluster off, you're pretty much home free. -
Thanks Loren, you're awesome. This is exaclty what I need. I had done a number of searches looking for this information but apparently I wasn't clever enough with my search terms as i was only turning up information on key swaps, battery replacement, etc. Thanks again.
-
My 2002 996 C4S has the the standard key with 2 buttons: hood release and luck/unlock vehicle. I was wondering what the threshold is in terms of physical distance from the vehicle when using these 2 remote buttons? The reason I ask is because in order for my vehicle lock/unlock button to work, for example, I need to be standing literally right next to the vehicle. It doesn't work if I'm even 10 ft away from the vehicle. In contrast, my BMW has the same buttons on its key and it works from 50+ ft away from the car...much farther distance it's able to operate at. So that being said, what distance is considered normal operating range? The only thing I could think of is that I thought I might need to replace the battery (a CR2032, I believe) if it's weak or something....but I read that the red light on the key will stay solid when the battery needs to be replaced, and mine is not on. I guess it wouldn't hurt to replace the battery anyway but I was wondering if the operating range I'm describing is normal. A simplistic question, I know. Thanks in advance.
-
Power driver seat
Silver_TT replied to 996-99's topic in 996 Series (Carrera, Carrera 4, Carrera 4S, Targa)
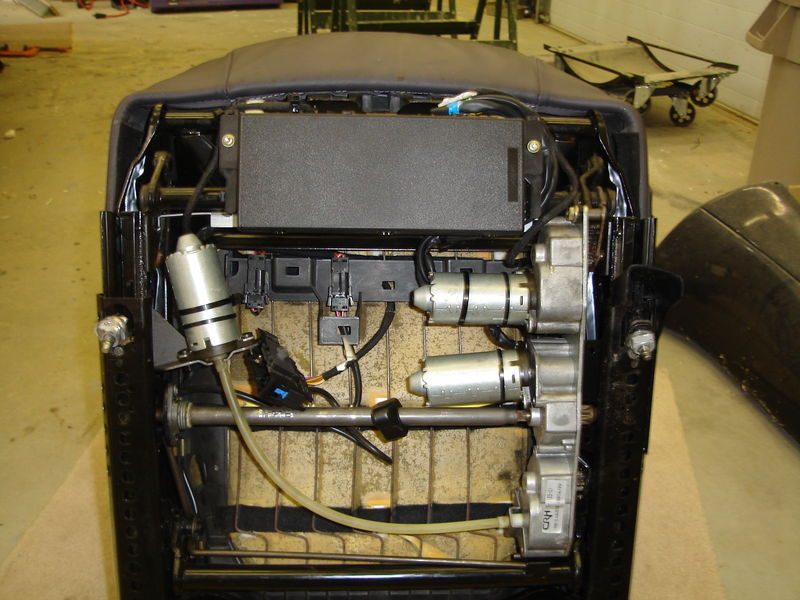
I just fixed this same problem with my passenger seat in my 2002 911 C4S. When trying to move the seat up/down I would hear the motor running but the seat wouldn't move. All other forward/backward, tilt, etc seat controls were working just fine. The fix was very easy using the information in this post. Dharn55 had the correct solution--the cable needed to be replaced. You will not be able to duct tape this; the cable needs to be replaced. Few quick notes: 1. The seat needed to be unscrewed with a E12 socket but does NOT need to come out of the cabin. I just tilted the seat backward after it was unscrewed and used a box to prop it up so I could work underneath it. I had plenty of room to work and since the seat isn't being removed you don't need to worry about tripping any computer faults or power issues as you would if you were to unplug the seat and remove it. 2. I bought a set of external torx sockets at Sears for $9.37 (order online and have it shipped to the store for free, else the Craftsman available in the store if you just "walk in" is expensive: $39.99+tax) -- couldn't find these anywhere else including local auto stores and Home Depot. The two torx screws in the front of the seat have covers which are easily removed by using a screwdriver to lift the tabs and then slide the cover forward (toward the front of the car). 3. The part number listed by Dharn55 996.521.609.00 is correct. I paid $24.97 for it at the local Porsche dealership. Normally I order parts online but this part appears to be special order from Germany so it was actually the same price online. 4. I attached a picture that I found online which I found helpful to understand the controls of the seat. The person that took this picture has obviously taken the seat out of the vehicle (which, again, isn't necessary) but it's a useful picture to orient you to what you're trying to do. The front of the seat (the end closest to the front of the car) is on the floor in this picture. In my specific case, the cable running from the motor on the left was missing (previous owner must have known about this issue but didn't fix it). The right-end of the cable in the picture is attached to the seat gears with a metal clamp (this comes with the part) that you can see if you expand the picture. The left-end of the cable that screws into the motor does not have a metal clamp like this, but rather is held in place between the motor and the metal bracket it attaches to on the seat. The torx screws that hold this in place were much more difficult to get to, especially the one on the left of the motor in this picture....until I got the idea to use the torx bit and a wrench. This was necessary because you have to unscrew from a 90 degree angle because of the way the motor is positioned. You wont be able to unscrew it from the top down, as you normally would, because it is obstructed. This cable that was replaced is simply a square drive-cable sheathed in white plastic. As soon as I replaced it the up/down functionality of the passenger seat now works again. Most of the information you would need is already covered in this post but I hope these little extra details help anyone that needs to do this in the future. Thanks 996-99 and other contributors.
-
Thanks! I don't mean to belabor this thread but I just had one last question: Do you know what it is that trips the airbag light? In other words, specifically how does the computer know when the airbag cover is off? The reason I ask is because it seems to me that it would be difficult to pre-position the window exactly where it needs to be before disconnecting the battery and taking the door off where I can see the inside of the door. This is annoying because it means each time I need to make a small adjustment up/down with the window (or even to test after making the adjustment for that matter), I need to put the door panel back on, screw everything in, re-connect the battery, make the up/down window adjustment, disconnect the battery, unscrew everything, and then finally take off the door panel again. Thanks again.
-
To follow-up on this for people with the same issue in the future, the correct solution to my problem would be 1schoir's, above...(thanks Maurice).... this is adjustment #3 that he lists "3) forward and backward". It's also much more complicated in my 996 than performing adjustment #1 or #2. I was able to get my 996's door panel off pretty easily but that's when things started to get complicated. The foam barrier (that's there presumably to keep water out?) that's under the door panel glued to the door is a major obstacle. I was going to have to remove this and my adhesive is too old so I would need to get some when I need to get it back on. I'm also not sure I can get it off without tearing/stretching it. So I opted to cut a small area into this (and taped shut after). I had my battery disconnected because it's proper procedure when working on electronics, I didn't want to trip the airbag light (which I believe you need a computer to reset if you do), and not to mention that I didn't want the airbag exploding in my face. However, part of my problem is that the car needs to be on so the window could to be adjusted up/down for me to work on it. The window should be down to loosen these clamps....but when the window is all the way down I couldn't get my torx wrench in there so it needs to be inched up a bit where the torx can get in. To even further complicate things, the previous owner of the car upgraded the stereo and the speaker in the passenger side door are custom and looks like it's going to be a pain to get out....getting it out will be necessary because the other innermost window clamp (there are two) is behind it. So..that being said, I have been able to do quite a few DIYs but I think this one is over my head and I'm going to let my mechanic do it. He's an indy that's been working on Porsches for decades and can fix this in a fraction of the time it would take me to get it all adjusted and working properly (not to mentioned breaking a lot less in the process too I'm sure). It's quite possible, if not probable, that these adjustments would have taken me many iterations to get the window working right. I was just being greedy trying to save some cash and 45 minutes each way to get to his shop. But I guess I have a nice drive on Friday afternoon ahead of me....hope there is no traffic :) Thanks again to everyone that contributed to this post.
-
First off, Dennis, thanks for the response. Second,as a follow-up to Dennis' instructions I played with the door today using the two adjustments on the front and rear of the underside of the passenger door -- Dennis was correct that this is 5mm socket size. However, as "white99c2" posted above, this also doesn't appear to adjust the gap between the passenger door window and the passenger rear window (see my pics in original post). From playing around with it today: - It seemed that the innermost adjustment (the one closest to the front of the car) tilts the left part of the window up/down. For example, when turning the socket many revolutions clockwise this left a big vertical gap between the top of the window and the door seal when the door is shut -- conversely when turning the socket counterclockwise the window did not go down a few millimeters when opening the closed door after lifting the latch. Turning this socket either way didn't seem to have a meaningful impact on the size of the gap, which I believe is too small on the door that's "sticking". - It seemed that the outermost adjustment (the one closest to the back of the car) made my window roll down automatically after shutting the car door. When the window is up and I close the door, normally it pushes the window up a few mm after it's shut. However in this case it actually rolled the window down many inches. Are these two adjustments truely what I need to increase the gap between the two windows??? If so am I just using the wrong combination or not being precice enough with my adjustments? I spent over an hour on this today and wasn't able to make any meaningful progress in increasing this gap between the windows and getting my passenger door to stop "sticking". I need to get this fixed ASAP since it's scraping each time I open/close to passenger door....definitely not good. Thanks.
-
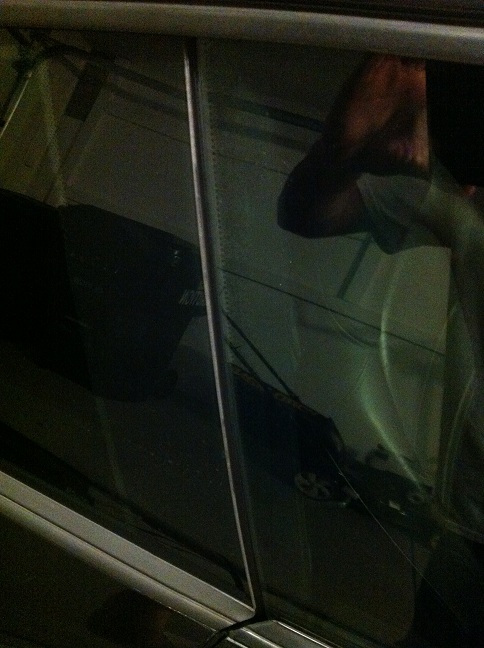
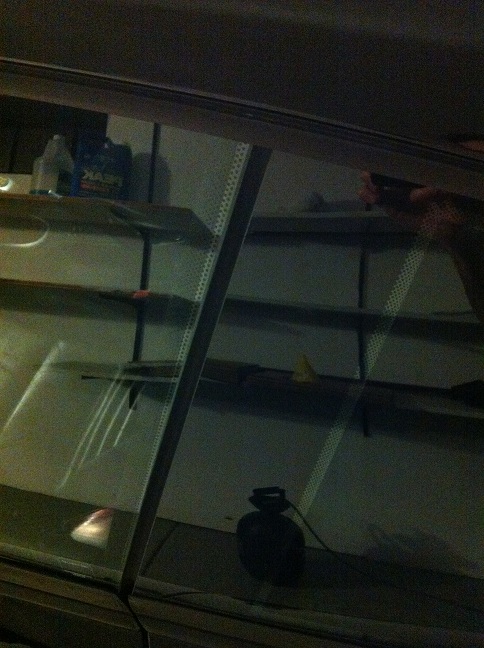
If anyone has any suggestions on the following I would be very grateful: When both opening and closing the passenger side door of my 996 C4S it is "sticking" -- or more accurately the passenger glass window is hitting the glass that it sits up against (the small stationary backseat glass window). This doesn't appear to me to be an issue with the regulator or door locks as I can see that when I pull the door handle the window lowers as it should, and when the door is closed the window raises as it should. Since my driver's side door functions without a problem I decided to look more closely at what appears to be the difference between this working door and the sticking passenger door. I have attached 2 photos showing my driver side door (opens/closes with no problem) and my passenger side door (sticks). As you can see from the photos, when the doors are closed....on my driver's side there is a much wider gap between the two pieces of glass as opposed to the passenger side door. I've come to the conclusion that the reason the passenger door is sticking is because this gap isn't big enough.. and this is verified in that I can see when opening the passenger door handle and the glass lowers it's hitting up against the backseat glass window. On the driver's side when the door is opened and the window lowers, there's still a decent size gap giving plenty of room for the door to open without hitting/sticking. Is there a way to adjust the position of the glass window in the door? The door wasn't sticking previously so it appears that somehow the window got out of alignment Thanks in advance for any comments.
-
Cluster Reset Stem / Shaft
Silver_TT replied to brian2034's topic in 986 Series (Boxster, Boxster S)
Brian sells the stems (there is no part#, Porsche does not sell them despite that they are junk plastic and break easily)...stem caps can be purchased too (part# is 99664191100) if you needed that too but this is separate from the stem itself. -
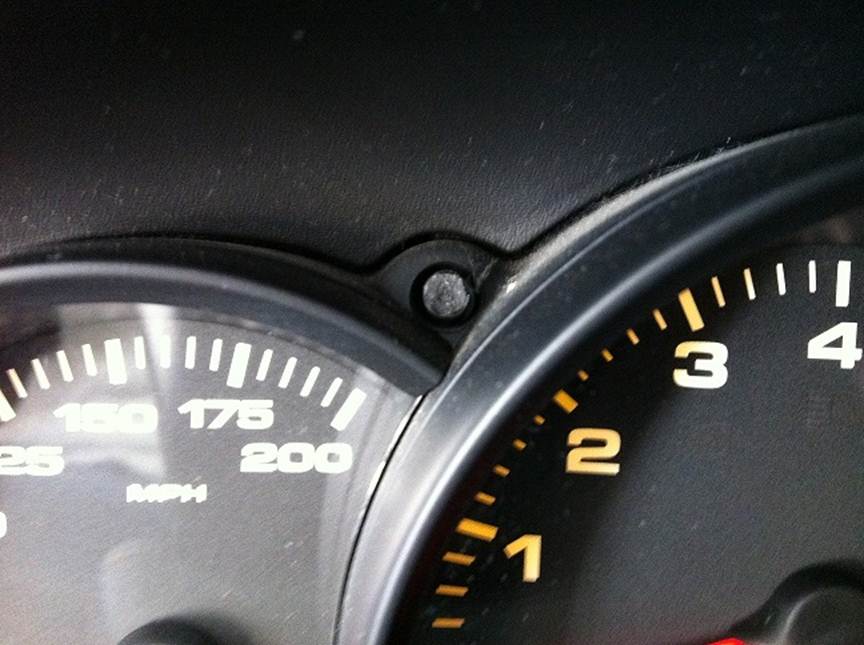
I have a broken instrument knob (part# 9664191100) between the speedometer and odometer -- see picture attachment. I was wondering how hard it is to replace this? Is it difficult to pull the speedometer/odometer console display out? Has anyone posted a DIY on how to take the console out or even more specifically how to replace this knob? I did a search and didn't see this. I have a 2002 911 C4S. Thanks much in advance....
-
Broken Sun Visor Cover/Flap
Silver_TT replied to JohnJStewart's topic in 996 Series (Carrera, Carrera 4, Carrera 4S, Targa)
Thanks, Loren. I saw your other post about replacing the entire vanity mirror housing (which is incredibly helpful by the way). In this thread I was actually asking about using the method which Swynn97 described, which is to replace the flap *only* (the flap is a part of the vanity mirror housing) -- more speficially, buying the $20 "European Vanity Mirror Lid - non-illuminated" (which is for the Boxster) from SunCoast and removing the flap to move it over and replace the one that broke off in my car. At any rate I went ahead and took your advice on replacing the entire mirror housing instead of just the flap since I've read some of your other posts and you are incredibly knowledgable when it comes to Porsches. Many thanks. -
Broken Sun Visor Cover/Flap
Silver_TT replied to JohnJStewart's topic in 996 Series (Carrera, Carrera 4, Carrera 4S, Targa)
Swynnn97, Do you mean the flap in item 11 in Loren's pic? Item 13 is the mirror, not the housing. Has anyone followed up and tried this? I have the exact same problem in my 02' 911 C4S w/ black interior, and only need the plastic flap. I can buy the original mirror housing for $75 but would rather only spend $20 if this works since I only need the plastic flap from the mirror housing...not the rest. Getting rid of the airbag print on the flap would be an added bonus if this works. Thanks in advance for your time.