Welcome to RennTech.org Community, Guest
There are many great features available to you once you register at RennTech.org
You are free to view posts here, but you must log in to reply to existing posts, or to start your own new topic. Like most online communities, there are costs involved to maintain a site like this - so we encourage our members to donate. All donations go to the costs operating and maintaining this site. We prefer that guests take part in our community and we offer a lot in return to those willing to join our corner of the Porsche world. This site is 99 percent member supported (less than 1 percent comes from advertising) - so please consider an annual donation to keep this site running.
Here are some of the features available - once you register at RennTech.org
- View Classified Ads
- DIY Tutorials
- Porsche TSB Listings (limited)
- VIN Decoder
- Special Offers
-
OBD II P-Codes - Paint Codes
- Registry
- Videos System
- View Reviews
- and get rid of this welcome message
It takes just a few minutes to register, and it's FREE
Contributing Members also get these additional benefits:
(you become a Contributing Member by donating money to the operation of this site)
- No ads - advertisements are removed
- Access the Contributors Only Forum
- Contributing Members Only Downloads
- Send attachments with PMs
- All image/file storage limits are substantially increased for all Contributing Members
- Option Codes Lookup
- VIN Option Lookups (limited)


mihaipopa
-
Posts
54 -
Joined
-
Last visited
-
Days Won
1
Content Type
Profiles
Events
Forums
External Paint Colors
Downloads
Tutorials
Links Directory
Collections
Classifieds
Store
Everything posted by mihaipopa
-

Ride Height Sensor - Wiring Harness
mihaipopa replied to 4CN Air's topic in 9PA, 9PA1 (Cayenne) Part Number Requests
Hi 4CN Air, just came across your thread. I have the same issue (I think). Do you have any of the ride height connectors left? I have a 04 cayenne s. Thank you mick -
Are all tires the same size? Have you checked for variance in pressure and thread depth? A faulty angle steering sensor would most likely throw a code.
-
Worn or non-matching tires would be my first guess
-
I would check the coolant reservoir, if you still have the original. It's usually the next thing to go, after the pipes. It develops small fissures around the bottom seams that let coolant leak slowly when pressuriezed, hence the lack of evidence on the garage floor.
-
You're very welcome, glad I could help.
-
Grab the plastic hook and push it all the way down, it is attached to a spring and you will hear a click when it gets to the open position. If it doesn't budge, try again but first pull the door handle and hold it in the open position, then press the tab down. That way you will be able to close your door. Next, spray some graphite lube down the lock vent and push the hook down, close door, open door, repeat. That should take care of any moisture that might be trapped in there and that usually cause this sort of problems. Wd40 works too, but it's messy and will collect dirt. If that doesn't do it, it's the door latch. $600-700 at the shop. Around $170 for the part and not too bad DIY, just lots of stuff to remove. Good luck!
-
A couple of years ago, I was driving from Miami back to NY, on a Friday afternoon when the front differential let go, about 100 mi north of Miami. Had no clue what had happened, I just had a sudden loss of drive/power combined with a massive vibration coming from the front of the car. Crawled to the first exit, was lucky to run into a truck repair and collision sort of shop, had this super nice guy take a look at it, and he's like, it's the differential. Out in the boonies, at 4pm on a Friday, with kids, dogs, luggage in the car, I started calling shops around, through my insurance, google, etc., no one would touch it. Running out of time, with the weekend nearing in, I finally called Porsche Melbourne. I held it as a last resort, just dreaded going thru a dealer again. However, I have to say that that was one of the best experiences I've ever had when dealing with a repair shop. This guy Andy, the service manager, actually waited for me, way past closing hours, booked my truck in, offered us dinner in the dealership's kitchenette, provided us access to their computers to book the flight back, had one of his colleagues drive us to the airport, and kept emailing/txting me every other day about the progress of the repairs. I ended up paying about 3K for the differential replacement, and since I had the car in I asked them to refinish the wheels, and they did a superb job for only $250 for all four, which came as a shock to me, since any dealer on Long Island charges at least $150 per wheel. Anyway, maybe that's just a Southern thing, and I was just easily impressed, but I have to say I never received that sort of treatment in the NY area, especially on an old, out of warranty Cayenne. Took in a Mustang GT, Audi TT, MB E430, Jetta, GTI, Nissan Sentra, all under warranty, and every single time it just sucked. So that was my one time experience with Porsche Melbourne, and it felt like night and day compared to what we get up here, not only in terms of pricing, but also courtesy and openness. good luck!
-
:thumbup:
-
Transfer Case Oil - ?!?
mihaipopa replied to ManMN's topic in 9PA, 9PA1 (Cayenne, Cayenne S, Cayenne Turbo, Cayenne Turbo S)
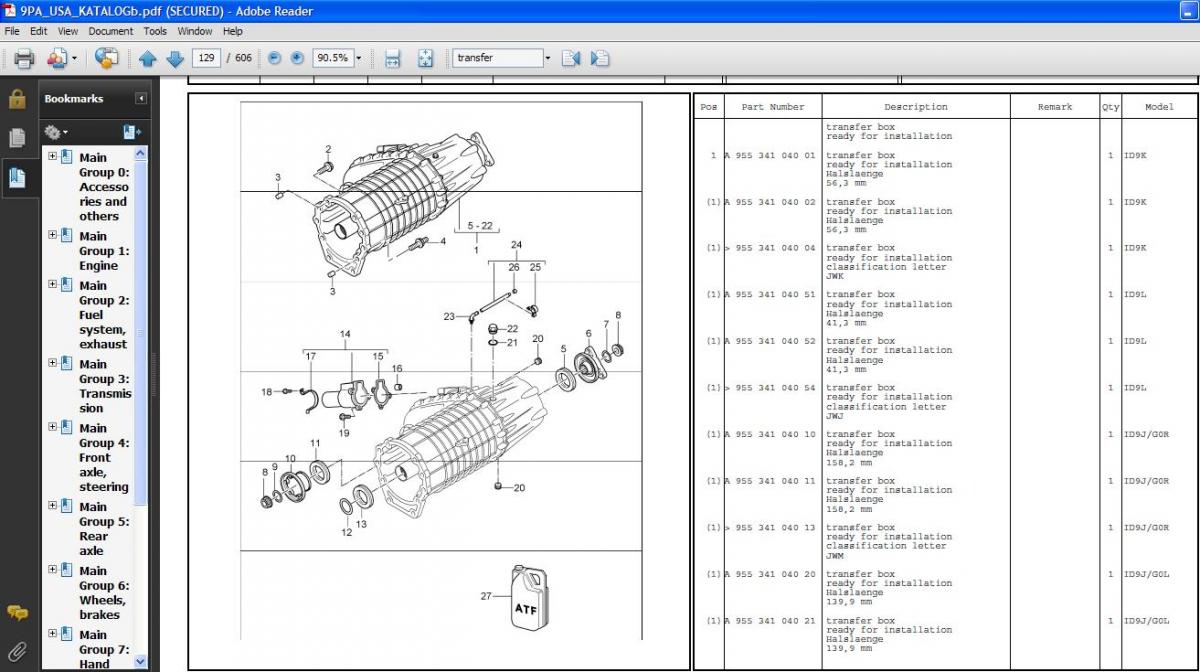
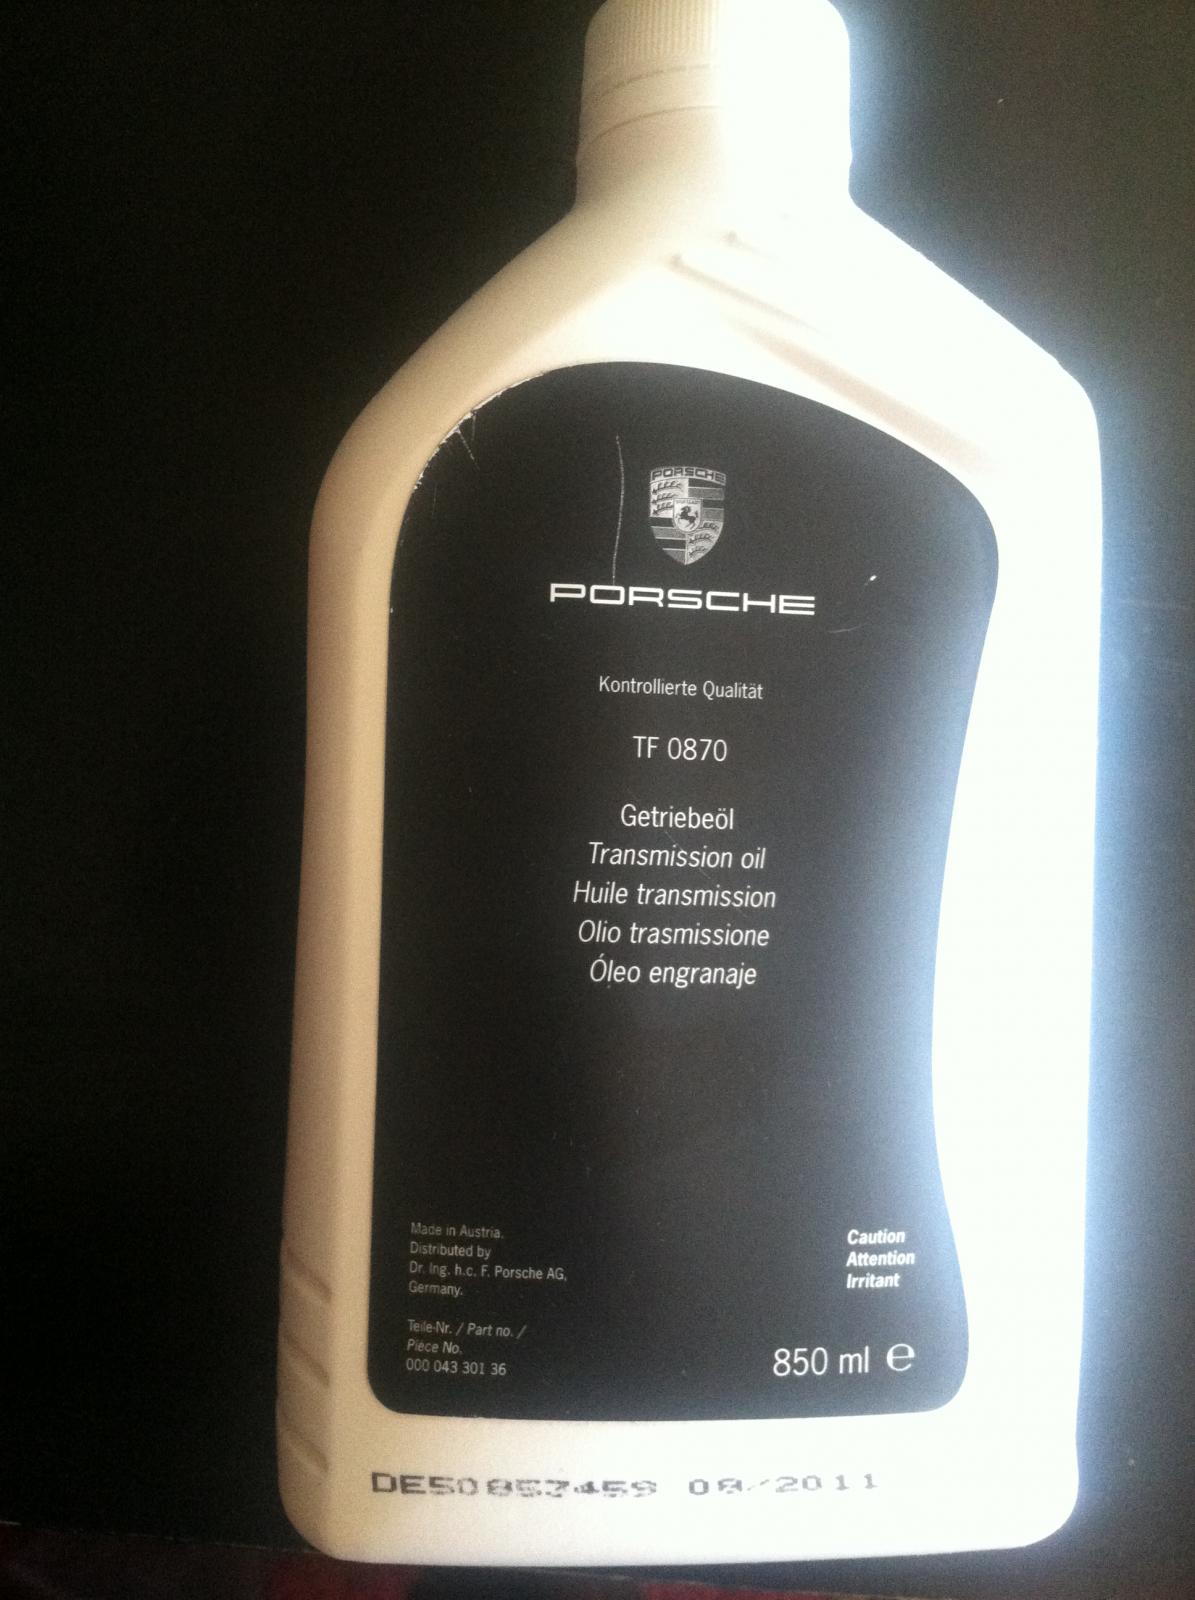
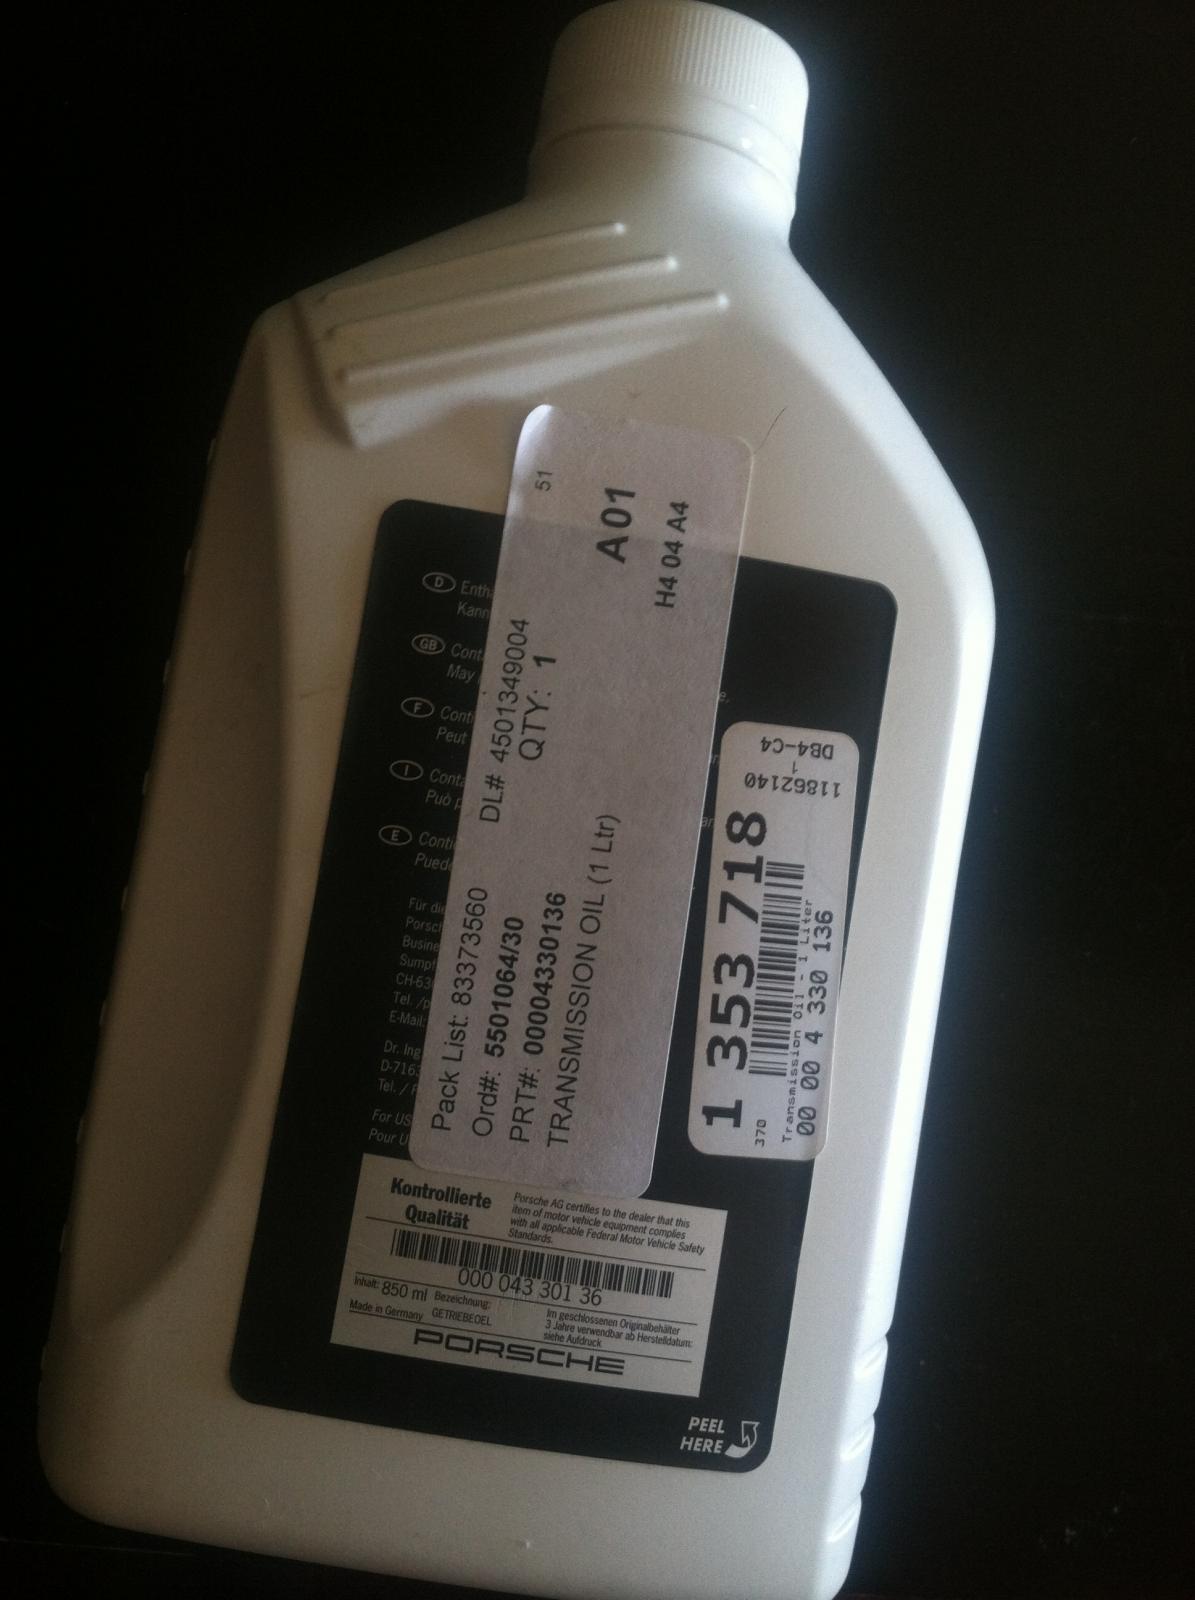
That is it. The latest part number for transfer case fluid is 000 043 301 36. The transfer case in all AT 955 and 957's S, GTS, Turbo and Turbo S (both 4.5 and 4.8) is #95534104055. If you search porsche's parts catalog you will find that the ATF fluid is listed at pos.27 as part# 000 043 300 36. That part, however has changed to 000 043 301 36. Same for the two plugs, listed at pos. 20 as part# 955 301 115 00, have since changed to 955 301 115 01.
-
Transfer Case Oil - ?!?
mihaipopa replied to ManMN's topic in 9PA, 9PA1 (Cayenne, Cayenne S, Cayenne Turbo, Cayenne Turbo S)
I bought this last summer from ecs, for about $48. Haven't changed it yet. It's part # 00004330136. And two plugs (part# 95530111501).
-
:) brilliant, alev8. sounds like an sos for engine mounts. and i do think you're right.. nothing has worked so far
-
what i've noticed so far: the vibration is diminished when: - warm weather (winter vs summer, morning vs afternoon) - warm engine vs cold engine (regardless of climate) -no AC/Heat on also, no vibration when in Neutral, or when slowly crawling to a stop
-
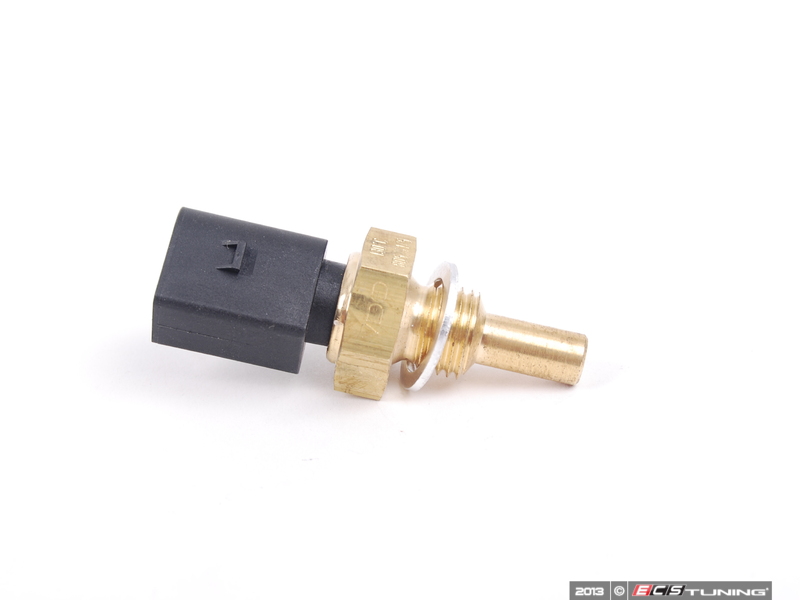
Hi guys, Just wanted to report back. I changed the coolant temp sensor about ten days ago and monitored everything closely. Car's been driven daily, mixed city/highway. All the symptoms are gone and the gauge works well, settling at 180º. Code P3081 never returned. The engine warms up evenly. No coolant leaks observed; coolant level in reservoir at constant level. I changed the sensor without removing the manifold, and although it's a bit difficult due to lack of space and visibility, it can be done with a bunch of extensions and sockets. I actually put together a diy, hope it comes in handy for the next person. Thanks again for all your help. Cayenne V8 coolant temp sensor.pdf
-
Cayenne V8 coolant temp sensor replacement w/o removing manifold Hello Everyone, Here’s a quick tutorial (PDF file at the bottom of the page) on: Replacing the Coolant Temperature Sensor on a 2004 Cayenne S without Removing the Intake Manifold Applicable models: Cayenne S (2003-2008), Cayenne Turbo (2003-2008) Author mihaipopa Category Cayenne (9PA, 9PA1) - Common Fixes and Repairs Submitted 02/26/2015 07:02 PM Updated 03/11/2017 05:27 AM
-
Hello Everyone, Here’s a quick tutorial (PDF file at the bottom of the page) on: Replacing the Coolant Temperature Sensor on a 2004 Cayenne S without Removing the Intake Manifold Applicable models: Cayenne S (2003-2008), Cayenne Turbo (2003-2008) Symptoms: faulty temperature gauge, engine cold at touch even after driving, really loud (like jet engine noise) radiator cooling fans blowing cold air thru the air ducts, code P3081. The truck has about 105k miles. The coolant pipes have been changed at 74k miles and the coolant reservoir at 95k miles. On both occasions the system has been bled, vacuum tested and refilled with new coolant/distilled water mix, under pressure, using Uview AirLift tool, thus eliminating the risk of air being trapped in the circuit. The process is pretty straightforward, but I wanted to share a few tips on how to get around the problems that might arise. Although removing the intake manifold would make the job easier, I chose this pathway due to time limitations and mostly because of the weather. Plus removing the manifold has its own downsides: it would take way longer, plastic lines that crack, fasteners hard to access or stuck, gaskets on the manifold and throttle body that would need replacement, etc. Hope this helps. Parts needed: 1) Coolant Temperature Sensor 996-606-410-00 Tools needed: For Secondary air pump removal/install: 1) 3/8 T40 torx socket 2) 3/8 1-1/2" extension (optional) 3) 3/8 ratchet 4) 3/8 torque wrench 5-80 ftlb. range For Coolant temperature sensor removal/install 1) 1/2 22mm (6pt) deep socket 2) 1/2 3" extension bar 3) 1/2 universal joint 4) 1/2 10" extension bar 5) 1/2 ratchet 6) 3/8 1/2"adapter 7) 3/8 torque wrench Wear gloves, coolant is toxic. The job must be done with the engine cold. Depressurize the system by opening the reservoir cap (only after the engine has cooled down). You can choose to drain the coolant reservoir before removing the sensor, as coolant will start gushing out of the sensor’s mounting hole. I chose not to. I dropped a clean rag in the valley, right next to the sensor, and I covered the hole with it while swapping the new part in, as quickly as I could. I lost maybe 1/2 quart of coolant. For that same reason, I chose not to bleed/pressurize/refill the system again, as the loss was pretty insignificant and the coolant is relatively new. I just topped the reservoir up with fresh coolant/distilled water mix, and monitored for any discrepancies, smells, leaks. After replacing the temp sensor, I cleared the P3081 code So far, I can report that the temp gauge came back to life, never passed the 180° mark, the radiator fans are silent again, heat works fine, the engine feels warm all around, and the P3081 hasn’t returned. 1. Here’s the new coolant temp sensor vs. old sensor 996-606-410-00 (washer is included) 2. Location. On the left side (passenger) of the engine, right behind the intake manifold (upper left corner, next to fastener no. 5, the last one on that bank). 3. Remove the plastic covers by turning the plastic retainers until they release. (Mine were off already so I have no pics, but that’s pretty straightforward). 4. Remove the Secondary Air Pump. First, unplug the vacuum hose (yellow arrow), then unscrew and remove the three T40 torx screws (red arrows), and finally, pull the electrical connector up and unplug it (green arrow). 5. Pull the plug off the temp sensor. This part here is a little challenging. I reached the sensor with my left hand, from the top, and gently squeezed the top end of the plastic tab, towards the wire harness, and pulled up at the same time. It came off rather easily, but finding the right position to get a proper hold of it was a bit of an issue. Be careful here, you absolutely do not want to damage that connector. All those wires are 10+ years old, exposed to heat and elements and stuff, so approach with caution. 0 Here is the sensor with the electrical connector removed. Notice the hose that goes on top of the sensor, it is gonna make it pretty difficult to align your socket and the first extension. I managed to bring down the 22mm socket with my left hand and then slowly adjust it on top of the sensor while pulling the hose towards the front of the engine The problem is that given the height of the sensor, a deep socket is absolutely necessary, but that leaves almost no room to align your sockets and extensions. Here’s the removed sensor. I flipped the picture upside down to show how the socket fits the sensor when in the engine. Notice that the socket grabs the sensor just a little below its top rim. That’s why the 1/2 22 mm deep socket is a must. I don’t think a 3/8 deep would work here. 6. To Remove Sensor: This is the order of tools going into the engine, one by one, on top of each other 1) 22mm 6pt deep socket 1/2 2) 1/2 3" extension bar 3) 1/2 universal joint 4) 1/2 10" extension bar 5) 1/2 ratchet 7. Once the sensor breaks loose, turn once or twice and stop. Remove your sockets and extensions one by one, get a clean rag next to the sensor and follow unscrewing it by hand. Also, make sure you have the new sensor at hand’s reach, ready to go in. You should practice reaching in and out a few times using your best route of access, so that when you do the swap, you do it as quickly as possible. As you keep unscrewing, coolant is gonna start leaking out (given the diameter of the sensor, I don’t think there would be a massive coolant loss, but anyway, the less the better, not just for the obvious reasons, but also because it would be impossible to clean it up). Remove the sensor completely out of its mounting hole and cover the hole with the rag. Quickly bring the new sensor in, remove the rag and screw it in by hand. Make sure the washer that attached to the new sensor stays in place. Tighten it by hand and then re-insert all the tools back in, one by one, as it follows: To Install new sensor: 1) 22mm 6pt deep socket 1/2 2) 1/2 3" extension bar 3) 1/2 universal joint 4) 1/2 10" extension bar 5) 3/8 1/2"adapter* 6) 3/8 torque wrench* *not used in removing of sensor Tightening torque for coolant sensor: 30Nm (22ftlb.) 8. Reinstall the Secondary Air Pump on Bank 1 (electric plug, vacuum hose, and the tree T40 torx screws). Tightening torque for the screws: 10Nm (7.5ftlb.) 9. Top reservoir with coolant, and screw the cap on until it clicks. 10. Reinstall plastic beauty covers. 11. Using a code reader, clear all the codes you may have had. 12. Start it up and observe for leaks, smells, while closely monitoring the temperature gauge. (*As I warmed up the engine, whatever coolant leaked down by the firewall released a small puff of steam that went away within seconds). Good luck! MP Cayenne V8 coolant temp sensor.pdf
-
Thats what I thought too. I just don't get it..Car's been parked all this time, coolant level hasn't changed, there are no leaks, no smells, no codes, all the symptoms just suddenly gone. I'd normally be happy with not having to fix things, but this just seems odd, and I have a feeling that it's not really over. Plus, reading all the horror stories of scored cilinders especially in cold climates caused by compromised cooling systems, I'm reluctant to even start it up. Puzzled here..I guess I'll go with changing that sensor first. Thanks for reading, any input will be highly appreciated.
-
A bit of an update: so yesterday I received my new coolant sensor from ecs (promptly as always, thanks ecs!) and today I went ahead to check the water pump per wvicary's instruction (thank you for the tip) and it seems like the pump works just fine. However, after I put the cap back on the reservoir I left the engine running and what I noticed was that the cooling fans on the radiator stopped making that engine jet noise, and the engine felt warm. On top of that, the coolant indicator on the dashboard slowly went to the 180 mark, where it settled. The only variable that has changed since last week would be the outside temperature.. Today, it was around 40, so above freezing point. Everything else on the car stayed the same. Now, does outdoors temperature affect the coolant sensor? I mean I will get it replaced anyway, just curious here. Thanks guys, I'll report back.
-
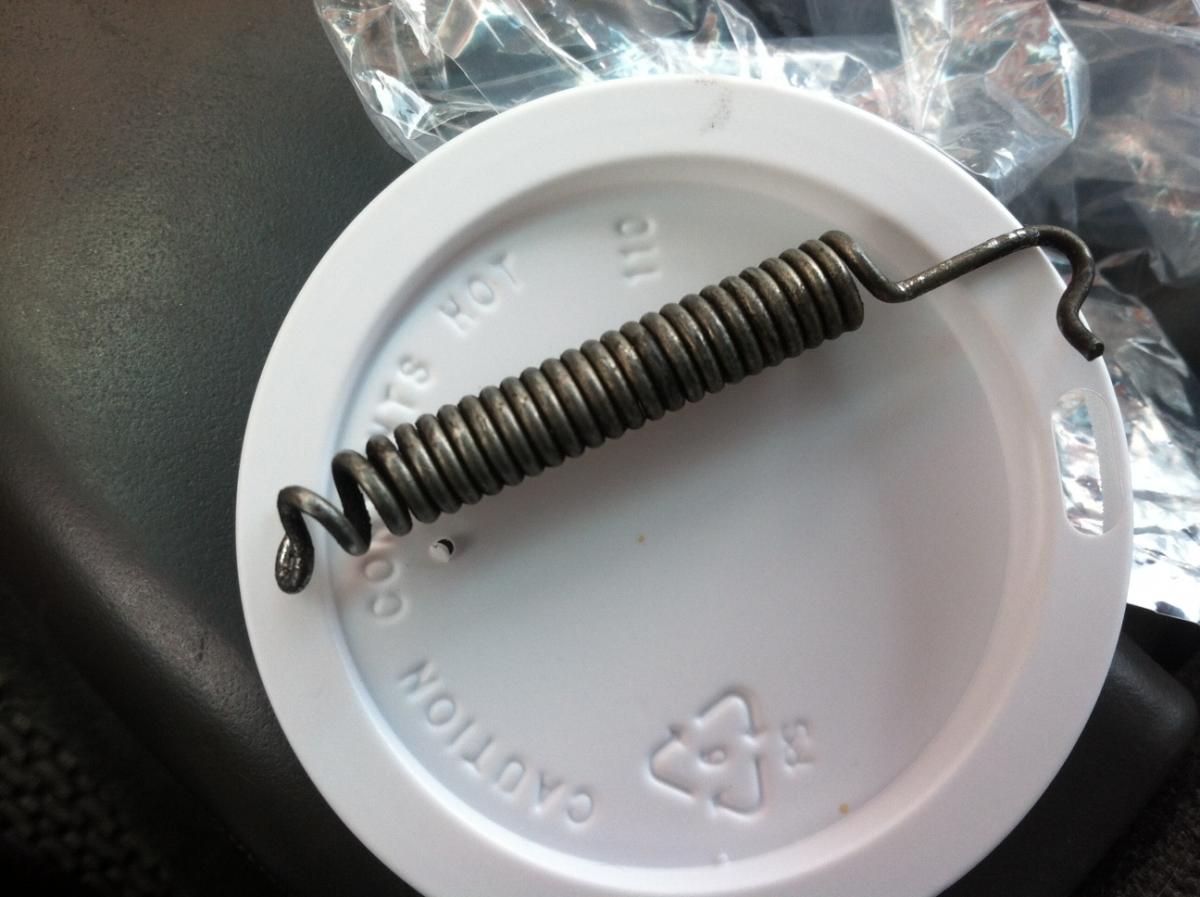
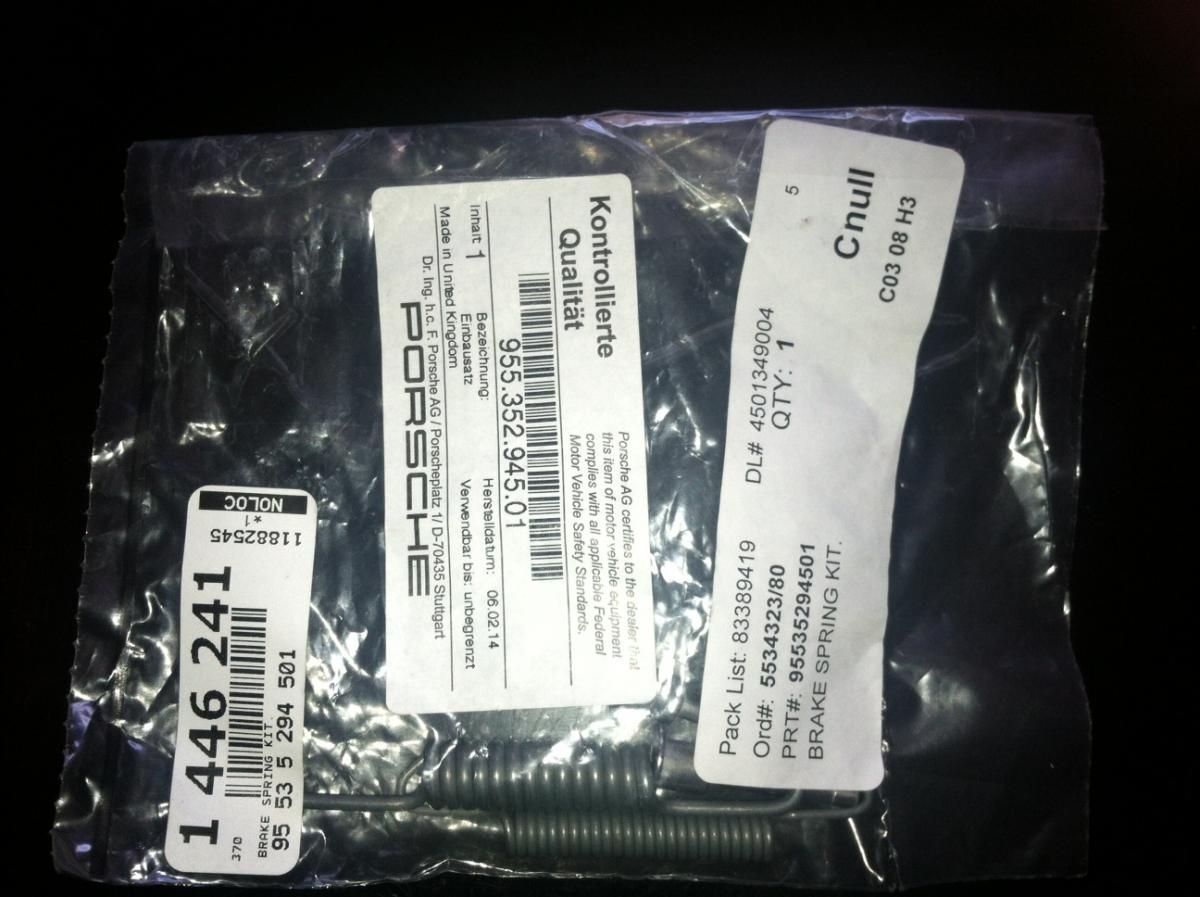
Right on, JFP, really useful little tool. I actually bought one, well afterwards :), and tried it on a spring, makes the job way easier
-
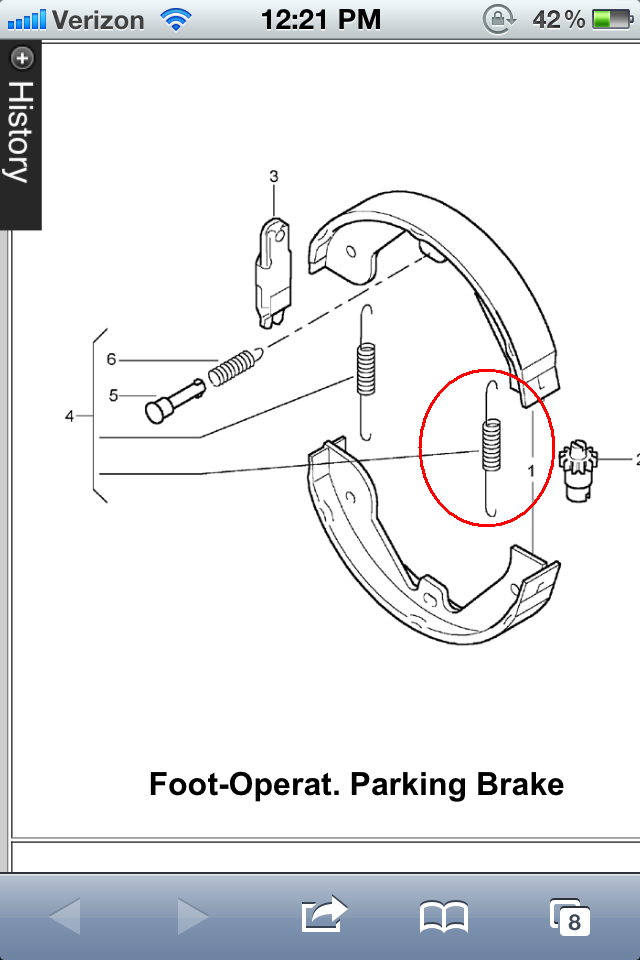
You might have a broken spring. I found mine hanging loose from the top hook, behind the rotor, with the bottom part shattered. They come in a kit, and I believe they're the same that vw, audi and even bmw sells. Takes a bit of effort to get it stretched so that it hooks properly at both ends, but it's doable with a pair of fine nosed pliers. Wear safety goggles, lots of tension on that little spring.
-
there's the sensor (on Pelican a search for 99660641000 actually describes the part: Engine Coolant/Oil Temperature Sensor (includes sealing ring)
-
Thanks wvicary, will check the water pump when I get home. As for the sensor, I ordered it from ecs, it's part 99660641000, and I hope that is the latest version. In the pictures it looks like the o-ring is included and the retaining clip would be the plastic part on the left..? This morning I got heat in the cabin within ~5 minutes of drving; the dashboard coolant gauge stayed at zero, and the front fans made the same jet noise. No leaks, engine definitely felt cold at touch. Should I hold onto ordering a new thermostat then? I dread the idea of dealing with all that coolant nonsense again, especially at 20 degrees. Thanks again for your input
-
Thanks pkscheldt, Would it be a terrible idea to drive it that way, till I get to fix it? I know a closed thermostat is out of question, but an open one?
-
Hello everybody, Just a quick question regarding my 04CS. Been really freezing for the past couple of weeks, and the truck have developed some heating issues. It started about ten days ago with the heat not working until after being driven for, I don't know about 30 miles. Same symptom once or twice, always in cold mornings. Today, it happened again, but on top of that, the coolant gauge on the dashboard never moved from the 100 baseline. The engine also felt cold at touch, the warmest part was the coolant reservoir. I turned it on and noticed a strong air flow blowing from both the front of the engine, from the radiator fan area under the hood, and from the air vents on the bumper. I also pulled code p3081. Coolant pipes have been done a couple years ago, coolant tank replaced last year. I had refreshed the coolant in the summer also, uview vacuumed, pressure tested, refilled w genuine stuff. No coolant leaks/smell as of today. I'm about to order a coolant temperature sensor (part# 99660641000) What do you guys think? Safe to drive? Any input would be greatly appreciated. Thanks ps just noticed that the thread title says p0381..sorry, I meant p3081
-
Door problems
mihaipopa replied to Enzo955's topic in 9PA, 9PA1 (Cayenne, Cayenne S, Cayenne Turbo, Cayenne Turbo S)
It happened to me a couple of times also, always in the winter when the temperatures dropped below freezing point. I think that whatever water drips down the door frame and find its way into the locks ends up causing all these issues. I've used graphite lubricant (I highly recommend wurth) with great success; a few applications inside the locks followed by closing/reopening the doors fixed it. I have tried wd40 also, and it did work, but I've learned since that it is not recommended since it attracts dirt, hence the graphite choice. Another solution is to use a blow drier and try to get all the moisture repelled. Once, it went away by itself, as the weather warmed up. So, in my opinion I wouldn't get too worried, it's most likely a result of freezing temperatures and moisture messing with the locks. Unless the lock is damaged of course. I had to change mine last year cause the plastic hook would not fold over and every time I tried to close the door it would just bounce right back. Id have to manually pull that little black plastic pin in and push it down every time I had to close the door. Pretty intensive job for a simple lock, as I had to remove not only the door panels but also the metal card underneath, all sorts of rivets and whatnot, but I doubt that's the issue here. Good luck -
Door problems
mihaipopa replied to Enzo955's topic in 9PA, 9PA1 (Cayenne, Cayenne S, Cayenne Turbo, Cayenne Turbo S)
wurth HHS-k is really good. I thinl it's being sold under a different name these days, but you should be able to find it on their website. wd40 for emergencies.