Welcome to RennTech.org Community, Guest
There are many great features available to you once you register at RennTech.org
You are free to view posts here, but you must log in to reply to existing posts, or to start your own new topic. Like most online communities, there are costs involved to maintain a site like this - so we encourage our members to subscribe or donate. All subscriptions and donations go to the costs operating and maintaining this site. We prefer that guests take part in our community and we offer a lot in return to those willing to join our corner of the Porsche world. This site is 99 percent member supported (less than 1 percent comes from advertising) - so please consider an annual subscription or donation to keep this site running.
Here are some of the features available - once you subscribe RennTech.org
- View Classified Ads
- DIY Tutorials
- Porsche TSB Listings (limited)
- VIN Decoder
- Special Offers
- Paint Codes
- Registry
- Videos System
- View Reviews
- and get rid of this welcome message
It takes just a few minutes to register, and it's quality Porsche information at a low cost.
Contributing Members also get these additional benefits:
(you become a Contributing Member by subscribing or donating money to the operation of this site)
- No ads - advertisements are removed
- Access the Contributors Only Forum
- Contributing Members Only Downloads
- Send attachments with PMs
- All image/file storage limits are substantially increased for all Contributing Members
- Option Codes Lookup
- VIN Option Lookups (limited)

P-Kay
-
Posts
16 -
Joined
-
Last visited
P-Kay's Achievements
Member (1/1)
0
Reputation
-
 G'day Dave, You are correct that the amp is in the frunk (front trunk). It's more behind the spare wheel. Basically when you open the lid and look straight into the trunk you should see a bracket in the centre behind the spare and the amp is mounted to this bracket. Regarding installation istructions, there are many great writeups on this site along with topics on this exact subject and a search will yield you many results. You also have many options regarding installation kits that are readily available from eBay as well. Mine was purchased from Euromotorspeed (I think that is the name of the company) great instructions and very DIY friendly. Good luck Cheers
 -
Alternator & weak battery issues ?
P-Kay replied to britdave's topic in 996 Series (Carrera, Carrera 4, Carrera 4S, Targa)
G'day britdave, I had a similar problem with my 98 996. The main difference was that I was unable to re-start my car after it had warmed up. As you take your jump start box, it may be the same problem? I ended up replacing the Y cable that goes to the starter/alternator/jump start point in the engine bay - Problem solved! Looks like Ahsai steps will enable you to conclusively determine exactly where the problem lies. Good luck in hunting it down Cheers -
Double Din Installation...
P-Kay replied to creekman's topic in 996 Series (Carrera, Carrera 4, Carrera 4S, Targa)
G'day, To be honest with you, I am not too sure what the Double Din factory faceplate looks like (pretty confident it does not have the logo) The kit from Euro definitely has the logo (well at least it did when I ordered mine close on two years back) Hmmm...I just had a quick look at the ebay link above and there is no logo...Interesting?! Perhaps a phone call to the guys at Euro is your best bet. Cheers -
Mirror heater turns itself on
P-Kay replied to rjordan100's topic in 986 Series (Boxster, Boxster S)
I understood the mirror heater turns on for a period of time when the rear demister is activated. By chance is this what is occurring? -
Double Din Installation...
P-Kay replied to creekman's topic in 996 Series (Carrera, Carrera 4, Carrera 4S, Targa)
G'day Creekman, From factory the avic control is in the bottom cubby (storage) therefore the wires are long enough. If you want to keep the storage and move the avic to the current cd storage unit, there are modifications required (not for the faint hearted and not reversable) however, in my opinion, more ergonomic. There's a detailed 'how to' written by Eurospeed from memory on rennlist. I used the Eurospeed double DIN kit and as mentioned above, great product Good luck -
Red light on Dash Central Lock switch
P-Kay replied to dammad's topic in 996 Series (Carrera, Carrera 4, Carrera 4S, Targa)
Hi there dammad, I had the exact same problem, whereby the horn would intermittently beep and the central locking switch light would come on. For me, it turned out to be a faulty passenger lock mechanism. Same as described above regarding the mocro switch and yes, it is not servicable and the entire lock mechanism needs replacing. Good luck with your repairs. Peter -
G'day hi8ha, When I did mine, I routed the wires from the camera into the r/h tail light space. I then spliced into the wiring loom. Located the reverse wire (cannot recall the colour now) which was located with a voltmeter, into the tail light plug (of course when the ignition is on and the car into reverse). The camera red wire is spliced into this wire. he camera black wire to the car earth wire (brown if memory serves) and you are good to go. Enjoy seeing what's behind you Cheers Peter
-
Seat reupholstery on 996
P-Kay replied to Speedobird's topic in 996 Series (Carrera, Carrera 4, Carrera 4S, Targa)
G'day Speedobird, I'm not too sure what product you used for your seats, but I have recently purchased Leatherique and I have to say the results are as good as the pictures! I redyed my wife's seats in her Mercedes and although the test of time is still pending, so far so good... I also conditioned and cleaned my seats and the suppleness has well and truly been revived. I don't want to dye them just yet as I am okay with the creases in the bolsters. Good luck whichever path you choose Peter -
RoW M030 Sport Suspension Install
P-Kay replied to drpaulmarsh's topic in DIY Articles - Carrera (996) - Mods
I know you get told all the time, but I cannot resist to say it again. Loren...YOU ROCK! Thank you for your speedy turn around and an amazingly informative and helpful forum! Cheers -
RoW M030 Sport Suspension Install
P-Kay replied to drpaulmarsh's topic in DIY Articles - Carrera (996) - Mods
Hi there, Appreciate this is an old thread, but the link to the DIY seems to have problems. It only shows to point #5 Am I doing something wrong? Thank you in advance Peter -
I would recommend using this link as it was extremely helpful --> http://www.renntech.org/forums/topic/19074-new-dvd-navigation-install/
-
Hi J_Status, Have you looked further into your problem? Mine would do the exact same thing, whereby the first attempt would be a small crank, the second seemed to stop at the compression stroke and the third would do the trick. Sometimes I would need to open the spoiler to cool the engine and go for a walk to cool myself off!! After the car left me stranded, I phoned roadside assistance and they checked the battery and it was fine, although they had to use their heavier duty jumper machine. This had convinced me it was either the +ve cable from the jump point/alternator/starter or in fact the starter motor. Considering you need to remove the throttle body and intake distributor to access either of these items, I was not going to do it twice, therefore I changed both. WOW! What a difference, no more lazy starting, the thing turns over like a jet engine (hot or cold) and the battery gauge on the dash has never shown such a high reading. I can only imagine the cable was on it's way, however, I am extremely glad I did both! It is so good to have confidence back in the car, especially when it is a daily driver. Peter.
-
Hi there RS, This is the exact link that I used to assist in my reverse camera installation. Like you, I tapped into the tail light for earth and power for the camera when the reverse light was illuminated. I then taped the RCA extension supplied with the camera to a straightened coat hanger and fed it through the grommet on the RH side. With the rear trim and sound proofing removed, my better half was in the car and was able to locate it and then it is a matter of carefully pulling the wire through. As far as routing the wire, I carefully tucked it along the carpet line and then underneath the centre console. This was achieved by carefully prying the edge and feeding both the RCA cable and the power cable from the head unit. RCA towards the deck and head unit switch/power wire towards the back. Regarding the power/switch wire from the head unit, this was tapped into the wire described in the link you have specified (underneath the bracket where the ECU resides). Just double check with a multi meter to ensure you have the exact one. From memory, mine was black with a purple/pink tracer. You will be able to pinpoint it as it will be the same colour combination as your tail light wire. Good luck! Peter
-
New DVD Navigation Install
P-Kay replied to trieullionaire's topic in 986 Series (Boxster, Boxster S)
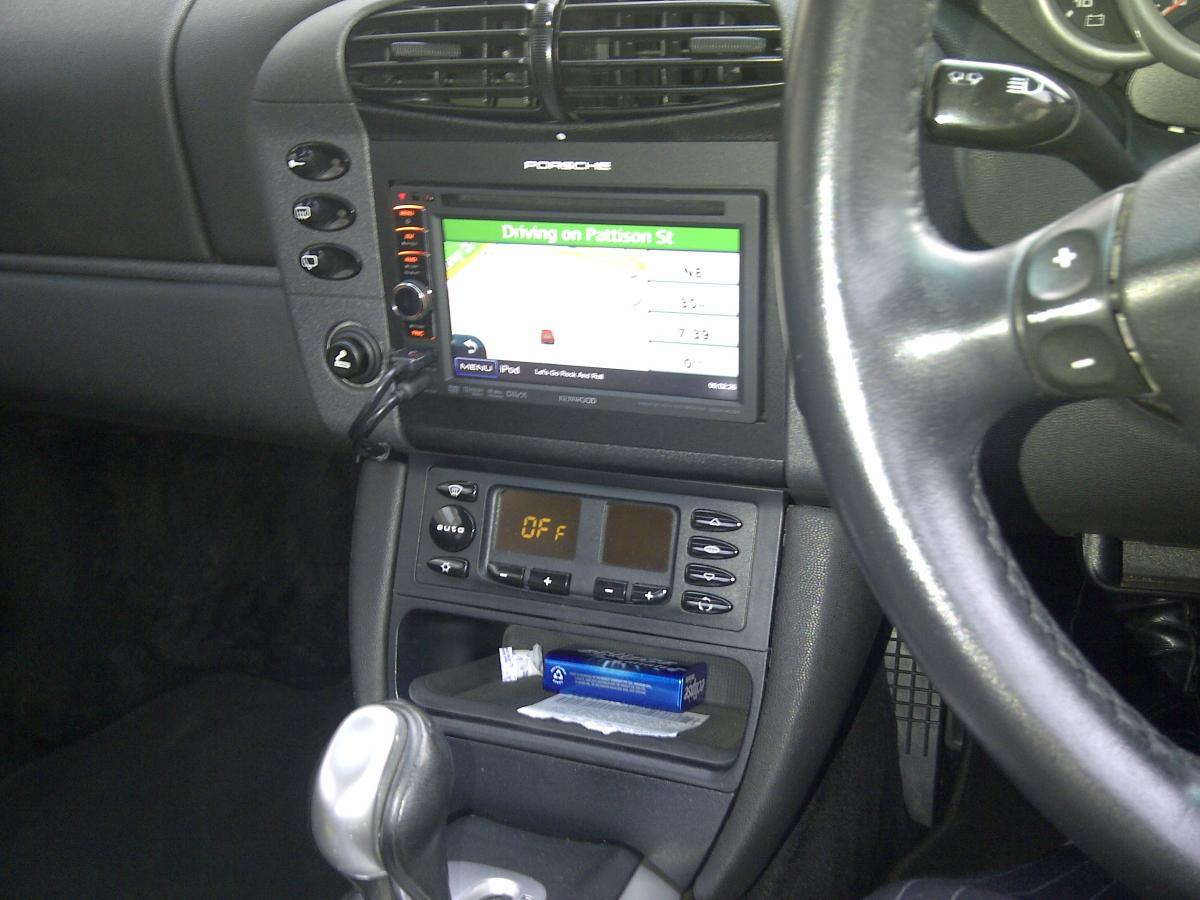
Hi there godwine, I am not familiar with the DSP, however as it fits in the last slot, then it would have the same 'fitting structure' as the climate control. This being the case, you would need to get creative with the DSP and the cubby hole. I originally placed the climate control in the bottom slot as I was too scared to 'hack' the slot above, but after getting annoyed with the stick getting in the way every time I wanted to alter the temp, I built the courage to approach the movement of the units. I refer you to the Installation Instructions found on Page 2 of this thread and unfirtunately, I have to agree that it is a hack and not for the faint hearted. I say this as you literally hack the cubby hole to fit the unit. Again, I need to preface that I am expecting the DSP has the same fitting 'structure' as the climete control. Happy installing and hope the above helps. Cheers EDIT Added pic of install -->
-
High mile role call
P-Kay replied to violaGT3's topic in 996 Series (Carrera, Carrera 4, Carrera 4S, Targa)
New to Porsche ownership and I have a 1998 Carerra Tiptronic with 185K ish The car has full service history and I am the third owner. Still pulls hard and has a slight knock/tick which sounds like a lifter once warmed up. Fun at 100klm and press the go pedal. I'm in lurve