Welcome to RennTech.org Community, Guest
There are many great features available to you once you register at RennTech.org
You are free to view posts here, but you must log in to reply to existing posts, or to start your own new topic. Like most online communities, there are costs involved to maintain a site like this - so we encourage our members to donate. All donations go to the costs operating and maintaining this site. We prefer that guests take part in our community and we offer a lot in return to those willing to join our corner of the Porsche world. This site is 99 percent member supported (less than 1 percent comes from advertising) - so please consider an annual donation to keep this site running.
Here are some of the features available - once you register at RennTech.org
- View Classified Ads
- DIY Tutorials
- Porsche TSB Listings (limited)
- VIN Decoder
- Special Offers
-
OBD II P-Codes - Paint Codes
- Registry
- Videos System
- View Reviews
- and get rid of this welcome message
It takes just a few minutes to register, and it's FREE
Contributing Members also get these additional benefits:
(you become a Contributing Member by donating money to the operation of this site)
- No ads - advertisements are removed
- Access the Contributors Only Forum
- Contributing Members Only Downloads
- Send attachments with PMs
- All image/file storage limits are substantially increased for all Contributing Members
- Option Codes Lookup
- VIN Option Lookups (limited)

lkchris
-
Posts
113 -
Joined
-
Last visited
Content Type
Profiles
Events
Forums
External Paint Colors
Downloads
Tutorials
Links Directory
Collections
Classifieds
Store
Everything posted by lkchris
-
Could you post the part number? Thanks
-
I've got the double beep with switch light remaining problem, too, and think I have the part to replace the existing problem part. Just an FYI, this winter I've noticed that the problem does not occur in cold weather. One day when it was still cold I parked the car where the sun hit the driver door for an hour and the problem reoccurred. Whatever the circuit that's broken in the mechanism, it's a pretty small break I think!
-
 And, if it's a radar detector, the previous owner would have left it with the car ... which seems unlikely.
 -
Windshield Washer Nozzles strange behavior
lkchris replied to JuncoJones's topic in 986 Series (Boxster, Boxster S)
Recommend checking following thread if contemplating ordering new sprayers ... http://www.renntech.org/forums/topic/49173-when-they-change-the-wiring/ -
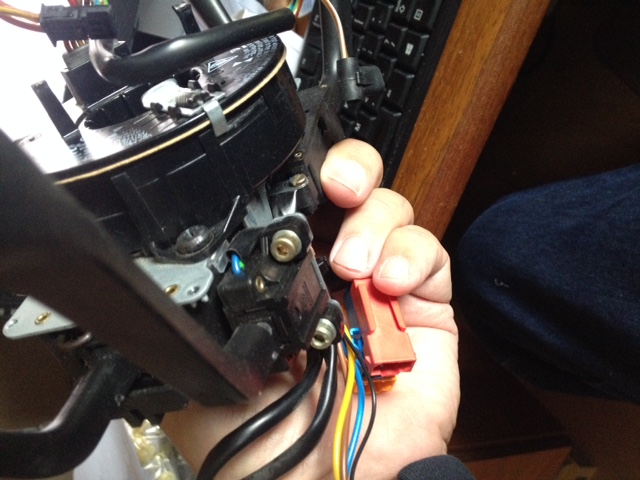
So, decided to replace the plastic cowling around the windshield wiper shafts on my '01, since the original was fairly sun faded and just generally biodegrading as the Germans intend. A fairly large PITA job as there's lots to disconnect and the cowl piece doesn't exactly drop into place. Do it right, I thought, so also ordered new windshield washer sprayers, as they're black plastic, too. It's yet another lesson on how methodical one must be in doing this stuff, as it turns out Porsche has changed the electrical connectors (for heating) on the sprayers you get these days and they won't mate up with the existing harness connectors. Was fairly far along into reassembly before I noticed this, but knowing PET (the parts system) lists "repair kit, wire harness," I finished the whole thing, with just wires disconnected. Yes, PET calls for two repair kits if needed and that looked like what I needed to do. Well, price for a kit is $67.97/$43.88 (list/sale) for each kit, so maybe the kit is more than just a pair of wires with a connector on each end. (997 612 976 00) And more complicated. Anybody familiar with the kit? So, looks like I get to disassemble it all again and either just reinstall the old sprayers or splice the old connectors on the new ones. As it always is with DIY, the second time through should be easier and quicker and possibly a Porsche pro knows to check things like wiring connector changes. Ain't DIY grand? PS: One post I read somewhere recommended some tape on the windshield to mark how to get the wipers back in the same position. On this later version of the cowl ('01-on) at least that's not so critical as the plastic is molded in such a way that you just mount the wiper arms so they parallel the molding when parked and you're good. It wouldn't look good not parallel and that's your clue.
-
Haven't seen question/ answer on this and am not optimistic, but ... Dashboard was changed for 2003 so it had a glovebox, but the central radio mounting and the switch horseshoe was changed, too. Basically the cup holder system was changed so it didn't take up an entire din 1 slot, and it coexists with two such compartments. Can't really tell how this was accomplished ... are the central vents smaller? But pertinent question is is the new configuration an easy retrofit to older Boxsters? Sure would be handy when contemplating a double din radio installation if could still have cup holders.
-
Windshield Washer Nozzles strange behavior
lkchris replied to JuncoJones's topic in 986 Series (Boxster, Boxster S)
The black plastic trim on these cars is recyclable and certainly deteriorates and dis colors with sun and age. My next mini project is replacing all the cowl area plastic, including the sprayers. My sprayers work ok I think, but will need to be disturbed to replace the other plastic, so I'll just install new ones. I think they're $25 or thereabouts. -
How to Remove the Front Bumper
lkchris replied to Loren's topic in DIY Articles - Carrera (996) - Maintenance
Just a note that "spacer sleeve" #7 exists on the screws at the top front of the bumper (under the cover that must be removed) as well as on the screws at the sidemarkers. They're not quite as obvious as the two at the side markers and don't necessarily fall out like those mounted horizontally or upside down will. First time I did this, I unknowingly just left them there and of course they fell out when it came time to actually move the bumper away from the car. It was dumb luck that I noticed them laying on ground nearby. So ... be sure they're removed as you remove the screws. -
Bolts for the side airbag
lkchris replied to myturbo's topic in 996 Series (Carrera, Carrera 4, Carrera 4S, Targa)
PET shows 4 M6X16 screws. Someone must have lost one previously and replaced it with something close. -
Reads like you mean these screws (it's only a bolt when you put a nut on it) ... which look like M4X12 to me. Looks also like a little longer wouldn't hurt.

-
This is a problem endemic in all German cars from maybe 1995-2005 (and BMW motorcycles). The new wiring harness specifications were created in response to new German (or Euro) regulations that automotive wiring harnesses be biodegradable. First try at this wasn't so successful. Later cars have gone to CANBus, drastically reducing the size of wiring harnesses. Those of us with these cars have a problem on our hands and can take to the bank it won't be warrantied.
-
R&R sparkplugs, how tough? pointers to how-to?
lkchris replied to boxster_nut's topic in 986 Series (Boxster, Boxster S)
Americans seem to be amazed and confused by the notion of spark plugs being correctly gapped out of the box. That is, in fact, standard practice for the combination of German engines and German spark plugs. Since the 1970s when my experience with German vehicles began, and probably longer than that. That gap will be indicated on the box, although not necessarily for multi prong plugs. You won't find a gap spec from the engine builder most times when multi prong plugs are specified. Just install them. Not all engines the same, you say? In Germany, if it's a different engine requiring a different gap, there's a plug specifically for that engine. I once had a Range Rover with the old BOP aluminum V8, and iirc the Bosch plug was called LR10 and sure enough the out-of-the-box gap met LR's spec. Just a little more of the difference between the world leader in things automotive and the USA, which is comparatively a 3rd world country when it comes to things automotive. -
Spark Plug Change Instructions
lkchris replied to Loren's topic in DIY Articles - Carrera (996) - Maintenance
Regarding which torque figure to use for installing spark plugs, I'd use the figure printed on the spark plug box. You'll note in previous comments, Loren gave a figure for previously-installed plugs which was less than for new plugs. That's because the function of torqueing down the plugs is essentially a function of crushing the crush washer that comes on the plug. So, different plug makers may use different crush washers and the same manufacturer may have changed the washer used over time. No way Porsche knows anything about this. It's the plug manufacturer's responsibility to know the metallurgy of the crush washers they use and specify a tightening torque that corresponds. Again, no way Porsche knew back in the early 2000s what's being produced in 2015. Maybe somebody can find some obscure DIN or SAE document specifying that all plug crush washers should be identical, but I doubt it. Seems harmless but correct to follow what the plug maker specifies. -
Thanks for sharing your ideas.
-
Self-dimming rear view mirrors availability
lkchris replied to psng's topic in 986 Series (Boxster, Boxster S)
Auto-dimming mirrors are available from Porsche for 986 For early, see http://www.classicshop.porsche.com/pcos/986/zubehoer-986-alle-baujahre/interieur/innenspiegel-fuer-porsche-911-944-928-993-und-986-99373198200.html For late, see http://www.classicshop.porsche.com/pcos/986/zubehoer-986-alle-baujahre/interieur/innenspiegel-satinschwarz-fuer-porsche-986-und-996-ab-2001-9967315110201c.html The part numbers shown are good at the website of my usual parts ordering dealer. -
FWIW, German cars are all wired to Bosch standards, and in this case the horn never works with ignition off by design. If it does, something's wrong and I'd think it more than a missing ground, as clearly it's getting one to work. It's also getting a positive, which should not be the case.
-
Pays to be a contributing member here, as there are two TSBs regarding the hardtops. One discusses fixes for what seems like about 17 different versions of squeaks. The other is quite specific regarding a "rattle," and looking at this helped me. It appears not soon after the hardtop introduction Porsche found it useful to change the plastic caps on the blades that mount into the sockets on the windshield header. Didn't really give mine a look, but had some included in a parts order I was putting together for other items, as they're maybe 25 cents each. Finally looked at my top the other day and discovered there was no cap at all on the side where I had quite a rattle. As I suspected the other side had what is probably the newer cap already there. Got one glued on but haven't tested it yet. This could have been a wild goose chase for sure had I had a mechanic somewhere looking to solve the problem. For the first time gave my hardtop a close look over in anticipation of having it painted. My car is rainforest green and the hardtop I found is seal gray and doesn't look bad that color at all. My interior and soft top are graphite gray, so it maintains the theme. Friends say leave it alone. In any event in studying it I discovered the two "styling grooves" on each side are actually removable pieces apparently held in by a rubber gasket, $30-something each and clearly something to be removed for painting. The gasket around the rear window also surely needs special treatment when changing paint color and viewing the parts system indicates this gasket is not separately available. Rather, the parts system lists "windscreen ready to install" for $300 something. Seems pretty likely removal of rear window is needed for painting. BTW, separate rear windows are listed for base and S, probably some of that titanium trim again. There is clearly painted area contact with the gasket around the side windows as well. That gasket is all one piece, i.e. both side windows and across the front and is $900, pretty close to what I paid for the whole hardtop. Very little here to find about hardtops doing search, except for one line that indicates dismantlement required for painting. That's no lie. Any additional comments on painting hardtops or otherwise maintaining them? Staying gray for a while yet, but my yellow speedster humps (genuine) from eBay and a replacement front bumper are being painted next week.
-
The Story? Front Bumper Grilles
lkchris replied to lkchris's topic in 986 Series (Boxster, Boxster S)
Well, more digging reveals the parts are PP+EPDM, that's rubberized polypropylene and Wikipedia lists it as subject to UV degradation. Parts should probably be painted prior to installation. -
The Story? Front Bumper Grilles
lkchris replied to lkchris's topic in 986 Series (Boxster, Boxster S)
I think so, too, but think it might be deteriorates rather than fades. I've purchased an S front bumper for my base and the titanium paint on the outer grilles is the great condition. The vertical support bars are however the chalky white, but moreso on the front than the back. The interesting thing is that portions of the center scoop are also faded, but almost in a manner that looks like it follows a design. That is, the complete circle, top and bottom is the chalky white, and I'd think the top wouldn't get the same sun exposure as the bottom. It's a raised area in the casting, and most of this piece remains black. There is nothing but all black available from parts for the center scoop, and while it may be nonstock, I think I'lll paint this rim titanium before installation. A little black maybe, too, on those verticals. On the center things, a previous owner melted the tabs rather than installing the factory clips, so it's two new parts. I'm rainforest green, and frankly the chalky white I currently have looks pretty natural, as all black would be lost in this dark color. Lots of photos I see of black, blue, dark red etc. Boxsters about all show the chalky white on base models. It's a curious thing. -
Regarding the pre-facelift ('97-'02) front bumpers ... What's the story with the color of the grilles? Not every Boxster I see has them in white (or is it silver?) and for sure the only thing available in spare parts is "satin black." Photos of new cars in my "Porsche Boxster Story" book shows them not all the same color, it appears. Were there officially different colors for different main paint colors? Is there a particular paint to use to achieve the white/silver color when faced with a new satin black part?
-
Key fob replacement housing only?
lkchris replied to brucenoah1956's topic in 986 Series Part Number Requests
Order 996 637 351 00 This is a new key half ... With buttons -
Well, here's some information. The first 996 amp I purchased was 996 645 311 00, an amp from and for a 996 coupe. Since I don't believe in random coincidence and noting that the original amp in in the Boxster is 986 645 323 00, I purchased a second 996 amp, 996 645 323 00, labeled for 996 Cabrio. Just don't think "323" is a random coincidence and instead describes amps for open/soft top cars. Anyway got it installed and immediately noticed a difference. More volume from the rears and more bass overall. Yes, it's a comparison of just two used amps, and maybe three minutes listening--not necessarily conclusive and have no other data from Porsche other than my "323" assumption. But, I'd just recommend searching for the 996 Cabrio amp when converting your Boxster to have rear speakers.
-
They are indeed a cool design ... just wish replacement front "glass" was available. Mine look pretty good, but when lights are turned on lots of crazing is visible.
-
When the headlight is installed, it is pushed into its electrical connector. Seems plausible that yours wasn't latched down properly and momentum moved it forward and disconnected it. I'd try pushing it back in and latching it according to instructions in your owners manual--requires a tool.
-
Question asked above but not answered ... What is the difference between M490 6X40 amps for 996 coupe and same for 996 cabriolet?