Welcome to RennTech.org Community, Guest
There are many great features available to you once you register at RennTech.org
You are free to view posts here, but you must log in to reply to existing posts, or to start your own new topic. Like most online communities, there are costs involved to maintain a site like this - so we encourage our members to subscribe or donate. All subscriptions and donations go to the costs operating and maintaining this site. We prefer that guests take part in our community and we offer a lot in return to those willing to join our corner of the Porsche world. This site is 99 percent member supported (less than 1 percent comes from advertising) - so please consider an annual subscription or donation to keep this site running.
Here are some of the features available - once you subscribe RennTech.org
- View Classified Ads
- DIY Tutorials
- Porsche TSB Listings (limited)
- VIN Decoder
- Special Offers
- Paint Codes
- Registry
- Videos System
- View Reviews
- and get rid of this welcome message
It takes just a few minutes to register, and it's quality Porsche information at a low cost.
Contributing Members also get these additional benefits:
(you become a Contributing Member by subscribing or donating money to the operation of this site)
- No ads - advertisements are removed
- Access the Contributors Only Forum
- Contributing Members Only Downloads
- Send attachments with PMs
- All image/file storage limits are substantially increased for all Contributing Members
- Option Codes Lookup
- VIN Option Lookups (limited)


dphatch
-
Posts
233 -
Joined
-
Last visited
Content Type
Profiles
Events
Forums
Exterior Paint Colors
Downloads
Tutorials
Links Directory
Collections
Classifieds
Store
Everything posted by dphatch
-
Mobil 1
dphatch replied to Bk4205's topic in 997-1 Series (Carrera, Carrera 4, Carrera 2S, Carrera 4S)
Check out Walmart,s price for Mobil1 0w40 M1 as it runs around $ 25 for the 5 QT jug. Hard to eat that price. -
Try these guys...http://www.beckerautosound.com/repair_info.html for repair. Have never needed to use them so let us know how you make out.
-
By "tapping " you mean mild pounding or the "hammers of hell" type pounding . Will soaking with PBLaster assist in the removal process ? Any reason the be concerned that the vibrations from the "tapping" will have any negative impact on the O2 sensors given their close proximity? Sorry for all the questions put my brain works best when it isn't questioning what my hands are doing .
-
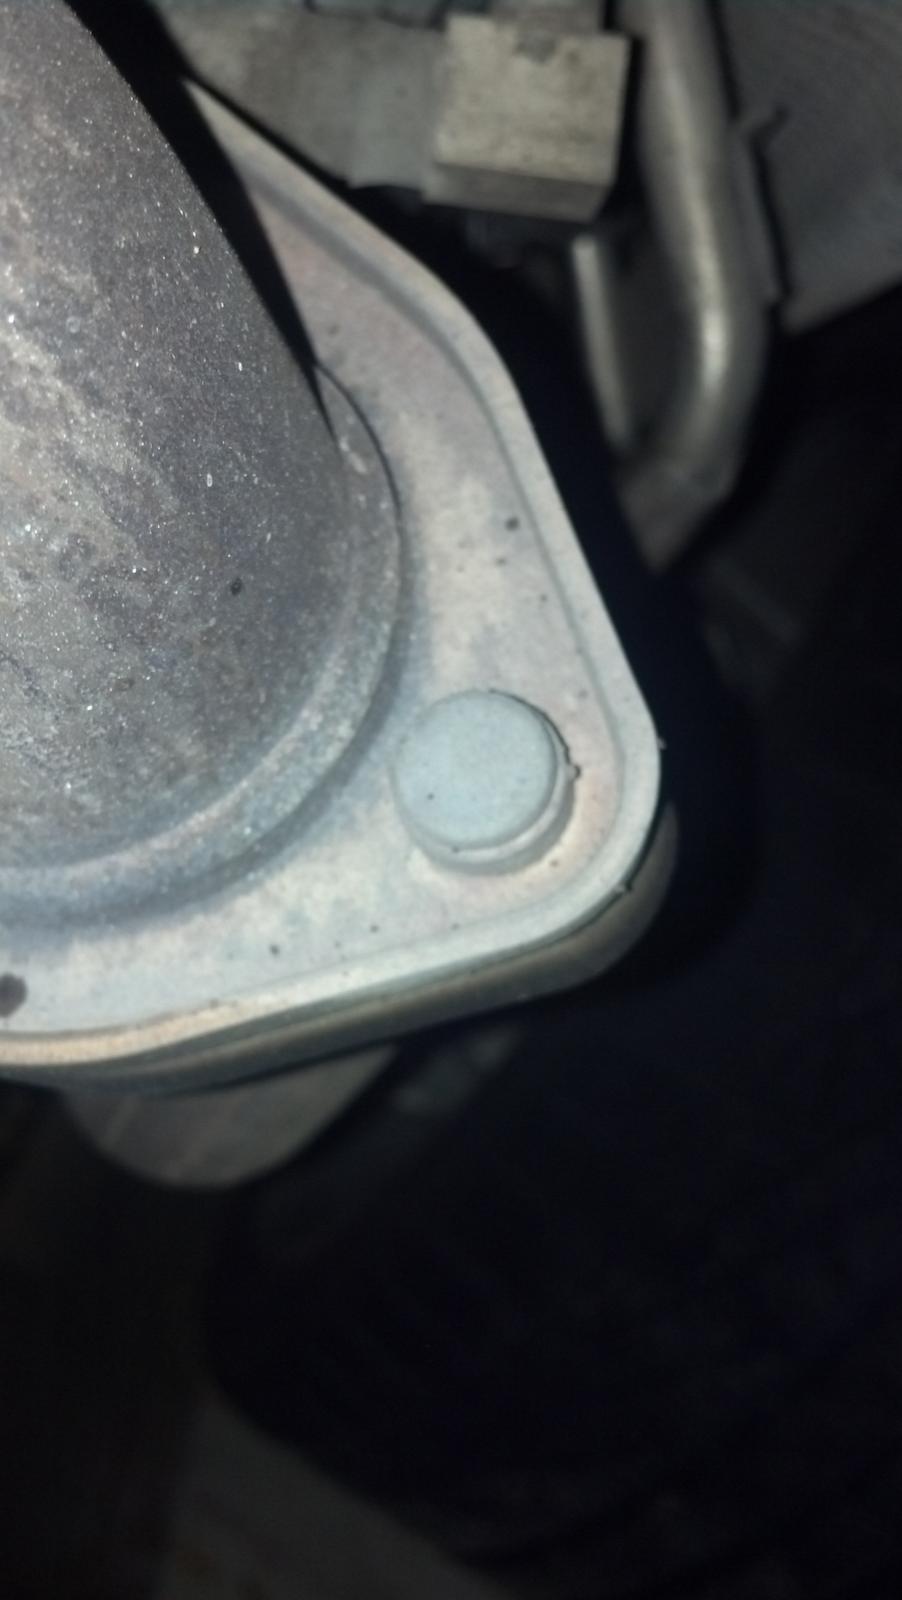
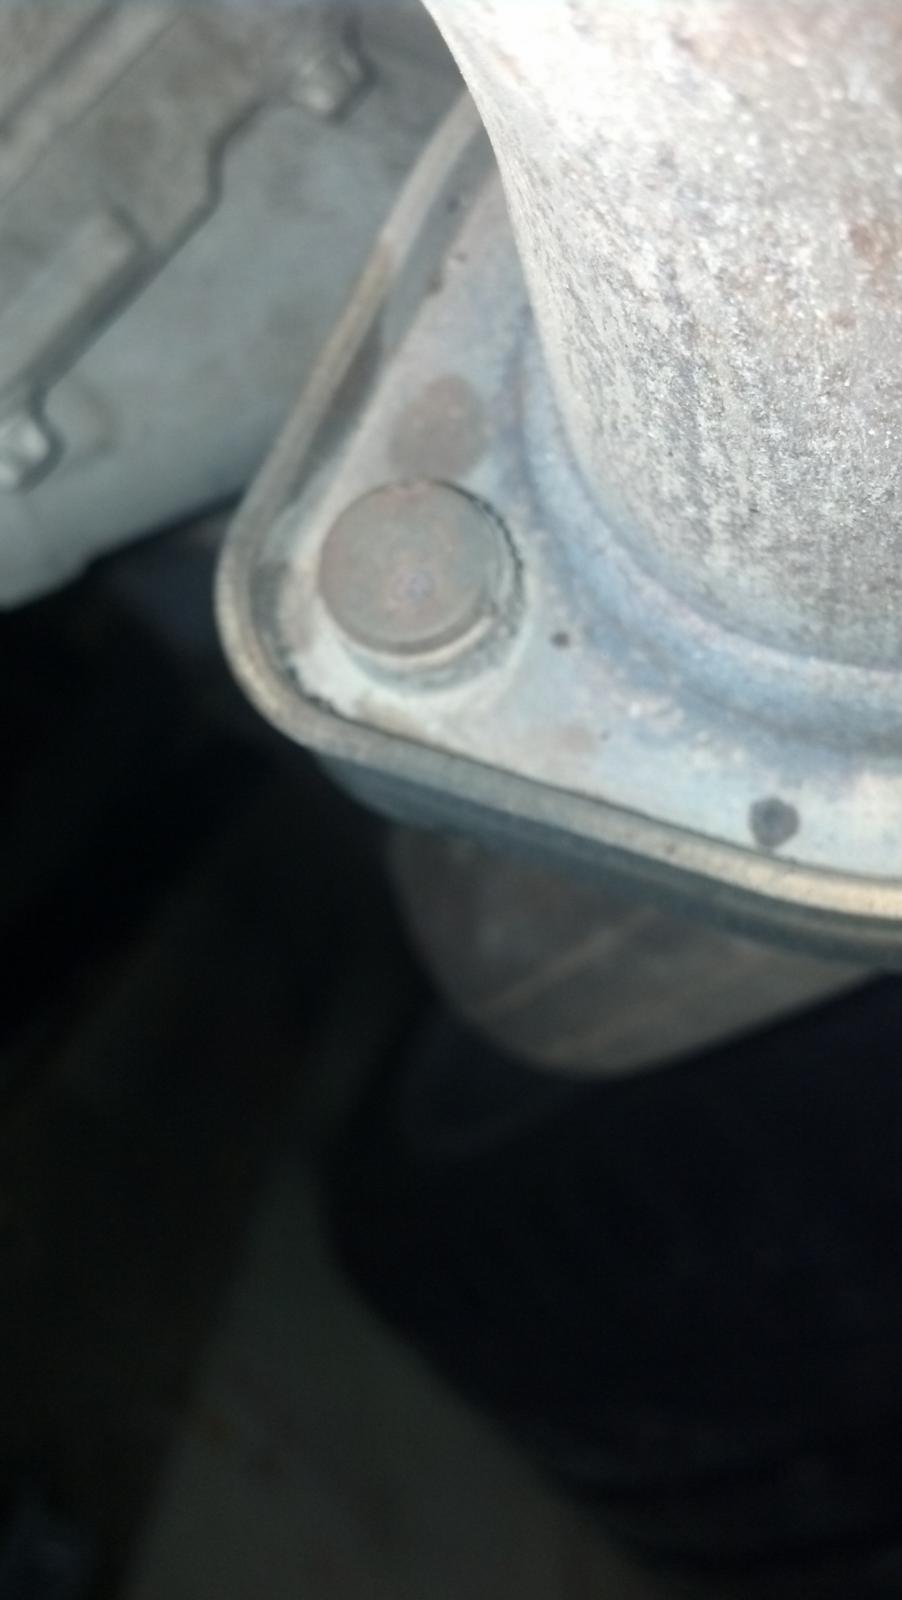
As an update to my original post, finally decided to get under the car and inspect the flange bolts, or better put, studs and they are indeed what look to be pressed in studs. They are not hex head screws as I was hoping. see pics... I know what the PET shows but that must be for replacements. The originals are pressed in studs. So any suggestions for the DIY'er or do I take the cats off and have all the studs pressed out ? Anyone ever try drilling these out ? don't have access to a torch so that's not an option.

-
Thanks, will stick to the Porsche parts as you suggest. Maybe one of the discount Posche parts guys can save me a buck or two on 'em. Never ceases to amaze me what Porsche charges for stuff as simple as nuts and bolts. As always your informed guidance is appreciated.
-
Correct. So they are screws and should be extractable from the cat side of the flange ? Any reason not to use upgraded SS blots and nuts ? Will a high quality antiseize hold up to the heat over time to be of any use ?
-
Can someone tell me how the bolts/studs on the muffler flange that attaches the center mufflers to the exhaust manifolds are attached ? Are they press in studs or just bolts ? Snapped one off and need to replace. If pressed in can they be replaced without removing the center exhaust from the car ? if so and tips and same would be appreciated.
-
2014 lease question
dphatch replied to WTL's topic in 997-1 Series (Carrera, Carrera 4, Carrera 2S, Carrera 4S)
Go to leasecompare.com and fill in the compare payments form to gt an idea what the payments should look like. Lots of info there about how leases are calculated and what the key factors are ie.. Residual, depreciation and the money factor. If you want to know what interest rate you're actually paying multiply the money factor by 2400. The result is the interest rate. You can compare that number to your local bank or bigger banks who advertise lease deals on the internet. -
2014 lease question
dphatch replied to WTL's topic in 997-1 Series (Carrera, Carrera 4, Carrera 2S, Carrera 4S)
The residual is what the bank estmates the car will be worth to a wholesale buyer at the end of the lease. As the bank is not in the used car business all they want to do is cover the back end of the tansaction to insure they get the desired return on the money they are lending on the lease. Now there are two people who have an option to buy the car from the bank at lease end, the lessee and the dealer, with the lessee having the right of first refusal. Banks don't care who pays the residual value, they just need to get the pre-established used value at the end of the lease to insure the transaction has been profitable. As options have limited value when a wholesaler looks at a used car, they are discounted accordingly when residual values are calculated. Lease a car or buy it, you take the full hit for any depreciation, not the bank. -
That's a tough one to find anything about on the net except that it's a costly unit and buying a used one could be an expensive crap shoot. If you want to continue using it as your phone interface dealer could tell you best. A cheaper approach for BlueTooth interface would be to replace it with an after market unit like the Dension BT500 for about $ 500 ( give or take ) Installing it calls for disconnecting the stock unit, it functions the same way and maintains the full functionality of your PCM. Can be done as a DIY project and there are lots of DIY's on it available.
-
2014 lease question
dphatch replied to WTL's topic in 997-1 Series (Carrera, Carrera 4, Carrera 2S, Carrera 4S)
MRM is the Maximum Residualized MSRP that a vehicle can have that is used to calculate depreciation. All dealers do it that way because that's the way the banks that loan the money for the lease do it. -
Not lack of interest but lack of hands experience with the problem I suspect. As logray suggested, and regardless of the problem, it would require removal of the tranny to investigate. As you had already come to that conclusion, wasn't much else anyone could offer unless they had experienced the same issue. None the less, good to know about the change in release lever for those who maybe tackling the same project in the near future.
-
Tire Pressure sticker removal
dphatch replied to dphatch's topic in 997-1 Series (Carrera, Carrera 4, Carrera 2S, Carrera 4S)
Thanks Loren. -
What's the best way to remove the Tire Pressure sticker inside the driver side door jam ? /Mine has been scratched by the seat belt buckle and I bought a replacement. don't want to scratch the paint in the process of removing the old one. Heat gun, Googone, just peal it off ....?
-
Oil Level Check after refueling
dphatch replied to jl-c's topic in 997-1 Series (Carrera, Carrera 4, Carrera 2S, Carrera 4S)
My experience as well. No matter what or where, if the car is started with a fully warmed engine the timer counts down from 5 minutes (which is stated in the owners manual instructions as condition # 2). -
Oil Level Check after refueling
dphatch replied to jl-c's topic in 997-1 Series (Carrera, Carrera 4, Carrera 2S, Carrera 4S)
I have read that section before and didn't interpret it the way you have but now I'm curious. Have never bothered to check the oil after refueling because, as you say, it takes forever. But, reading the section again it suggests that getting an instant reading is possible within 15 minutes of a fill up of a fully warmed engine. II will try it next time I fill up and see what happens. My expectation is that I'll get the 6 minute countdown clock but we'll see. Will post my results here. -
Oil Level Check after refueling
dphatch replied to jl-c's topic in 997-1 Series (Carrera, Carrera 4, Carrera 2S, Carrera 4S)
Turn the key to the accessary on position, which requires you to turn the key twice until all the system check lights appear in the center gauge. Vertical bar graph will show up in the center display, 5 seconds later it gives you a reading when engine is cold. When engine is hot The proceedure is the same but the countdown timer will show a longer time period before the reading is displayed. The auto close function works. You need to reset the window position sensor by holding the window switch while the window goes all the way up, let go of the switch, then hold it again until the window goes all the way down. Do it for both switches. -
rear wheel bearings
dphatch replied to Mijostyn's topic in 997-1 Series (Carrera, Carrera 4, Carrera 2S, Carrera 4S)
I don't know about that, we have had customers actually blow the CV boots right off the car while cleaning the underside with a power washer. And, as I noted earlier, we do not see any more wheel bearing failures on 986/987/996/997 cars than we do on other makes; the bearings are pretty sturdy on these cars. And while they are designed to deal with rain and road salt, I'm reasonably sure they did not consider what would happen to them when their seals get hit with a 3,200 PSI steam of water and detergent.......LOL. 3200 PSI with a 10% tip will blow holes in concrete. In that context I would agree power spayers should not be used to clean your car. I haved used a 2500 PSI unit with a 40 % tip for years with no ill effect whatsoever on all my cars including three Posches. -
Alternator terminal B+ access
dphatch replied to dphatch's topic in 997-1 Series (Carrera, Carrera 4, Carrera 2S, Carrera 4S)
Voltage drop testing is the best way to find the problem because it is dynamic. Your testing the actual components with out disturbing any connections that might be the issue. As a factory trained tech I use voltage drop testing as one of my first diagnostic testing strategy's. Today's cars have up to 75 + computer modules on board and most of our problems come form bad grounds and or resistance connecting circuits.The problem with only using an Ohm meter is your not testing the circuit under load so is might ohm out as good but will fail when you put a load on it. Diagnostic Auto Lab I tested the cable after it was removed so there were no other connections involved. Was going to do the drop test first but the b+ lug on the alternator isn't very accessable and wasn't sure if the " bent coat hanger" approach would give me a valid reading. Your point about the cable not being under load makes sense and eases my mind a bit as there was no doubt that changing the cable corrected the problem. Was just expecting to get further confirmation from the Ohm readings. Thanks for your help. -
Alternator terminal B+ access
dphatch replied to dphatch's topic in 997-1 Series (Carrera, Carrera 4, Carrera 2S, Carrera 4S)
As an update, finished installing te new cable and the difference is night and day. Car starts as it should when hot or cold. Hasn't been on the charger for a week and shows no signs of weakness when starting. Re-testing voltage readings. Battery static - 12.81, battery with engine running and full load (AC,RADIO, FAN, both heated seats) 14.7 . Durametric reading with car running and full load 14.6. Now, one odd test result I received was the Ohms reading I took on the old cable after it was removed. While I can't zero out my DMM, the reading while shorting the DMM cable + to - and the readings from the cable were the same which suggests there is no resistance evident on the cable. All the connections when I removed the old cable where tight and clean with no signs of corrosion. Am stumped on this one as the old cable was deffinately the weak link in the system. Short of both my DMM's being bad (a bit of a stretch) or a weak connection point, how is the reading of no resistance in the cable possible ? -
you dont have a link to the DIY do you? your link just brings me back to the top of the page and i searched RL but couldnt find any posts by "equinox". i am planning on doing this sooner or later so would like to find all the DIY's i can. thanks! Here are the two links I referenced. Equinox's was the original poster of the process and the second guy added his thoughts after doing the install using some of Equinox's original post. Got the website wrong in my post above. Was not rennlist. Good luck and if you have any questions let me know. http://www.6speedonline.com/forums/997/263679-high-mileage-06-carrera-s-journal-equinox-4.html starts at post # 53 http://www.6speedonline.com/forums/997/289189-3-8s-how-replace-alternator-cable.html I did not remove the AOS to get to the cable as it wasn't necessary. As for the cable, If I had a heavy duty cable cutter I would have cut the lug ( heavy attachment point where the starter and atlernator cables attach to each other ) off the old cable to facilitate it's removal from the car. New cable is much easier to put in with the new lug in place because the cable is more supple. I tied a standard house hold conduit gound wire to the new cable at the lug to help guide it into the engine bay from above. Two sets of hands would be better but I only had a one. One more thought, remove the clips from the old cable before attempting to extract it. The cable comes with new ones so study how they work before you remove the old ones. I removed from the new cable before installing it. They can be re-installed once the cable in in place.
-
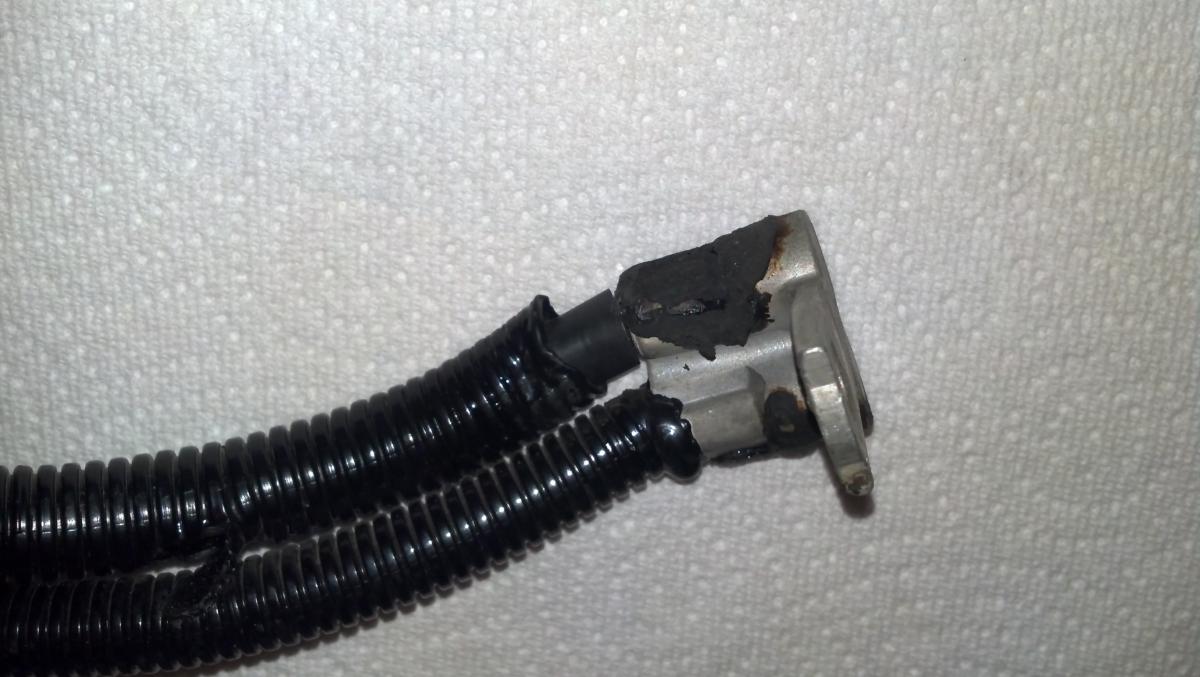
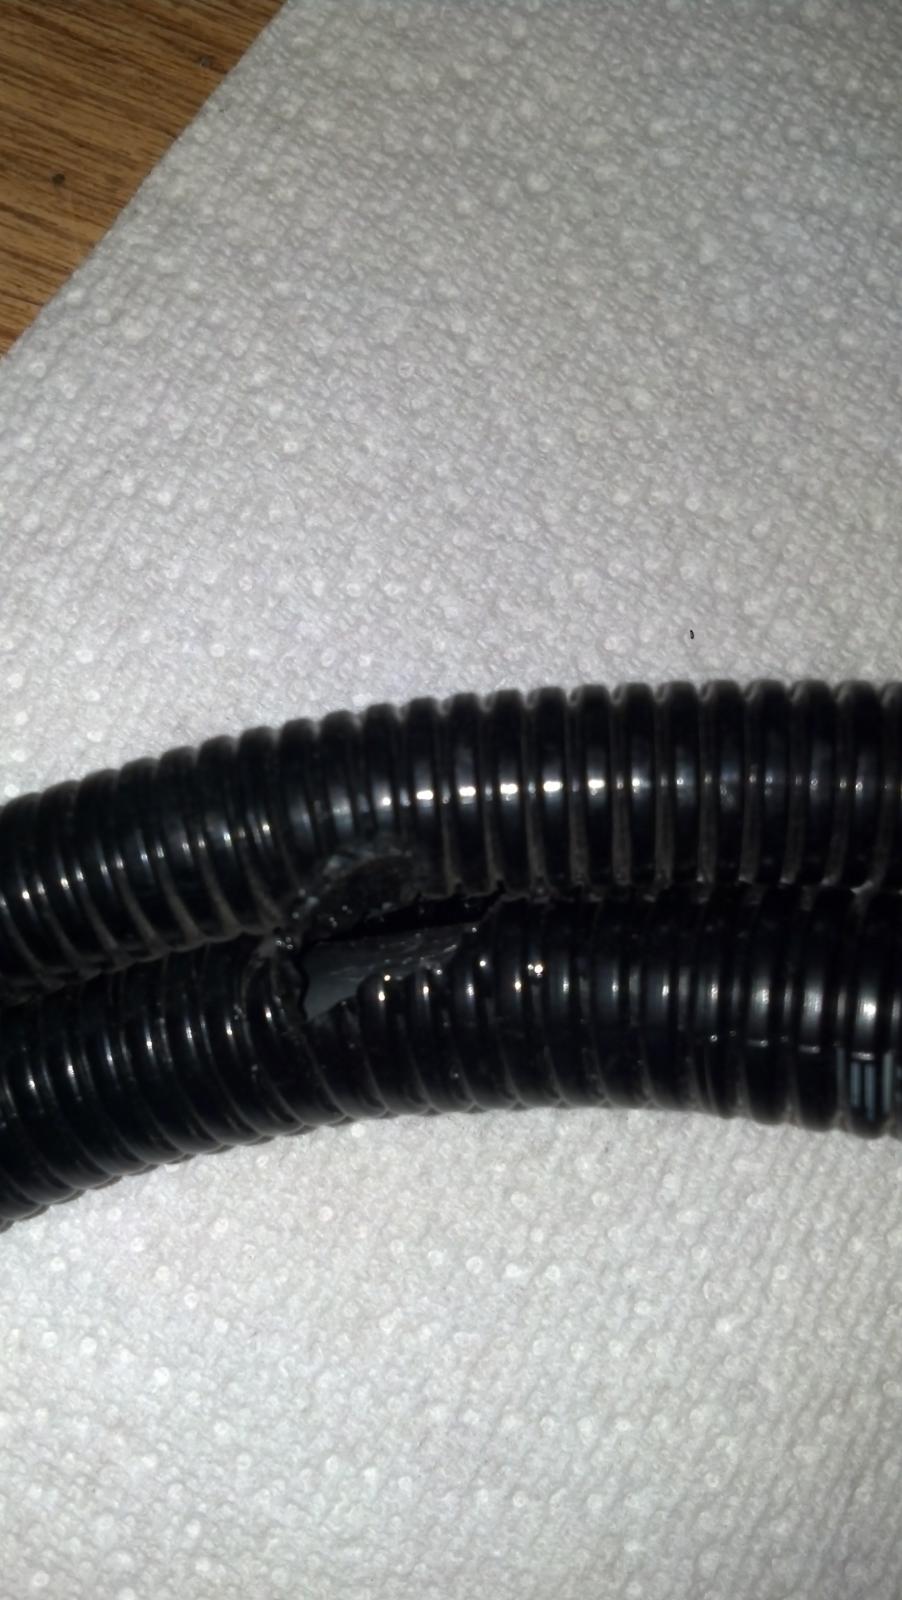
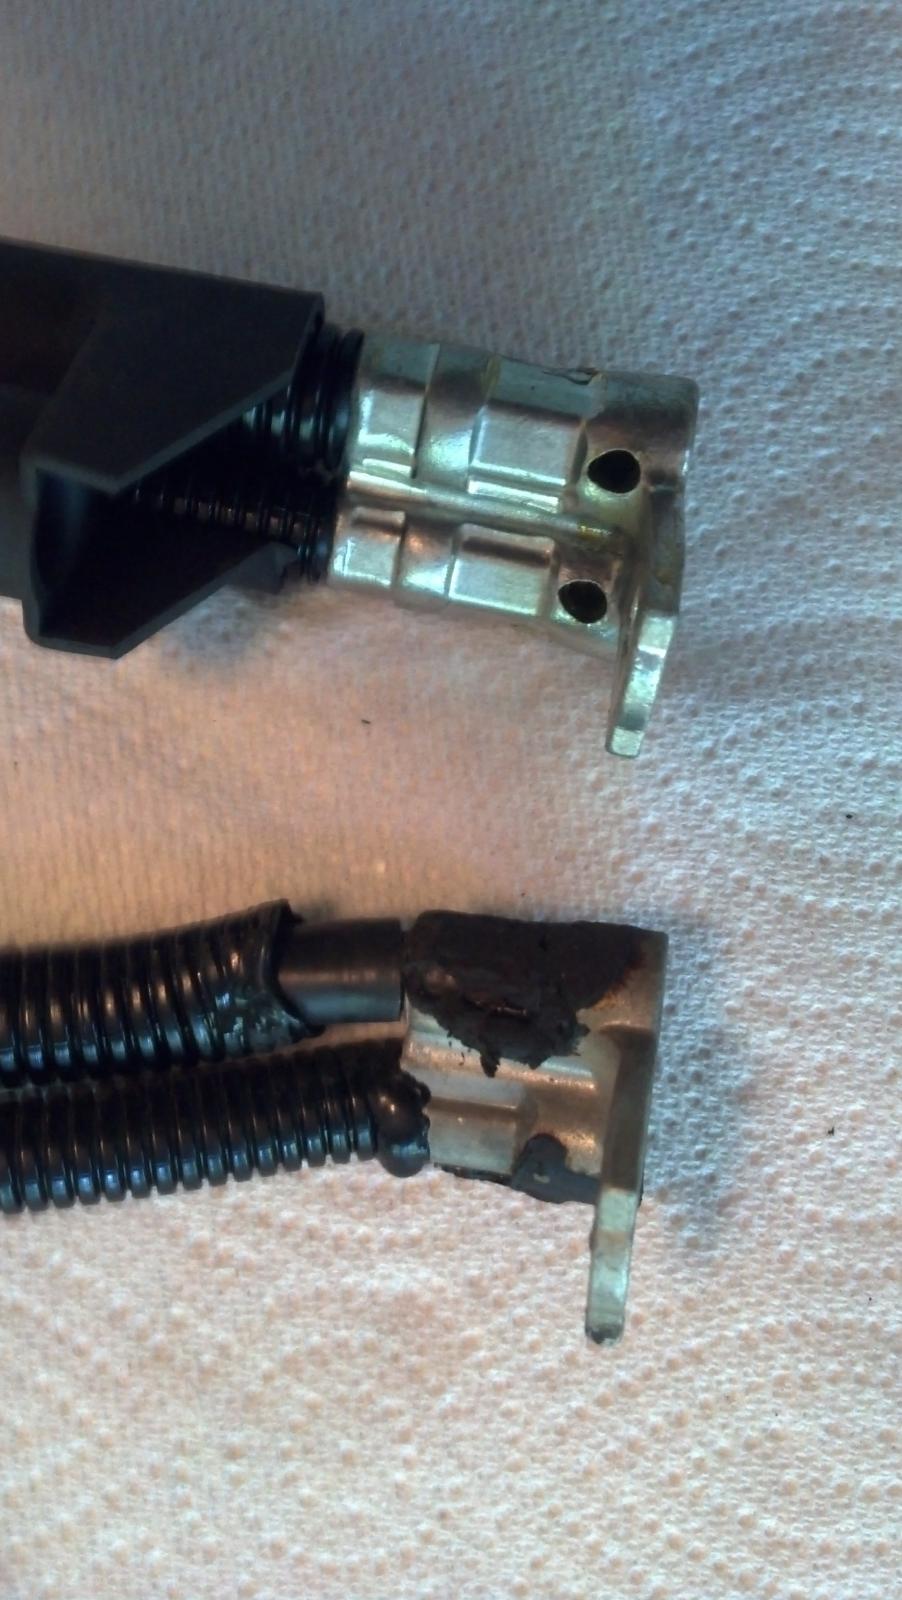
Just finished installing a new alternator to starter cable and the thought I'd share a couple of pics of the old cable, a hint on replacing the ac compressor and the results of the install.First a couple pics of the old cable.Note where the rubber insulator melted to the attachment lug to the starter. You can also see some melting of the plastic cable wrap at the lug and a little further down.Little better pic of the melted point on the cable wrap. Might just be from engine heat but this cable doesn't come in contact with exhaust headers at any point in it's routing.This is a pic of the new and old cable starter attachment lugs side by side. New cable appears a bit thicker than the old and, as you can see, the primary attachment lug for the starter is a good deal more robust than the old one.As for the procedure, my thanks to equinox's DIY on the subject on 6speedonline.com, without which I would not have been able to attempt nor complete the swap. One helpful hint I might offer to his writeup is shown in the pic below.To simplify the re-install of the ac compressor I attached zip tie to the rear most bolt to keep it up and out of the way during the re-install. once I had the compressor back in place and had re-installed to two bolts in the front of the compressor, I cut the tie, holding on to it make sure it didn't wind up in nether regions of th engine bay, and the bolt fell right into place. Overall the install is challenging but not impossible if you have a fully stocked tool chest and some free time on your hands. The OOP savings over what a dealer would charge you will almost buy you a new set of Michellin Super Sport tires.As for the outcome, the difference is nothing less than amazing on my car. Can actually start the car with radio and AC on immediately after shutting down a fully warmed engine in the dead of summer and the car had not been on the trickle charger for at least 5 days. I started the process of removing the old cable a few days before the new one arrived and finished the day after. And while this wouldn't be a big deal on any other make of car on the planet, it is on this model 997 and well worth doing if you experience slow starts when your engine is hot.
-
Alternator terminal B+ access
dphatch replied to dphatch's topic in 997-1 Series (Carrera, Carrera 4, Carrera 2S, Carrera 4S)
My "secret weapon" for the B+ terminal :) A solid core insulated stiff wire hooking from the back of the alternator, with about 1/4" of metal wire exposed. Just conenct it to your multimeter first, then probe the back for a quick reading. You have to hold it by hand otherwise it can't stay connected though but it's good eough for checking v drop of that starter/alternator cable under load. Wear protective glasses and be very careful pooking around the rotatating pulleys and the always live terminal though. I got a v drop of 0.4v sometimes between the B+ and the engine +ve jump start point in the engine bay (low beam and a/c ON) so I knew the cable is bad. Removed it and saw lots of corrosion at the starter end. Replaced it with the latest cable and now the v drop is not even 0.1v under the same condition.Clever approach. Is the engine running or are you measuring while energizing the starter ? Where is the +ve jump start point in the engine bay ? Not familiar with that but will google it . -
For those who use this particular weight of Mobil 1, Walmart has the 4.7L (5Qt) jugs for $ 22 and change . Have never seen it that low anywhere. Must be becoming more popular.
-
Alternator terminal B+ access
dphatch replied to dphatch's topic in 997-1 Series (Carrera, Carrera 4, Carrera 2S, Carrera 4S)
Posted results When we get a car with a suspect cable problem, we disconnect the cable and check it for internal resistance using a digital multimeter. These cables should have no resistance; if we find any, the cable gets replaced. This is a fairly common problem. You can do the same thing by measuring voltage drop to get to the same place, but you need to be cautious because that method cannot pinpoint which cable is the problem if the harness has more than one cable or a connector in it. So comparing the results from the Durametric to the voltage reading at the battery + terminal won't offer confirmation ? As an update, checked the Durametric voltage at DME and it reads anywhere from 12.96 to 13.12 with AC, Radio and front cooling fans and engine at idle. Voltage at battery + terminal under the same conditions varied between 13.10 and 13.56. Engine was fully warmed up. A system that is in good shape (battery fully charged, cables good) should show a static voltage (engine not running) of around 12.6V at the battery. Engine running on a system in good shape, you should be seeing 13.5-14.5V at the battery. At a minimum, your voltages are a bit low. Check the system again, engine running but everything else turned off; if the Durametric voltage is not in the 13.5-14.5V range either there is an alternator/regulator problem, or one or more of the cables are high in internal resistance.Posted results, with everything I could turn off turned off, in above post. Many thanks for your help. The voltage readings you listed where most helpful and the first time I have seen them listed together presenting a much clearer undersanding of what I should be looking for in the results. As noted will post retest results once I install he new harness. Elimination of my starting issues further supports the fact that this issue is not limited to the '05-'06 models.