Welcome to RennTech.org Community, Guest
There are many great features available to you once you register at RennTech.org
You are free to view posts here, but you must log in to reply to existing posts, or to start your own new topic. Like most online communities, there are costs involved to maintain a site like this - so we encourage our members to subscribe or donate. All subscriptions and donations go to the costs operating and maintaining this site. We prefer that guests take part in our community and we offer a lot in return to those willing to join our corner of the Porsche world. This site is 99 percent member supported (less than 1 percent comes from advertising) - so please consider an annual subscription or donation to keep this site running.
Here are some of the features available - once you subscribe RennTech.org
- View Classified Ads
- DIY Tutorials
- Porsche TSB Listings (limited)
- VIN Decoder
- Special Offers
- Paint Codes
- Registry
- Videos System
- View Reviews
- and get rid of this welcome message
It takes just a few minutes to register, and it's quality Porsche information at a low cost.
Contributing Members also get these additional benefits:
(you become a Contributing Member by subscribing or donating money to the operation of this site)
- No ads - advertisements are removed
- Access the Contributors Only Forum
- Contributing Members Only Downloads
- Send attachments with PMs
- All image/file storage limits are substantially increased for all Contributing Members
- Option Codes Lookup
- VIN Option Lookups (limited)


Popolou
-
Posts
146 -
Joined
-
Last visited
Content Type
Profiles
Events
Forums
Exterior Paint Colors
Downloads
Tutorials
Links Directory
Collections
Classifieds
Store
Everything posted by Popolou
-
cracking noise fron the soft hood
Popolou replied to roanne4's topic in 987-1 Boxster Convertible Top Issues and Solutions
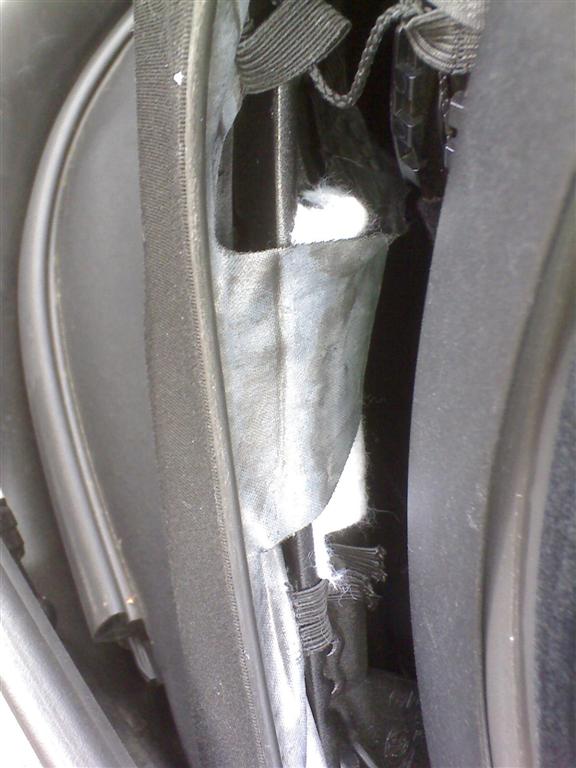
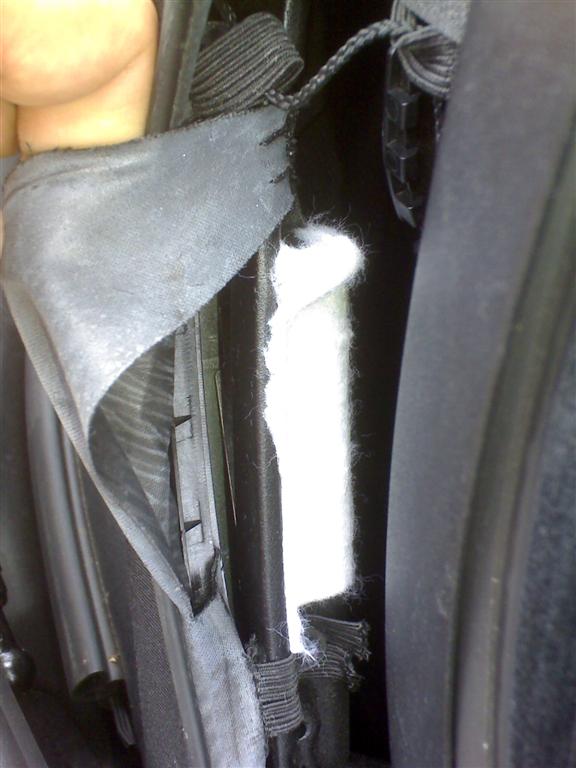
If you look at the picture on the prior page it was frayed exactly where the red felt pads were placed. That's were a small part was cut out by the dealer. To add to the renewed discussion, i'd been meaning to send in some pics of the fix on what the end result was that rid me of this little niggle. It was as simple as purchasing some felt tape (or equivalent) and working it around the area to reduce the friction. This is how it currently looks: - I just had to be sure that all surfaces that the strap is in contact with were sufficiently covered to prevent any contact with the plastic. Other than that and how always it's the case, a pain to discover but simple to remedy. Regards Pop
-
cracking noise fron the soft hood
Popolou replied to roanne4's topic in 987-1 Boxster Convertible Top Issues and Solutions
Must admit that i really would have thought something official would have come out about now. Back when this was an incredibly annoying problem i had the chance to show a tech how i went about curing the problem. It was a simple matter of putting the soft top in the service position which would drop the tension on the (tension) cables allowing you to pull back the canvass. You will then see a triangular fabric by the corners (as per my previous post) that looks rather worn and battered. Simply put either a wide piece of tape or smooth adhesive cloth/felt pad on the plastic bracket that it rubs on and the clicking sounds disappear for good. :thumbup: If someone comes across info on the official fix, do post up as i'd be interrested to see how they solved it. Regards pop -
No regrets - actually, i consider it some of the best of my hard earned i've spent on the car. The film doesn't end up embedding any of the road debris or the like and instead does a good job or repelling all but the largest of objects. If the installation is a good one, the film should last for quite a while yet; i'm currently running on almost 2.5 years now and its held up to most that's been thrown its way. Maintenance of the film is not a big deal tbh, it just requires a wash and wax like the rest of the car. Some films come with a clear coat and others come without so you will need to do a little homework beforehand (mind you, IIRC they may all come with a layer of clear). Being plastic it has memory so any small grazes will pop out with a little warm water say and manipulation. Whereas in the past you will also have a partial bonnet covering, the manufacturers now produce a larger film for greater coverage so you won't get any borders. Removal is simple. You can either wait for a warm day and have the film bathes in the direct light, or use something like a hair drier to heat up the area and remove the film bit by bit. It will come off without any hassle but on the odd occasion you may need to use a little cleaner to remove any residue. The peace of mind it offers knowing its there is very appealing. Before it was on i could hear and gringe each and every knock i end up collecting. Regards Pop
-
I've heard of talk that this is easy too, but suspected it to be more relevant to the 986. Still, would be interested to know how winding back the clock is possible. Nonetheless, yes you can check using the PIWIS the operating hours (or something to that effect) that is clear evidence on the use of the car. There are several posts on this issue and there is an accepted ratio that converts the number of hours into meaningful mileage to help correlate with the mileage on the clock. I think there was talk of approx 30 miles for each hour. Pop
-
It's a front bumper removal job unfortunately. Pop
-
Not to worry as i am sure it was like this when it arrived. The update being restricted to the PCM and navigation, it wouldn't affect the components on the MOST bus and so wouldn't be responsible for the little glitch. As long as the car is under factory warranty, you should have no problem in showing them the exclamation marks. Just probably best not to go about explaining the update you carried out. ;) BTW, ask them to carry out severel recalls to the PCM that may not have been done yet. They may say that unless you identify a specific problem, they won't perform these "campaign" items. If they do seem unreasonable, this site lists all the bulletins the OPC's themselves get sent which include faults with the PCM which were subsequently rectified. You'll need to be a contributing member however. Pop
-
Off the peg, i'd say no it's not compatible, unless you also have the PCM update CD that is required to bring the revision level of the unit to one that accepts the Map DVD. The PCM units have three Model Levels currently (well 4 if you count the "+" level too) and they range from the earliest at pre May 2005 cars to those afterwards. The May '05 cut off date relates to a hardware change, but if you do a search you should find some more info on the boards. Don't confuse the previous PCM v2 units with those in the 9x7 cars which come with the PCM v2.1. If you hit the MAIN and TRIP buttons together and go into the PCM menu, look for the entry TARGET and ACTUAL. These tell you the actual software level for the PCM deice itself and one relates to what is installed, and the other relates to what the MOST bus is expecting to see installed. If you have exclamation marks on the entries, it means that you will need to get the car down to the OPC to do a module discovery with their PIWIS machine they have available in-house. There is a mismatch with what devices are installed on the MOST bus and that detected by the PCM. It shouldn't cause any loss of functions however, but is a nuisance nonetheless. Pop
-
White, you don't work in the Bat Cave by any chance? :D Pop
-
Informative post Loren. Does this scale ring true for the other 9x7 cars? Cheers Pop
-
Well strictly speaking it was part of the 9x7 range from new. But i'd suggest you pay a visit to a local breakers yard because i suspect that'd be the easiest way to get you hands on one. Pop
-
I suspect the reason is because the alarm control unit needs to be resync'd with the key fob once again. I do not have the information to hand, but it has been covered here in the past. IIRC, it involved inserting the key into the ignition, turning one position and holding down the remote button on the fob for a few seconds. Pop Ps: Just to add that the fact the alarm triggers means that the CU is working fine.
-
Also check glovebox and centre armrest storage. Pop
-
Hard top left marks?
Popolou replied to swynn97's topic in 996 Series (Carrera, Carrera 4, Carrera 4S, Targa)
There has been a report on here where an OPC had overtightened the hardtop when fitting once the car had completed the PDI on customer collection. On first removal, the rubber membrane that runs the perimeter of the hard top that touches the clamshell had work into the clear coat leaving a quite apparent mark. The OPC repaired it FoC and acknowledged the mistake. The indentations, are they three equal sized circles around halfway on the soft top? If so, these circles that you see are for the bump stops on the underside of the clamshell. There is nothing that can be done about them unfortunately, and they seem to get worse if you'd lower the top when its slightly damp. Others have tried inserting a small material to protect the lining, but this will not allow the clamshell to settle flush when parked and may cause undue stress on the linkages. The hardtop itself does not touch the soft top when installed. Pop -
Short Shifter Fears!
Popolou replied to donlycan's topic in 997-1 Series (Carrera, Carrera 4, Carrera 2S, Carrera 4S)
I did have the tool, unfortunately, I had no info on use. To my earlier question, if all works, is all OK? Don If the gear shift pops out of gear or you feel there is not enough movement to engaging a gear, then you'd need to realign the cables using the tool. This may not happen immediately, but you may be in the clear. Be aware however, that because the short shift reduces travel, it increases the forces on the joints/linkages. If the cables are not correctly aligned and you start having the above problems, you run the risk of doing damage. Pop -
Short Shifter Fears!
Popolou replied to donlycan's topic in 997-1 Series (Carrera, Carrera 4, Carrera 2S, Carrera 4S)
To echo RFM's post, you need the green alignment tool to ensure the new SS is in the absolute neutral position before you connect the cables to the linkages. You say you purchased the OPE units - did the tool not come packaged together with the frame? As long as you made sure that before you removed the linkages from the original item, the cables were both in the neutral position, you can set the shifter shaft by eye (if you didn't have the tool) and without moving the cables, connect them as close as possible to a neutrall positioned SS. In other words, its perfectly possible to set the OEM SS without the green alignment tool, but it'd take a little more preperation and checking, whereas the tool would allow a bolt on, clip on and refit in half the time. Pop -
Two ideas for you. 1. Get a can of a protectant and water resistant spray called Scotchgard. There are two variants, one for indoors and another heavy duty version for canvass/convertible roofs. Spray the interior/mats with the stuff and once dry it should make things a doddle when cleaning. 2. Get black mats. I went and purchased the black mats from Costco that complements the interior and breaks up the beige just right. They sit ontop of the originals. Also, may be a little too late, but dealers normally spec mats for free. Try going back to them and have them to order a set complimentary. Pop
-
When you remove the rear console, just in front of the gearshift frame is an orange/red coloured box. This is the SRS control unit. If you removed any cables or dislodged the box sufficient to cause the cable to come loose, you'd see an error like that. Pop
-
Bose system automatic vol and eq adjustment
Popolou replied to ariarec's topic in 987-1 Series (Boxster, Boxster S)
Yes, but lower down in the volume range. There is a level above which it won't operate. Pop -
If you choose to enable the sport chrono mode via the Sport button, then yes as well as making the car more responsive to throttle inputs, it will retard the PSM slightly too. It will not be off entirely unless you manually hit the PSM button. Pop
-
Shame about the turn of events. However, i think you're giving up too easily. You clearly seem confident handling electronics so why not have another attempt to see what may have gone wrong with the unit if indeed you did do something wrong first time round. I can't see you doing any more damage tbh. Failing that, consider salvage yards. They tend to get a number of Porsche's in on a fairly regular basis (troubling :( ). Douglas Valley come to mind. Regards Pop
-
Porsche i-Pod kit
Popolou replied to PDQ911's topic in 997-1 Series (Carrera, Carrera 4, Carrera 2S, Carrera 4S)
Does this hook-up really work? I had never seen it before and it seems like a viable, if less high-tech, option to Nav-Tv and Dension which would not require tearing the electronics apart. Should do, it's a Porsche approved solution afterall and available as part of the Tequipement range. Less high-tech is exactly what it is. The sound quality will not be up there with the Dension/Mobridge/NavTV solutions because of the limitations of FM. It will also neccessitate music control via the MP3 player itself. If you approach the official unit as a compromise, its a good piece of kit. As an audiophile-level component, it's below par. However, the trick is to get it at a reasonable price as spending only a few more of your hard-earned and the alternative solutions would come across better. Pop -
75mph equals 72gps?
Popolou replied to PAULSPEED's topic in 997-1 Series (Carrera, Carrera 4, Carrera 2S, Carrera 4S)
Its all by design. The true speed is as recorded by the GPS. The indicated speed on the speedometer includes a margin for error that all manufacturers include now. I believe its between a 5% - 10% variation. This is assuming, of course that the car is standard and the diff and wheels are all OEM. Pop -
Dension Porsche Post installation blues
Popolou replied to pppp240's topic in 986 Series (Boxster, Boxster S)
I've heard a few similar problems where the installation was made to a switched 12v. The instructions were'nt very clear but it should be to a permanent 12v supply. My 2p. Pop -
Was wondering if anyone has any useful tips for maintaining the smooth running of the convertible top and clamshell. I've noticed a brief increase in faults for Cab cars in general and this got me thinking as to whether people just leave the system alone since it "ain't broke" or if the apparent complexity of the top mechanisms scare the owners from the off. Especially with the ability to open when rolling, i'd have assumed that ensuring that all critical joints and gears are well oiled and lubed for least resistance would go a long way in preventing any failures or premature wear. What's everyone's thoughts on this? Cheers, Pop
-
Porsche i-Pod kit
Popolou replied to PDQ911's topic in 997-1 Series (Carrera, Carrera 4, Carrera 2S, Carrera 4S)
In essence, it's an FM modulator w/ antenna pass through. Once you have the storage compartment adaptor all wired up and fixed down to the console, the main harness routes along the underside of the console to the PCM where it would connect to the contol unit that's in the kit, itself afixed in any space below the PCM. Now, wire in the control unit in-between the main antenna and the PCM. You get an extra antenna/coaxial cable to hook the control unit up to the PCM antenna socket. Then, just supply power via the harness and you should be up and running. Pop