Welcome to RennTech.org Community, Guest
There are many great features available to you once you register at RennTech.org
You are free to view posts here, but you must log in to reply to existing posts, or to start your own new topic. Like most online communities, there are costs involved to maintain a site like this - so we encourage our members to donate. All donations go to the costs operating and maintaining this site. We prefer that guests take part in our community and we offer a lot in return to those willing to join our corner of the Porsche world. This site is 99 percent member supported (less than 1 percent comes from advertising) - so please consider an annual donation to keep this site running.
Here are some of the features available - once you register at RennTech.org
- View Classified Ads
- DIY Tutorials
- Porsche TSB Listings (limited)
- VIN Decoder
- Special Offers
-
OBD II P-Codes - Paint Codes
- Registry
- Videos System
- View Reviews
- and get rid of this welcome message
It takes just a few minutes to register, and it's FREE
Contributing Members also get these additional benefits:
(you become a Contributing Member by donating money to the operation of this site)
- No ads - advertisements are removed
- Access the Contributors Only Forum
- Contributing Members Only Downloads
- Send attachments with PMs
- All image/file storage limits are substantially increased for all Contributing Members
- Option Codes Lookup
- VIN Option Lookups (limited)
Leaderboard

-0001-0001.thumb.png.17f5bb25bf8ec261a17c21e6321c8492.png)
Popular Content
Showing content with the highest reputation on 10/29/2019 in all areas
-
Try 54971 point
-
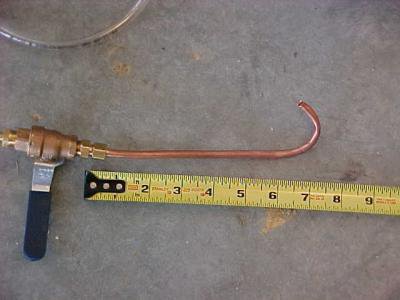 The Tiptronic transmission has a special tool for fluid. First you have to purchase the tool (expensive) or make one (inexpensive). The tool is the V.A.G.1924, runs about $300. You need the following tools and parts to start: 1. ATF fill tool 2. 7 (US) Quarts of Pennzoil Multi-Vehicle ATF 3. Torque wrench for 60 ft lbs 4. Torque wrench for 7.5 ft lbs (90 in lbs) 5. 17 mm allen bit 6. 8 mm allen bit 7. Torx 27 bit 8. Temperature meter with probe. I used an Oregon Scientific with a probe that has a 10 ft cord. 9. Porsche part 986 397 016 00 Paper gasket (Call Sunset Porsche, great guys) 10. Porsche part 986 307 403 00 ATF filter 11. Porsche part 986 397 016 00 rubber ring for fill plug 12. Kitty liter, you will spill 13. Socket set 14. Plenty of rags 15. Oil catch pan 16. Safety goggles First we assemble the filling tool out of parts you can find in Lowes or Home Depot type of homestores: 1. Hudson 1 gallon tank ($9.95) 2. Barbed fittings and 8 ft of tygon 3/8 clear hose. 3. 1/4 inch shut off valve - brass 4. 12 inch of flexible copper tube, 1/4" 5. Assemble as shown below and bend the tube per the picture. The steps are easy to follow: 1. Lift car off the ground and on jack stands. I need 16 inches on the stands to be comfortable. 2. Slide oil catch pan under fluid pan and remove drain plug with 8 mm allen bit 3. Remove the cross arm that traverses the fluid pan. Loosen only one bolt, remove the other. It will be easier for the next step and you can prop the arm to help catch the pan when the bolts are removed. 4. When the fluid has drained, secure drain plug back in and torque to 30 ft lbs. 5. Using the Torx 27 bit, remove all the screws crosswise. Move the cross arm out of the way as needed, but put back in a place where the pan will not fall. THE PAN STILL HAS FLUID in it, be careful 6. Remove pan carefully. The green gasket should still be attached to it. 7. Remove the two screws that hold the filter in place. Make sure the oil catch pan is underneath, the filter will have fluid as well. Remove filter. 8. Thinly coat some petroleum jelly on the suction collar of the ATF filter and install filter 9. Install new filter and screw the two screws to a torque of 4.5 ft lbs. 10. Empty the filter pan into the oil catch pan with all the waste oil. Place the filter pan on a flat surface and remove the gasket. 11. Set the plastic guard cap so the two windows are facing sideways. The holes will be used later for the fill tube and for the temperature probe. Notice how large they are. 12. Use the rags to clean the pan and the magnets in the pan. Set the magnets back to their original location. Here is a nice clean pan and magnets. 13. Place the new gasket on the pan. I used petroleum jelly thin coat on a few places to hold it in place. 14. Fit ATF pan back into transmission, tighten the screws crosswise to 7.5 ft lbs. It may be convenient to use the cross arm as a resting place while you re-attach the pan. 15. Remove the fill plug with the 17 mm allen key. Replace the ring gasket with the new one. 16. Fill the pressure tank with ATF fluid, make sure the valve is closed. Pump the tank to provide the pressure to move the fluid. The clear hose will show the red fluid filling it, and also you will see it running later. 17. Insert the "hook" end of the copper tube into the fill hole, and hook it into one of the holes mentioned before. Insert the temperature probe into the other hole, make sure it is secured. 18. Open the valve and let the ATF fluid begin to flow. You will have to add more fluid to the tank and keep it pumped. When the fluid begins to escape through the hole. It will drip, so close the valve. 19. Start the car. Open the valve to let more fluid into the ATF pan. Keep it pumped. Look at the temperature display on your probe. The temperature should not exceed 45 C. It begins at room temperature, so you got a few minutes. 20. Move the selector to position "P" and let idle for a a few seconds. When the fluid begins to emerge again from the filler tube, close the filling valve. 21. The engine should still be idling, keep an eye on the temp probe. With the brake pedal on, change the transmission through each position, holding the position for 10 seconds. 22. Open fill valve again until ATF fluid escapes from the hole. Make sure the temperature is higher than 30 C, and should be around 40C by now. Remove temperature probe and filler tube. 23. Replace the filler plug and torque to 59 ft lbs. 24. Turn engine off, and take car out for a test. :drive: 25. You are done, check for leaks, clean the spills (cat litter), and enjoy some smooth shifting.1 point