Welcome to RennTech.org Community, Guest
There are many great features available to you once you register at RennTech.org
You are free to view posts here, but you must log in to reply to existing posts, or to start your own new topic. Like most online communities, there are costs involved to maintain a site like this - so we encourage our members to subscribe or donate. All subscriptions and donations go to the costs operating and maintaining this site. We prefer that guests take part in our community and we offer a lot in return to those willing to join our corner of the Porsche world. This site is 99 percent member supported (less than 1 percent comes from advertising) - so please consider an annual subscription or donation to keep this site running.
Here are some of the features available - once you subscribe RennTech.org
- View Classified Ads
- DIY Tutorials
- Porsche TSB Listings (limited)
- VIN Decoder
- Special Offers
- Paint Codes
- Registry
- Videos System
- View Reviews
- and get rid of this welcome message
It takes just a few minutes to register, and it's quality Porsche information at a low cost.
Contributing Members also get these additional benefits:
(you become a Contributing Member by subscribing or donating money to the operation of this site)
- No ads - advertisements are removed
- Access the Contributors Only Forum
- Contributing Members Only Downloads
- Send attachments with PMs
- All image/file storage limits are substantially increased for all Contributing Members
- Option Codes Lookup
- VIN Option Lookups (limited)

-0001-0001.png.112c13ee97acfad0cb1e70d195cc9a0e.png)
Loren
-
Posts
37,902 -
Joined
-
Days Won
651
Content Type
Profiles
Events
Forums
Exterior Paint Colors
Downloads
Tutorials
Links Directory
Collections
Classifieds
Store
Everything posted by Loren
-
-0001-0001.thumb.png.17f5bb25bf8ec261a17c21e6321c8492.png) The Tiptronic codes are also listed here on the site -- Tiptronic P-codes
The Tiptronic codes are also listed here on the site -- Tiptronic P-codes -
Sorry, those are part of the AC/Heater controller. The parts list does not list them separately.
-
PSM switch is 955.613.153.00.6N3 PSM Switch in matt black. I will need a pic or other description for the other switches as I am not familar enough with the Cayenne switches to know which ones you are talking about.
-
Disconnecting Battery
Loren replied to paulg1's topic in 997-1 Series (Carrera, Carrera 4, Carrera 2S, Carrera 4S)
I think it is better to use a charger. Also, if it is going to sit for a long period of time then consider gas stabilizer and tire cradles (or put the car on jack stands). -
Engine Idle Problem
Loren replied to Cesarfl's topic in 996 Series (Carrera, Carrera 4, Carrera 4S, Targa)
:thumbup: -
Unfortunately yes, you need a PST2 or PIWIS from a shop or private owner -- unless you disconnect the connector and hook it up to 12 volts.
-
Engine Idle Problem
Loren replied to Cesarfl's topic in 996 Series (Carrera, Carrera 4, Carrera 4S, Targa)
http://www.renntech.org/forums/index.php?s...ost&p=45536 Item 7 in the diagram. -
Detail:

-
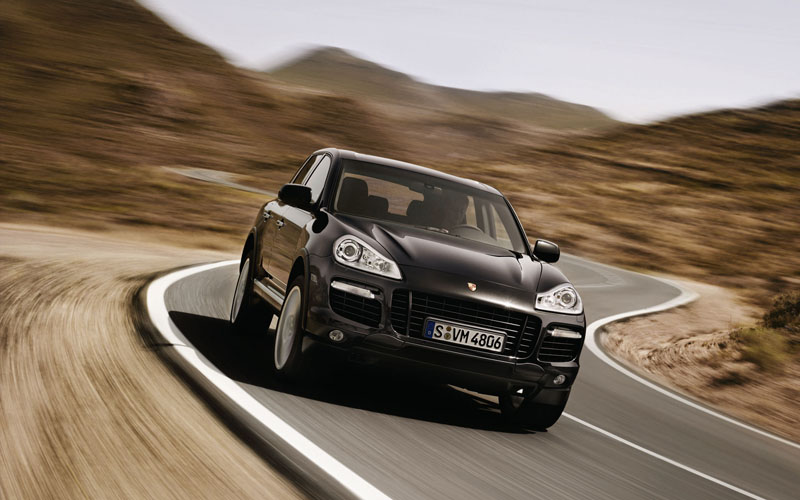
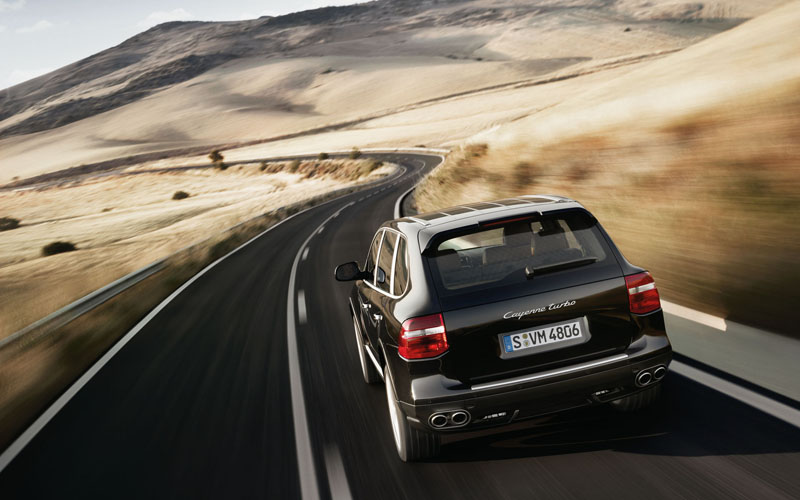
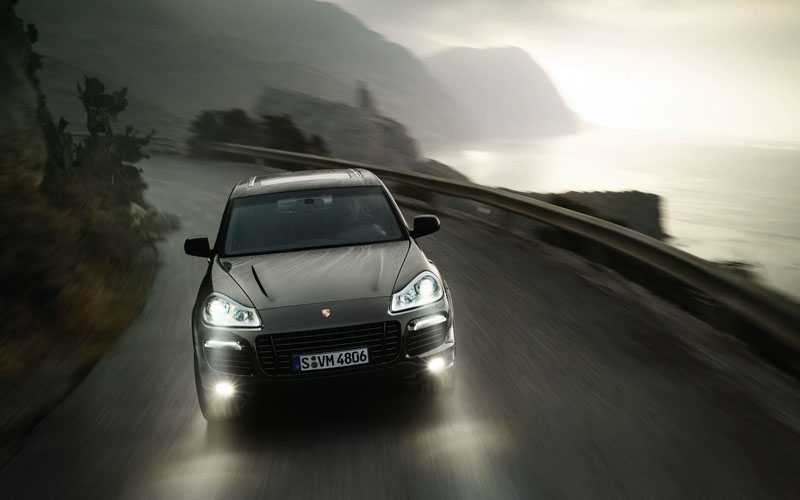
Here are the latest (from Porsche) promo pics of the MY08 Cayenne. Other (sales) details are available at the Porsche website. Order guide(s) are here.
-
http://www.renntech.org/forums/index.php?s...ost&p=42702
-
Deviated Seat Belt Kit - Boxster 987 my06
Loren replied to Westcoaster's topic in 987-1/987C1 Series Part Number Requests
For a MY06 Boxster (987): 987.803.033.02.V02 Left seatbelt in speed yellow -- MSRP CDN $330.95 987.803.034.01.V02 Right seatbelt in speed yellow -- MSRP CDN $330.95 (prices as of November 2006) -
Carnewal.com sells a kit with the parts assembled and ready to put on the car. I don' think Porsche has a kit. You would need to buy shocks, springs, additional springs, upper support mount for the fronts. And for the rears shocks, springs, compensating plates, and upper ring support. Essentially all the X73 parts and assemble them.
-
I don't see it listed as separate item - only the whole switch assembly. Try JeffClark@sunsetimports.com. He may have a better idea if you can order just the lever.
-
Please do not double post - I answered your question here.
-
We have added and/or updated TSBs in the following categories today (16 total): Boxster (986) - 1 Boxster (987) - 3 Cayman (987c) - 3 Carrera (996) - 1 Carrera (997) - 5 Cayenne - 2 Other - 1
-
How to Replace Tiptronic Shift plate
Loren replied to stanman's topic in 996 Series (Carrera, Carrera 4, Carrera 4S, Targa)
Try our Search feature - it works really well ;) http://www.renntech.org/forums/index.php?s...ost&p=10388 -
How to Replace Tiptronic Shift plate
Loren replied to stanman's topic in 996 Series (Carrera, Carrera 4, Carrera 4S, Targa)
If you are talking about the trim around the shifter base - it just pulls up. It is held in by clips. Make sure you find any clips that fall off and reattach them. -
None of the items you mention are factory installed options. They maybe actual Porsche parts but not factory installed. Is the car a US car or ? Use the our VIN decoder here to see what the car originally shipped as. Then look under the front hood for the option codes sticker and you can look up the factory options here.
-
HELP! Strange beep w/aftermarket stereo
Loren replied to tmc's topic in 996 Series (Carrera, Carrera 4, Carrera 4S, Targa)
You likely need to remove the alarm wire from the new radio harness (since it does not support it). Look for a Brown/Blue wire from the original radio connector and remove the pin and tape it (or cut and tape the wire). If the alarm still chirps then you likely need to hook up the Durametric Software, PST2 or PIWIS tool and see where it says the fault(s) are. -
Coolant Tank - yes, I searched before
Loren replied to GOB's topic in 996 Series (Carrera, Carrera 4, Carrera 4S, Targa)
For a MY98 RoW car you need tank part number: 996.106.147.56 This is a third generation tank for the pre MY01 cars. I do not think a MY01 and newer tank will fit in the older cars without some modification(s). (If they did, Porsche would not carry two tanks in inventory - just one). -
Paint Code Request
Loren replied to Powerdna's topic in 996 Series (Carrera, Carrera 4, Carrera 4S, Targa)
Yes, Wurth Silver wheel paint will match well. You will also need Wurth Clear coat. -
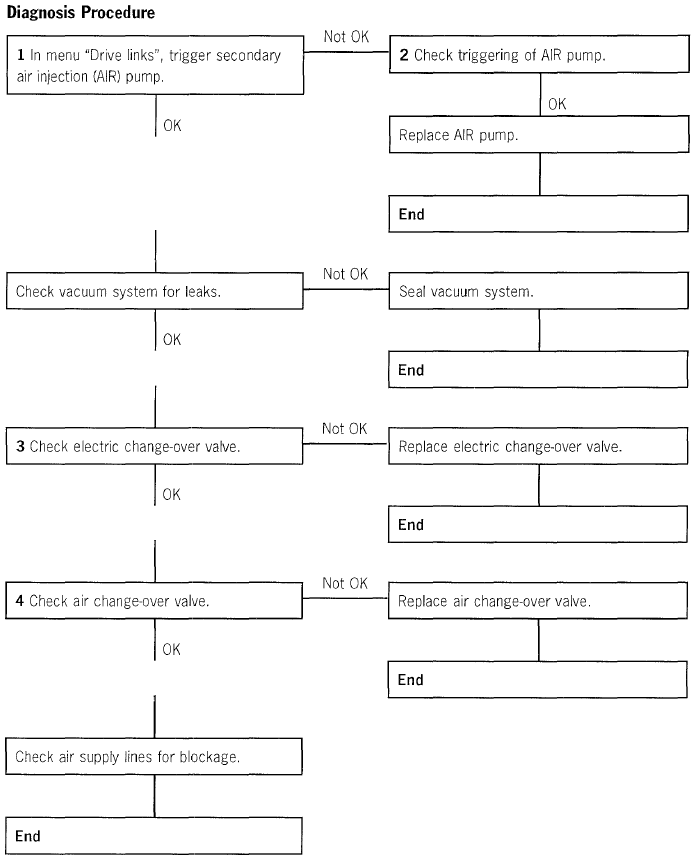
Unknown fault code (ABS 5.7)
Loren replied to Norway996c4's topic in 996 Series (Carrera, Carrera 4, Carrera 4S, Targa)
ABS Fault 4440 -- Steering-angle sensor - The PSM function is switched off. - The ABS function is switched off - The ESD function is switched off - The ASR function is switched off "If the fault codes 4400 Transverse acceleration sensor, 4420 Rate of turn sensor and 4440 Steering-angle sensor are displayed together, there may be an open circuit in the circuit to control module terminal 39." If you want the full diagnostic procedure - send me a PM. -
Tips from past Work On Cars Days... 1. Make sure you have all of your parts - and that they are the right parts. 2. If you are changing fluids (oil, brake fluid, etc.) - plan to bring something to carry them away in. 3. Plan to clean up any spills or mess you make. 4. Help us plan ahead - tell us what you want to do. Depending on the number of people/cars we try not to take on anything that will take more than a couple of hours each.
-
Try LA Dismantlers or Parts Heaven in Northern Ca.
-
Climate Control Display Problem
Loren replied to PJorgen's topic in 996 Series (Carrera, Carrera 4, Carrera 4S, Targa)
With or without AC? US/Canada car or RoW?