Welcome to RennTech.org Community, Guest
There are many great features available to you once you register at RennTech.org
You are free to view posts here, but you must log in to reply to existing posts, or to start your own new topic. Like most online communities, there are costs involved to maintain a site like this - so we encourage our members to donate. All donations go to the costs operating and maintaining this site. We prefer that guests take part in our community and we offer a lot in return to those willing to join our corner of the Porsche world. This site is 99 percent member supported (less than 1 percent comes from advertising) - so please consider an annual donation to keep this site running.
Here are some of the features available - once you register at RennTech.org
- View Classified Ads
- DIY Tutorials
- Porsche TSB Listings (limited)
- VIN Decoder
- Special Offers
-
OBD II P-Codes - Paint Codes
- Registry
- Videos System
- View Reviews
- and get rid of this welcome message
It takes just a few minutes to register, and it's FREE
Contributing Members also get these additional benefits:
(you become a Contributing Member by donating money to the operation of this site)
- No ads - advertisements are removed
- Access the Contributors Only Forum
- Contributing Members Only Downloads
- Send attachments with PMs
- All image/file storage limits are substantially increased for all Contributing Members
- Option Codes Lookup
- VIN Option Lookups (limited)


CJ_Boxster
-
Posts
480 -
Joined
-
Last visited
Content Type
Profiles
Events
Forums
External Paint Colors
Downloads
Tutorials
Links Directory
Collections
Store
Everything posted by CJ_Boxster
-

Noisy Boxster Rear Suspension
CJ_Boxster replied to w_pienaar's topic in 986 Series (Boxster, Boxster S)
Suprizingly YES. If you buy the adjustible control arm, you just jack you car up, remove the tire and then unbolt the control arm itself and while its off you have to adjust the new one to the exact length of the old control arm. There are only 2 bolts that hold the control arm in, and after removing them, the control arm slides out. -
steering wheel or tire problem
CJ_Boxster replied to wignes's topic in 996 Series (Carrera, Carrera 4, Carrera 4S, Targa)
This happens to me also on 2 roads i take to work, the road seems ok but is actually uneven and will cause the steering wheel to pull left then right then left again. If you steering wheel always pulls about 30 degrees at every stop you come to, It could mean that you need your brakes & suspension looked at. Since Anti-clockwise means the car basically turns slight left, that could mean you have a worn out front suspension bushing or bearing OR the brakes on that side are gripping slightly more than the right side and you could just need to have the brakes replaced and brake discs also. -
How many miles could i drive with MAS unplugged?
CJ_Boxster replied to CJ_Boxster's topic in 986 Series (Boxster, Boxster S)
I see, By no means would i bypass the airfilter, I removed the sensor today and cleaned the area around the gapping hole and tapped it up so its got a air tight temporary seal. Its running quite well without LOL i guess my mas was really wakky -
How many miles could i drive with MAS unplugged?
CJ_Boxster replied to CJ_Boxster's topic in 986 Series (Boxster, Boxster S)
Good deal, Ill knock off my MAS on monday and hope to get it tuesday. -
How many miles could i drive with MAS unplugged?
CJ_Boxster replied to CJ_Boxster's topic in 986 Series (Boxster, Boxster S)
It should be, I already drove the car once in the past with it disconnected to diagnose an issue with the MAS, I was given that advice awhile back on the forum, so i already know the car will run better with it unpluged if the MAS is faulty. My question is, How long could i drive it like that. I plan on unpluging it and removing it and plugging the mounting hole until i get the New MAS the next day. -
Reason im asking this question is cause the mechanic that replaced my MAS months ago is replacing it again but for free. He wants me to drop off the sensor and wait till the end o the day for the new one to arrive. Anyone know how many miles i could drive with the MAS unplugged? BTW the boxster is my only car and i dont wanna miss work cause the car is sitting at the shop waiting for a new MAS to be delivered the same day.
-
I would go with dutch treat in gardena, they are less expensive and just as good as the dealer is.
-
CEL MAF code and a P1115
CJ_Boxster replied to CJ_Boxster's topic in 986 Series (Boxster, Boxster S)
Loren Thanks for your help, I replaced the o2 Sensor yesterday and all alot of the missing HP came back and im already noticing that my mileage is increasing, I drove the car atleast 20 miles and spirited too and the fuel gauge needle moved about a millimeter. Literally, the needle was touching the higher edge of the 1/4 mark on the gauge after the install of the new O2 sensor and after the spirited driving i did afterwards and the drive to work this morning... It now touching the lower edge of the 1/4 mark. BTW, i have 104k miles on my boxster and when i replaced the 1 bad o2 sensor, i did not get the cel for the other 3 o2 sensors like some forum members experienced. -
Noisy Boxster Rear Suspension
CJ_Boxster replied to w_pienaar's topic in 986 Series (Boxster, Boxster S)
A set comes with 2 arms, one for each side of the rear. I dont know if they are stronger than stock and i assume you can replace the worn bearing cartridge by unscrewing it from the arm... Send a message to the vendor, im sure he could send you spare bearing cartidges for them for extra money. -
Noisy Boxster Rear Suspension
CJ_Boxster replied to w_pienaar's topic in 986 Series (Boxster, Boxster S)
Heres what the finished product looks like... :clapping: :notworthy:
-
Noisy Boxster Rear Suspension
CJ_Boxster replied to w_pienaar's topic in 986 Series (Boxster, Boxster S)
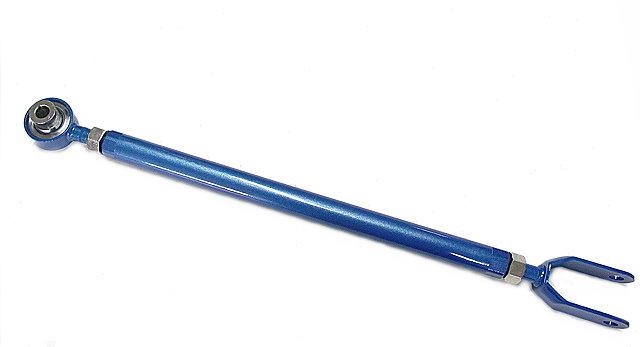
Boy are you all lucky, I have a buddy on another forum that has fabricated some adjustible rear control arms, guess how much for a SET.... $269!!!!!! go here for more info VVV. http://986forum.com/forums/showpost.php?p=...p;postcount=162 -
Seems easy but disconnecting the Seat belt wires momentarily will probably cause the Airbag light to come on and you'll need to pay some big bucks just to turn it back off.
-
Noisy Boxster Rear Suspension
CJ_Boxster replied to w_pienaar's topic in 986 Series (Boxster, Boxster S)
Sorry people, I could not find the time to try and resolve this issue today on saturday, The racks at the shop were full BUT on tuesday i will be going to the shop to attempt to repair the trailing control arm. Ill keep you updated on the progress i make on tuesday. -
Sorry people, I could not find the time to try and resolve this issue today on saturday, The racks at the shop were full BUT on tuesday i will be going to the shop to attempt to repair the trailing control arm. Ill keep you updated on the progress i make on tuesday.
-
Can PSM be disabled?
CJ_Boxster replied to Jeremy Cottrell's topic in 986 Series (Boxster, Boxster S)
I would consult a Porsche race shop... preferibly a shop that has there own race car. And if it were up to me, i would allow you to swap out my non-PSM system for your PSM system. We both live in Los Angeles.... ;-) -
DJ, Hopefully you didnt order the AOS yet, i called the dealer again, they said that the Part Number 996.107.023.03 has already been superseided with a new part number meaning theres been another update, the new part number is 996.107.023.04
-
Noisy Boxster Rear Suspension
CJ_Boxster replied to w_pienaar's topic in 986 Series (Boxster, Boxster S)
Hey guys, This is just so people interested in my progress dont have to wait here for my reply, Ill got word from my father yesterday that I will have access to the hydralic press on Saturday, Saturday i will take pictures of what we did and write out how we did it. So till saturday! -
Probably Suncoast, make sure your getting the one thats got the updated design. Old part number is 996.107.023.02 New part number is 996.107.023.03 To replace the separator, you need to remove the hose(s) from the top, then the two mounting bolts down the side (I think they have 10mm heads). On the bottom of the separator, there is a squeeze clamp. Use some pliers to squeeze and remove the clamp. Don't reuse the spring clamp. When you put the new separator on, put the bottom on first and use a new stainless steel screw down clamp. There is a TSB that suggests replacing the squeeze clamps with screw down types as you do maintenance and remove the old clamps. They can weeken after being removed and cause leaks. Tighten the clamp down so it stays attached, but leave it loose enough so it can rotate. Put the two mounting bolts in and finger tighten them to hold it in place. Connect the hose(s) to the separator, then tighten the mounting bolts and clamp on the bottom of the separator. If you have the time, you should replace the "J" hose that goes in the top of the separator. There is a TSB recommending it since the accordian folds can eventually crack and cause vacuum leaks.
-
Noisy Boxster Rear Suspension
CJ_Boxster replied to w_pienaar's topic in 986 Series (Boxster, Boxster S)
Ok then, Well It seems to be a 50% chance of it working, I like those odds HA. Ill see if I can give it a try today after i leave the shop thats replacing my MAF. I will definatly post my results and anything i did and did differently. -
Noisy Boxster Rear Suspension
CJ_Boxster replied to w_pienaar's topic in 986 Series (Boxster, Boxster S)
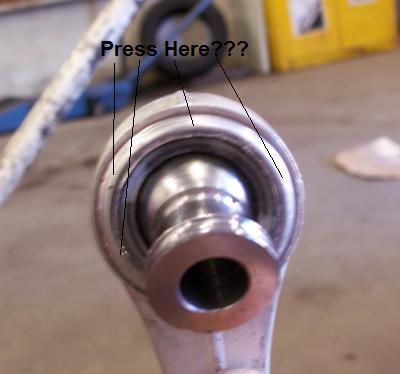
absolutely do NOT remove the bearing. you'll never get it back in with the crimp in tact. the loose bearing in the photo was removed from a bent control arm to see if there were any part numbers on it that may lead us to a replacement supplier. GOOOOOD! Ok so just to recap, In the area I specified and drew lines in your picture... Thats where the crimp is and needs to be pressed. and I do not need to remove the bearing... only reason you removed it was cause your control arm was bent. I think thats all i needed to recap.. Hey Insite, is the still noisey control arm the one you pressed the bearing out then back in? If so, do you think if you didnt remove the bearing and just pressed the crimp down tighter that you would not have any noise outta that control arm? -
Noisy Boxster Rear Suspension
CJ_Boxster replied to w_pienaar's topic in 986 Series (Boxster, Boxster S)
The pictures are very informative, Would it be neccesary for me to remove the bearing? couldnt i just remove the rubber boots and use a dye to press the crimp? -
Attn. ToolPants: Boxster on fire, popping, etc.
CJ_Boxster replied to bandy1r's topic in 986 Series (Boxster, Boxster S)
Thanks, Mikefocke. We did have it properly flatbedded. As for warranties....bought it AS-IS. A serious Porsche shop gave an over-the-phone suggestion that it's a catalytic converter problem. Anyway, we look forward to getting this car running again and truly enjoying it. Thanks again. If its AS-IS, you still have the standard 30 days after the purchase that covers mechanical issues. -
Noisy Boxster Rear Suspension
CJ_Boxster replied to w_pienaar's topic in 986 Series (Boxster, Boxster S)
I called my Father who works front desk at a mechanic shop. He says they have a Hydrolic press for things like this. insite, would you think that if you have an industrial type press that you would have 2 non-rattling control arms rather than 1 working and 1 not working? He said that if i get him some control arm removal directions for the mechanic that he can give the arm a go on the press.... If i do this, Would the area in the picture below be the area that should be pressed down or further out or more inward?
-
Noisy Boxster Rear Suspension
CJ_Boxster replied to w_pienaar's topic in 986 Series (Boxster, Boxster S)
What part of the metal are you crimping in that last picture? ^^^ draw an arrow around it. -
Noisy Boxster Rear Suspension
CJ_Boxster replied to w_pienaar's topic in 986 Series (Boxster, Boxster S)
Ahh i see, Up and down, I would have thought side to side but up and down would make more noise... Hey, would you say that the Nylon is wearing or would it be a combination of the metal ball and the nylon? If anyone here new anything about nylon molding or knows of someone that can make a remake of a new nylon sleeve using a new nylon sleeve as a template, we could all save hundreds of dollars!!!