Welcome to RennTech.org Community, Guest
There are many great features available to you once you register at RennTech.org
You are free to view posts here, but you must log in to reply to existing posts, or to start your own new topic. Like most online communities, there are costs involved to maintain a site like this - so we encourage our members to subscribe or donate. All subscriptions and donations go to the costs operating and maintaining this site. We prefer that guests take part in our community and we offer a lot in return to those willing to join our corner of the Porsche world. This site is 99 percent member supported (less than 1 percent comes from advertising) - so please consider an annual subscription or donation to keep this site running.
Here are some of the features available - once you subscribe RennTech.org
- View Classified Ads
- DIY Tutorials
- Porsche TSB Listings (limited)
- VIN Decoder
- Special Offers
- Paint Codes
- Registry
- Videos System
- View Reviews
- and get rid of this welcome message
It takes just a few minutes to register, and it's quality Porsche information at a low cost.
Contributing Members also get these additional benefits:
(you become a Contributing Member by subscribing or donating money to the operation of this site)
- No ads - advertisements are removed
- Access the Contributors Only Forum
- Contributing Members Only Downloads
- Send attachments with PMs
- All image/file storage limits are substantially increased for all Contributing Members
- Option Codes Lookup
- VIN Option Lookups (limited)


Gator
-
Posts
52 -
Joined
-
Last visited
Content Type
Profiles
Events
Forums
Exterior Paint Colors
Downloads
Tutorials
Links Directory
Collections
Classifieds
Store
Everything posted by Gator
-
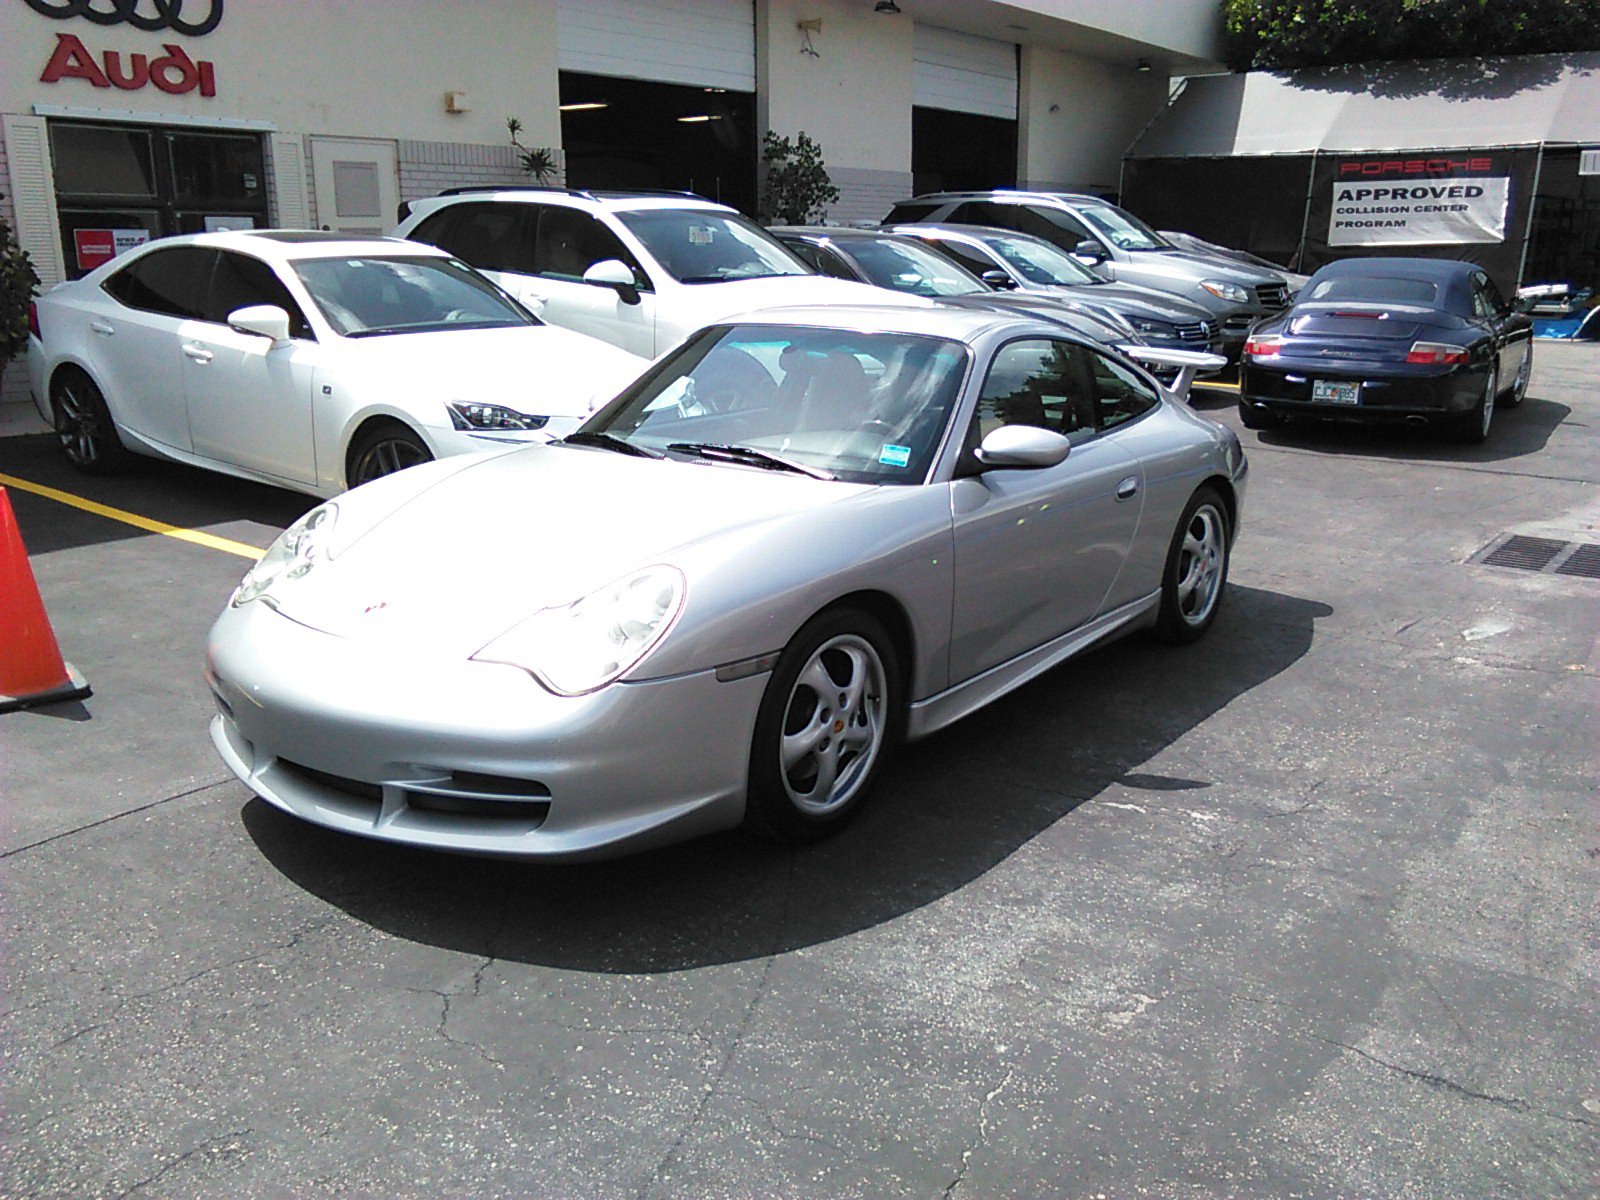
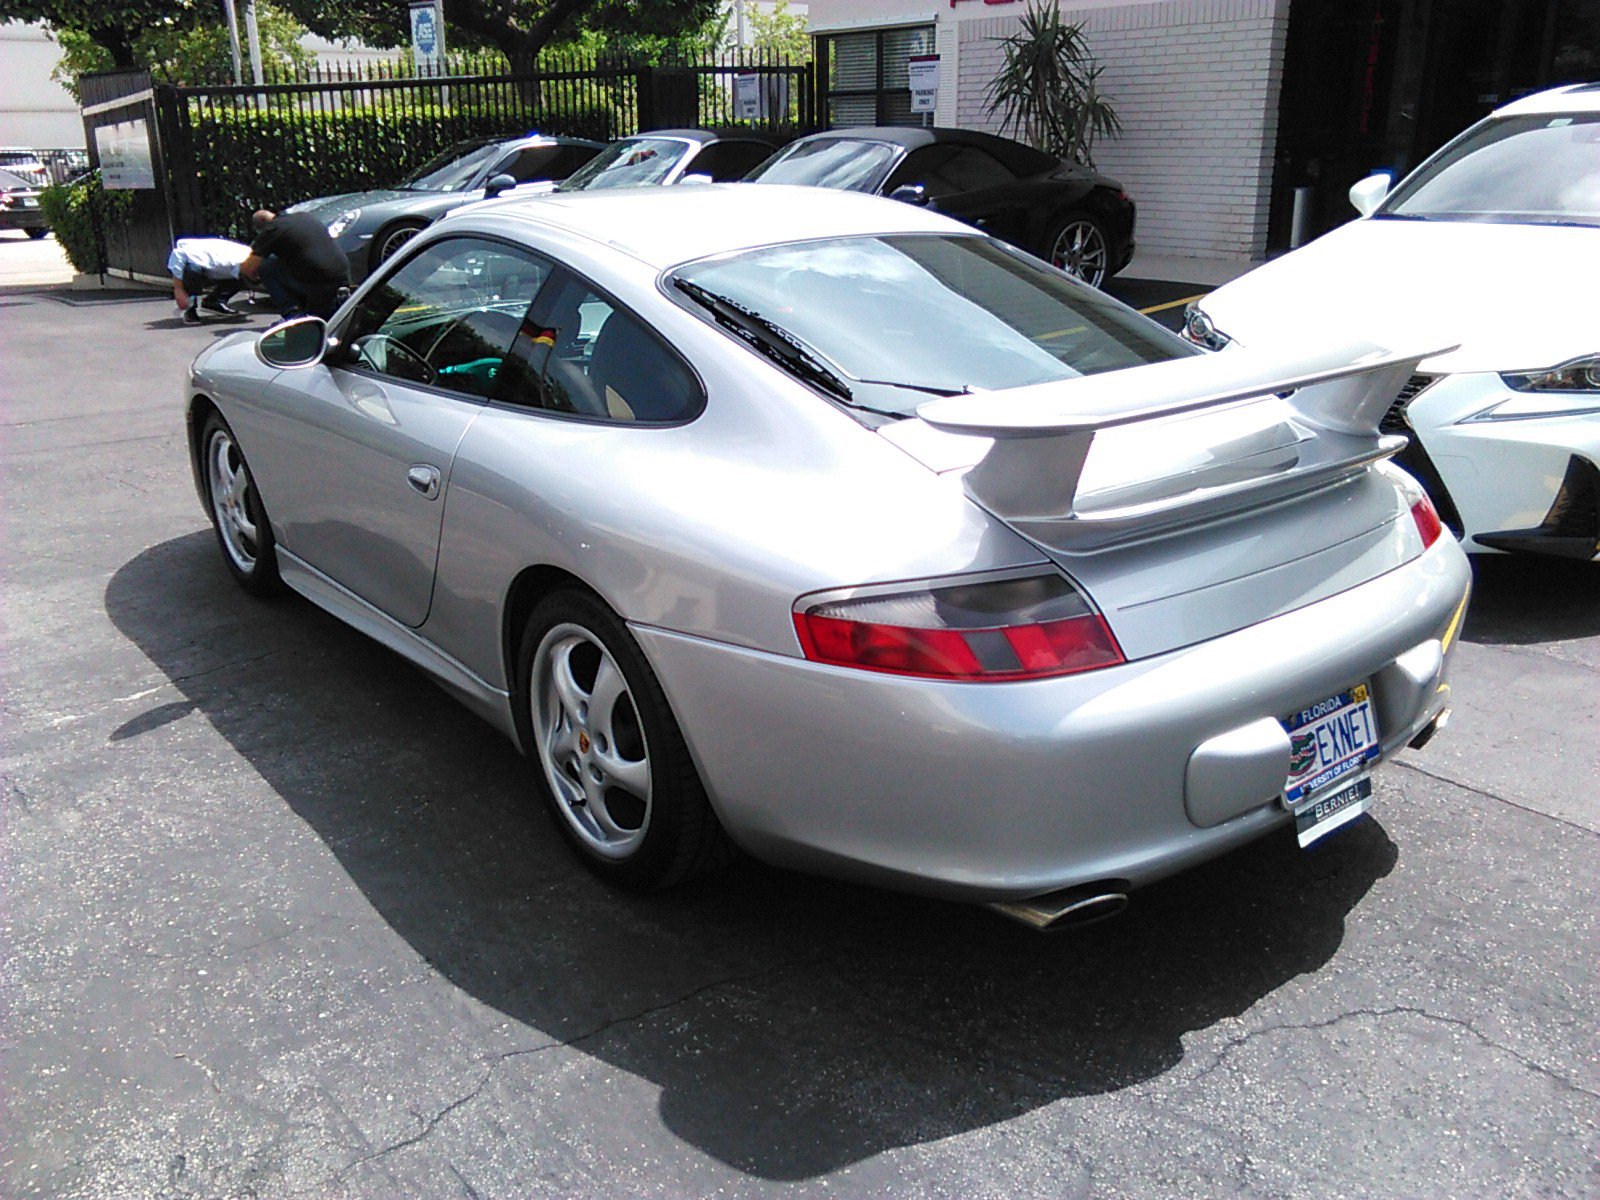
My 2000 C2 w/ Aero II added
Gator replied to Gator's topic in 996 Series (Carrera, Carrera 4, Carrera 4S, Targa)
To answer your question, "it is complicated." I purchased the car in 02. The front clip upgrade was done in 04 or 05 after a 'perfect' accident. Nothing important bent, just managed to ding every single thing on the front end. Insurance paid for it and I just told the service manager, "let's order 04 parts." and he said, sure. So that part of the equation is nebulous. (that, btw, was a 35k job.) I got the rear clip off of a guy around 2012 or so. It was the proper color and for maybe 300 bucks, I got the bumper and all of the assessory parts (exhaust, shields, etc) I needed to do a proper update back there. I also did the interior. I think around 2010. So I also have an 04 interior with glove box, later center vent system and full leather interior. For this latest job, I got the parts from Suncoast. 4.2k for the wing and rockers, I think. I also bought about 1.5k of rubber, etc. to make sure things looked good. You can check it with them. Best prices for parts that I have found. The paint job was around 15k or so. Some of this was insurance, so the total is a bit fuzzy but I think about 15k would get this done. Not counting any parts or updates. Hope this answers your question. p.s. I thought about the wheels but my rubber is really new. I will likely update the rims to proper gt3 style when I need new rubber. -
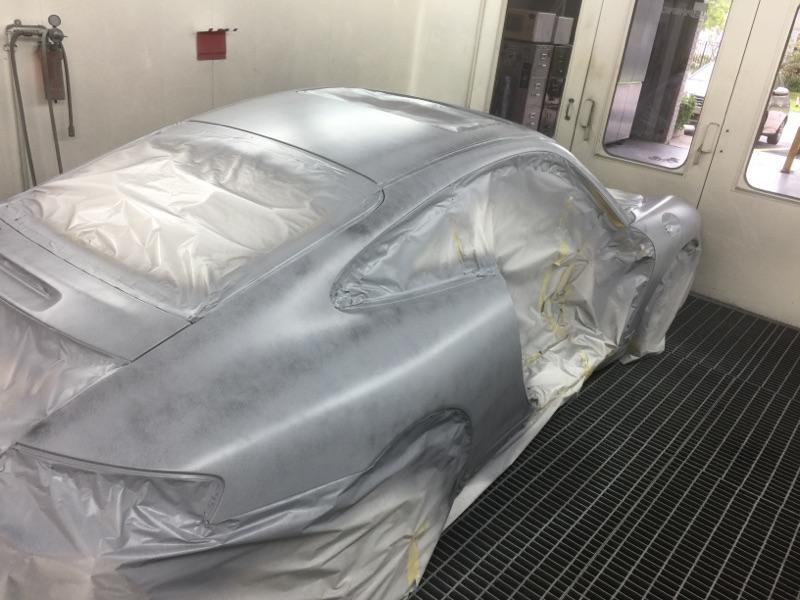
Took a couple of months but picked up my baby yesterday. I had Porsche replace the AC unit (the whole unit under the dash.) They also refinished the calipers and headlights. I then took it over to Stuttgart International (near Miami). They are Porsche trained and certified. They fixed some dog bites (yes, my dog bit my car chasing lizards. She survived but she knows better now.) Four panels were involved in the biting event but I had Stuttgart shoot the rest of the car as well and also had them add the Aero II rocker panels and rear wing. (I had the Aero II front bumper added about 10 years back when I updated the front clip after an accident.) I also had Stuttgart do the wheels. Basically the whole outside of the car has been done. I think Stuttgart did an amazing job. The car looks new all around including door jambs and hood/trunk seams. Panel & door alignments seem flawless. Hoping to keep her around for another 16 years or so. btw, I am not affiliated with Stuttgart at all nor did I get anything from posting this. I just really like the job they did. This is the second large body job that I've had performed by a Porsche certified shop and I don't think I'd take my car anywhere else (but I do hope this is the last time for a while.)

-
Non Turbo to Turbo options
Gator replied to tccack's topic in 996 Series (Carrera, Carrera 4, Carrera 4S, Targa)
I suspect there are a number of threads that will provide a lot of insight to this question (search is always my friend), but it happens that I was brousing just last evening through the Enhancing Performance chapter (chapter 11) in Adrian Streather's 996 The Essential Companion. I don't think I've seen many references to Adrian's book on this site, and as it is fresh in my mind, I'll share his thoughts. In the perforance chapter he reviews a number of potential modifications. In the Turbocharger sub-section (pg 535) he states: "The normally aspirated, fully water-cooled enginers types M96/01/02/04 and the 03 are not suitable for turbocharging, so this type of modification should never be considered; in theory a 996 GT-3 type M96/76/79 could be turbocharged." Unfortunately, he doesn't outline specifically why. In the Supercharger section on the following page he does admit that supercharging is a viable option for the fully water cooled engines but points to the significant costs and suggests one read and fully understand the warranty. A number of times in the chapter, Adrian points to cost, risk, and what you may or may not get in return for your money and suggests one just buy a 996 Turbo car instead. For what it is worth, I feel the same way. btw, I have really enjoyed this rather sizable book and recommend it to all 996 owners. -
My antivirus app (Norton) is giving me the following when I attempt to access this site: "Malicious Web Site Blocked You attempted to access: http://www.flat6innovations.com/shop/home.php?cat=399 This is a known malicious web site. It is recommended that you do NOT visit this site." Just thought I'd pass this warning on. GA
-
I took a look in the shop manual. Attached are the pages for assembling the spoiler. One page is the drawings/pictures the second page is the instructions. Possibly these will help. GA 996_deck lid - pics.pdf 996_deck lid - instructions.pdf
-
Heated Seat
Gator replied to moonshadow's topic in 996 Series (Carrera, Carrera 4, Carrera 4S, Targa)
I forgot to mention: if you do unplug the seat, don't turn on the ignition. If you do, the airbag system will fault out and your airbag light will come on and you'll need to reset it. (there are a number of posts dealing with that, just do a search). enjoy, GA -
2000 996 - Ignition Switch
Gator replied to Philip54's topic in 996 Series (Carrera, Carrera 4, Carrera 4S, Targa)
Phillip, If I understand your problem: you insert your key, try to turn it but cannot. You wiggle the wheel, the key and finally the key turns and the car starts but it doesn't seem like wiggling the wheel really helps. I've not had this problem but if I were troubleshooting this problem, I'd break it down as a) key, B) key slot and c) wheel lock mechanism. your description seems to preclude "c". I would then focus on a and b. if you haven't yet, try another key. does that help at all? if not, you focus should be on the key slot. perhaps lubricant will help (I'd do some searches to see what kind of lubricant is recommended) good luck, GA -
about the connector: I don't know the part number but I compared 99 and 04 schematics. Both indicate a 6 pin connector (only 3 wires used). The 04 wiring diagrams include a page with connectors and part numbers. I am attaching that. Perhaps you can get your hands on the sensor and look at the connector page and match them up. about routing the wiring: the wiring diagrams indicate that wiring to the rear sensor routes to the rear (engine) wire loom via the X2/3 connection. I would locate the correct position for the sensor and just route the wires the best way I could figure out. about the rear sensor location. On my 2000, I have holes in the suspension where the sensors mount (I added the lights to my car and thought about but haven't installed the sensors, so I kind of know your situation). My concern is that your car (according to your bio, is a 98.) It does not look like the 98 had the 601 option. You might not have the holes which is why you are having difficulty figuring this out. about the diagnostic connection. I installed full power seats in my baby. when I did, I wired up the memory and mirror functions. for kicks I ran the diagnostic wire to the diag connector per the wiring schematic. Next time I connected my PST2, it recognized the seats and I could operate them via the PST2. A pleasant surprise. I just occured to me as I reviewed this, that my front wire loom should have the connector you are looking for. I will try to take some time tomorrow and try to find it and share the part number with you. good luck. Glenn 04 996 connectors.pdf
-
Heated Seat
Gator replied to moonshadow's topic in 996 Series (Carrera, Carrera 4, Carrera 4S, Targa)
There are two aspects to removing the seat cushion: a) seat cushion attachment. the cushion itself is secured by two brackets. They are located on the front underside of the cushion. The brackets each have a peg that you need to pull out (I usually use pliers). Once the pegs are out (btw, they are secured to the base of the bracket by a strand of plastic), you need to pop the bracket out. I usually use a larger flat head screwdriver to do this. The bracket is hinged on the front of the seat so you need to get leverage from under the seat. Also, the bottom seat cushion has the seat controls in it. some times the two little phillips screws on the bottom of the seat control panel need to be removed in order to pull the seat cushion out. B) wiring. the seat cushion has wires routed along the frame and secured via various wire management clips. These can be a pain to find. The wired terminate in the main seat connector underneath the seat. Depending on what you are doing, you might have to pull wires/pins out of the main seat connector to remove the seat cushion from the rest of the seat. This brings me to a suggestion. I usually find it is easiest to pull the seat out of the car in order to do any work on the seats. To pull the seat you'll need to remove the plastic rail covers on the front rails, then remove the four star bolts (2 under the seat front and 2 rear). I have full power seats so I usually move the seat forward and rearward to remove the bolts. when I am done removing the bolts, I then center the seat. Once the seat is centered, I tilt the whole seat back. This provides me excellent access to the underside of the seat. Most of the time, this is enough access. When it isn't, I pull the seat out of the car and pul it on my workbench. Hope this helps. GA -
Wiring Diagram 996 2001
Gator replied to vroomvroom's topic in 996 Series (Carrera, Carrera 4, Carrera 4S, Targa)
sorry, didn't notice the GT3 lable. here is the correct schematic (in case you still need it.) GA 996 2001 C2 DME wiring diagram.pdf -
I saw a wiring diagram for 997 seats a while back. The seat wiring included CAN connections. I have Adaptive seats in my Mercedes. The seat system includes a separate controller that figures out what the vehicle is doing and gives the seat the information it needs to adapt to driving conditions. I believe this communication is done via what Mercedes calls the Most system which seems to be similar to the CAN system found in Porsches. Perhaps, the seats are expecting driving information from the car that they can "adapt to" and that you need connections as well as the devices on the other end for your seats to talk to for the adaptive portion of the seat to work.
-
Wiring Diagram 996 2001
Gator replied to vroomvroom's topic in 996 Series (Carrera, Carrera 4, Carrera 4S, Targa)
see attached diagram. enjoy, 996 2001 DME wiring diagram.pdf -
Catalytic Converter rebuild advice
Gator replied to Gator's topic in 996 Series (Carrera, Carrera 4, Carrera 4S, Targa)
I got the Cats in from Oklahoma Foreign on Friday. Was too busy this weekend but was able to put them in today. After extensive test drives a review of my PSTII outputs indicate that Readiness status is perfect and no errors in evidence. I'll continue to monitor. A couple of notes: 1. Oklahoma sent me a very nice looking set of Cats. Very clean. Even the bracket and cuffs were included but, most importantly, the studs facing the headers were in great shape. All I needed to do was pop over to my local auto shop and purchase new flange nuts (M8 x 1.25) and was good to go. (btw, even if the nuts were included, I would have replaced them.) all in all, I'm very pleased with my purchase from Oklahoma. 2. I found the job to be very straightforward. I believe you'll find it to be a 2-3 hour leasurely job. I didn't bother to put the car on my lift. Nor even raise it with a jack. I had great access to the Cats by removing the bumper and heat shield panels on the rear and sides. You'll also need to remove the air filter cannister so you can disconnect the sensor cables. btw, I removed the Cats without removing the mufflers but this made the nuts on the Cat/header connection flange a little trickly to access. I found that using a 6 point socket for a sure grip, a u-joint to get the right angle, and appropriate sized extensions did the trick. The one tool I found very handy was a crowfoot type socket that I had picked up in anticipation of just replacing the sensors from my local Snap on tool man. Possibly I could have done the job without it but it made loosening the sensors very easy. The socket type/part number is SWR2. http://buy1.snapon.com/catalog/item.asp?search=true&item_ID=74621&PartNo=SWR2&group_id=1448&supersede=&store=snapon-store&tool=all GA -
Catalytic Converter rebuild advice
Gator replied to Gator's topic in 996 Series (Carrera, Carrera 4, Carrera 4S, Targa)
Yeah, I did that last night. $350 for the pair. Warrantied not to throw the errors. So, I pulled the trigger. We'll see. Thx, GA -
'99 996 tiptronic differential
Gator replied to borsonie's topic in 996 Series (Carrera, Carrera 4, Carrera 4S, Targa)
Dammad, I saw your original post on this. Did you look at the DIY that Loren pointed you to? Lot of good info there. To answer your specific questions. Yes, your 99 Tip is just like Eric's as well as mine (a 2000). Your differential is separate from the transmission. The differential is on the drivers side of the transmission. If you get under the car. Looking at the transmission from the drivers side. The differential is the housing that is between the transmission and the drivers side rear wheel drive shaft. The differential housing is round, about 12 inches in diameter. If you look at the 9 o'clock area of the face of the housing, you'll see a plug with an allen head cut into it. That is the fill plug for your differential. There is no drain plug. You change the fluid by sucking it out and then refilling it. I've attached the page from the shop manual that describes the diff fluid change. The picture/drawing in the middle of the page is looking at the transmission from the drivers side of the car from in front of the rear tire. This is not covered in your owners manual. GA Tipronid differential fluid change.pdf -
Tie Rods a DIY in the driveway job?
Gator replied to DaveFL76's topic in 996 Series (Carrera, Carrera 4, Carrera 4S, Targa)
Dave, The check on the inner (and outer) tie rods is pretty straightforward. Lift the front tires off of the ground. Then put your hands on the "3" and "9" positions on the tire and try to rock the tire side to side. If there is play then either the inner or outer tie rod is bad. Then, try to position yourself so that you can watch the tie rod and rock the tire again. (it might be easier to have someone else rock the tire while you look.) If there is no play on the outer rod joint then your inner (which you can't see) is bad. I had to replace my drivers side inner last year (at about 100k). I went ahead and did both inner and outer on both sides. btw, I picked up an Inner tie rod wrench from my snap on guy. It was actually a BluePoint tool. Cost about $100 buck but MAN, it made the job a snap. Can't imagine doing the job without it. The tool is tube that slides down over the tie rod, various size flare type sockets come with it that you put on the car side of the tool and over the tie rod bolt. You then attach your 3/8" ratchet and turn. Magic. as I think of it, the local automotive shop might have something similar but cheaper. With the tool, I can say that this is an easy and quick driveway job. one tip, mark where the adjustment nut is on the old tie rod. You can then count the threads and use to to install the new ones reasonably closely to the old ones. enjoy, GA -
Folks, I've been nursing the cats on my baby (2000 996 w/Trip and 105k miles) for the six months or so. I've been getting errors PO0420 and PO430 more and more regularly over this period. It's pretty much to the point now where I get them as soon as the car has been driven enough to fail the self-testing. Sadly there have been no other errors along with these (that might point to a less expensive fix). I have a PSTII, so I've been able to really monitor things. Do, I'm looking at replacing the Cats. As I am outside the extended warranty window, my first move was to check pricing on the OEM Cats. Naturally, I am agast at the price of these critters. And I need two of them.... During my research, I came across a company based out of Chicago, SmithCat. They rebuild Cats. I have spoken with them at length. The process is: you send them your Cats, they cut them open, clean them in a dip, stick in a new cartridge, weld it back up (using stainless weld), and test it. 2 year warranty. $519 for each Cat. My question: anyone heard of these folks, have experience with them? The price seems reasonable, so this isn't a price question. Simply put: I am seeking any references on these folks. Here is their site: http://www.smithcat.com/index.htm Thanks, Glenn
-
Joost, I've attached the OBD guidance for error p1130. It outlines five potential problems to check out. (the fifth is the note at bottom regarding possible exhaust leak). Also, I can't find a 1133 error in the guide. could this be error p0133? (oxygen sensor aging) Hope this helps. Glenn OBE guidance for P1130 code.pdf
-
996 Owners Rejoice!
Gator replied to CellN12345's topic in 996 Series (Carrera, Carrera 4, Carrera 4S, Targa)
I lived in Germany for just shy of 20 years. Many of those were as a young adult where I had to get by with a used car and that used car required TUV inspection every two years (I worked on the economy). I can attest, in less than pleasant terms, to the thoroughness of the TUV technicians. In Germany there is intense pressure to have high end vehicles maintained by the dealer. In the used car market a Porsche or a high end Mercedes/BMW that is not "Sheckheftgepflegt", that is, it has been fully serviced by a dealer and, more importantly, the service book full of the proper stamps indicating that fact, it will lose value. So you have very well maintained Porsches being inspected. I would trust that those cars would fly through TUV. One other point: in order to be inspected, the vehicle must be driven to the inspection facility. TUV only inspects running cars. They aren't going to check to see if the engine has been replaced. At least they didn't in my day. Just my perspective on this. -
insulation through the ac vents
Gator replied to E Kap's topic in 996 Series (Carrera, Carrera 4, Carrera 4S, Targa)
Eric, I've not experienced this problem. The only two places I can think of where insulation could be introduced into the system is a)under the pollen filter (I seem to recall seeing some insulation material there) and B) behind the AC/Heater unit. You might look under the pollen filter first to see if that is at least the source of the insulation. If that doesn't allow you to alleviate the underlieing problem so that the blowing insulation clears up, you might be able to access the AC/Heater core by pulling out the center console/vent assembly section of your dash. If the center vent removal doesn't give you the access you need, you will probably need to pull the dash. It isn't that bad of a job. The instrument cluster and steering wheel are the trickiest parts. If you've done those before, the dash isn't really tough. I think the first time I pulled my dash, it took me a while to find the screw behind the passengers airbag. GA -
'99 996 tiptronic differential
Gator replied to borsonie's topic in 996 Series (Carrera, Carrera 4, Carrera 4S, Targa)
Eric, Sorry to hear your difficulties. I had to replace the seal on my differential last year as it was leaking. It didn't leak much but boy did it make a mess. The oll had gotten everywhere and collected gobs of dirt. I spent FAR more time cleaning the bottom half of my engine compartment than replacing the seal. In short, I can't imagine missing a leak. FYI, There is no drain plug on the diff. So for regular maintenance/inspection, you just open the filler plug (near the middle of the unit) and check/top off. I forget the servicing interval (90k miles?) for the diff but for that you suck the oil out and replace it. In my simple mind, there is no, repeat, no way in the world you can miss a diff leak (or any other type of lubricant leak) on these cars. The evidence is all over the bottom of the engine.... I can't say how far a diff will make it without oil but, remember, they probably didn't/couldn't suck it dry. What was left was enough to get you 1000 miles. That is my guess. If you don't see an oily mess under your car, I'd say the dealer's mechanic sucked the oil out and forgot to replace it. I'd take lots of pictures and statements from your shop. I'd approach the GM of the dealership. Review your situation. Tell him that you'd like to give him an opportunity to make things right before you a) head to claims court AND B) write to Porsche USA. I'd stress both actions to the GM. Again, sorry to see your Porsche experience start this way. Good luck, GA -
Yes, the 210 and 220 are wired the same. Plug, enter security code, and play. The CDR23, won't work in your vehicle.
-
In a former life, I was an RCDD. I know what you are hoping to do but using the old wire as pull new wire won't work. Because you have the base speakers in the doors, I'll guess your car has either the M490 or M680 sound options (both are wired the same). In this senario, the speaker wires all go up to the trunk where the amp was (just behind the spare) and then a number of (different) wires connected the amp to the head unit. To get to the amp, all 12 wires pass through a rubber boot in the firewall. Inside that boot the wires are all glued together. The door speaker wires pass through the door harness connectors (open a door and look in the jamb and you'll see the rubber covering over the connector. Rear speaker wires pass through the front/rear harness connector that is at the bottom of the drivers side B pillar (under the rug). In short, If you want new wire, you'll need to pull new cable and by-pass the connectors and that firewall boot. I've not tried to by-pass the door connectors (to pull wire), but I've done a lot of electrical work on my 996 and I'm pretty sure it will be hard to make it look good and water tight. If you still have the original door speakers, I'd trust the door harnesses. You might take a good look at your harness. It could be that it is just the wiring from the head unit to the amp is that is messed up and that your speaker wires are, in fact, ok and that with new connectors for your speakers, the speaker wire will be fine. As a prior writer suggested, the trunk is the best place for an amp. There is not much room under the dash for anything new. In fact, it is downright tight and I usually pull the dash when I am doing wiring work. If you need to pass wires from the head unit to the amp location, there are other plugs/boots in the firewall you can punch a hole in to pull cables. I've attached the schematic for the various radio options as it might help you test your wiring. Good luck. 996_Group_9_Circuit_Diagrams_Part_1 Radio.pdf
-
The oil heat exchanger has an "oil breather hose" on the top of it. Is that the hose you are looking to replace? If memory serves, the oil heat exchanger is back behind the throttle body. Due to limited space, you'll probably need to pull the throttle body and air distribution tubs to get to the top of the oil heat exchanger. GA
-
996 Footwell Lights Stopped Working
Gator replied to corysam's topic in 996 Series (Carrera, Carrera 4, Carrera 4S, Targa)
The footwell lights get power from the bus panel. Power routes through the two relays and then to the lights. If your bulbs are good then you probably need to check out the relays. I believe the relays are located in positions 14 and 15 on the relay panel down by the fuse panel. Unfortunately, I am not sure how to check the relays other than swapping them out. However, if memory serves, these are pretty spendy relays. Perhaps someone has a method for testing them.
.jpg.d2a7270c450becd4e1dfc65070bcbc19.jpg)
