Welcome to RennTech.org Community, Guest
There are many great features available to you once you register at RennTech.org
You are free to view posts here, but you must log in to reply to existing posts, or to start your own new topic. Like most online communities, there are costs involved to maintain a site like this - so we encourage our members to subscribe or donate. All subscriptions and donations go to the costs operating and maintaining this site. We prefer that guests take part in our community and we offer a lot in return to those willing to join our corner of the Porsche world. This site is 99 percent member supported (less than 1 percent comes from advertising) - so please consider an annual subscription or donation to keep this site running.
Here are some of the features available - once you subscribe RennTech.org
- View Classified Ads
- DIY Tutorials
- Porsche TSB Listings (limited)
- VIN Decoder
- Special Offers
- Paint Codes
- Registry
- Videos System
- View Reviews
- and get rid of this welcome message
It takes just a few minutes to register, and it's quality Porsche information at a low cost.
Contributing Members also get these additional benefits:
(you become a Contributing Member by subscribing or donating money to the operation of this site)
- No ads - advertisements are removed
- Access the Contributors Only Forum
- Contributing Members Only Downloads
- Send attachments with PMs
- All image/file storage limits are substantially increased for all Contributing Members
- Option Codes Lookup
- VIN Option Lookups (limited)


catmanluge
-
Posts
188 -
Joined
-
Last visited
Content Type
Profiles
Events
Forums
External Paint Colors
Downloads
Tutorials
Links Directory
Collections
Classifieds
Store
Everything posted by catmanluge
-
Throttle Values E Gas 2000 Boxster
catmanluge replied to catmanluge's topic in 986 Series (Boxster, Boxster S)
Todd Took off the intake manifold today the resonance flap is open when off so in fact that is working correctly. I double checked all the vac lines and they are all hooked up as they should be for the Boxster. Maybe its all connected with the throttle body not fully opening? My 3.4 came out of a 1999 so I purchased a used E Gas intake manifold and throttle body. Is there any possible adjustment under that black cover of the Throttle Body. Do you keep reprogram records? catman -
I am tring to get test performed with Durametric software. Using a durametric looking at pedel values VS Throttle Values with the pedal value at 99.99 from 3556 RPM through 6757 PRM range the actual values are 47.6, 31.9 33.4, 36.2, 39.5, and 41.2. It sounds like I am not getting full throttle. Is this correct is there a way to adjust the actual values vs the pedel values?
-
Brake Caliper Seal Replacement
catmanluge replied to espooner's topic in 986 Boxster Suspension, Brakes, and Wheels
Yoy might want to replace you inner seals if you cooked the outers seals the inners are most likely dead. They are knock back seals otherwise you will have the same problem again! I rebuilt all four of my calipers in February on my '04 986S, replacing all the bore seals, pistons, boots and bleeder screws. If all you are replacing is the dust boot, you don't really need to remove the pistons. Just press the pistons back in and pull the boots off. They have a lip that fits into a recessed area on the caliper, and the top of them fits into a recessed area on the top outer edge of the piston, but the boot is reinforced at those parts and you should be able to pull them right off. Below you will note I caution on the use of a tool with the pistons, but if all you are doing is the dust boots, you can use a dental type tool to help get them out. If you want to go the full monty, here is way more detail than you asked for :D ....but be sure you read my caveat on doing the full monty below. You have to disconnect the fluid line on the back of the caliper to inject air to make the piston come out. As such, you should just remove the whole caliper. With the caliper off, and the brake line dripping into a bucket, use plenty of brake parts cleaner to wash everything down and getting as much fluid out. You don't have to do this, but if you don't, when you apply the air pressure, you are going to splatter nasty brake fluid all over the place. You can remove the bleeder screws too, and spray into those and into the back until you feel like most of the fluid is out. Then you need some blocks of wood; best to have some of different thicknesses. Place blocks between the pistons so when you apply the air pressure, these things hit something other than each other. And be careful, they come out with significant force. Use the different thicknesses to get the pistons most of the way out. Then you can pull them out with your hand if you got them far enough out. Don't use any metal tool on the pistons. You can scratch and ruin them. It is a bit like a puzzle sometimes to figure out what thickness of blocks to use to get all four pistons out far enough at the same time to pull them out, but it will make sense once you start. Inspect the pistons. If you boots are shot, and you've had a few track days where you were down to nothing on your pads, you will probably find a little bit of rash on the sides near the top. If this is all you have, just at the top, they can be reused, IMO. If they are scored on the sides in a place that would make the scratch go past the seal, then resuing them runs the risk of leaking past the bore seal. Look into the cylinder and half way or so down, you will see the bore seals - one per cylinder. You get these out with a dental type tool. These are inexpensive and readily available. I've seen them at sears as well as lowes. If you pull the seal out, you should replace it, because you do not want to run the risk of cutting or tearing it at all. Go crazy with the brake parts cleaner. Clean, clean, clean, clean - but only use brake parts cleaner, or brake fluid itself. NOTHING else in the cylinder but one of these two chemicals. When you reinstall the bore seals, you lube them with a silicon grease (came with my piston rebuild kits from Brembo - have more if you want the name) like you lube the ring on an oil filter. Then you bend them (because the rings' inside diameter is slightly larger then the diameter of the cylinder, and fit them into the little recessed area in the cylinder. The pistons go in next. No grease on them. And then put a tiny bit of the grease on the lip of the dust boots to make them fit easier on the lip of the caliper...try not to get any grease on the outside of the boot though, because it will gum up with dust. Once all back together, flush your brake fluid, and then bleed them a couple of times too. I've found my dust boots don't last long. It depends on what tracks I am visiting, but I am watching them more carefully now, and replacing them at least, sometimes twice a year. It seems to extend the life of the pistons because the dust doesn't have as much chance to damage the top edge. I trust you know the pistons are different diameters. Full Monty caveat - Unless you have experience some serious uneven wear,(unattributable to difference in grip in your tires) leaks, or have a jillion track miles, you probably don't need to rebuild the calipers completely. I've done it once in 15K track miles, and the bore seals were only marginally worn. BTW, someday try pagid yellow up front and black in the back. I get WAY more life out of the yellows, and the blacks, being a little more aggresive, is like a poor man's brake bias. They work nice with yellows upfront. Also, I found better cooling using the GT3 RS brake spoilers. -
Having trouble with lack of power I was hoping someone on this board could analyize this excel spread sheet? Box_test_3.Doc
-
Info re 3.4l engine swap please?
catmanluge replied to PleGrange's topic in 986 Series (Boxster, Boxster S)
I had good results with Spec. The Boxster clutch is the only one that will fit in the Boxster transmission bellhousing. I would go with the stage 3 if you plan to track the car other wise stage 2 is fine. If you go to a light weight flywheel be careful as some require machining if you use a sprung disk. As the stock type bolts will not fit.. Hi Michael, I contacted Spec cluth via e-mail and had no reply. Is this usual or do I just have to keep on e-mailing them? Regards Pieter -
Control arm noise
catmanluge replied to Benjamin Choi's topic in 996 Series (Carrera, Carrera 4, Carrera 4S, Targa)
I you have the suspension weighted loosen the control arm bolt then retighten. They are not susposed to be tighten wile unweighted... -
Todd Not sure if I understand. There is only one line connected to the TB from the AOS then it is connected to a value of some type under the drivers front side of the engine. I wil have to look at it again as its been a while since I studied the actual path of that line. Its about 5/8 inch in size... Bill I tried your suggestion and the performance was slightly worse.. Here are the CEL codes and Fault codes produce without the MAF connected. P0455 Fault 94 Tank vent System Error Major Leak P0102 MAF Fault code 115 Below limits (Not Connected) P0112 Fault code 124 Intake air temp below limit value The P0102 and P0112 are due to the MAF being disconnected. However, the P0455 is most likely your problem. Check your vacuum hoses for leaks and do a search of P0455 on here for more troubleshooting info. I have checked vacuum lines, air Filter, intake, spark plugs, and many other possibilities. There is one thing that I did that may be contributing to this problem as I use the Boxster Fuel Rails with the 996 Injectors but had to make a bracket to hold the injectors in place due to utilizing the 3.4 intake manifold. Is it possible that the injector rails are senitive to how they are mounted?
-
Not sure what tests to run with the durametric that may lead to solving this problem....
-
I tried your suggestion and the performance was slightly worse.. Here are the CEL codes and Fault codes produce without the MAF connected. P0455 Fault 94 Tank vent System Error Major Leak P0102 MAF Fault code 115 Below limits (Not Connected) P0112 Fault code 124 Intake air temp below limit value The P0102 and P0112 are due to the MAF being disconnected. However, the P0455 is most likely your problem. Check your vacuum hoses for leaks and do a search of P0455 on here for more troubleshooting info. I have checked vacuum lines, air Filter, intake, spark plugs, and many other possibilities. There is one thing that I did that may be contributing to this problem as I use the Boxster Fuel Rails with the 996 Injectors but had to make a bracket to hold the injectors in place due to utilizing the 3.4 intake manifold. Is it possible that the injector rails are senitive to how they are mounted?
-
Additional Information From Durametric not sure what values to run for analysis? Time Rpm Actual Cam Angles O2 Ahead Ristance O2 ahead Bank 1 Bank 2 Cat Ahead CAT FRA Bank 2 Throttle Value 12:05:33.1875000 808 0.59 -0.19 0.07 192 0.99 0.71 2.2 12:05:34.4531250 821 0.61 -0.23 0.78 192 0.99 0.1 2.2 12:05:35.5781250 830 0.48 -0.05 0.59 192 0.99 0.75 2.9 12:05:36.6875000 1007 0.36 -0.03 0.84 192 0.99 0.8 17.4 12:05:37.7656250 1145 0.23 0 0 192 0.99 0.02 13.9 12:05:38.8437500 1538 0.42 -0.17 0.85 192 0.99 0.84 6.6 12:05:39.9218750 2122 -0.31 -0.41 0.07 192 0.99 0.03 9.6 12:05:41.0156250 3094 -0.14 -0.34 0.03 192 0.99 0.11 22.9 12:05:42.1093750 4609 0.97 0.67 0.74 192 0.99 0.22 28.8 12:05:43.2343750 4949 2.05 1.19 0.84 192 0.99 0.87 6.8 12:05:44.3125000 3971 1.44 0.53 0.87 192 0.99 0.85 99.7 12:05:45.4218750 5204 1.88 1.42 0.88 192 0.99 0.89 94.7 12:05:46.5000000 3934 1.28 0.73 0.88 192 0.99 0 6.2 12:05:47.5937500 3783 0.41 0.36 0.82 192 0.99 0.85 101.1 12:05:48.7187500 4365 0.67 0.17 0.91 192 0.99 0.91 99.9 12:05:49.8125000 4643 1 0.64 0.9 192 0.99 0.85 6.2 12:05:51.0625000 3282 -0.17 -0.38 0.01 192 0.99 0.07 5.9 12:05:52.2968750 3109 -0.31 -0.53 0 192 0.99 0 5.6 12:05:53.5468750 3058 -0.05 -0.38 0.03 192 0.99 0.11 12.2 12:05:54.8593750 3081 -0.11 -0.34 0.82 192 0.99 0.67 13.1 12:05:56.0625000 3123 -0.3 -0.84 0.03 192 0.99 0.03 23.3 12:05:57.2968750 3229 -0.36 -0.56 0.57 192 0.99 0.17 33.6 12:05:58.5468750 3397 -0.34 -0.53 0.82 192 0.99 0.74 101 12:05:59.8750000 3553 -0.67 -0.38 0.92 192 0.99 0.91 99.9 12:06:01.1250000 3586 -0.44 -0.33 0.88 192 0.99 0.89 6.1 12:06:02.3750000 4560 0.94 0.3 0.88 192 0.99 0.85 7.2 12:06:05 5163 3.2 1.42 0.87 192 0.99 0.9 99.9 12:06:06.1250000 5673 1.27 0.7 0.91 192 0.99 0.92 18.4 12:06:07.2031250 5048 1.67 1.09 0 192 0.99 0 7.1 12:06:08.2968750 4452 0.86 0.33 0 192 0.99 0 6.8 12:06:09.3906250 4100 0.84 0.14 0 192 0.99 0 6.3 12:06:10.4687500 3821 0.28 0.19 0 192 0.99 0 6.4 12:06:11.5781250 3608 -0.58 -0.14 0 192 0.99 0 6 12:06:12.6718750 3412 -0.36 -0.25 0 192 0.99 0 6.2 12:06:13.9531250 3132 -0.47 -0.56 0 192 0.99 0 5.7 12:06:15.2500000 2894 -0.13 -0.48 0 192 0.99 0 5.6 12:06:16.5781250 2682 -0.3 -0.5 0 192 0.99 0 5.2 12:06:17.7968750 2491 -0.09 -0.31 0 192 0.99 0 4.9
-
I tried your suggestion and the performance was slightly worse.. Here are the CEL codes and Fault codes produce without the MAF connected. P0455 Fault 94 Tank vent System Error Major Leak P0102 MAF Fault code 115 Below limits (Not Connected) P0112 Fault code 124 Intake air temp below limit value
-
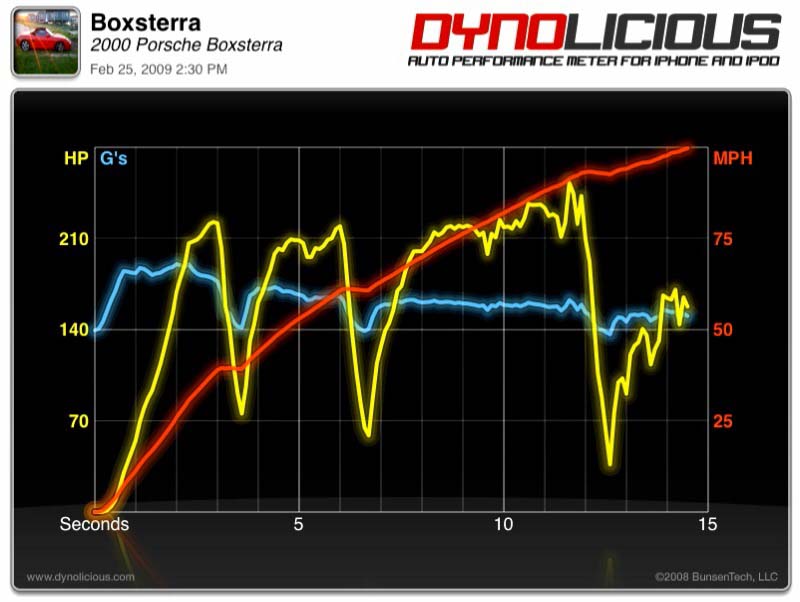
I am experiencing a problem with my 2000 Boxster 3.4 liter. The car under acceleration pulls strong though 1 gear stumbles slightly through 2 gear but starts to really have a noticeable stumble in 3rd gear approaching 5000 RPM and actually sounds like it starving for fuel but then catches and accelerates up to 7000 Rpm. It a similar feeling to fuel detonation in older cars with bad gas. I try to attach a photo of my Dynolicious chart where the yellow line can be seen showing where it stumbles…

-
ME TOO!
-
I had a seal install tool made at a machine shop for a lot less money... The depth is important for success as the deeper the new seal (987 version) is placed the less flex the crank has.
-
3rd Radiator for Street Use?
catmanluge replied to BruceP's topic in 996 Series (Carrera, Carrera 4, Carrera 4S, Targa)
I added a third radiator and felt is was well worth the effort. On track days the temp would reach the high end of the guage. Now it stays in the normal range even while pushing hard on summer track days. -
Clutch pedal drops to floor and stays there....
catmanluge replied to AWIZRD's topic in 996 TT, 996 TT S, 996 GT2
Try Bleeding the Clutch. I had this problem and it turneed out to be the slave cylinder not the master cylinder. -
Vertex out of Florida is Fine but watch out for a company with the same name out of Los Angles they sell rip off parts!
-
996 Underdrive Pulley
catmanluge replied to A2MVS's topic in 996 Series (Carrera, Carrera 4, Carrera 4S, Targa)
Why not they share the same pulley! -
Boxster S Clutch Sticking
catmanluge replied to colinpbarrett's topic in 986 Boxster Suspension, Brakes, and Wheels
Bleed the Clutch! -
Polishing acrylic headlights
catmanluge replied to perucho's topic in DIY Articles - Carrera (996) - Common Fixes and Repairs
Great Idea! -
Does a 987 have a hood release cable under the passenger side inner fender lining? Have a dead battery but the fuse post thing will not allow the hood to open when connected to a separate battery. I can hear a clicking sound but no release...
-
Fuel Air Mixture
catmanluge replied to catmanluge's topic in 996 Series (Carrera, Carrera 4, Carrera 4S, Targa)
Nice job, but it would be alot easier to simply make your MAF have a variable signal. Maf would be calibrated one way in closed loop which would allow the O2 sensors to properly managed the a/f and then would switch to the another calibration in open loop. You then have a fully adjustable MAF signal and full control of your a/f ratio in a matter of seconds. Interesting -- Sounds like a direction I should look at! Thanks for you write up! -
I experianced the same issue - keep bleeding the slave cyclinder...
-
Window not staying down when closing door
catmanluge replied to pawmaro's topic in 986 Series (Boxster, Boxster S)
IMO, if your window drops normally when pulling on either handle (inside or outside), then it is not likely to be your window regulator. The problem is a faulty microswitch. One of the three that are in each door. Most likely the one in the door lock assembly. Look for a post by member RFM. IIRC, he gave the solution for this exact issue a few months ago. Regards, Maurice. Its the Micro switch on the Door Lock which is not cheap. Takes about 30 minutes to install. The only problem is that you have to buy the whole lock assembly. -
Have you tested the starter motor itself?