Welcome to RennTech.org Community, Guest
There are many great features available to you once you register at RennTech.org
You are free to view posts here, but you must log in to reply to existing posts, or to start your own new topic. Like most online communities, there are costs involved to maintain a site like this - so we encourage our members to donate. All donations go to the costs operating and maintaining this site. We prefer that guests take part in our community and we offer a lot in return to those willing to join our corner of the Porsche world. This site is 99 percent member supported (less than 1 percent comes from advertising) - so please consider an annual donation to keep this site running.
Here are some of the features available - once you register at RennTech.org
- View Classified Ads
- DIY Tutorials
- Porsche TSB Listings (limited)
- VIN Decoder
- Special Offers
-
OBD II P-Codes - Paint Codes
- Registry
- Videos System
- View Reviews
- and get rid of this welcome message
It takes just a few minutes to register, and it's FREE
Contributing Members also get these additional benefits:
(you become a Contributing Member by donating money to the operation of this site)
- No ads - advertisements are removed
- Access the Contributors Only Forum
- Contributing Members Only Downloads
- Send attachments with PMs
- All image/file storage limits are substantially increased for all Contributing Members
- Option Codes Lookup
- VIN Option Lookups (limited)


ninerguru
-
Posts
29 -
Joined
-
Last visited
-
Days Won
1
Content Type
Profiles
Events
Forums
External Paint Colors
Downloads
Tutorials
Links Directory
Collections
Store
Everything posted by ninerguru
-
 Replacing the Coolant Reservoir on a MY99 996 Start by removing the air filter/metering unit. Two clips hold the Air Fuel Meter cable in place. Disconnect AFM connector and set aside.Remove single bolt holding AF assembly (13mm) and tilt unit back to remove. Set aside. Remove 2 bolts and 1 nut (10mm) holding air pump. One nut holds the Coolant Reservoir. Set aside. I used some string to pull it away from CR. Drain antifreeze by means of drain plug at the bottom of engine. Drain just enough to empty CR, then a little more. I used an a Author ninerguru Category Carrera (996) - Common Fixes and Repairs Submitted 02/10/2006 01:41 PM
 -
Start by removing the air filter/metering unit. Two clips hold the Air Fuel Meter cable in place. Disconnect AFM connector and set aside.Remove single bolt holding AF assembly (13mm) and tilt unit back to remove. Set aside. Remove 2 bolts and 1 nut (10mm) holding air pump. One nut holds the Coolant Reservoir. Set aside. I used some string to pull it away from CR. Drain antifreeze by means of drain plug at the bottom of engine. Drain just enough to empty CR, then a little more. I used an aluminum turkey tray to hold antifreeze and reuse. Loosen 3 spring clamps holding hoses to CR. There are two fuel lines that will prevent you from removing the tank from the engine compartment. Loosen (17 & 19mm) them and tuck away (see picture). Disconnect tank sensor. In my car, it seems like it was leaking... (see picture) Slide tank towards engine and maneuver tank out. Be careful with other hoses and electrical connectors. Reverse the procedure to install. Add antifreeze, purge and check for leaks.
-
cylinder position firing order
ninerguru replied to ga996's topic in 996 Series (Carrera, Carrera 4, Carrera 4S, Targa)
Driver's side from rear to front of car are 1, 2 and 3. Pass side from rear to front are 4, 5 and 6. You are looking for the center cyl on the pass side. Lou -
One of my neighbors was cut off and ran into a curb. He's looking to replace the right rear wheel on a 2003 C4S. Can anyone provide a part number so he can shop around for it? BTW, the car was a gift from his wife for his 60th birthday! Thanks! Lou
-
Instrument Cluster Pt. #
ninerguru replied to ElusiveC4's topic in 996 Series (Carrera, Carrera 4, Carrera 4S, Targa)
Kevin, at least in the US models if you twist the clock adjusting knob (I think to the left) and hold, the units will change from US to metric and viceversa. Don't know if it is a worldwide feature. Lou -
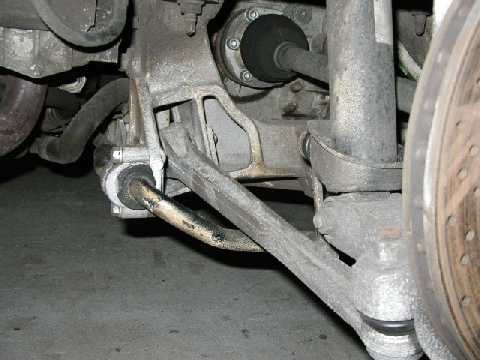
Help! Rear Strut Re-installation
ninerguru replied to Barre's topic in 996 Series (Carrera, Carrera 4, Carrera 4S, Targa)
Between the lower suspension trailing arm and the actual chassis, right below the CV joint, you just want to gently lower the suspension arm... Lou
-
Help! Rear Strut Re-installation
ninerguru replied to Barre's topic in 996 Series (Carrera, Carrera 4, Carrera 4S, Targa)
When I did mine, I used a long breaker bar to gently push the lower suspension arm down in order to install the bolt. Good Luck! Lou -
Water Temperature Warning Light
ninerguru replied to jonny's topic in 996 Series (Carrera, Carrera 4, Carrera 4S, Targa)
Jonny, I also have a '99 that I drive at the track and experienced the same problem. I believe it had something to do with the tank and not the sensor. Porsche updated the tank a couple of times. I had a leak in the original tank and replaced it. Since then, I had not had problems with the flashing light after driving at the track. I posted the tank replacement procedure a few months ago. Search for it if interested... Lou -
I'm in the process of installing some Cobra aftermarket seats on our '99 C2 that is used for Driver's Ed. I had one of the OEM seats removed for fitting since I was able to obtain a set of used frames to use for mounting. Since my wife also drives at the track, the idea is to retain the power seats and memory functions... Anyway, my ABL came on. I noticed that there is a connector that goes into the seatback. I am assuming that it provides some info to CPU to let it know when someone is sitting in the car. I put an ohmmeter and read 8 ohms... Has anyone installed aftermarket seats and found a way to dissable the ABL? I will get an 8ohm resistor and attach it to the empty connector to see what happens. Will disconnecting the battery clear the light or does it need to be reselt with the P-tool? Thanks for any input! Lou
-
Abe, I installed H&R springs on my '99 Carrera without undoing the ball joints. Search for my screen name "ninerguru". I'm pretty sure the Boxter will be the same... Lou
-
Instrument Cluster Illumination
ninerguru replied to Chukka's topic in 986 Series (Boxster, Boxster S)
For what is worth, I had one of those lights go out on my car also... I was able to find one at my local Volvo dealer. All you have to make sure is that they are of the correct wattage. Light bulb should have a number telling what the wattage is. My Porsche dealer did not have one in stock, took my chances at a VW dealer and finally got lucky at the Volvo place... Lou -
Blinker Doesn't............
ninerguru replied to Flakarter's topic in 996 Series (Carrera, Carrera 4, Carrera 4S, Targa)
Could it be just asa simple as a burnt light bulb? Lou -
How do you change the Polyrib belt?
ninerguru replied to b-man's topic in 996 Series (Carrera, Carrera 4, Carrera 4S, Targa)
On a 996, you first remove the airbox held in place by a 13mm bolt towards the back of the car. You also need to unplug the MAF sensor and dislodge its cable from two clips that hold it to the airbox. Once you get the air box out, use a wrench as shown to loosen the auto tensioner. Replace belt and re-assemble. Airbox has two pins at bottom that fit in holes to position it in place. Oh, you must loosen the air tube clamp that holds it in place by the throttle. Make sure that the belt is properly seated in the pulleys. Should take about 20 minutes. Good luck! Lou -
996 Engine Coolant Loss
ninerguru replied to Baps's topic in 996 Series (Carrera, Carrera 4, Carrera 4S, Targa)
On my late '99 C2, I was experiencing the flasing light during track events. I also had a tank leak that was dropping antifreeze on the exhaust. After replacing the tank, the light went away even while tracking the car. I think that I read somewhere that the latest tanks had a redesigned "window" for the sensor. BTW, the sensor just plugs into the tank using a bayonet lock. No coolant loss if you remove it from the tank. Lou -
h&r springs
ninerguru replied to v8huntr's topic in 996 Series (Carrera, Carrera 4, Carrera 4S, Targa)
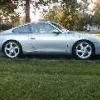
I'm quite happy with my H&Rs. Went with them after riding with another instructor that had them on his 996. My car was lowered about 3/4" all around. Just enough to lower center of gravity, but not enough to cause problems going up and down my driveway. My next step is to go with the H&R sway bars. I found my set on the web along with the M030 shocks. Shop around on Ebay since they usually come up... You can see my car at http://basketcasemotorsports.bravehost.com/ some before and afer shots. Good luck! Lou -
Mike, I have done that on my 99... Just use the brake lines as support for them and tie them up with tie wraps... Just make sure they do not rub any suspension parts.
-
Correct manual trans fluid
ninerguru replied to ninerguru's topic in 996 Series (Carrera, Carrera 4, Carrera 4S, Targa)
Thanks! Lou -
Hi All! I recently changed the manual trans fluid on my '99 C2 to Mobil1 75w90 and the trans has become really notchy. Specially now that the cold weather is here. Loren, do you know which brand Porsche uses as OEM fill? Is it synthetic or plain dyno? Thanks! Lou
-
I attached mine in 3 places using 3 bolts that are used to hold hose brackets. Two on the side, one in the front I did not use the rearmost attachment point in my car ('99 C2). Looks like I would have to drill and tap a hole in the block for it! Held well at VIR last week during DE. Lou
-
99' 996 C2 Tire Pressure
ninerguru replied to Flakarter's topic in 996 Series (Carrera, Carrera 4, Carrera 4S, Targa)
Also, give your tires some time to settle in... They can be "greasy" for the few hundred miles. Lou -
I just installed H&R springs with MO30 shocks in my car about 3 weeks ago... Make sure car is well supported. Be carefull with spring and compressors. There is a lot of energy stored in them ready to be released! If not comfortable, leave it to the PROS! Your family and friends need you! The rears shock strut combo is held in place by 3 bolts on top and a cross bolt at the bottom. To access top, you need to remove the rear parcel cover behind rear seats. Loosen rear sway bar at lower suspension arms. Compress spring using a spring compressor. Remove lower bolt holding lower part of strut/spring assembly. I used a pry bar to lower susp arm and gently remove complete assembly. Once out of car, you need to remove top bolt. I used a wrench to loosen nut and held shock shaft with hex bit. Note position of all washers. Reverse procedure to reinstall. Note position of upper bearing. One of them faces 90 deg. from where lower bolt goes through. Use pry bar to lower susp arm and install bolt that holds strut in place. Make sure that spring end is seated in top rubber damper correctly. Install sway bar. Re-install top bolts from inside car. Fronts are a little bit more complicated. I removed the battery cover and 2 inner plastic aprons from inside trunk using torx bits. I marked the top 3 bolts that hold the top bearing assembly using tape. They are used to adjust camber. Loosen the sway bar connection. Upper bolt connecting sway bar link to strut body holds strut to wheel carrier. Mark how upper bearing is positioned since it fits one way. I was able to compress the spring enough to overcome the shock strenght and removed the shock/spring without undoing ball joint. Just be careful, it will compress enough to swing the whole assembly outwards. Once clear of fender, you can just pull assembly out of wheel carrier. Once out, disassembly is similar to rears. There is one washer that is embeded in the bump stop. I missed it, caught it on the second one and had to go back and redo the other side again. Reverse the order to reassemble. Be careful pushing the assembly into the fender. Also, make sure that the wheel carrier makes full contact with the little tab at the bottom of shock. In other words, push wheel carrier upwards as you tighten holding bolt. Return upper bearing to marked position. Also, make sure your top and bottom spring ends are positioned correctly. There are indentations at the bottom plate and at the top rubber isolator. I was able to return the upper bearing to where it was, car seems to pull straight. Will eventually get a track aligment :) That is pretty much it. I had the fronts out in about 45 minutes per side, did 3 times due to missing washer. Rears were about 30 minutes each. Hardest partfor me, was removing my harness bar which mounts using the top 3 nuts per side. As I said before, be real carefull with the springs. If in doubt, let the pro's do it. A good man knows it limitations... Good luck! Lou
-
I tackled the Coolant Reservoir this morning. Put instructions and pictures on my web site at http://basketcasemotorsports.bravehost.com/Tank.htm Lou
-
Instructions for changing transmission fluid
ninerguru replied to steve_wilwerding's topic in 986 Series (Boxster, Boxster S)
FWIW, I just replaced the Manual Trans fluid yesterday on my '99 996. I did not have the triple square drain or fill plug. They were just regular 10mm hex bit holes. Might want to check yours... After proping the car up on safety stands, I conected a hose to the hole after draining the trans. Then I secured the hose to the fender using "racers' tape" and then used a workbench chair to hold the end of the hose up. Connected the Mobil 1 bottle to the hose end and let gravity do the work. I actually made a small hole at the bottom of the bottle (now on top) to let the bottle "burp" air. Took about 10 minutes per bottle. Specs call for 2.85 quarts (2 quarts + ~ 28 oz.) I temporarely plugged the hole in one of the bottles and measured 28oz from the last bottle and dumped into it. I wanted to save the last 4 oz in a non-holed bottled. Took about 40 minutes to complete. Biggest pain was waiting for fluid to drain. My fluid was really black (51K miles) Good Luck! Lou -
Thank you much Loren. Actually, the latest part has been upgraded to a #57. Should have it shortly. Will try to document the exchange and post pictures. Thanks! Lou
-
Has any one replaced their Coolant Reservoir Tank on a 996? How is the tank fastened to the body? How much coolant should be drained from the system? Any help will be appreciated! Thanks! Lou