Welcome to RennTech.org Community, Guest
There are many great features available to you once you register at RennTech.org
You are free to view posts here, but you must log in to reply to existing posts, or to start your own new topic. Like most online communities, there are costs involved to maintain a site like this - so we encourage our members to donate. All donations go to the costs operating and maintaining this site. We prefer that guests take part in our community and we offer a lot in return to those willing to join our corner of the Porsche world. This site is 99 percent member supported (less than 1 percent comes from advertising) - so please consider an annual donation to keep this site running.
Here are some of the features available - once you register at RennTech.org
- View Classified Ads
- DIY Tutorials
- Porsche TSB Listings (limited)
- VIN Decoder
- Special Offers
-
OBD II P-Codes - Paint Codes
- Registry
- Videos System
- View Reviews
- and get rid of this welcome message
It takes just a few minutes to register, and it's FREE
Contributing Members also get these additional benefits:
(you become a Contributing Member by donating money to the operation of this site)
- No ads - advertisements are removed
- Access the Contributors Only Forum
- Contributing Members Only Downloads
- Send attachments with PMs
- All image/file storage limits are substantially increased for all Contributing Members
- Option Codes Lookup
- VIN Option Lookups (limited)


ericinboca
-
Posts
458 -
Joined
-
Last visited
-
Days Won
1
Content Type
Profiles
Events
Forums
External Paint Colors
Downloads
Tutorials
Links Directory
Collections
Store
Everything posted by ericinboca
-
It depends - you really need to ask the body shop, but... The issue with waxing an aftermarket paint job is with curing - the paint needs to be completly cured before wax goes on. In the factory, they usually cook the car to cure it, but that is not a great option aftermarket...so it comes down to what the paint manufacturer says for the paint used. Generally it is 30 - 90 days, though.
-
Did you check the oil on your dipstick to see if it is a strange color? and/or in your coolant reservoir?
-
I would wager on heat shielding too. Problem is, there is a lot of up all up under the rear trunk, and down the side of the rear wheel wells and lining the rear bumper - it could be loose in any number of places. And it also is not one monolithic piece - there are four or more I think, overlapping each other, some of it permantely attached to plastic coverings. You can get to a few of the pieces by removing the rear bumper cover, and I also think the pieces along the rear would be most likely to be loose. Other thing to look at is the muffler mounts.
-
ECL without Catalytic Converter?
ericinboca replied to rmahawaii's topic in 986 Series (Boxster, Boxster S)
Won't there still be an error to reprogram to look at the 2nd set of sensors? There is no cat on the car right now. Sorry to ask. What is a PST2 or PIWIS tester and IPAS codes? PST2 and PIWIS Porsche specific diagnostic and DME programming tools. Lots of indies have PST2; dealers have PIWIS, although I know one indy that has a PIWIS. Ipas codes are special keys specific to your VIN that let the PST2 or PIWIS operator do its thing. You need to have your DME reprogrammed to Euro Norm 3 emission standard with a PST2 or PIWIS. You will not pass an emissions test this way, though. I've done this (rather had it done for me) but my 986S is a track car and not driven on the street. -
Wheels seem to be pretty inexpensive at the moment. I just picked up a set of turbo twists (not replicas) 8x18 and 10x18 for $400. They have rash, but as phillipj suggests, repairs on rash are pretty easy. I did a set of turbo twists off a wreck about a year ago - bondo, sandpaper, primer, paint, polish and elbow grease - they came out great.
-
Bentleys doesn't differentiate based on S or non S, rather on the size - Bentleys says: Inner CV joint to output flange M8 29 ft/lb M10 60 ft/lb
-
How to remove rollbar from 986?
ericinboca replied to babyporsche's topic in 986 Series (Boxster, Boxster S)
Hope these photos help. The hoops have four legs. The forward ones go basically straight down and are bolted to the floor on the outside rear of the seats. That is what I tried to show in this first picture on the driver's side. It is under the carpet, which has sound insulation on the back of it - you will have to pull all that back out of the way, but you will be able to mash it back in place. The other legs go back at an angle into the convertible top area. You will need to pull back the black rubbery material to expose those bolts. I think I took my roll hoop out after having removed the top, so you will need to figure out the best way to configure the top to get access to these angled legs...I would think start in the service position to get to them, and then move to pull the hoops straight up and out. Note I set the roll hoop back in the car for the photos - so the nuts on the threaded rods are missing, of course.
-
I think juniinc is right - three that "point" out the front - and two other ones that don't have grills or openings.
-
Control Arm Link Sensor Clip
ericinboca replied to white's topic in 987-1 Series (Boxster, Boxster S)
I think you are talking about part #21 in the picture? If so, I believe it holds the bottom half of the lever that is part of an angle sensor, which I believe is part of the lintronic headlights. -
Control Arm Link Sensor Clip
ericinboca replied to white's topic in 987-1 Series (Boxster, Boxster S)
I broke the same part. I used two wire ties to make an X across the top if it - works great. -
HELP! My windows wont roll up...
ericinboca replied to ercc's topic in 986 Series (Boxster, Boxster S)
Is it only on one side?? -
How to remove rollbar from 986?
ericinboca replied to babyporsche's topic in 986 Series (Boxster, Boxster S)
It is bolted down in four places. You have to pull the carpet and sound insulation up to expose the bolts at the four posts. Once exposed, it is quite easy to un bolt. If you don't quite follow, I can get pictures end of this week of where it mounts, as I just stripped my car, including removing the factory hoops. -
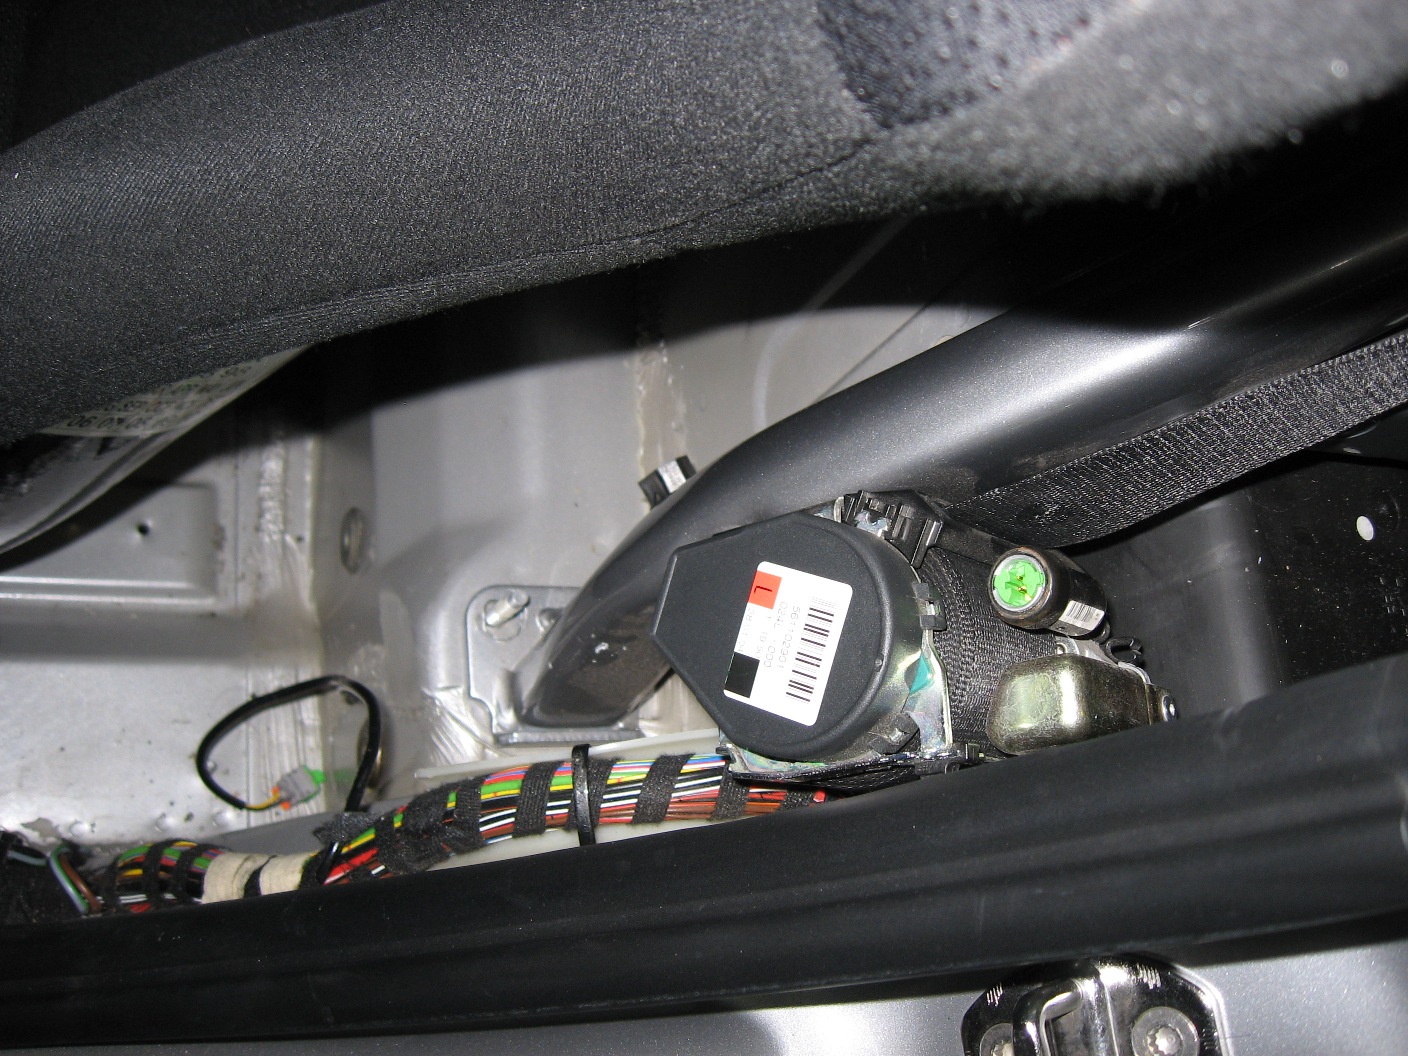
HELP! Wife locke key in trunk of '07 Boxster!
ericinboca replied to Jay-Three's topic in 987-1 Series (Boxster, Boxster S)
On a 986, there is an emergency release cable that you find in the left hand rear wheel well area. Bet it is same on a 987 - see this thread. http://www.renntech.org/forums/index.php?showtopic=27751 -
A/C Evaporator Replacement
ericinboca replied to jamesgood72's topic in 996 Series (Carrera, Carrera 4, Carrera 4S, Targa)
I don't mean to hijack this post...but I have an entire working climate control unit I just took out of my 2004 986S - I took it out because I am stripping it to prepare for a full cage as it becomes a full-on race car. If anyone needs it, I will let it go cheap plus shipping. I can provide pictures. Replacing the unit wholesale essentially requires taking the dash off, and removing the wiper assembly and battery. It is held on by three threaded posts that pass through the firewall, plus one place on the cockpit side. Takes patience, but getting the dash off is not that bad IMO. -
Say....what kind of sound do you get from it? I turned a tight steep curve the other day and heard a terrible metallic squeal coming from the rear. Assumed it was a brake, but it has not done it again. Could this be what I'm dealing with??? Bob Squeal or a roar? I would check your wheel bearings. They can be hard to diagnose sometimes, noise in a tight turn makes me a little suspicious of a bearing.
-
You are saying the conical part of the ball joint will not fall out of the wheel carrier or that you cannot swing the control arm down and out of the way? If the latter, be sure the radius arm (number 8 in your picture) is disconnected from the lower control arm. It is just a bolt through the bushing. With the bolt out, it will have some room, not a lot, but some to move to allow the arm to go far enough down to clear the wheel carrier. Also the toe adjust arm in the back. If you resort of a pry bar, be careful - steel is way harder than aluminum alloy. OK, Eric, I'm just little confused. You say in one post, "Then move to the wheel carrier, remove the drop link, and get the carrier off the strut, and finally pull it all clear." Are you saying you actually remove the entire wheel carrier from the vehicle? With the entire upper strut mechanism. That seems like a lot of work. You remove the strut? Are you also saying that you took the wheel carrier and half axle out all as one piece. Sorry, just a little more detail please. If I read your post literally, it appears you took everything off that side of the rear suspension. Nothing left. thx I'm a confusing guy. :D I did not remove the strut. I did not detach the toe adjuster, the lower control arm or the forward radius arm from the suspension frame. Only disconnected those from the wheel carrier (or from each other as is the case with the forward forked radius arm and the lower control arm). The wheel carrier is attached to the strut via the drop link bolt. So if you get the lower control arm off the carrier via the ball joint (which has the forward forked radius arm attached (and I would remove the bolt that attaches the forked arm to the lower control arm to give you more swing up and down with the control arm) and the rear toe adjust arm off, pull the drop link bolt out at the top of the wheel carrier, and you have the joint at the transmission housing disconnected (wow that's a lot) - then you can pull off the wheel carrier with the axle still attached to it. Does that help??
-
The dust shield. On track cars we take those off to help dissipate heat. It has been a good 2 years since I removed mine, and I only have a vague recollection...but I seem to recall... There are only 3 bolts holding the dust shield to the wheel carrier. The problem is the hole in the middle of the dust shield is not large enough to fit over the wheel hub, so if you want to remove the shield, you have to press out the hub. You might find, though, that if you remove the caliper and the rotor, that you will have plenty off room to use your hands to reshape it or bend it out of the way. It is not a critical piece - like I say - most track cars have them removed.
-
I don't know if an acton reader is going to give you accurate codes - it might, i just don't know. 300 - 306 are misfire codes - 300 being the sum total and 301 being culinder 1, 302, cylinder 2, etc. 131 is low voltage to 02 sensor. Did you disconnect the connector on the 02 sensor to get to the coilpack? If so, be sure it is tightly and prperly reconnected. If it were me, I would use a durametric to clear all the codes, drive it to see if anything comes back, and then read the codes. We'll see if the other guys have any better ideas.
-
You are saying the conical part of the ball joint will not fall out of the wheel carrier or that you cannot swing the control arm down and out of the way? If the latter, be sure the radius arm (number 8 in your picture) is disconnected from the lower control arm. It is just a bolt through the bushing. With the bolt out, it will have some room, not a lot, but some to move to allow the arm to go far enough down to clear the wheel carrier. Also the toe adjust arm in the back. If you resort of a pry bar, be careful - steel is way harder than aluminum alloy.
-
If I remember correctly I freed all the ball joints on the wheel carrier, and loosened the drop link, but left the bolt through the strut to hold it up. I then took all those bolts out - there are a lot of them. Once the end is freed from the housing, and you have everything removed but the drop link on the wheel carrier, the wheel carrier and strut will "flex" in its mount at the top, so you can push the wheel carrier out some, and lay the axle down on some of the stuff back back there - the joint at the wheel carrier can move all around so you are not limited much in where you want to set it.. Then move to the wheel carrier, remove the drop link, and get the carrier off the strut, and finally pull it all clear. It has been a while, but I don't remember it being anything that tripped me up. And I don't remember the end cap being delicate - maybe I didn't know any better and got lucky! But I didn't damage it even slinging it around my garage hitting things like a moron.
-
It is hard to get in there, but no, you do not need to remove the exhaust or secondary cats. To remove my axles, I took the wheel off along with the rotor, and used a couple of long socket extenders allowing me to have the rachet in the wheel well with room to rachet it. I rotated the axle around so I could have the socket extender attack the bolts in the same place each time. On the control arms, I took the wheel carrier off with the axle still in by removing the rear toe adjuster arm ball joint, the radius arm attached to the lower control arm (allowing the control arm more room to swing down) and the lower control arm ball joint. (and of course the drop links) You may know this, but be sure you get the ball joint separator thoroughly and squarely on the head of the ball joint threaded rod. It is hard to get on - you need to be sure the ball joint boots are squished down thoroughly. If you don't get it on fully, the top of the threaded rod can get crushed at an angle.
-
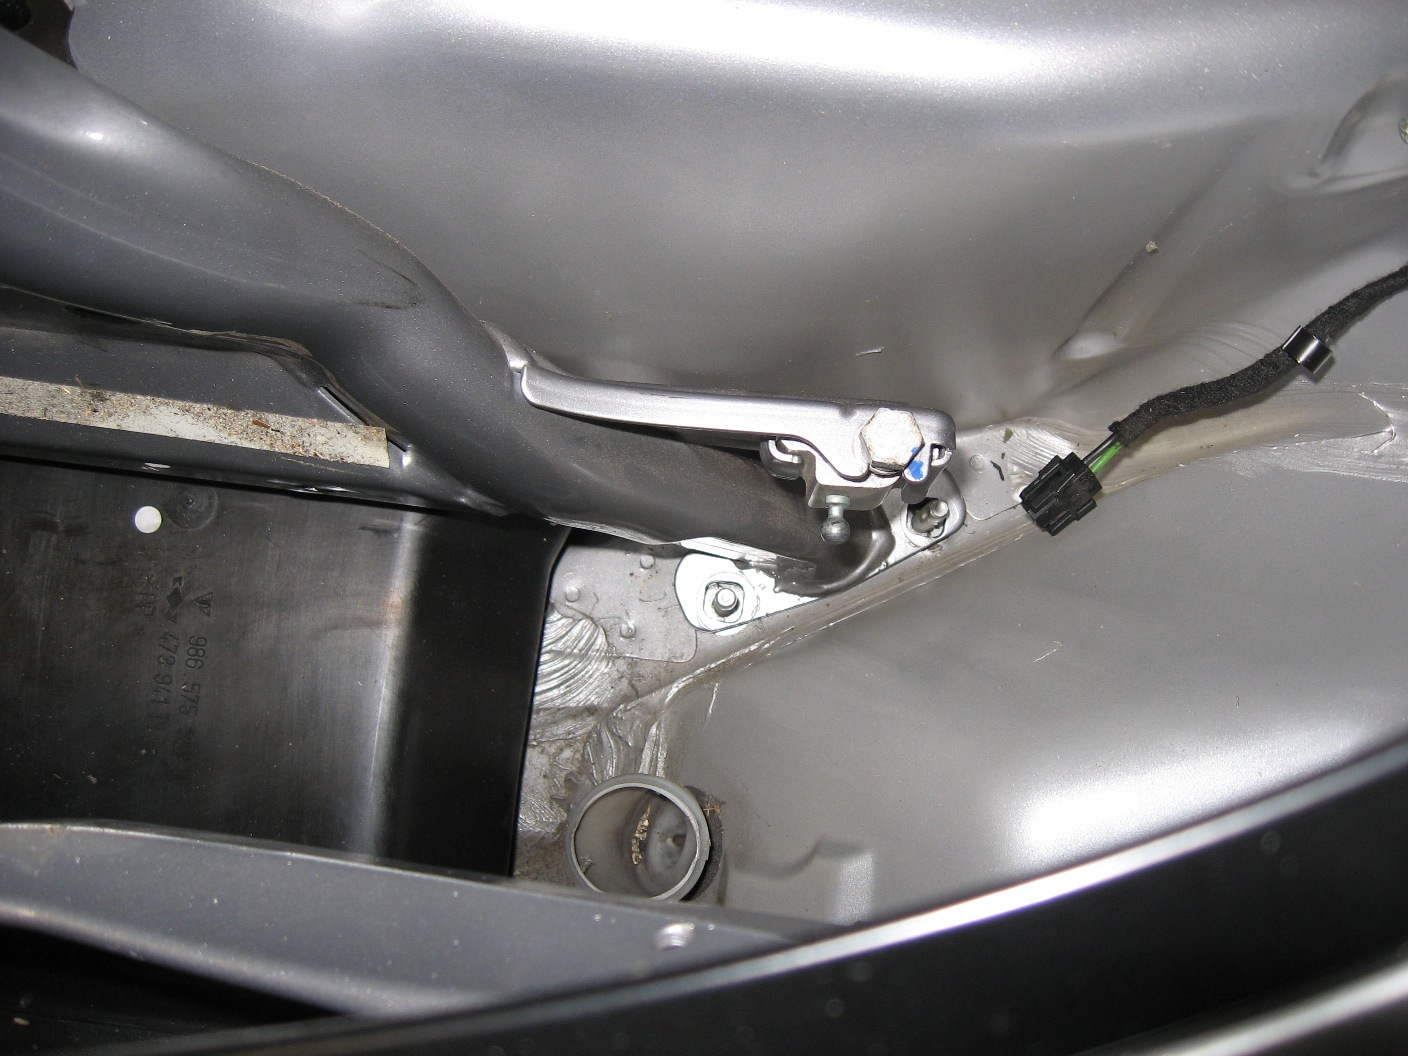
There is a thin cable wire that runs from the latch down into the rear bumper cover, ending behind the drivers side rear wheel. Find that wire and give it a yank. It's purpose is to provide a manual way of opeing the trunk if the electric mechanism fails. You might have to loosen/remove the black plastic cover to get you hand in behind the bumper cover to get to it.
-
They are held in with a spring pin/roll pin - the end of the pin fits into a groove on the guides (I call them posts - don't know the actual name.) You can't see the groove in the post unless you remove it. I only know this because one of the roll pins came out while I was on track once, and the post backed out and struck the wheel spokes at about 70 mph...not a positive result. I think the purpose of these posts is to hold the pad in place under braking; to keep them from rotating out of the caliper. I don't think they are meant to be moved in and out - I suppose you could by adding a second groove, but then you are shortening the length sticking out for the pads to press against. There is a published maximum and minimum thickness for the rotors - I don't have the book with me at the moment, but operating from faulty memory, front rotors new (for a 986) are supposed to be 26mm thick; rears 24mm - and minimums in front 24mm, and rear 22mm. I'm sure someone can correct my max and min thicknesses if my memory is wrong.
-
how hot should it run?
ericinboca replied to arizonaboxster's topic in 986 Series (Boxster, Boxster S)
Seems to me that you are running hot. Just to give you a datapoint -- when it was 107 here in Austin last week I was stuck in stop and go traffic and my coolant rose to just to the right of the center of the 0 on the 180 mark. No where near where you are talking. When I put the heater on for additional cooling, it moved back to the center or just left of center of the 0. I'd have to check where I normally run -- but using my duramatic -- I've measured the typical 193, which I think is closer to the 8 on 180 indicator. This is an '00 3.2S that I rebuilt last winter. So all in all I'm pretty pleased to see it hold up to 107 degrees and just sitting there after running about 80 down the freeway for 30 minutes. I am using 0W-30 Brad Penn Racing oil. M Just to add to the data points...in my '04 986S track car, a couple of weekends ago at Sebring International Raceway (florida), the ambient air temp was 100 while running on the track and the temp gauge was showing just to the right of the 0 on the 180 all day as I flogged it around the track. 115 ambient temp is pretty toasty, but yours sounds a little hot. Radiators all clean? Oil cooler functioning properly? -
Help suspension clunk car crabbing
ericinboca replied to crstfr's topic in 996 Series (Carrera, Carrera 4, Carrera 4S, Targa)
B) If the 996 is like a 986 in the rear, which I imagine is likely, I would check both "radius" arms - the one in the rear that goes from the wheel carrier to the suspension frame and is used to control toe - presumably the one the tech changed - but also check the one in the "front". It is easy to see where that one attaches to the wheel carrier, but you have to remove the forward wheel well plastic cover to get your head in there to see the end of it where it attaches to the chassis. It is easy to overlook 'cause it takes a little effort. If that foward radius arm is loose or busted, I can see how twisting would bend and damage the rear toe arm. I would also be sure the strut mount at the top of the coilover is mounted securely. Of course, this depends on if the 986 is like the 996. And, while this wasn't the nature of your question (sorry for the unsolicited advice) once you get it all figured out and it will hold its alignment, I would recommend slight toe-in on the rear - slight toe-in will help keep the rear from coming around so easy. But suspension set up and alignment set up related is a personal choice - so feel free to ignore the know-it-all :D