Welcome to RennTech.org Community, Guest
There are many great features available to you once you register at RennTech.org
You are free to view posts here, but you must log in to reply to existing posts, or to start your own new topic. Like most online communities, there are costs involved to maintain a site like this - so we encourage our members to subscribe or donate. All subscriptions and donations go to the costs operating and maintaining this site. We prefer that guests take part in our community and we offer a lot in return to those willing to join our corner of the Porsche world. This site is 99 percent member supported (less than 1 percent comes from advertising) - so please consider an annual subscription or donation to keep this site running.
Here are some of the features available - once you subscribe RennTech.org
- View Classified Ads
- DIY Tutorials
- Porsche TSB Listings (limited)
- VIN Decoder
- Special Offers
- Paint Codes
- Registry
- Videos System
- View Reviews
- and get rid of this welcome message
It takes just a few minutes to register, and it's quality Porsche information at a low cost.
Contributing Members also get these additional benefits:
(you become a Contributing Member by subscribing or donating money to the operation of this site)
- No ads - advertisements are removed
- Access the Contributors Only Forum
- Contributing Members Only Downloads
- Send attachments with PMs
- All image/file storage limits are substantially increased for all Contributing Members
- Option Codes Lookup
- VIN Option Lookups (limited)


ericinboca
-
Posts
458 -
Joined
-
Last visited
-
Days Won
1
Content Type
Profiles
Events
Forums
External Paint Colors
Downloads
Tutorials
Links Directory
Collections
Classifieds
Store
Everything posted by ericinboca
-
I see a few posts where people have listed the actual value they get via Durametric for throttle position sensors and pedal encoder potentiometer, but no clear reference to what the values should be. 2004 986S US 3.2L For throttle position sensor 1 at idle, I get .64 volts; at 3000 rpm I get .84 volts For throttle position sensor 2 at idle I get 4.37 volts; at 3000 rpm I get 4.16 volts For pedal encoder potentiometer 1 at idle .76 volts; at 3000 rpm I get 1.08 volts For pedal encoder potentiometer 2 at idle .38 volts; at 3000 rpm I get .54 volts proper values or no??
-
suspension upgrades
ericinboca replied to John Howar's topic in 986 Boxster Suspension, Brakes, and Wheels
I use a lot of the tarett stuff. I like it, and think Ira does a good job with customer service. I recommend softer springs, though, than what the spec guys run - I started with 450/500 and have, over time, moved down to 400# all around. -
Hankook Tire Problems
ericinboca replied to shark715's topic in 996 Series (Carrera, Carrera 4, Carrera 4S, Targa)
I have the Hankooks on my C4S street car. I killed the rears at about 15K, and I did have a few light track days on them. The race shop that does work on my race car, also works on my C4S and said he sees rears go 15 - 20 only. I expected them to be noisy considering the price, but i haven't found the noise to be too bad. I replaced the rears only. Now I find the rears have way more grip than the older fronts, and the PSM comes on more often because of understeer! I guess in total, I am OK with them - way cheaper than the Michelins, and I didn't have very high expectations. -
I am using synthetic in my 986 race car and have stretched thus far to 2K miles between oil change with the samples coming back showing no change in wear and good viscosity. I plan to continue to stretch the changes until I see viscosity dropping off or see wear levels rise. I think I can get to 3K. I think testing, whether you are using conventional or synthetic, is the way to know. Test sample is 20 bucks or so. I was changing very frequently and my lab said "you know champ cars run 500 miles on the same oil. If they can do it, you probably can too. :) "
-
The symptoms closely match an experience I had with a dying fuel pump. I, too, thought at first there was water in my fuel. I could get it to start if I let it cool for an hour or more. I'd change the pump.
-
If you don't get an answer from someone local, you might want to give NAPA a call - I THINK they usually have a good assortment of brake caliper bleeder screws. If the caliper itself, rather than the valve screw, is stripped, then it can be fixed with a TimeSert insert.
-
Is Fuel Pump the Problem
ericinboca replied to 911 FAN's topic in 996 Series (Carrera, Carrera 4, Carrera 4S, Targa)
I'm assuming the car turns over normally, but just doesn't fire off? One symptom of a dying fuel pump is it failing when hot, but once cooled, it will work again. As it gets progressively worse, you may also start to feel it fail while driving. Replacing involves removing battery, the tray, etc. to get to the port at the top of the fuel tank. There is a collar nut that calls for a special tool, although if you are creative, it is possible to remove this collar without that tool. From there it is pretty easy. You are supposed to replace the pump with the tank empty. Otherwise you risk sparking, and you have to stick your hands down in to find the locking tabs on the bottom of tank to know where to place and lock in the pump. Risky behavior, but I have replaced with fuel in the tank at the track. -
99 Boxster Small Oil Leak - Need suggestions
ericinboca replied to westladog's topic in 986 Series (Boxster, Boxster S)
Location makes me think rear main seal. It is a $20 part, but it requires removing the transmission and the flywheel. I might get flamed for this :D but if it is not leaking much, and you are the obervant type, you might be able to wait to replace when you do a clutch job. -
Battery overflow hose. Original factory battery and Porche replacement batteries will have a place it plugs into. Some aftermarket batteries have a place, but it does not always fit the factory fitting. On my 996, I don't use it as my aftermarket battery does not have a place for it.
-
Did LSD come standard on the 986 Boxster?
ericinboca replied to El Patrick's topic in 986 Series (Boxster, Boxster S)
A real check for a mechanical diff is to lift the rear, and rotate a wheel. If the other wheel rotates too, but in the opposite direction, then it has a mechanical locking diff. I added a Guards 60/40 LSD to my 986S racecar. There are certain turns at certain tracks with poor rear grip (Homestead Miami Speedway for example) where the LSD kicks in a lot. The Boxster race cars in the Grand Am Sports Car Challenge ST Class are also using this same diff. If anyone else is thinking of adding a diff for track use, the Grand Am guys tested both the 80/20 and the 60/40. The 80/20 caused excessive understeer. The 60/40 also makes it biased to understeer, but it can be dialed out with shocks, springs and sway bar settings. If anyone is thinking about a diff for spirited street driving, the torque biasing diffs are good. -
Resurfacing Drilled Rotors
ericinboca replied to jose's topic in 996 Series (Carrera, Carrera 4, Carrera 4S, Targa)
+1 for Dharn55 answer. Many shops will automatically replace the rotors to reduce call backs. If thickness, grooving and cracking are ok, and you don't have a rotor issues, such as a pad imprint causing judder, then you can keep using them. And no, you can't turn drilled rotors. -
Window regulator failures
ericinboca replied to E Kap's topic in 996 Series (Carrera, Carrera 4, Carrera 4S, Targa)
It is a common failure for 9x6 cars. I am replacing my second one in my '03 996 today. Regulator is about $200; a rebuilt motor is about $200, but it is usually just the regulator that goes. It looks like an intimidating job, but once you understand it, it is pretty easy. -
Brakes are soft
ericinboca replied to JordanSimon's topic in 996 Series (Carrera, Carrera 4, Carrera 4S, Targa)
When I take my 996 to the track and switch from street pads to track pads, I do not do anything special to re-burnish the rotors. A couple of warm up laps, slowing adding heat, is adequate to transfer the pad material to the rotor, and the pad compounds, from one pad to the next, is pretty similar. This assumes, of course, that you have properly broken in the pads prior to arriving at the track. Note real track pads are a lot harder to break in than the performance pads. ANd at end of day, I change back out, and never give it a second thought. I've had no problems with this approach. I do not bleed when changing pads in this manner. I bleed before I leave home just to change out the fluid in the caliper. If you are confident you have good fluid, no air or moisture, and you don't find any leaks, then I think the next step is a dedicated track pad. Hawk HT10, while I have never used them, look like they have a very wide and high temperatre range. In the Pagid brand, Orange is a great compound and very popular. Yellow is an endurance compound and last a longer time, but are more expensive. My favorite Pagid is Black, but they are hard on rotors. I use DTC 70 on my 986S race car - they are great, but are hard on rotors. -
Brakes are soft
ericinboca replied to JordanSimon's topic in 996 Series (Carrera, Carrera 4, Carrera 4S, Targa)
Hard to say for sure, but here are some things to consider. In my experience, it is usually the fluid. Either too old or air or moisture. I have a motive bleeder, but prefer to bleed the old fashioned way - two people, one building and then holding pressure on the pedal, and one cracking open the bleeder screws. Be sure you are bleeding from both screws on all calipers, starting with the screw farthest from the reservoir, then next farthest away, etc. And be sure you remember to bleed both screws on each caliper - i forgot one bleeder screw once. Super Blue should work for you. A lot of guys use the Motul or Castrol expensive stuff. I'm sure it is good, but as long as I keep my fluid new and properly bled, the Blue has not presented a problem for me. I bleed before every event. Be sure you still have at least the stock air scoops to direct some cooling air to the brakes. If those are missing, there is not much else to provide cooling. The GT3 brake scoops would be an inexpensive upgrade. I used to strictly use pagid pads, but now race in series that offers Hawk pads as a contingency, so I switched to those. I use DTC-70s and do not have experience with the other compounds. I do a lot of instructing and I've found with novices the fluid presents as a problem well before the pads. The pads become a problem only after a driver has several track days under his belt and is consistently exceeding the heat limits of the street pads. You can use a pyrometer or the color changing tapes to get an idea of how much heat you are building. If you are pretty experienced, you are probably fading the pads. The 996 in stock configuration is pretty heavy and produces a lot of heat. Now unfortunately, "hybrid" pads are a compromise. On the track, you might be hitting 700 - 900 - 1000 degrees. Street pads, and street performance pads, are unlikely to be able to handle that heat. If you look at the compounds of the various pads available - pagid, hawk, others - they will publish the heat range in which the pad is effective. True track or race pads don't work well at lower temps. They have to have some heat in them to work well. So on the interstate driving to a track event, they can cool down and in a sudden braking moment, they may not bite initially. A lot of guys change pads when they get to the track and change back for the drive home. On the ABS, I am frankly unsure of the answer. I think the amount of fluid is really small. And you would only be pressurizing that fluid if you get into the ABS. I have found the ABS in my 986S race car to be a bit of a PITA. It doesn't like trail braking under G load and you can feel it in the pedal being confused. I recently started using the Durametric tool to "activate" the ABS when I bleed. You will see some posts from some people about this - when you activate, you would think fluid would come out or you would hear the pump. I don't get any of that. But, it seems that the car feels better when I get into the ABS, but that might be all imagined. Finally, and I am unsure of this, but it makes sense I suppose - a respected race shop told me once there are two reasons for braided stainless steel brake lines - first is to protect the lines from debris; second to reduce the expansion of the rubber line under pressure. I don't know about either, but do use braided lines. Geez I'm long winded :) Here is a summary of recommendations. * bleed properly before every event * use a real race pad on track that can handle your heat if you are experienced driver * use GT3 brake scoops * use braided lines * and if all else fails and you can determine the brakes are fading when the ABS kicks in, bleed the ABS BTW - I do occasionally track my daily driver - my 996 C4S. I change the fluid and use DTC 70s all around. No braided lines, no ABS bleed, street tires (which means less braking) no extra cooling - and have had no fade. -
Best suspension for Boxster S 2001?
ericinboca replied to SamyTheBull's topic in 987-2 Series (Boxster, Boxster S, Spyder)
I had the M030 on my '04 986S. It is a very good choice. M030 will get you new dampers, new springs and I think new sways too. It will not do much to ride height; likely be nearly the same as what you have now, which sounds good if you have an incline to negotiate. Be sure you take a look at all those bushings. That will make a huge difference. -
Best suspension for Boxster S 2001?
ericinboca replied to SamyTheBull's topic in 987-2 Series (Boxster, Boxster S, Spyder)
That's sort of a hard question to answer as there are several suspension pieces that can be updated, and it all depends on what you want. To keep it simple and relatively inexpensive, and considering you have rough roads, you might want to go back to near stock. In that case, Bilstein makes repalcement dampers that run somewhere around 200 to 250 a piece. Bilstein makes the dampers that came on the car. Usually worn out springs cause the car to sag. Springs will often outlast the life of a car unless the car is doing a bunch of heavy towing, are overloaded, etc. So unless the car is sagging, I would bet your springs are fine. Then there are all the control arms, bushings, bearings, etc. If the arms are OK, then it is possible to press out the old bushings and put in stock ones to replace. Considering the mileage and the environment, I would recommend doing this. It is cheaper than replacing all the arms, again, assuming the arms are all OK. Upgrading your busings and spherical bearings on all these arms is great for track handling, but on a street car, upgraded and.or solid bushings will transfer in more road noise and make the ride harsh. Don't forget the bushings in the sway bars - two in the front and two in the back. And finally, take a look at the strut mounts in the front and back. They also have bushings that are often a wear item. Although with these, just replace the mount completely. Then my reco is: * Bilstein 046239/046222 or 046215/046222 (tire rack, pelican parts - lots of places to get) * new strut mounts (dealers - sunset, suncoast, others) * replace all control arm and sway bar bushings and bearings (dealer might have - pelican has sway bar bushings) * inspect and replace any damaged control arms, toe arms, etc. -
I have a front set - 996.352.949.03 - Pagid brand that have been in my bedroom closet for about 3 years. Box has never even been opened. I am not going to use them. I will let them go for half of retail plus shipping. If interested, PM me.
-
Blue painters tape works great and does not leave an adhesive mess. Racers tape is a lot like duct tape - real sticky, but in my experiecne has not removed paint, but it leaves a good bit of residue behind. In one of the DE groups I am active in, we use liquid chalk on the windows. Stays on good - need a razor blade to get off, but no damage.
-
Is that part supposed to snap into the arm? My rear sensor just rests there, I'm assuming the part that snaps it into place has broken off. Anyone have any ideas? Thanks. Yes, they are supposed to "snap" in. There are little tabs, and they are supposed to go into a spot on the control arms. . There are actually two different types of controls arms for cars with and without lintronic. If for some reason you don't have the right control arms, or you want a down and dirty fix, you can use two wire ties. Make an X across the top. Holds just fine. (Note in this image, the control arm is disconnected from the wheel carrier and is hanging down loose, making the sensor off kilter.)

-
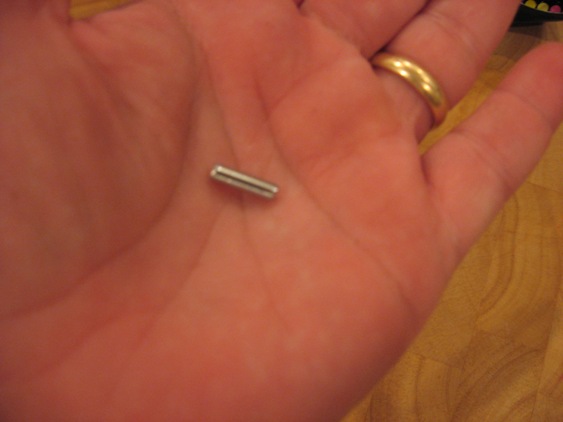
I imagine the half of the pin that fits into the hole on the stud sheared off. Will the stud come out on the wheel side? If so, take the wheel off and slide the stud out. If you cannot slide the stud out that way, then you may want to remove the caliper, just to get that stud out. With the stud out, use some WD 40 and see if you can push the remainder of the roll pin up into the hole for the stud. You may need to find something of the correct diameter and use a light tapping with a hammer.
-
That stud is what holds the pad in place, keeping it from rotating around with the rotor. It is held in with a small roll pin. Take the wheel off, stick your head in and look at the underside of the caliper. There is a small hole where the roll pin goes. I got a roll pin that fits from smallparts.com. That was several years ago, so I do not know if they still carry roll pins. But the measurement is 1/2" long with what looks like an OD of 1/8". I removed the caliper, cleaned out the hole and cleaned up the stud with brake parts cleaner, and used some Loctite on the roll pin when I put it back in. No problems since. The stud on mine came out the other way and hit on the inside wheel spokes while on the track - man did I think something was horribly broken with all that racket.
-
Where is this fluid coming from!
ericinboca replied to blackboxster's topic in 986 Series (Boxster, Boxster S)
I think you are OK. Be vigilant on the temp, the coolant level, and the overflow hose for a few more days. If no other strangeness, chalk it up as an anomaly. -
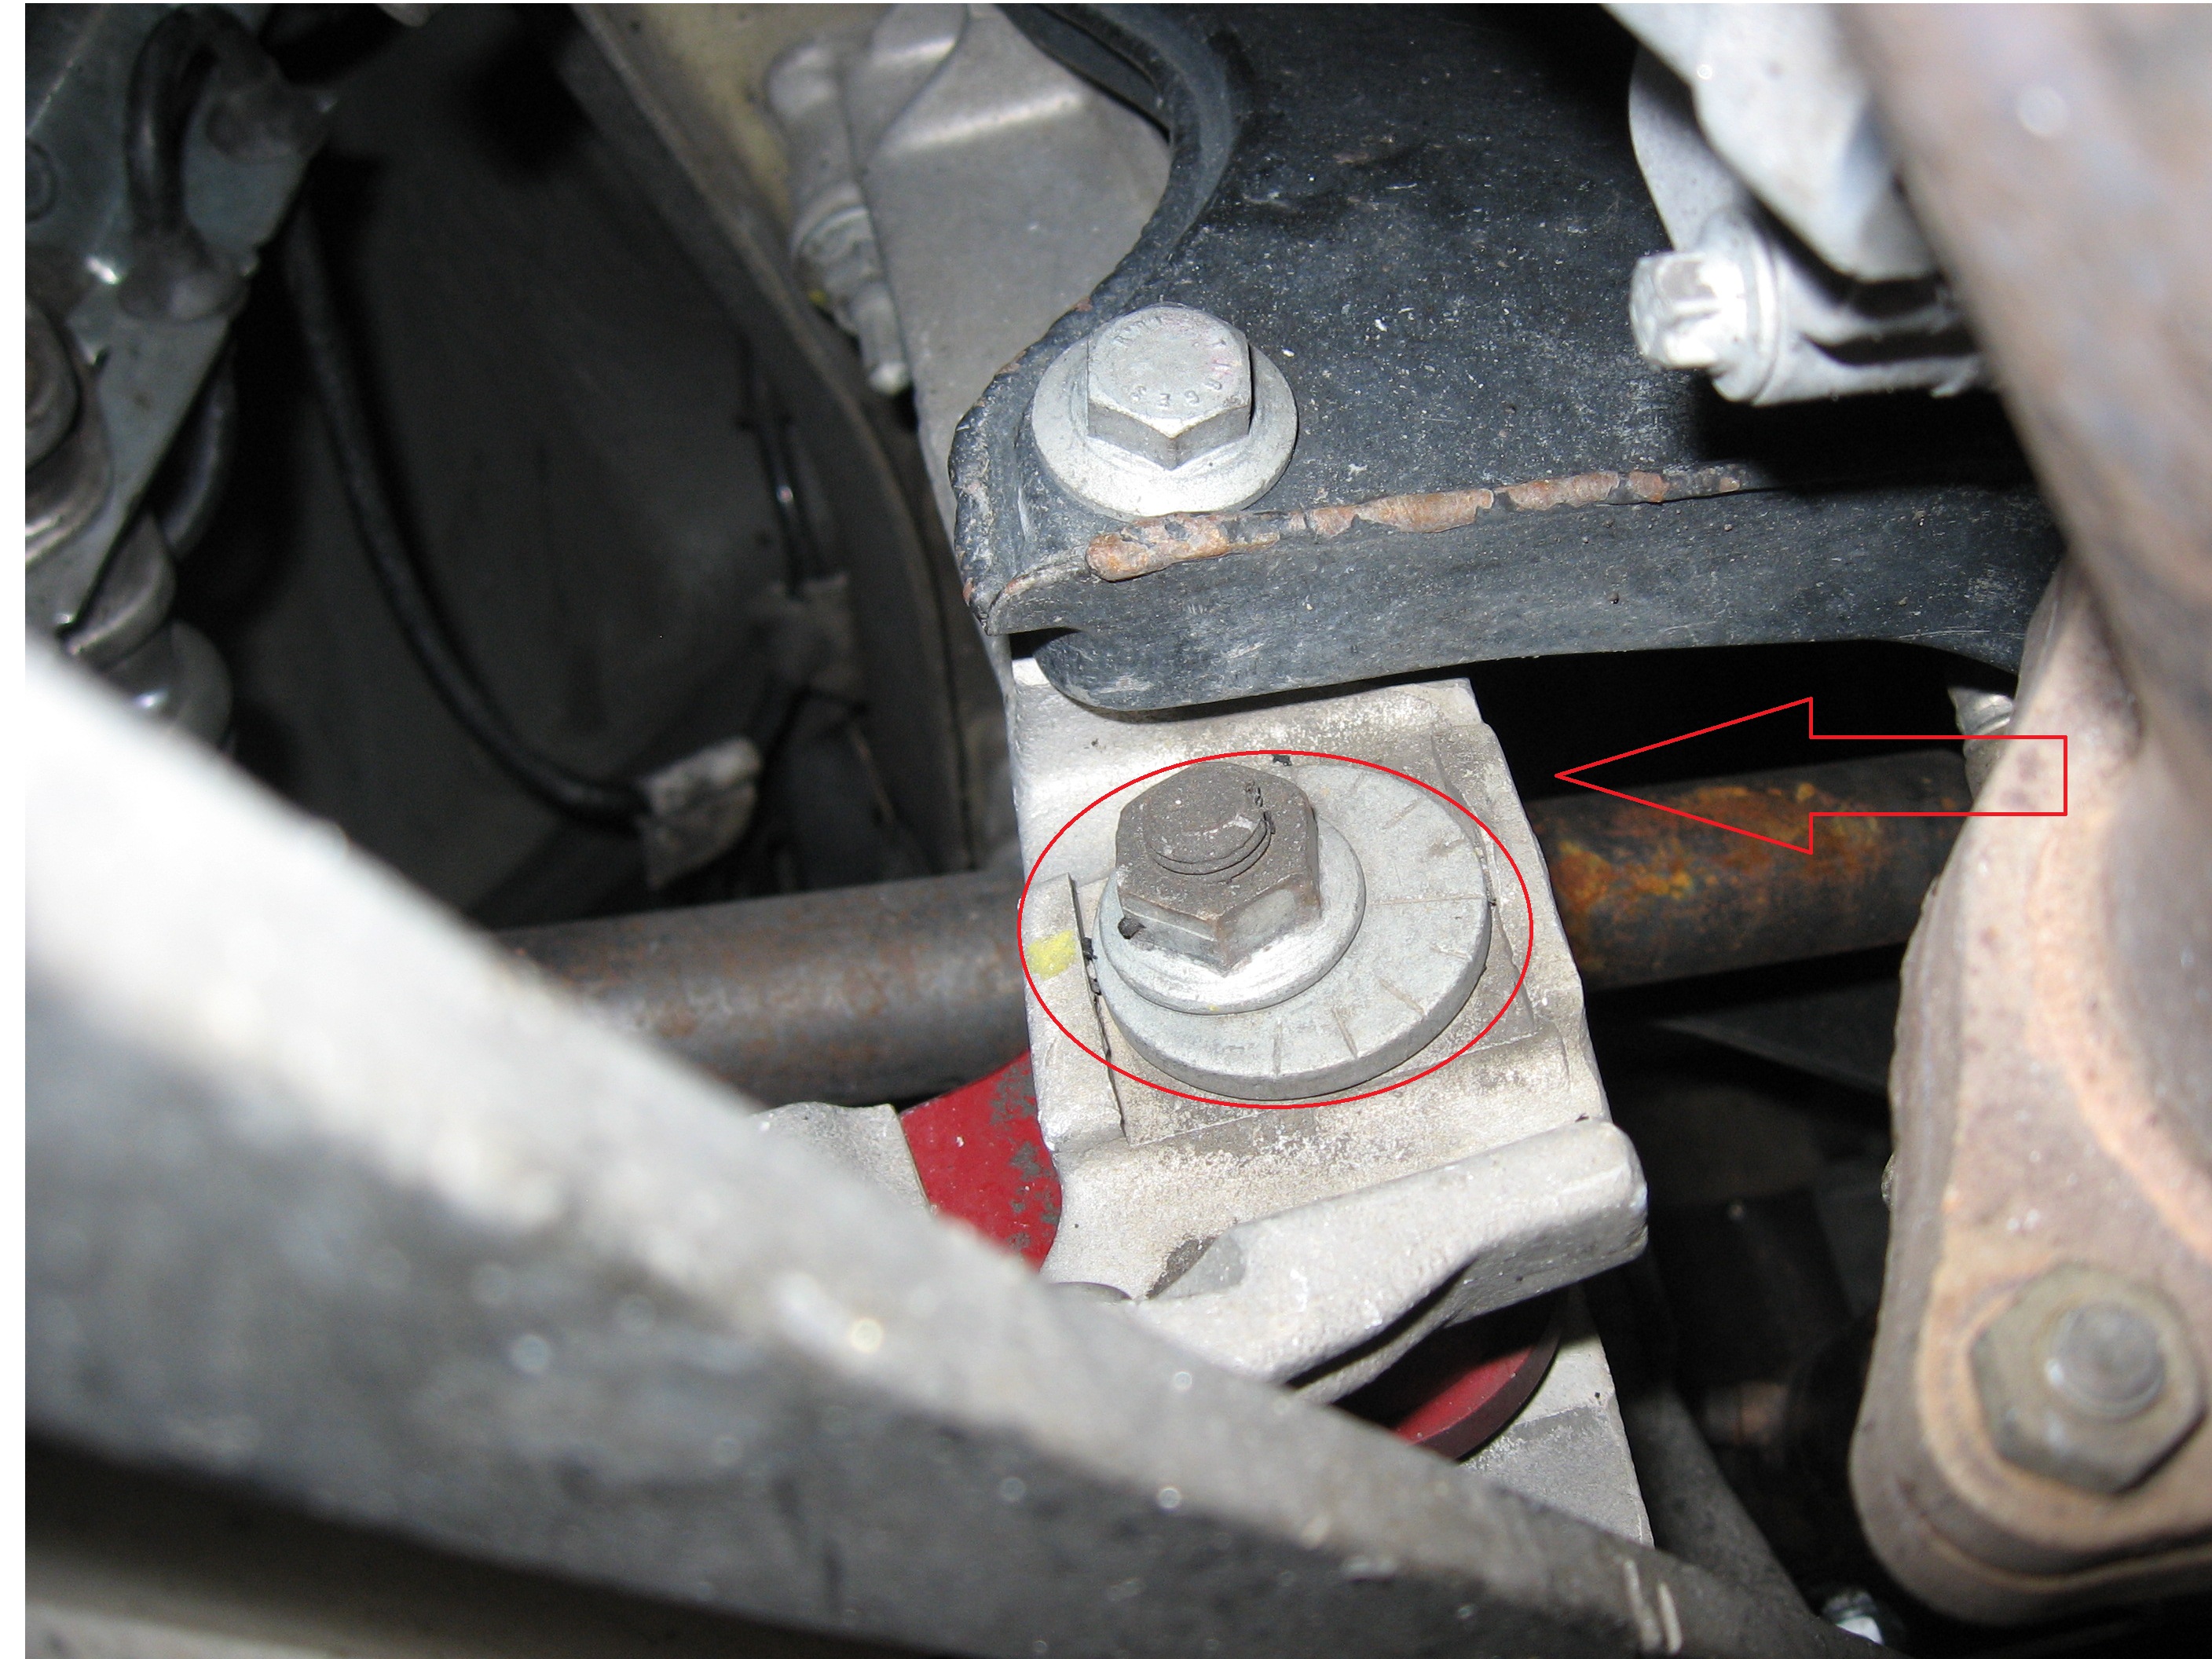
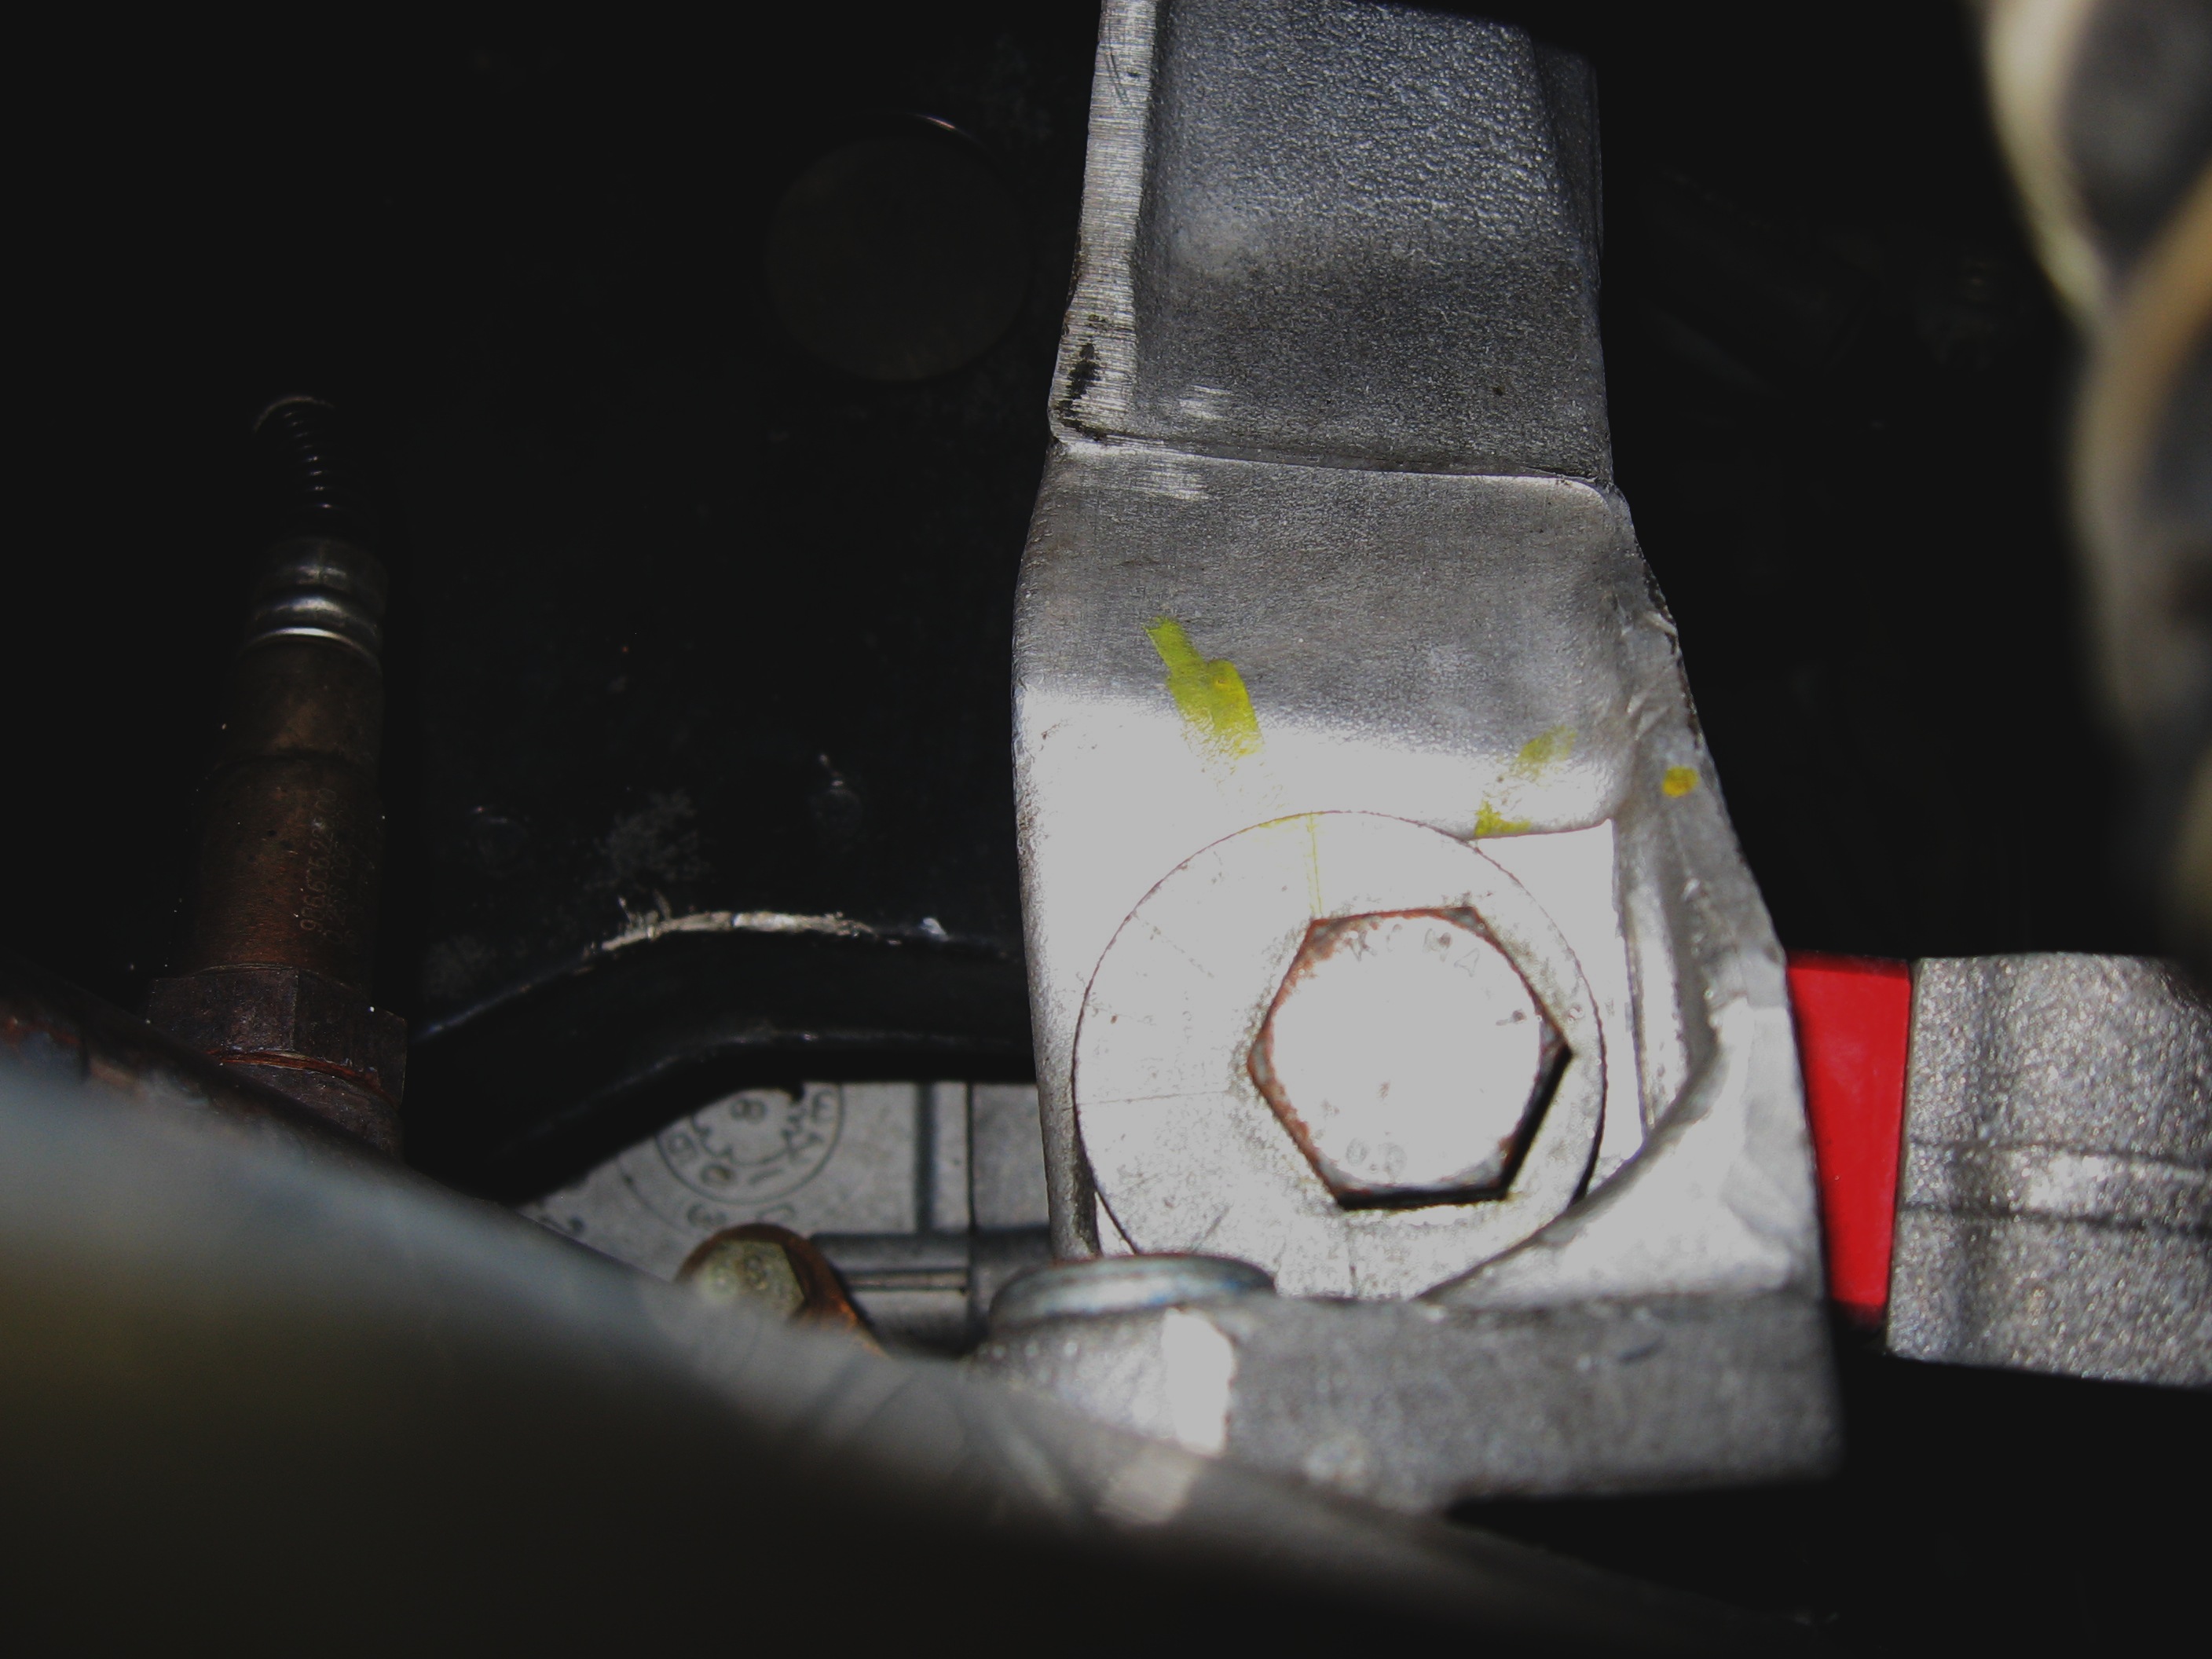
My apologies if this post ends up being posted twice - I seem to have had a glitch in trying to add the first time. ** The camber bolt is an eccentric bolt so that its rotational axis is offset from the center. It's like a big washer, but with the hole off to one side, not in the middle. On the head side of the bolt, the"washer" is part of the head, permanently fixed to the bolt. On the nut side, the "washer" has a tab on it that fits into a groove that runs part of the length of the bolt. If the bolt rotates, the"washers" also rotate. The washers are set between two flanges on the suspension subframe so that they ride against them. If the bolt is rotated, the control arm moves in and out as the offset washer rides along the flanges. Here are some pictures to clarify. First is the nut side of the bolt. The red arrow is pointing at what I call theflange. The "washer" is circled in red. The second image is of the head side of the bolt - sorry, poor lighting. Note the LCAs in these pictures are shimmable control arms, but for purposes ofshowing the camber bolts and how they work, that does not make any difference.
-
Yes, in replacing the lower control arms in the rear, you will need an alignment following. In the rear, the control arm is used to adjust camber, unlike the front where the control arm's lateral position is fixed. You can try marking the position with paint, but in my experience, while that might get you in the ballpark, it will not be good enough. The work itself is not all that difficult. Couple of gotchas - It is hard to hold a torx bit on the ball joint to keep it from turning when removing/tightening the nut. I use a small wrench with a short bit. And sometimes it is difficult to get the camber adjusting bolt out, but if you study it, you can begin to undertand how it is oriented. Finally, if you drop that aluminum triangle shaped pan off the studs, it never seems to want to line back up right. You just have to keep working it - takes patience
-
Where is this fluid coming from!
ericinboca replied to blackboxster's topic in 986 Series (Boxster, Boxster S)
I suppose it could be the shock, but it doesn't sound like it, at least in my limited experience with a leaky shock. I've not experienced a leaky shock on a Porsche, but have with an Elise. In that situation, you could actually tell something was wrong with that corner (it was right rear) when you drove it. It just didn't behave the same as the other corners. And when parked, it dripped off the bottom of the damper. To have a lot of fluid on the control arm and other places, I think you would have to have a severe leak in the shock that would be noticeable. Shock fluid is an oil too, so not sure if the fluid you experienced seemed like an oil.