Welcome to RennTech.org Community, Guest
There are many great features available to you once you register at RennTech.org
You are free to view posts here, but you must log in to reply to existing posts, or to start your own new topic. Like most online communities, there are costs involved to maintain a site like this - so we encourage our members to subscribe or donate. All subscriptions and donations go to the costs operating and maintaining this site. We prefer that guests take part in our community and we offer a lot in return to those willing to join our corner of the Porsche world. This site is 99 percent member supported (less than 1 percent comes from advertising) - so please consider an annual subscription or donation to keep this site running.
Here are some of the features available - once you subscribe RennTech.org
- View Classified Ads
- DIY Tutorials
- Porsche TSB Listings (limited)
- VIN Decoder
- Special Offers
- Paint Codes
- Registry
- Videos System
- View Reviews
- and get rid of this welcome message
It takes just a few minutes to register, and it's quality Porsche information at a low cost.
Contributing Members also get these additional benefits:
(you become a Contributing Member by subscribing or donating money to the operation of this site)
- No ads - advertisements are removed
- Access the Contributors Only Forum
- Contributing Members Only Downloads
- Send attachments with PMs
- All image/file storage limits are substantially increased for all Contributing Members
- Option Codes Lookup
- VIN Option Lookups (limited)


amcleod1
-
Posts
69 -
Joined
-
Last visited
Content Type
Profiles
Events
Forums
Exterior Paint Colors
Downloads
Tutorials
Links Directory
Collections
Classifieds
Store
Everything posted by amcleod1
-
 Hi, Does any have the following Factory Workshop Repair Manual Pages that they could pdf and attach ? Group 69 58 19 drivers airbag remove/install Group 69 54 19 steering wheel contact unit remove/install Group 91 20 19 radio remove/install (CDR-220) Thanks. Alex.
 -
Under Bumper Trim Function?
amcleod1 replied to HalM's topic in 996 Series (Carrera, Carrera 4, Carrera 4S, Targa)
When I bought my car both were missing or damaged badly. Looking at where they fit, and the air chutes near them, I tend to think the fin diverts the hot radiator outlet air down and outboard of the front wheel and away from the brakes. -
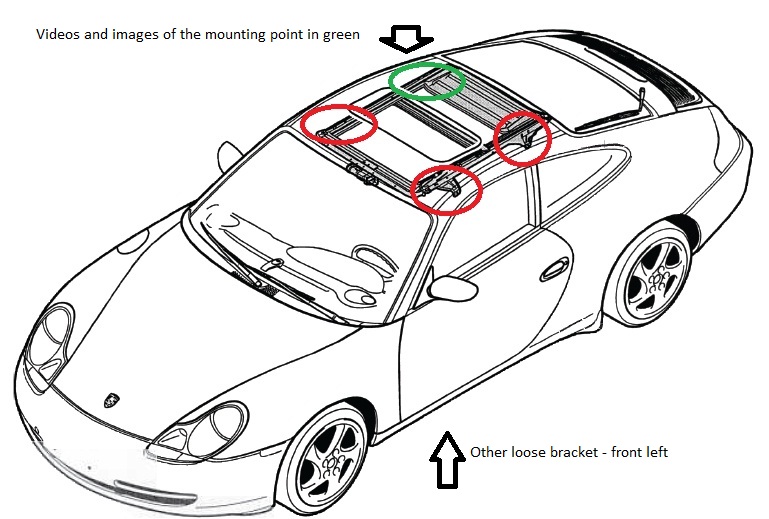
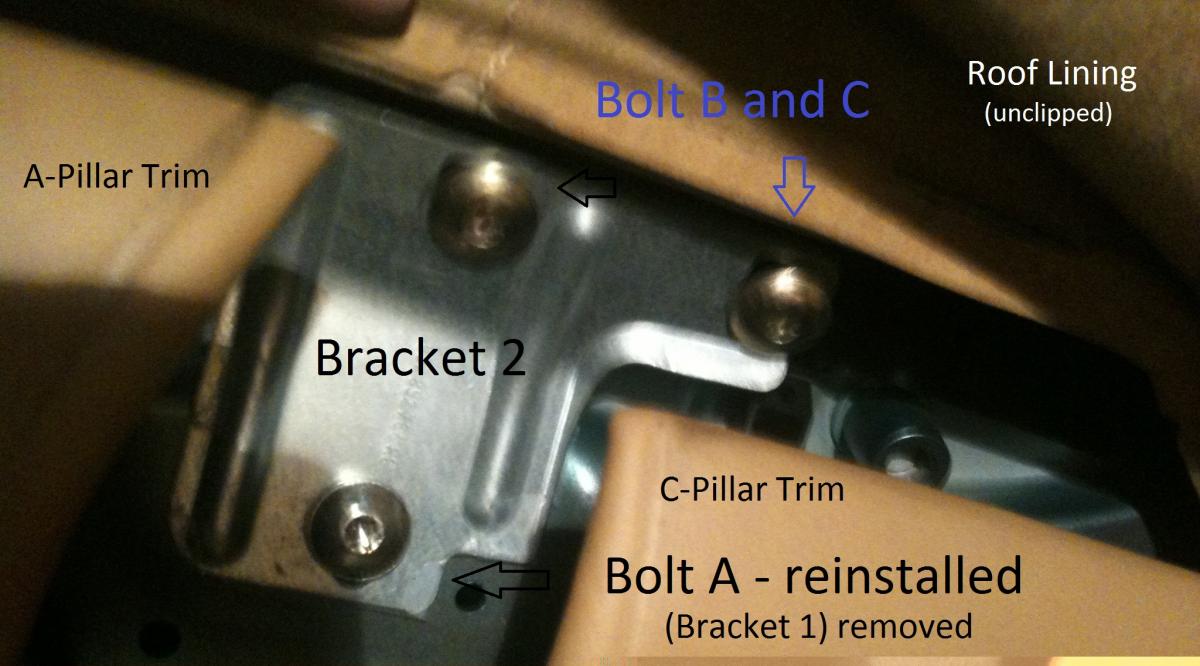
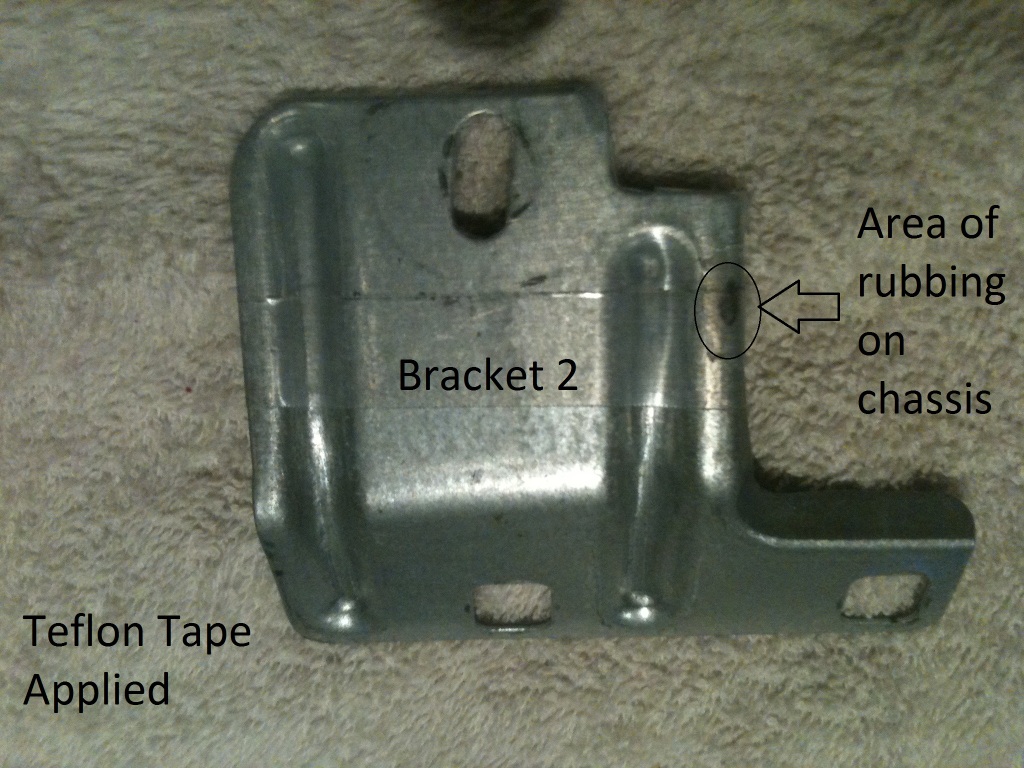
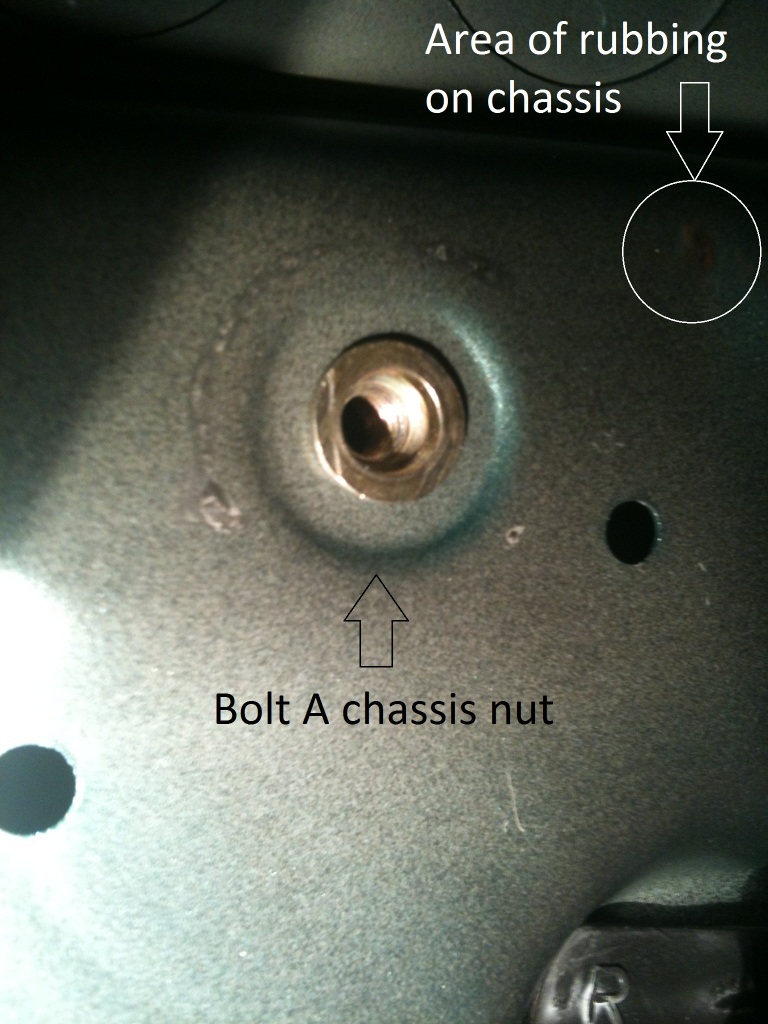
Hi - I too suffered the dreaded sunroof ticking/clicking noises until today. I had two ticking/clicking noises: (1) The first noise turned out to be the 9 foam inserts (MY2000 car) stuck to the upper-side of the sliding sunroof trim panel. The foam inserts had aged and become tacky and were making/breaking contact with underside of the metal sliding sunroof panel as wind passed over or via bumps in the road. Each time they broke contact they made the ticking/clicking noise. There's a TSB on replacing the 9 inserts with 6 new ones but like all things Porsche very expensive. I solved the noise by using 9 strips of 25mm wide x 4 inches long self adhesive felt stuck to the underside of the sliding sunroof panel where the foam strips were touching (15mm width would work too). To install I disconnected and slid the sliding sunroof trim panel back into recess. Front 6 x felt tapes were installed with the sunroof closed. Rear 3 x felt tapes were installed with the sunroof in the tilted position. Clean the areas with alcohol first. (2) The second was far harder to diagnose and fix. This noise was the ticking/clicking many have reported that can he heard above and just behind your head when driving or gently pushing on the roof lining transverse support bar (between the rear window and rear edge of sunroof opening. And like everyone else it was driving me crazy. It turned out to be a very small relative movement between right rear main mounting bracket of the sunroof to the chassis. I've posted images and video to help others. To fix meant getting in and under the roof lining - never done this before. See the First Video - before I started (with coat hook removed). I diagnosed by gradually removing one trim item at a time and rechecking the ticking/clicking was still there or not. Firstly, removed the coat hook trim (ticking still there); then B-pillar trim completely (still there), C-pillar trim partially (still there); A-Pillar trim partially (still there); Uncliped the roof lining on one side (still there); removed the torx bolt (Bolt A in images) securing the aluminium bracket at the junction of the A/B/C pillars and thus exposed the right rear main sunroof mounting bracket (bracket 2 in images) underneath. PRESTO - TICKING GONE. So I re-installed the torx bolt (Bolt A) without the aluminium bracket, tightened Bolt A, and the ticking came back. I then tightened the torx bolts holding bracket (Bracket 2) to the sunroof rail in case they were loose - still there. I could not see why it ticked until I removed the 3 torx bolts (Bolts A, B and C) and the sunroof mounting bracket (Bracket 2). On the rear of the sunroof bracket (Bracket 2) and on the chassis there was the slightest scuff area where the two items had been rubbing together for many years. I stuck some teflon film to the rear of the main bracket (see images) and reinstalled with all bolts (A, B and C) all tightened - NO NOISE. I also had the same noise on the passenger side, same approach to disassembly and diagnosis. This time it was the left front main sunroof bracket which was solved by just tightening all 3 torx bolt. I now have no creaking, ticking, clicking noises at all from the roof - the silence is now bliss. :thumbup:

-
Thanks again EleCTriCT and JFP. Will post update once completed. Update: Disconnected battery for 20mins, removed the passenger airbag, re-connected battery, got airbag light as expected on engine start, no other issues noticed while driving. Was unable to find a fuse(s) dedicated to the airbag(s) system. Still searching for the noise in dashboard though.
-
Thanks EleCTriCT and JFP for the responses. A slightly different angle then - is it possible to fully disable the airbag system so I can drive the car without risk the bags blowing up. Such as pulling a fuse etc. I won't be driving the car far to find the culpit dashboard noise, so I'm happy not to have the airbags operational. Also I assume that in the caution note to have airbag opening facing up - the opening they're talking about is the "opening face" that faces the passenger in the installed in the car ? I've also read to disconnect the battery and wait at least 1 minute before removing the airbag. Was planning much longer but just want to confirm.
-
Hi, I'm about to commence searching for an irritating squeak coming from inside the dashboard (passenger side) which I hope doesn't become a search for the holy grail. To help pinpoint where the noise is originating from I'd like to remove the passenger airbag from the dashboard and drive the car while my son who has radar ears locks onto the cause. Does anyone know if its safe to remove the passenger-side dashboard airbag from the car and drive around ? By safe I mean, the drivers and side airbags will still work as normal. I assume I'll get the airbag warning lamp and codes that can be cleared once the passenger airbag is re-installed (I have durametric) . Car is MY2000 C2 Tiptronic RHD (Aussie) Thanks in advance. Alex.
-
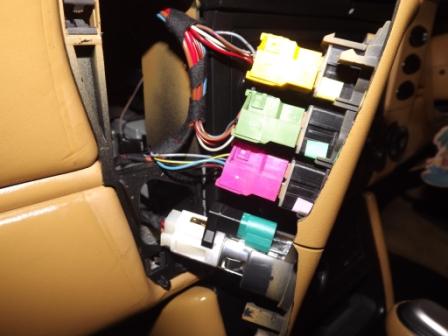
:help: Hi there, I'm replacing a painted/lacquered centre vent switch panel that's showing its age. I've managed to remove the wiring loom plug from the cigarette lighter assembly by depressing the lock tab on the plug and I've also removed the lighter assembly itself from the panel. One down. However I'm struggling to removing the 3 wiring loom plugs from the 3 switches. I've tried but they don't seem to want to budge even with some good elbow grease. I can't see any obvious locking tabs on the plugs. I'm afraid to apply more force in case of damage either the plug or the switch. I've attached an image showing the 3 plugs (the yellow green pink plugs). Is there a trick to removing these, or do I just need to apply more force or perhaps lever them off ? Suggestions welcome. Alex.
-
Thanks Loren for the quick response. I'll stick with the MY2000 one and list the 2002/3 one on e-bay sometime in the future along with the whole interior light trim. And yes, I gave you the rep point. :thankyou:
-
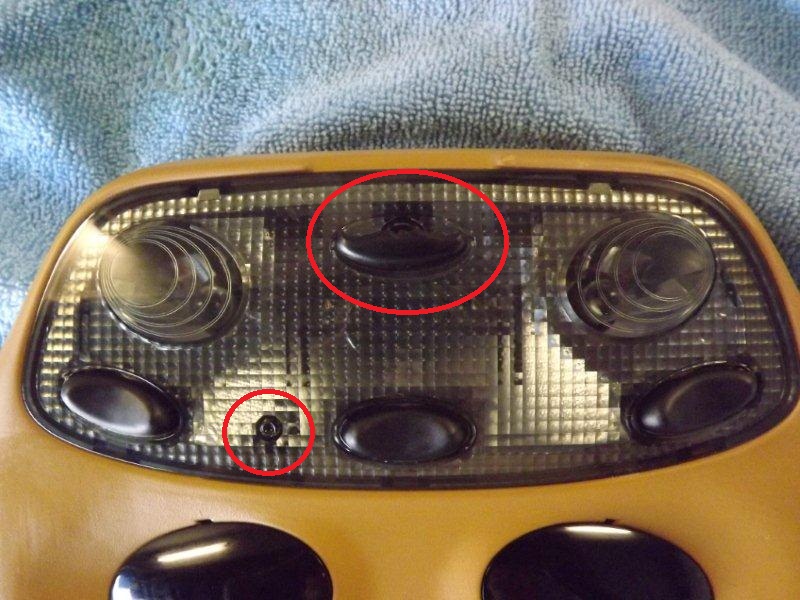
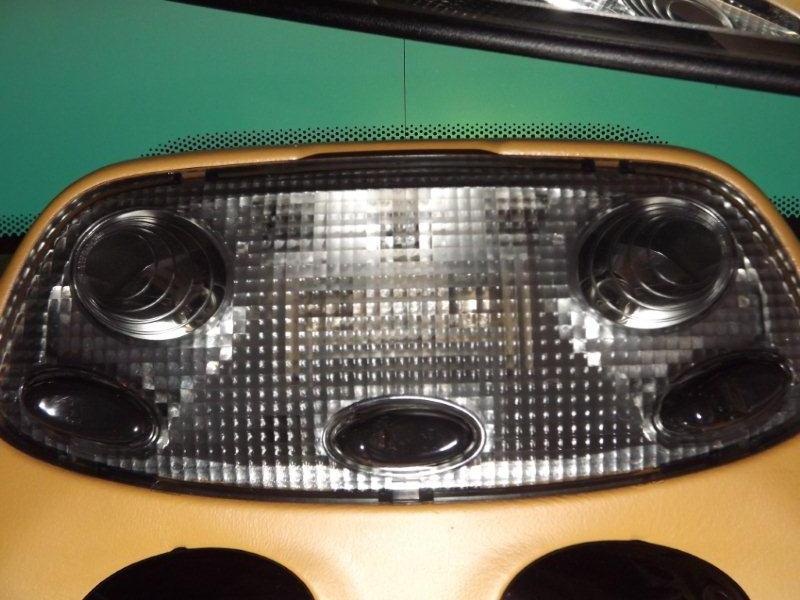
Hi Fellow 996ers, :help: I'll give a reputation point the first to answer the question about the purpose of what appears to be 2 extra sensors on the interior light assembly - see attached photo, extra bits/sensors circled red. I suspect this assembly is off a later model car than mine. The assembly I have in my car (MY2000) does not have these extra bits (also pictured) and was wondering whether the extra bits give me extra horsepower (just kidding). No, seriously, I'm interested whether its worth replacing mine with this and what may be involved. As minimum I have already noted that both assemblies have the same 3-pin connector, but different keying on the connector so not simply plug-n-play. The other two connectors (sunroof switch and alarm sensors) are plug-n-play. Thanks in advance. Alex.
-
Squeaking sounds from front?
amcleod1 replied to Dominic123's topic in 996 Series (Carrera, Carrera 4, Carrera 4S, Targa)
Hi, Just a week ago I resolved my suspension squeaking noise that was driving me crazy. I fixed it by checking the torque on all the major suspension and crossmember nuts and bolts. I found two nuts not loose but way under-torque. Now they're at torque no more squeaking when going over speed bumps or potholes. -
Power Seat Noise - Groan
amcleod1 replied to JP3670's topic in 996 Series (Carrera, Carrera 4, Carrera 4S, Targa)
Hi all, I had a groaning noise too. Fixed it via a TSB. See link below. -
I had exactly the same problem and its a simple fix and known problem. See the 996 Carrera TSB 7213 under the DIY Tools menu. Link below should take you there. TSB 7213 - Noise When Electric Seat Fore / Aft Adjustment Is Activated Hope this helps make things quiet for you as it did for me.
-
coolant replacement 2001 996
amcleod1 replied to ewaleson's topic in 996 Series (Carrera, Carrera 4, Carrera 4S, Targa)
Hi, not sure if this assists but if you do want to replace the coolant with OEM see the following link: -
Hi, Fabspeed also offer an exhaust with vacuum controlled valves. They have instructions online, perhaps they'll assist you. http://www.fabspeed.com/PDF_files/996-997-997.2%20Valvetronic%20Installation%20Instructions.pdf
-
Seems you're fortunate you decided to undertake this project. I checked the Porsche PET and the heat shields are P/N: 996 104 425 02 - same both sides. You'll probably need the bolts to secure the heat shields to the engine, they are P/N 900 378 163 09 - you'll need 4 (2 per side). The bolts for the spark plug coils are P/N: 900 067 089 01 in case you need them too. Hope this helps.
-
I recently used the Snap-on wobble bar ( FXWP4 ) and plug socket ( S9706KRA ) with a non-snap-on torque wrench with no problems. One thing that could cause you some anxiety is that the rubber socket insert really grips onto the plug when withdrawing the socket from the tightened spark plug. Next time I do the plugs I'll lube the rubber insert or remove the insert completely.
-
Hi - I've bought many parts, many times from Pelican Parts in the US for my 996. In my view they are reliable, reasonably priced, with most parts in stock, and quick delivery to Australia. Just remember not to exceed the Australia Customs limits on importing parts (including the delivery cost), otherwise you'll wipe out all saving buying overseas. The limit as of July/2011 is A$1000.
-
Exhaust smokingfrom cold start
amcleod1 replied to Alfieboy's topic in 996 Series (Carrera, Carrera 4, Carrera 4S, Targa)
Hi - I too had smoke at startup - not much and not for long - see video for 2 starts that show it clearly. As you can see in one start there's more smoke on the the left side, then on the other more smoke on the right. Changed the AOS and no more smoke. Maybe this helps you diagnose. -
Spark Plug Tube replacement
amcleod1 replied to TomCat's topic in 996 Series (Carrera, Carrera 4, Carrera 4S, Targa)
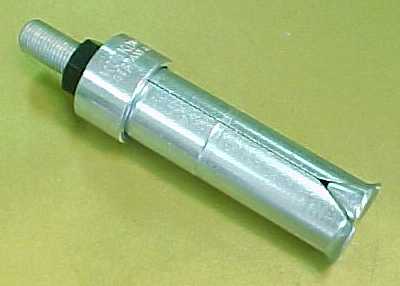
Hi - i just did my coils, plugs, tubes and o-rings on a 2000 996. Removing/replacing the tubes is a really simple job with the right tool. I purchase the factory recommended puller tool - from Kukko P/N: 21-4 (same as Hazel 788-30) - A$100 well spent. Instructions are in the repair manual at Group 15 46 19 - page 15-83. However instead of the two mounting bars, I used the nut on the puller to secure a ring spanner under a large washer and then levered the puller and tube out against a wood block against the engine. They all popped out with little to medium force. Prior to installation make sure you use the recommended lube on the o-rings. To install I used the handle end of a large screwdriver - that fitted snuggly on the end of the tube without getting stuck - to push them back in. Hope this helps. edited to add photo of Kukko 21-4
-
Now that I've had time think about it - I think you're right - it was a loose spark plug. I was surprised how little effort was required to remove 1-2 off them. I also think the leak in the vacuum canister was the cause of my intermittent P1128 error - will need to drive for several week with no errors to be sure.
-
White billowing smoke?
amcleod1 replied to venturawildes's topic in 996 Series (Carrera, Carrera 4, Carrera 4S, Targa)
I just replaced my AOS. One of the symptoms was a large cloud of white smoke at startup that lasted about 3-4 seconds each time. The white smoke occurred only about 4 times over a 2 month period, but I started to notice a little puff of blue smoke more regularly at startup. So +1 on the AOS too. -
Hi All - an update - I think it's fixed. Not quite sure what the cause was as I just replaced the spark plugs, AOS and a leaking vacuum canister. One of them seems to have been the cause. I suspect the leaking vacuum canister.
-
Oil fill pipe, tube or gooseneck
amcleod1 replied to Rapewta's topic in 996 Series (Carrera, Carrera 4, Carrera 4S, Targa)
If you have access to the 996 Factory Manuals see Group 15 17 19 pages 17-27 to 17-31 - Removing and Installing the Oil filler Neck (engine installed). Same process as described by RFM but step by step. -
Hi fpb111, Ok, I'm curious. I've not heard that term before....what does "tires talking" mean ? Also to brake with engine off, I assume I'd place the tip into neutral first then switch ignition off and then brake. As to the wet road - how did you know I just detailed the car !!
-
I went through this coolant question about 10 months ago. See the following links Porsche Coolant - ELF and OEM Porsche Coolant in the 996 forum. Hope this helps save you some headaches.