Welcome to RennTech.org Community, Guest
There are many great features available to you once you register at RennTech.org
You are free to view posts here, but you must log in to reply to existing posts, or to start your own new topic. Like most online communities, there are costs involved to maintain a site like this - so we encourage our members to subscribe or donate. All subscriptions and donations go to the costs operating and maintaining this site. We prefer that guests take part in our community and we offer a lot in return to those willing to join our corner of the Porsche world. This site is 99 percent member supported (less than 1 percent comes from advertising) - so please consider an annual subscription or donation to keep this site running.
Here are some of the features available - once you subscribe RennTech.org
- View Classified Ads
- DIY Tutorials
- Porsche TSB Listings (limited)
- VIN Decoder
- Special Offers
- Paint Codes
- Registry
- Videos System
- View Reviews
- and get rid of this welcome message
It takes just a few minutes to register, and it's quality Porsche information at a low cost.
Contributing Members also get these additional benefits:
(you become a Contributing Member by subscribing or donating money to the operation of this site)
- No ads - advertisements are removed
- Access the Contributors Only Forum
- Contributing Members Only Downloads
- Send attachments with PMs
- All image/file storage limits are substantially increased for all Contributing Members
- Option Codes Lookup
- VIN Option Lookups (limited)


Q-Ship986
-
Posts
232 -
Joined
-
Last visited
-
Days Won
3
Content Type
Profiles
Events
Forums
External Paint Colors
Downloads
Tutorials
Links Directory
Collections
Classifieds
Store
Everything posted by Q-Ship986
-
Renntech.org and other sites have covered various installations of footwell lighting for 986 and 996 applications. A popular example: http://www.renntech....?showtopic=9578 When the cabin is dark and I needed an interior light, I didn't find it very easy or convenient to grope for the switch in the overhead dome light. That switch is unlit, small, and awkwardly oriented to me. Once in a while you just need the lights turned on without the hassle. It would also be nice to have some light on the floor, for instance to find dropped articles. After review of the many lighting solutions here and elsewhere on the web, I decided to install footwell lighting (FWL) more or less according to original factory specification, which is option code IXX2 (aka MXX2). By installing FWL this way, you get two things: (1.) A more conveniently located and backlit switch that you can easily reach and activate, even without looking. (2.) Upon pressing the switch, all of the interior lights turn on at once (overhead dome, door, and footwell). By using the factory circuitry, the new lights work in concert with the other interior lights (such as fade in/out), and they time-out after about 12 minutes to save your battery just in case you leave them on when the car is turned off. A fellow board member, Sandy, helped me a lot with this project. Thanks, Sandy. This footwell lighting installation was for my particular 2003 986S. Other vehicles may be different, part numbers change, and there are safety risks involved in doing mechanical and/or electrical work on a vehicle. What's presented here is a general overview of my DIY project, not a complete step-by-step set of instructions. Please obtain, understand, and follow the necessary repair and installation procedures in order to work safely, avoid damaging anything, and achieve a safe result. Frankly, this ended up being a lot more work than it may be worth to most people. What made it more worthwhile to me was that I did the installation while adding a built-in Homelink device (another post in this forum). Anyway, I first made sure the key was out of the ignition and then disconnected the battery. Among the things I ended up removing to do both projects: the driver's seat, driver's side rocker and kick panel trim, the dashboard relay carrier, the gauge cluster, all components of the upper center console (i.e. trim, radio, HVAC control, vents, cupholder, etc.), the lower center console, and other trim. I put the FWL switch in the center position on the left in the horseshoe. The targa shade switch below it is for the Homelink device. Original equipment footwell lights use the same lights (bulbs and diffusers) as the front/rear trunk (10 watts). They use rather expensive supports, which I thought would have special feature(s). They really don't. These supports just hold the lights, reducing backscatter and preventing the back side of the light from unintended contact with anything else. But after spending so much time planning and executing the wiring, the price premium for the light supports didn't bug me as much. I have the console-delete trim installed; however, I affixed the supports to it in the same manner as they would be if the original center console was installed. These photos make some attempt to show the overall result: I put together some wiring diagrams that apply to my car, so use them at your own risk. For simplification, I modified the OE wire diagram, which is shown below; the portions in black are OE. My changes and notations are in blue and red. In the following diagrams, I added some notations (in blue) and highlighted relevant portions for my records. The photos below show my relay panel with the two FWL relays installed in positions 1 and 2 which were unused -- the two upper left positions in the left photo. The right photo shows the backside of the relay panel. Relay #1 is an ordinary SPST relay. Relay #2 is the same as the rear window defog relay in position 4. To install the relays, you need the following parts: (1) -- 141.951.253.B -- relay SPST "53" (relay #1) (1) -- 996.615.117.00 -- control unit, rear window heating (relay #2) (2) -- 928.610.511.00 -- relay carrier (9) -- N.017.490.6 -- connector (2) -- N.903.352.04 -- connector Use N.017.490.6 for the larger tabs and N.903.352.04 for the smaller tabs (tabs 1 and 6 on relay #2 ). The photo below shows a close-up of the connections. You also need to tap into two contact bridges/bridge plugs ("BS") on the relay panel for FWL switch backlighting and 12V power. On my car, "Dim LED" switch backlighting is BS5/2 and "consumer-switched-off" 12V power is BS7. For that, you need these parts: (2) -- 999.650.320.22 -- connector The photo below shows a close-up of the connections to the bridge plugs. One of the more critical things you need to do is tap into the "inside light" circuit that is governed by the alarm control unit under the driver's seat (below). This is a brown wire with a yellow stripe (BN/YE) from pin location B11 (your wire color and/or pin location may be different). I partially unwrapped the alarm control unit wiring harness and spliced into the BN/YE wire from B11. I used a soldering method with shrink tube covering and then re-wrapped the harness. Ground point 7 (GP7) is the lug in the floor pan, photo above. This is the OEM ground point for FWL. I added one ground wire for the FWL and another one for the Homelink device I was adding at the same time. The photo below shows the final route of the spiral-wrapped wiring to the footwell lamps. To connect the lamps, you need the following parts: (2) -- 996.632.980.00 -- light support (2) -- 997.632.201.00 -- light, with 10w linolite lamp (bulb) (2) -- 815.971.989.B -- plug socket (4) -- N.017.490.6 -- connector (spade) If you don't use the OEM light supports, you need to figure out how (and where) to adequately and safely mount the lights. At the switch end, note the photos below. The green plug socket on the left side is for the FWL switch. (Above the HVAC tubing, you can see the Homelink unit I installed.) Here, you need the following parts: (1) -- 996.613.980.06.A05 -- switch, console, FWL, black matte (1) -- 999.650.110.40 -- plug socket, console switch (green) (5) -- 999.650.103.12 -- connector Regarding wiring, I used automotive-grade TXL 18 AWG wire, except for the ground wire for which I used TXL 16 AWG wire—all purchased online from KayJay Co. (http://www.kayjayco.com/). You'll need a ring connector for the ground wire, available at your local electronics store. I bought extra connectors for everything, because they are cheap and if you mess up during crimping/soldering, it is no big deal to just do another one. Have some shrink tubing/insulation handy. Also, you'll want to have high-quality friction tape, electrical tape, wire ties, and wire covering for neat and safe wire routing. I hesitated to write this up because this method is a bit too involved and costly, especially considering the other options out there to get light at your feet. But a fellow board member contacted me recently and I see an occasional post where it seems someone is considering going the OEM route. So, if this helps someone, one way or the other, all the better. --Brian
-
Yet Another Installation of Footwell Lighting Renntech.org and other sites have covered various installations of footwell lighting for 986 and 996 applications. A popular example: http://www.renntech....?showtopic=9578 When the cabin is dark and I needed an interior light, I didn't find it very easy or convenient to grope for the switch in the overhead dome light. That switch is unlit, small, and awkwardly oriented to me. Once in a while you just need the lights turned on without the hassle. It would also be nice to have some light on the Author Q-Ship986 Category Boxster (986) - Mods Submitted 10/30/2008 08:14 PM Updated 11/26/2010 10:52 AM
-
Some good ideas for integrating a garage door opener have been previously presented in these forums; this is probably the most popular: http://www.renntech.org/forums/index.php?showtopic=5770 In this case, I installed a genuine Homelink device, tapping into two of its three channels which are actuated by a Porsche targa shade switch for near-OEM function and appearance. I went this route because it has the advantage of being programmable (and re-programmable) and there are no worries about power or battery life. Although this isn’t an original idea, I went about it a little differently than I’ve seen before, so I thought I’d share here. This Homelink installation was for my particular 2003 986S. Other vehicles may be different, part numbers change, and there are risks involved in doing mechanical and/or electrical work on a vehicle. What’s presented here is a general overview of my DIY project, not a complete step-by-step set of instructions. Please obtain, understand, and follow the necessary repair and installation procedures in order to work safely, avoid damaging anything, and achieve a safe result. I obtained a Homelink device by purchasing a used overhead console unit from a late model GM vehicle. If I remember correctly, it was a 2005 Chevrolet Trailblazer. I bought it from an LKQ vendor on eBay for about $50. I wanted to get a device that I was fairly sure would have rolling code capability, so I took a pass on many of the units that did not have their date of production or vehicle of origin stated. Some photos of the console I bought: The Homelink was simply screwed into the plastic console and was extracted easily. I saved the connector and a bit of the wiring harness attached to it. (Most of the rest was recycled.) The three blue circles are actually tiny incandescent bulbs with blue, semi-transparent covers; these were for backlighting of the original console’s pushbuttons, which in turn actuated the silver/white pushbuttons located just above the bulbs. I studied the circuitry and did some internet research. I found that not all Homelink boards will look like the one above, so if you obtain one yourself, prepare for possible differences. Anyway, I determined that the GM wiring harness connected to this device did the following: The orange wire was +12VDC for the transmitter, the black wire was the main ground, and the brown wire with the white stripe (the middle wire) was +12VDC for the three backlight bulbs. I carefully detached the three blue-covered bulbs and the three pushbuttons from the board. I suppose you could leave the bulbs, but I wanted them out of the way. After that, the board looked like this: What I decided to do was keep the OE power/ground connector and solder wires to the appropriate tabs that formerly held the pushbuttons. The soldered ends are covered with glue for added durability. I trimmed the case a little, getting rid of the OE mounting tabs. A small hole in the case was made for the added wires. A Molex interlocking connector completed the assembly. I did the installation while doing another wiring project (adding footwell lighting, another post in this forum). I first made sure the key was out of the ignition and then disconnected the battery. Among the things I ended up removing to do both projects: the driver’s seat, driver’s side rocker and kick panel trim, the dashboard relay carrier, the gauge cluster, all components of the upper center console (i.e. trim, radio, HVAC control, vents, cupholder, etc.), the lower center console, and other trim. I connected the targa shade switch and the Homelink directly to the appropriate bridge plugs (“BS”) and ground point (“GP”). I put together a wiring diagram for my records (see below). In my car, BS7 is for consumer-switched-off and BS5/2 is for the instrument panel LED lighting with dimming. These bridge plugs are in the dashboard relay carrier. GP7 is under the driver’s seat. This way, the switch is backlit and dimmed the same as the other console switches. The consumer-switched-off circuit goes into standby mode about two hours after the car is turned off. Therefore, power to the Homelink is shut down, too. However, the Homelink retains its programming, regardless of the duration that power is interrupted. As soon as a door is opened, this circuit springs back to life and the Homelink functions as usual. This wiring diagram applies to my car and the Homelink board that I tapped into, so use at your own risk. There was a good place above the HVAC ductwork with plenty of room to mount the Homelink assembly. I used heavy-duty self-adhesive Velcro to adhere it to a flat spot on the underside of the dash. The purple socket on the left side is what I prepared for the targa shade switch. The targa shade switch in the lower left position is easily reached without looking. Push one side to activate one channel, push the other side to activate the second channel. To program the Homelink, you hold the remote that you want to emulate near the center of the dash above where the Homelink is mounted. Press and hold the remote button. Press and hold the appropriate side of the targa switch. Count to ten. If your garage door opener is not rolling code, then you are done. If rolling code, you have to follow the instructions that came with your garage door opener. For mine, the final steps were to press a “learn” button on the opener itself and then press the targa switch three times (each time holding for a second or two), all within 30 seconds. The range on the Homelink as I installed it here is acceptable to me; it works from 50-100 feet (15-30 meters), no matter what direction the vehicle is facing. I was going to try mounting it high up in the A-pillar as others have done, but the Homelink case was just too big to fit under the trim. Porsche Parts List: (1) -- 996.613.119.10.A05 -- switch, console, targa shade, matte black (1) -- 996.650.111.40 -- plug socket, console switch (purple) (5) -- 999.650.103.12 -- connector (for console switch plug socket) (2) -- 999.650.320.22 -- connector (for contact bridge/bridge plug) Regarding wiring, I used automotive-grade TXL 18 AWG wire, purchased online from KayJay Co. (http://www.kayjayco.com). You’ll also need a ring connector for the ground wire and the Molex connector and pins that I mentioned above; these are items available at your local electronics store. I bought extra connectors for everything, because they are cheap and if you mess up during crimping/soldering, it is no big deal to just do another one. Also, you’ll want to have high-quality friction tape, electrical tape, wire ties, and wire covering for neat and safe wire routing. That’s it; hope it was of interest. --Brian
-
Yet Another Way to Add a Homelink Device Some good ideas for integrating a garage door opener have been previously presented in these forums; this is probably the most popular: http://www.renntech.org/forums/index.php?showtopic=5770 In this case, I installed a genuine Homelink device, tapping into two of its three channels which are actuated by a Porsche targa shade switch for near-OEM function and appearance. I went this route because it has the advantage of being programmable (and re-programmable) and there are no worries about po Author Q-Ship986 Category Boxster (986) - Mods Submitted 10/30/2008 07:17 PM
-
Oil Change Instructions
Q-Ship986 replied to Loren's topic in DIY Articles - Carrera (996) - Maintenance
You have to look at both the minor maintenance schedule and the major maintenance schedule. They dovetail with each other in terms of time and mileage. Thus, the manufacturer's suggested oil change interval in this case is every 2 years or 20,000 miles. --Brian
-
If the vehicle is not inordinately pulling to one side, an off-center steering wheel is a symptom of front toe mis-alignment. Regardless of your mileage, I would have it checked/corrected to avoid irregular tire wear and fix your steering wheel complaint. --Brian
-
Bridgestone OEM Tires
Q-Ship986 replied to 500's topic in 997-1 Series (Carrera, Carrera 4, Carrera 2S, Carrera 4S)
Orders from Porsche dealers tend to take priority with Tire Rack. However, it is worth calling Tire Rack directly on your own if you have a preferred installer, regardless of the inventory shown on their website. Have your VIN handy; they generally want to know the tires are being allocated to the "right" vehicles. --Brian -
As far as most M96.03 and M96.23 engined cars go, the phrase "matching numbers" equates to "ticking timebomb." That is unless of course the original engine has already been rebuild with the updated intermediate shaft. I personally think as others have said in this thread the way to go is a reman engine. You get all of Porsche's latest and greatest parts and a two year warranty on it all. What is the updated intermediate shaft? I missed that somewhere. --Brian
-
Anyone: What, exactly, is an OPC? I was under the impression that an "OPC" is the equivalent of a "dealer" in the U.S. Is an OPC a legal entity, affiliate, or subsidiary of Porsche SE? John: What was the OPC's defense; can you outline it? Did they offer any expert testimony or report? --Brian
-
Outside wear on rear tires
Q-Ship986 replied to rrspikemarty's topic in 996 Series (Carrera, Carrera 4, Carrera 4S, Targa)
Those look normal. The outside shoulder appears to be solidly tie-barred between the lugs. To measure tread depth, you need to use a gauge in the major circumferential grooves; from your photos, the wear across the tread looks more-or-less even. If anything, the inside looks a bit more worn to me than the outside. --Brian -
Can PSM screw up without throwing a code?
Q-Ship986 replied to Dus10R's topic in 996 TT, 996 TT S, 996 GT2
In addition to the tire advice (proper tires, proper inflation), I am wondering, do you need new shocks/struts? --Brian -
You may have read that there is a light sensor in the instrument cluster; it is part of the control system for backlighting of the LCD display in the same cluster. Also, it's possible you read that the litronics are automatic; they are, in the sense that they adjust their aim according to the loading of the vehicle. However, automatic illumination of headlamps was not even an option for 986/996, regardless of halogen or litronic. --Brian
-
Outside wear on rear tires
Q-Ship986 replied to rrspikemarty's topic in 996 Series (Carrera, Carrera 4, Carrera 4S, Targa)
Is it also possible that the rear tires were demounted and swapped left/right during recent service? --Brian Edit: Nevermind, I see with 4000 miles, they would have been mounted incorrectly from the get-go, as Paul wonders above. -
I subscribe to a few of the PCA Tech Q&A categories, including the Paterek's interior/exterior section. A lot of questions are answered with "Wurth" and/or "Duplicolor" products, which is what I thought of when I read your question. So, I was inspired to check and mildly amused when that was the answer for you; glad it helps. Take care, --Brian
-
Self-dimming rear view mirrors availability
Q-Ship986 replied to psng's topic in 986 Series (Boxster, Boxster S)
These are available in the aftermarket from one of the same companies that supplies the auto industry. Maybe not exactly the PAG or Audi mirrors being discussed, but worth a look in my opinion. See http://www.mitocorp.com/flash/nightvisions...mingmirrors.htm --Brian -
How important are those underbody panels?
Q-Ship986 replied to grover's topic in 986 Series (Boxster, Boxster S)
I never could figure that out. When I ordered it, my invoice said "steering shaft cover," so I questioned the parts manager, who just shrugged and said it was the right part number based on PET (which simply calls it a "cover, rear"). Anyway, when it showed up, sure enough it was correct. Curious, I looked at the PET listing of underbody parts for 996, 996TT, etc. because I thought maybe this cover was used up front on one of those chassis; but it wasn't. It could just be an error, maybe brought on in the German translation process--who knows? --Brian -
How important are those underbody panels?
Q-Ship986 replied to grover's topic in 986 Series (Boxster, Boxster S)
I replaced that same panel on my '03 986S; though it wasn't as damaged as yours, I figured it was from errant jacking. It is part no. 986.504.119.00 and runs about $100. Porsche calls it couple of things: a "cover" and a "steering shaft cover." My opinion, like those above, is that the underbody is no less important than the shiny side that faces up. --Brian -
Removing front speakers
Q-Ship986 replied to kevinkw's topic in 996 Series (Carrera, Carrera 4, Carrera 4S, Targa)
Is it part number 999.920.015.40 ? That's what my version of PET says it should be. --Brian -
If you are worried about authenticity, I think it is advisable to check with PCA's John Paterek, who moderates the "interior/exterior" section of Tech Q&A. For instance, I found this: http://www.pca.org/tech/tech_qa_question.a...C-1CFF06B937FA} --Brian
-
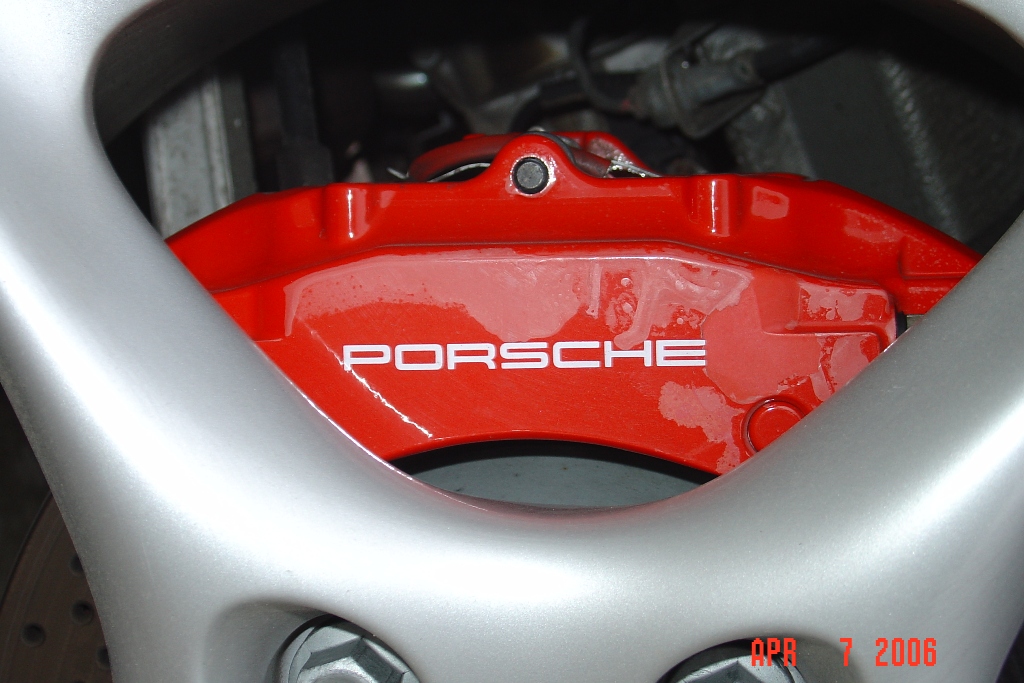
Brake Caliper Discoloration
Q-Ship986 replied to DMR's topic in 997-1 Series (Carrera, Carrera 4, Carrera 2S, Carrera 4S)
First if the eating away of the factory clear coat by the wheel cleaner, then the paint is the next to go oce the protection is off. It may not account for every problem, but I'm hold to my theory that high-alcohol or bad pH-balanced wheel celaner can cuase damage. Damon Sorry, I hit the "add reply" button accidently well before my post was finished. --Brian -
Brake Caliper Discoloration
Q-Ship986 replied to DMR's topic in 997-1 Series (Carrera, Carrera 4, Carrera 2S, Carrera 4S)
I have to say that I am not as convinced as others that the cause of degradation of the caliper finish is necessarily wheel cleaner. A couple of years ago, two or three of the calipers on my very low mileage (at the time) 2003 Boxster looked like this typical example: I brought this to the attention of my local dealer, who agreed that it appeared to be clearcoat that was flaking off the caliper. They eventually replaced all the calipers. I am not sure how they worked it out with PCNA, but the vehicle's original warranty was still in effect at the time (the car was also CPO) and there is a term of the warranty that addresses appearance issues. At the time, I was advised, as others have been, that wheel cleaner could damage painted finishes and that it was a probable cause in my case. My position was that whatever cleaner was used did not affect the paint on the wheels themselves, was not affecting all the calipers, and was not uniformly affecting those that were degraded. So just how could any cleaner used on all four wheels over and over again be so selectively damaging? Unless the calipers weren't appropriately finished in the first place (and it didn't matter what was used)? Not saying that it isn't possible that some nasty cleaners could do some damage, but I have trouble believing that Porsche and Brembo wouldn't account for obsessive owners armed with toothbrushes, or that P21S cleaners (and their like) are the only surfactant solutions that could possibly limit damage to caliper paint. Like I mentioned, all my calipers were replaced. With no change in my cleaning habits, the replacement calipers look as good as new so far. For what it's worth. --Brian
-
Remove/Replace Windscreen Sealing and Trim ?
Q-Ship986 replied to Q-Ship986's topic in 986 Series (Boxster, Boxster S)
Apparently, 3.2L Boxsters have a unique "titanium metallic" trim (986.541.541.02.9A4 for 2001-on) around the windscreen. Mine looks terrible from some sort of corrosion/deterioration. The parts are relatively inexpensive, so if I can remove/replace without having to alter the state of the glass, it would allow me to direct my OCD elsewhere. From what I can tell, it seems as if the metal trim is slotted for the glass to fit into around its periphery. Does the rubber seal snap into the trim behind it? Thanks, Jeff. --Brian -
Can you remove and replace the seal and trim around the 986/996 windshield, aka windscreen?? I mean, leave the glass alone, just replace parts 2 and 3 only (see below)? I can't tell from PET or the workshop manual if you can do this; the instructions are obviously for removal of the glass itself, with the removal and installation of the seal and trim as incidental steps. I am hoping our glass experts (you know who you are) can shed some light. Thanks, --Brian
-
When you disconnect the battery, the windows have to re-learn their upper and lower travel limits. This is done by "teaching" the windows: pressing and holding the window switches until the windows are completely up or down and then vice versa. Basically, what you did. It's in the owner's manual somewhere. --Brian
-
Need a few Techincal Manual Instructions
Q-Ship986 replied to usaf-lt-g's topic in 986 Series (Boxster, Boxster S)
FYI, what you are tapping into is called a bridge plug; these are identified on the schematic as "BS" and then a number. Sorry I didn't read this sooner, but glad you figured out you had to remove the relay carrier to get to them. Make absolutely sure you tapped into the correct bridge plug, since your perspective is different whether you are looking at the relay carrier from the front vs. the back. --Brian