Welcome to RennTech.org Community, Guest
There are many great features available to you once you register at RennTech.org
You are free to view posts here, but you must log in to reply to existing posts, or to start your own new topic. Like most online communities, there are costs involved to maintain a site like this - so we encourage our members to subscribe or donate. All subscriptions and donations go to the costs operating and maintaining this site. We prefer that guests take part in our community and we offer a lot in return to those willing to join our corner of the Porsche world. This site is 99 percent member supported (less than 1 percent comes from advertising) - so please consider an annual subscription or donation to keep this site running.
Here are some of the features available - once you subscribe RennTech.org
- View Classified Ads
- DIY Tutorials
- Porsche TSB Listings (limited)
- VIN Decoder
- Special Offers
- Paint Codes
- Registry
- Videos System
- View Reviews
- and get rid of this welcome message
It takes just a few minutes to register, and it's quality Porsche information at a low cost.
Contributing Members also get these additional benefits:
(you become a Contributing Member by subscribing or donating money to the operation of this site)
- No ads - advertisements are removed
- Access the Contributors Only Forum
- Contributing Members Only Downloads
- Send attachments with PMs
- All image/file storage limits are substantially increased for all Contributing Members
- Option Codes Lookup
- VIN Option Lookups (limited)


teeerex
-
Posts
79 -
Joined
-
Last visited
Content Type
Profiles
Events
Forums
Exterior Paint Colors
Downloads
Tutorials
Links Directory
Collections
Classifieds
Store
Everything posted by teeerex
-
Works :) Thanks very much - as always this site is THE resource for Porsche fans :thankyou:
-
Sorry another lost code - 996 C4 1999 Becker 1 4467 X5016794 49/98 Many thanks in advance, Richard.
-
Hi .. I've done this a few times now with success but does anybody know the actual amounts required to flush each section of the pipework / calipers ? I have used about 1L in the past but this time I got a lot more out the resevoir to start - so ended up using 1.5L as folows :- 1. 500mL : Extracted from the resevoir before starting (using a syringe and length of plastic pipe to suck out as much as I could via the small holes after taking out the filter) 2. 150mL : Rear Left, Inside Nipple 3. 150mL : Rear Left, Ouside Nipple 4. 150mL : Rear Right, Inside Nipple 5. 150mL : Rear Right, Outside Nipple 6. 100mL : Clutch 7. 75mL : Front Left, Inside Nipple 8. 75mL : Front Left, Ouside Nipple 9. 75mL : Front Right, Inside Nipple 10. 75mL : Front Right, Outside Nipple The reason I went with only 150mL for the each front is because that's all I had left ! :( Do you think this is enough ? Should I get another 500mL and do the fronts again ? The brake pedal feels excellent now but I'm concerned I've just pushed the old fluid into the calipar (fronts) and the fresh fluid is in the pipework ... PS - This is Motul RBF660 for tracking (taking her on the Nurburgring again in a few weeks ..) so keen to have optimal brakes ! Thanks all, Richard.
-
Auto Fog Lamps?
teeerex replied to AVIA8R's topic in 9PA, 9PA1 (Cayenne, Cayenne S, Cayenne Turbo, Cayenne Turbo S)
Hi - I'm not sure what the concensus is in the US but here in the UK it's frowned upon to run fog lamps when it's not foggy or visability is not seriously reduced (heavy rain etc). This is because the fog lamps blind oncoming traffic when they get in range of the (short) beam because it does not have any 'dipping' on it. Technically possible yes - but I'd question the use of it myself. -
Mixing wheels
teeerex replied to DannyLee's topic in 996 Series (Carrera, Carrera 4, Carrera 4S, Targa)
If the car has been 'designed' to run like this then fine - in the above example on the C5, then I would imagine the front suspension is slightly harder than the fronts to make up for the lower tyre spring in the lower profile rear tyres - in other words keep it all balanced. Another way to put it is to say use 15" wheels on the fronts with full sized no tyres and 20" on the rear with /25 etc tyres - how would that handle ? (same rolling circumference - but radically different grip/roll characteristics. ) In a straight line, likely no difference at all, but I'd hate to see what happended when I took a corner at speed .. ;) -
Mixing wheels
teeerex replied to DannyLee's topic in 996 Series (Carrera, Carrera 4, Carrera 4S, Targa)
Er... IMO not recommended at all. For one it will look odd (assuming your wheels are the same 'design', if not, then it will look horrendeous !) - but on the safety side then it's asking for trouble even if the tyres profiles 'should' even things up. I'm sure an insurance assessor would have something to say about it come pay out time when you end up backwards in a ditch... :( Replace all the wheels with 17" (better for winter driving due to higher profile tyre) and keep the 18" for summer (with lower profile tyres). -
Help - battery or alternator problem
teeerex replied to rlim's topic in 996 Series (Carrera, Carrera 4, Carrera 4S, Targa)
That's not entirely accurate. Alternators do a much better job of charging at lower engine RPM, simply because they are geared higher and spin faster than generators did in the good old days. The commutators in generators could not survive very high speeds, and thus were geared lower so they would not over-speed at the highest engine speed. As a result their output at low speeds/idle was poor. Alternators do much better, but they do not generate as much power at idle as they do at even slightly higher RPM. Bill We seem to have gone way off topic .. but I enjoy a good old fashioned debate ;) In your last statement - are you comparing an alternator vs a generator at higher RPM as I'm confused with what you are saying? Or you are saying that an alternator does not generate equal power at idle than at say 1500RPM ? If so, then I have to disagree.. lol.. For those still interested - this link below explains the two in a lot more detail ... Alternator vs Generator/Dynamo -
Help - battery or alternator problem
teeerex replied to rlim's topic in 996 Series (Carrera, Carrera 4, Carrera 4S, Targa)
Thanks wwest - I was well aware that I was over simplifiying things with todays alternators / regulators (trying to keep it simple!) - the other key fact of course is they supply a constant voltage/current regardless of RPM on the alternator itself, unlike a dynamo - all part of the regulator/electronics as you have said. All the best - Richard. -
Help - battery or alternator problem
teeerex replied to rlim's topic in 996 Series (Carrera, Carrera 4, Carrera 4S, Targa)
Sounds to me like the alternator is not providing a charge to the battery - simply put if it's 14-14.4v then it is, if it's 12v or less then it's not. The alternator consists of two main parts, the generator (the large motor looking bit driven by the belt) - this generates Alternatng Current or AC voltage and the 'regulator' which is a series of things called diodes that convert the AC voltage into Direct Current (DC) that is used to charge/power your car. Now the interesting thing is I have heard you can just replace the regulator if that s the problem - there is no need to replace the entire unit. However, I'm not sure if this can be done it situ or whether the alternator needs to come out. For future refrence - the regulator is designed/rated to keep charge on an already charged battery - so using it to charge a flat batttery usually will strain the diodes in the regulator - possibly even overheat and destroy them. So if you ever get a flat battery - then charge from an external source - never from a 'long drive' after a quick jump start. As has been said - double check all the connections on the alternator / jump start points etc incl the main ground connection. To load test the alternator - (with a fully charged battery!) - run ALL the electrical items (full beam etc) and if the voltage is still 14-14.4v, then your alternator/regulator is good. I hope this helps .. -
Anything can be done if you have the parts, skills and the tools ! PSM takes it's inputs from the ABS sensors, steering rack and egas throttle - so a retro fit would need egas for sure. PSM will also need the brake line plumbing (as each wheel can be individually braked) as well as the electrical brain + all the looms. I think PSM came about in the C4 first (1998/1999) then in the first egas C2's (2000?) A LOT of work - just sell the car and get one with PSM ... it'll cost a lot less in the long run ... ;)
-
The valves are made of brass (ie very soft) - therefore you will strip the threads if you do them up tight. My advise is to do them up until you get 'stop' resistance and then add max 1/8th turn more no more.
-
to add to the above comment - once out, then grease up the runners and locking mechanism to make them go back in easier and also make them easier to get out next time .. ;)
-
engine compartment fan
teeerex replied to alfic's topic in 996 Series (Carrera, Carrera 4, Carrera 4S, Targa)
Check that the temperature sensor hasn't fallen out and onto the engine block - this will cause the fan to come on (been there done that). The sensor sits inbetween the 1st and 2nd induction tube on the top right hand side of the engine (looking at the rear of the car) - if it's not there, then that is your problem ... It should just slot back in - remove the rubber grommet, put the sensor back in, then put the whole lot back.. -
Perfectly normal IMO. Due to the nature of the flat 6, oil will seep into the combustion chambers depending on how long the engine has been sitting unused. When you start her up - the oil will be burnt, hence the smoke. That said, some cars smoke more than others, the same way some use oil, whilist others use none ... If it only smokes a little and once after a cold startup, then I wouldn't worry about it - but if it happens on warm starts then it could be worn components / piston rings etc.
-
Handbrake release
teeerex replied to fastboydave's topic in 996 Series (Carrera, Carrera 4, Carrera 4S, Targa)
Got all mine from Euro Car Parts (Original Porsche Parts) and went with Textar pads (OEM Pads, just not a Porsche box ...) Also try design911 but I've never used them myself .. -
Handbrake release
teeerex replied to fastboydave's topic in 996 Series (Carrera, Carrera 4, Carrera 4S, Targa)
The wheel bolt hole nearest the rear of the car should be the one - line up all four holes so they are 90 degrees to the car - ie one facing rear, one front, one roof and the other facing the ground. You'll need to use a torch and then look for a 'gear' type device (with teeth on) through the 'hole'. Then you need to use a flat blade screw driver to turn the gear manually to the left or right - one 'click' at a time. I can't remember if it's turned to the left or right to tighten/loosen sorry - just keep track on the number of turns ... PS - its a pig to do and get adjusted properly - I found that a pull on the handbrake a few times once adjusted allows further adjustment - so keep at it until you get it just right. I hope this helps .. PPS - Don't put the calipar back on until the handbrake is fully adjusted - it makes it a lot easier to adjust if you can take the disc on and off to get it 'nearly there'.. -
Rear Wiper Install
teeerex replied to solsavr's topic in 996 Series (Carrera, Carrera 4, Carrera 4S, Targa)
See Post # 9 ... :rolleyes: It's a bit of a pain as you need to remove a lot of sound proofing to get to the bolts that release it. The only part you'll need is to bung up the hole - I guess you can get this from Porsche but I've no idea what the part number is as I used a generic bung which fitted perfectly.. (Black car/Black bung..) Since removing it over 2 years ago, I don't miss it at all - probably because I never used it in the first place ... and the lines are sooo much niver without it ... :thumbup: -
Brake pad sensor light
teeerex replied to P.Viby's topic in 996 Series (Carrera, Carrera 4, Carrera 4S, Targa)
I thought the system worked in two ways - the first is indeed if you break the circuit by cutting(wearing away) the wire in the sensors completly - but the second which will happen first, is grounding the sensor wire to the vehicle ground - via the brake disc. This happens when the plastic coating gets rubbed off the wire. It is also the reason why if you change the pads immediately when you get the light, you can re-use the sensors (assuming they are not worn through) BUT as Tool Pants alludes to - once you have split the platic wire covering, any moisture/water will create a circuit to ground should they get wet - so you'll get false alarm readings. So a continuity or low resistance test from the sensor plug sockets to venicle ground would also help you identify the problem (unplug them all first or a fault will show for all of them if there is a problem with just one ..) Maybe this helps ? Cheers, Richard. -
Home built "DIY PSE"?
teeerex replied to GOB's topic in 996 Series (Carrera, Carrera 4, Carrera 4S, Targa)
Hi - The 'Mk II' exhaust that Richard refers to is actually mine (Hi Richard..) - I've now put them on my 3.4 and they sound teriffic - as Richard says, a slightly deeper sound when driving normally but a much throatier roar when when hard on the gas and a 'sweet' sound at high revs when the cams are changing over ... I keep meaning to do a sound recording - I'll post if I do ... -
New style PSE - dB Noise Level ?
teeerex replied to teeerex's topic in 996 Series (Carrera, Carrera 4, Carrera 4S, Targa)
Blimey ! :unsure: That sure seems high ... Hmmm, do I put it on or not, decisions decisions .... Thanks for the reply .. Richard. -
Easy Ramps for basic Oil change
teeerex replied to Izzy's topic in 996 Series (Carrera, Carrera 4, Carrera 4S, Targa)
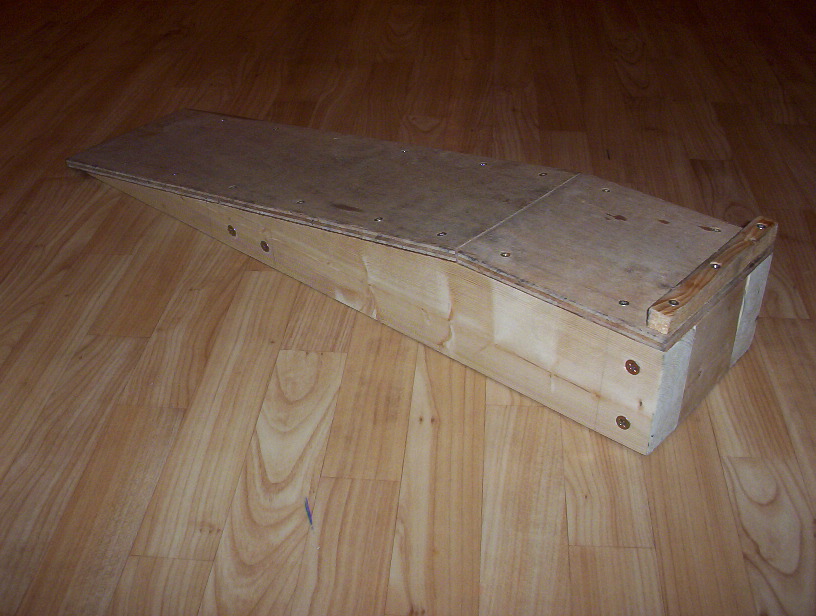
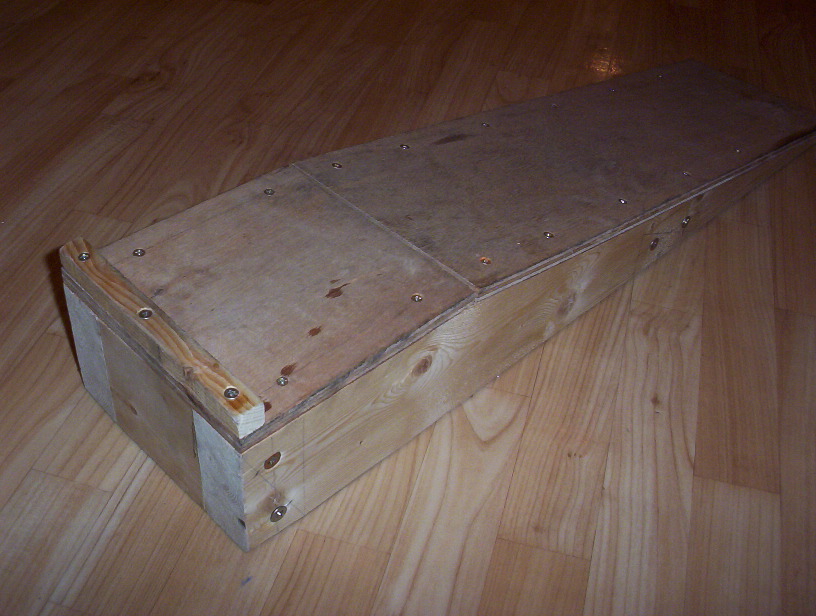
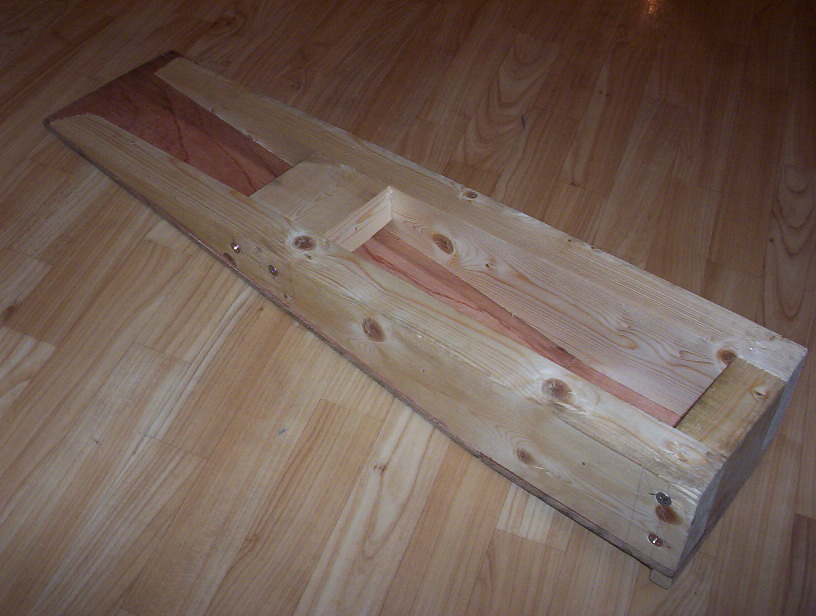
At the danger of turning this into a 'show us your ramps post' - here are some that I made from a spare length of 2 x 4 and a bit of ply ... Mine were custom made to also fit under the front bumper of my car fitted with the Aero package - no commercial ramp I could find (without spending silly money) allowed me to drive up - they always fouled the bumper. If you're interested in sizes, then drop me a PM and I'll add them to the post ... Inside structure :- :-)
-
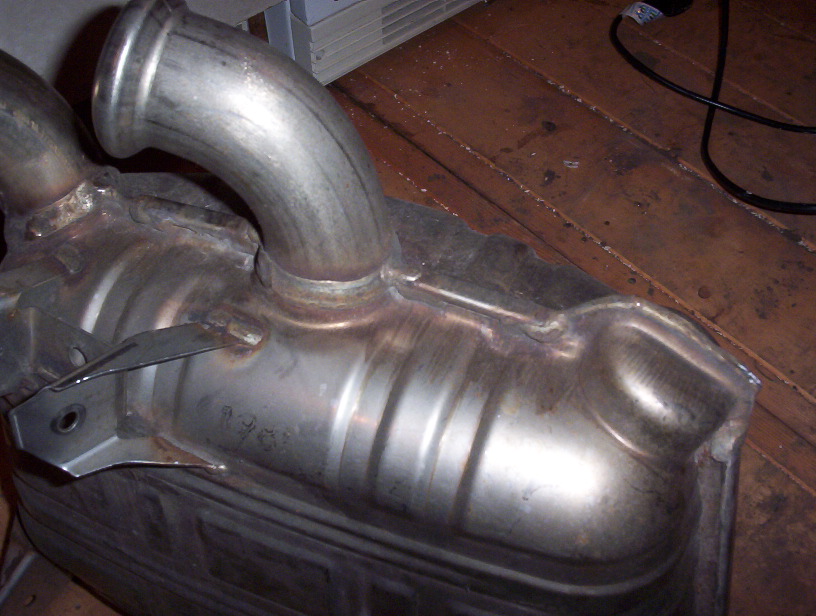
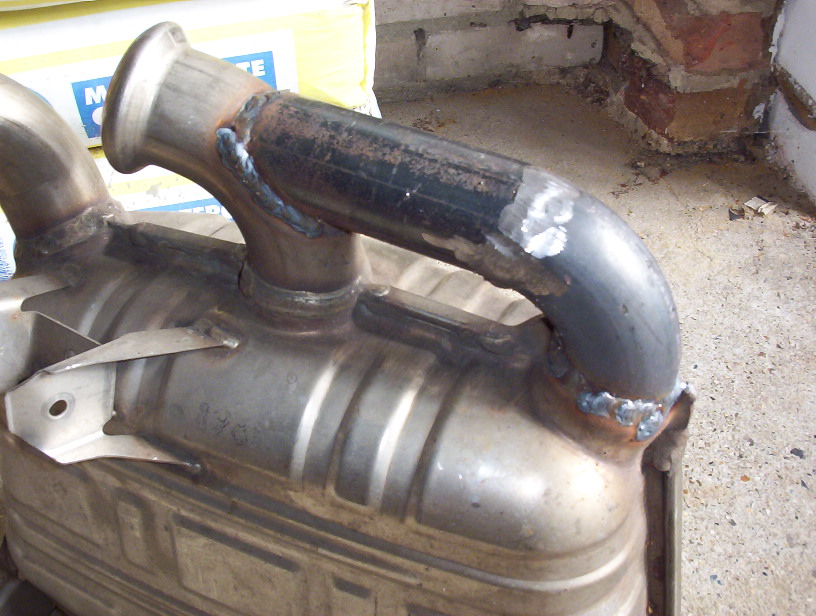
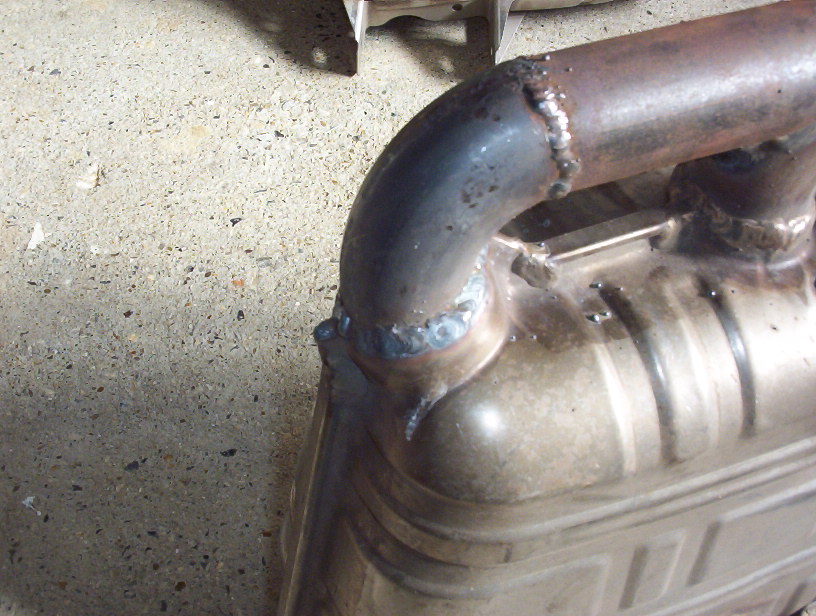
Hi all, I've had a friend make me a set of 'PSE' exhausts from a set of normal exhausts (ebay - £50!). I aim to fit these to my MY99 3.4 but I also do a lot of track days. Here in the UK, the noise regulations at track days are fairly tight for 'noisy' cars so does anybody have any idea of the noise level for a new style PSE (or large bypass pipe as per my modification..!) Some tracks are as tough as 98dB (102dB is average though) - I believe the standard exhaust is already 95dB @ 4500 RPM... :-( Thanks guys.. PS - Invaluable info from the vast PSE posts - great stuff. Pre Modification :- Post Modification :- :-)
-
Great - thanks guys - much appreciated. Checked them today - fronts are 27mm on the outside edge and rears 23mm - hmmm, guess I need to change both ... :-( They've done 6 track days mind you + normal driving so they've done well ... Thanks again, Richard.
-
Hi, I've done a search on this and can only come up with the minimum disc/rotor thickness for a Boxter and Boxster S - http://www.renntech.org/forums/index.php?s...mp;hl=thickness Can someone please confirm that the Boxster S thicknesses are the correct ones to use, or does the 996 ('99 C4 btw) have different tolerances ? Many Thanks, Richard.
-
Installed K&N cold-air intake
teeerex replied to ScottArizona's topic in 996 Series (Carrera, Carrera 4, Carrera 4S, Targa)
Great - thanks for that. Is that a new K&N Kit as I'm in the UK and never seen it over hear ? (Have you any part numbers etc) It looks good (certainly a big enough air tube!) but as you said in the review, other than shielding the engine heat directly, it doesn't look a great seal with the engine lid which is a shame. Thanks again, Richard.