Welcome to RennTech.org Community, Guest
There are many great features available to you once you register at RennTech.org
You are free to view posts here, but you must log in to reply to existing posts, or to start your own new topic. Like most online communities, there are costs involved to maintain a site like this - so we encourage our members to donate. All donations go to the costs operating and maintaining this site. We prefer that guests take part in our community and we offer a lot in return to those willing to join our corner of the Porsche world. This site is 99 percent member supported (less than 1 percent comes from advertising) - so please consider an annual donation to keep this site running.
Here are some of the features available - once you register at RennTech.org
- View Classified Ads
- DIY Tutorials
- Porsche TSB Listings (limited)
- VIN Decoder
- Special Offers
-
OBD II P-Codes - Paint Codes
- Registry
- Videos System
- View Reviews
- and get rid of this welcome message
It takes just a few minutes to register, and it's FREE
Contributing Members also get these additional benefits:
(you become a Contributing Member by donating money to the operation of this site)
- No ads - advertisements are removed
- Access the Contributors Only Forum
- Contributing Members Only Downloads
- Send attachments with PMs
- All image/file storage limits are substantially increased for all Contributing Members
- Option Codes Lookup
- VIN Option Lookups (limited)


1schoir
-
Posts
2,739 -
Joined
-
Last visited
-
Days Won
6
Content Type
Profiles
Events
Forums
External Paint Colors
Downloads
Tutorials
Links Directory
Collections
Store
Everything posted by 1schoir
-
Convertible Top Woes
1schoir replied to 1schoir's topic in 986 Boxster Convertible Top Issues and Solutions
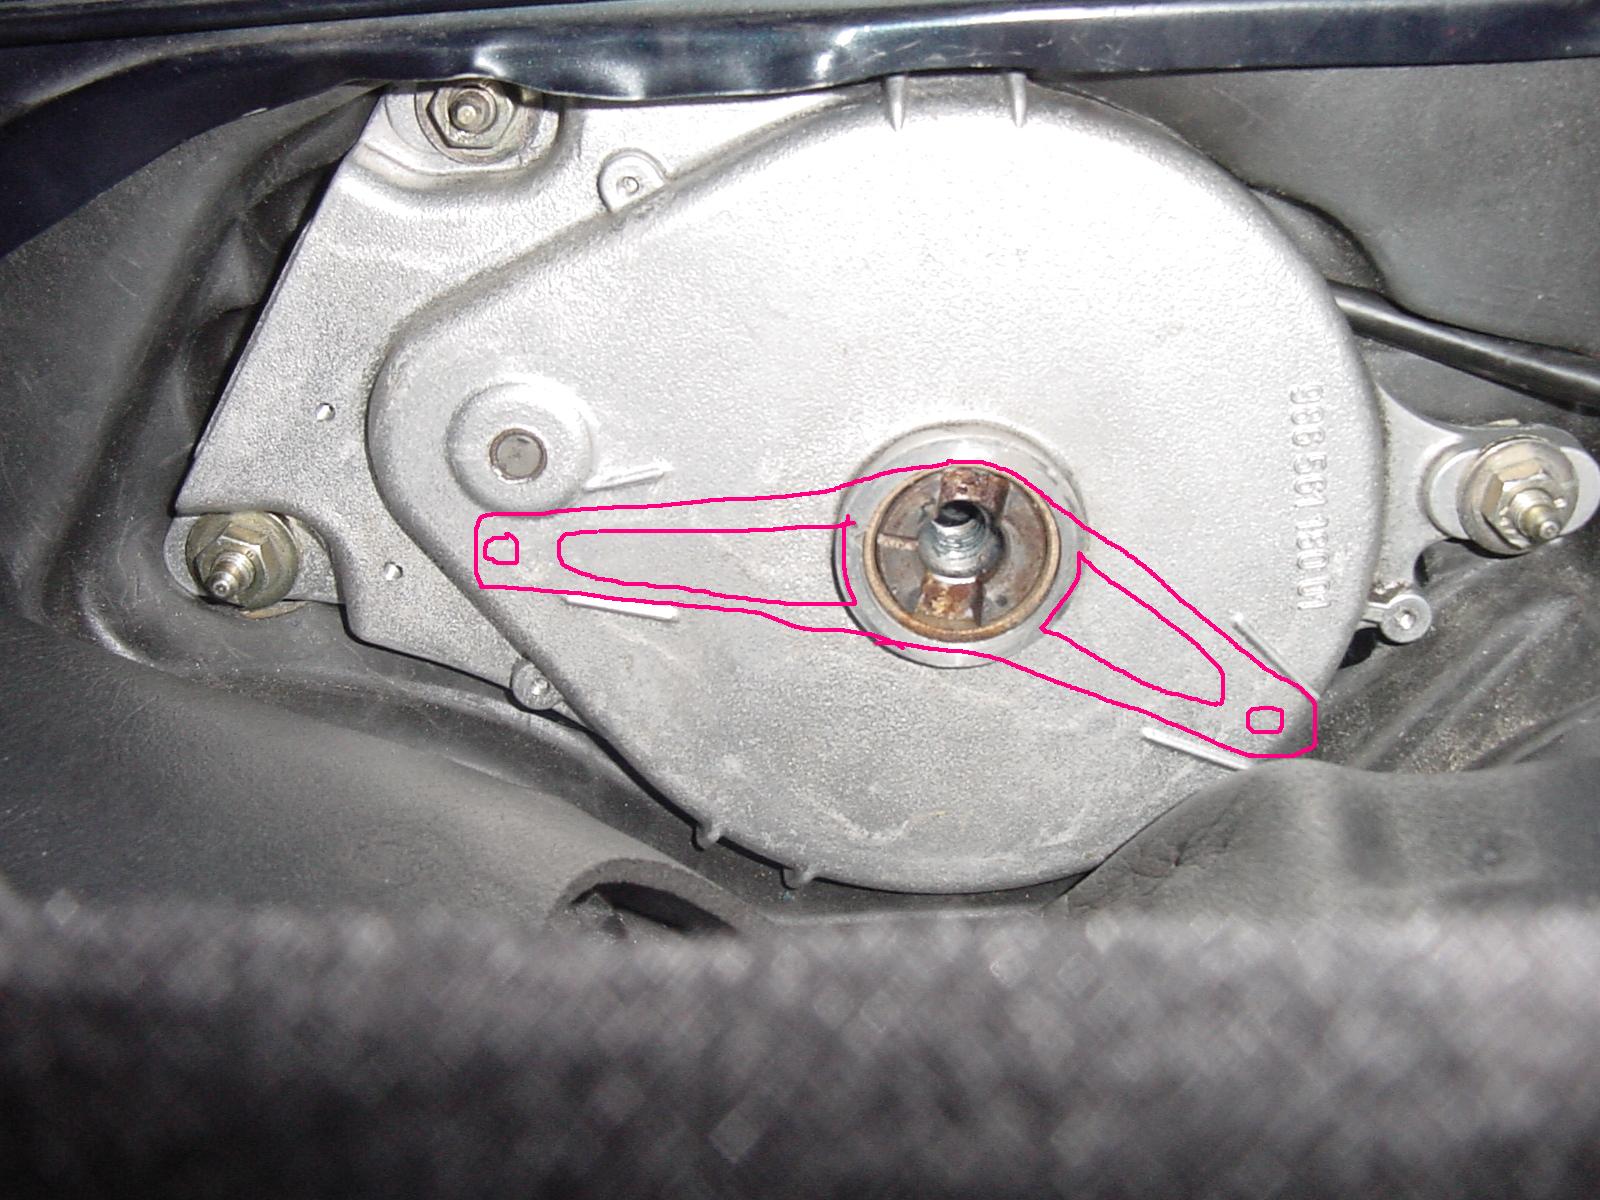
Mark: Thanks for sending me the information. Although a few of the older threads on the subject in these forums discussed the V-levers and their position relative to the transmissions, it was not until I read the instructions that you sent me that I found an explanation for the "markings" on the outside of the transmissions. For anyone else who has looked for this answer but could not find it, here it is: The instructions read as follows: (For transmission Version A [old style transmissions] Insert the flexible shaft of the convertible top gear to be adjusted into the drive motor and SET THE DRIVE LEVER (V-Lever) TO THE CENTRE OF THE MARKING NOTCHES with the rocker switch. Then (adjust convertible top gear on left and right synchronously). For the newer style transmissions (Version "B") (after production date 03.05.199) [not sure whether that refers to March 5, 1999 or May 3, 1999 due to different European nomenclature for days/months/years] the instructions are similar, but it then specifies to measure 195 mm (+ or - 0.5 mm) from the center of the drive lever ball head to the upper edge of the side section sealing channel. I have attached a photograph which I took of the psgr side transmission which clearly shows the "Marking Notches" and I have drawn in where the V-Lever is supposed to be for reference. (The marking notches are two on the left and two on the right, below the centerline of the transmission, on either side of the drawn-in V-lever.) I believe that this is the proper starting point and I will attempt that and report back. Regards, 1schoir.
-
Here's a link to a web page that shows you the method by which to safely remove your original emblem. Dental Floss!!! : http://boxsters.addr.com/hacks/logo_removal.htm Regards, 1schoir.
-
Convertible Top Woes
1schoir replied to 1schoir's topic in 986 Boxster Convertible Top Issues and Solutions
Thanks for the explanation and the photo, Mark. I can now see how the V-Lever is supposed to be positioned with the top in the maximum down position. So far, I've only taken the transmissions apart twice, and the pushrods and rod arms 3 or 4 times. I hope I don't get to 7 or more. It's raining like crazy here, so I will have to wait until it stops to have at it again. I have PM'd you my e-mail address. Regards, 1schoir. -
Convertible Top Woes
1schoir replied to 1schoir's topic in 986 Boxster Convertible Top Issues and Solutions
Thanks for reply, Mark. I will follow these instructions and report back with either progress or further symptoms. Do you reccommend that, (with all ball joints disconnected and with the cables disconnected on each side from the motor) I press the Up/Down button continuously for longer than it would take for the motor to get to its end point (say 30 seconds) in the down direction so that the motor's "position" is matched to the maximum down position as a starting point? Also, do you know what sends the signal to the dashboard display to either light up or extinguish the "top open" light? I did read in an old thread about someone putting in the V-Levers upside down (i.e, 180 degrees off) but I don't have another Boxster nearby or immediately available to ascertain the correct postion of the V-Levers but I will try to look for photos of where the V-levers are supposed to be in their travel when the top is in the maximum down position. Regards, 1schoir. -
On each door there is a microswitch that is tripped when the outside door handle is pulled and another microswitch that is tripped when the inside door handle is pulled. If the problem is only as you describe it, i.e., that if happens when you pull on the outside door handle, try to pull on the inside door handle and see if you get a different result. That could help you narrow it down. Regards, 1schoir.
-
Convertible Top Woes
1schoir replied to 1schoir's topic in 986 Boxster Convertible Top Issues and Solutions
The top works with drills hooked up to the cables and it also operated from the almost completely open position all the way up to the almost closed position (about 6 to 8 inches from the windshield), when it started cycling back and forth again. I willl see if I can dig up something like a speedometer cable to stick into the cable motor so I can watch the rotation as you suggested. Let me know what you discover when you install your new transmissions. Regards, 1schoir. 1schoir, I had a similar experience with my top - the transmission moved in the same direction regardless of what direction I pushed the button. I am in the process of upgrading the transmissions to the newer style and see if that helps. I will let you know. I have all the pieces I need (I think) and I am planning on getting it done this afternoon / evening. I already have a thread about my top experience - I will post pictures and the steps I took in that thread. Meanwhile, continue with the motor suggestion and see if it behaves the same way when it gets to the positions you mentioned. My guess is that the motor will operate normally unhooked, because you don't have the load of the transmissions / top, but it's just an uneducated guess. You could also try to unhook the top and see if the motor spins the transmissions in the right direction without the top connected, although I am not sure how that would help, except adding more details to your diagnosis. Good Luck, Azzar0. Thanks for the info, Azzar0. I did unhook both sides of the V-lever from the rod arms and from the push rods and the V-levers kept going in one direction (CCW, I think) no matter if I pressed the button in the "up" or the "down" direction. What is strange is that last week, when I just hooked up the clamshell via the pushrods to the V-lever, I was able to operate the clamshell back and forth (up and down) and the up/down switch was responding correctly. I have not been able to duplicate that this last time. I can't imagine how putting in new transmissions would help reverse the direction of rotation, but maybe I just don't understand what causes the reversal in direction. I think I have to look into the big relay on top of the fuse box and into the mysterious relay that I have heard is located behind the driver's side B pillar. I'll keep you up to date as well as I delve further into this. Regards, 1schoir. -
How hard can it be?
1schoir replied to Kim's topic in 996 Series (Carrera, Carrera 4, Carrera 4S, Targa)
1schoir, My vote for post of the year. Seems we can learn about more than just awesome vehicles here. I admire your courage. After all, putting your neck out and making this statement is 'Risky Business' James: Thanks for the vote. I meant it sincerely, but when I think back on it, I should have included my other thought which was: Regardless of what you decide, I wish you a speedy and full recovery. Regards, 1schoir. -
Is it possible that while your car was laid up for repairs some heavy rain or other water source caused some water accumulation beneath the driver's seat. The central alarm and locking functions are governed by the electronic module which is mounted beneath the driver's seat. When it gets wet, it can cause some of the symptoms you describe. A few posters on PPBB have successfully taken the module apart and dried it with a hair dryer, and reassembled it to find everything working again. A few others have tried the same method but were not so fortunate because the water was in there too long, etc... Perhaps take out the module and take it apart to inspect for moisture. That may give you a place to start or to eliminate as a possible cause. Regards, 1schoir.
-
Any got procedure on DIY top?
1schoir replied to rsfeller's topic in 986 Series (Boxster, Boxster S)
Shawn: A guy named Fred Adler did a nice step by step write up with photos and posted his "manual" on the Boxster Wiki (in PDF format). I used his instructions when I replaced my top about a month ago. Here is the link: http://boxster.wikia.com/images/e/eb/DIY_B..._Canvas_R_R.pdf There is another article in the Boxster Wiki that also deals with glass window top replacements for up to '03 model year. If you do your top and run into questions or problems, drop me an e-mail and I'll be glad to talk you through it. It's not too difficult, but it does take a lot of patience and quite some time. Regards, 1schoir. -
Side Windows Come Up By Themselves
1schoir replied to mustang66's topic in 986 Boxster Convertible Top Issues and Solutions
Great work, Mustang 66! It's amazing what a little perseverance (and a lot of hard work) will do. Regards, 1schoir. -
Convertible Top Woes
1schoir replied to 1schoir's topic in 986 Boxster Convertible Top Issues and Solutions
The top works with drills hooked up to the cables and it also operated from the almost completely open position all the way up to the almost closed position (about 6 to 8 inches from the windshield), when it started cycling back and forth again. I willl see if I can dig up something like a speedometer cable to stick into the cable motor so I can watch the rotation as you suggested. Regards, 1schoir. -
Bought the car more than a year ago, bought a hardtop shortly thereafter. Car is MY97 with low mileage, and I've gotten pretty good at taking the top up and down manually. About 2 months ago, I replaced the convertible top canvas (car came with a diagonal slash in the cloudy vinyl window) and that part came out excellent although it took two days, so I decided to try to get everything else working. The convertible top never worked in the automatic mode, and judging from the crease in the clamshell, I checked the cables (after reading Tool Pants' posts on the subject) and found that they were barely sticking out (one about 3/8 and the other one about 1/8). I removed the metal ferules with a little heat, cut the outer sheaths, reinstalled and re-dimpled the ferules and got the requisite 3/4" of square metal cable sticking out. The motor turns and the transmissions are the original, old style. I removed the transmissions, dissassembled them, lubed them up, reassembled them after counting the number of teeth on each one (50), re-installed them. When they were apart, I used the top motor to spin each cable so that the marks in the center of the outside of the housing matched up (as a starting point). I saw some info on this forum and decided to try this approach as a starting point. With the marks lined up, I only had to turn the psgr side one for a few seconds to get the V-levers in an identical position to each other. I hooked up the white ball joints and tried to operate just the top (without hooking up the black pushrods on the clamshell). Started with the top closed, but unlatched. The windows went down halfway when I undid the latch. The top started to open, but, after it got about 8 inches from the top of the windshield, it just started cycling back and forth (in an arc of about 4 inches) and it did that regardless of whether I pushed the button in the up or the down direction. After playing with that for a while, I used drills to power the top almost all the way down by spinning the cables. After the top was almost all the way down, I pressed the "up" button and the top started to close. When it got to about 6 inches from the windshield, it started to cycle again, back and forth in a 4 inch arc. Again it would not respond any differently when I pushed the "down" button. I disconnected the front rod arms from the top and connected the clamshell with the pushrods to the V-lever. That operated the clamshell to the down position, but, not only would it not go back up, but the V-levers would only move in one direction regardless of whether I pushed the "up" or the "down" button. I hooked up the cables to drills again and I got the clamshell up and disconnected and removed the V-levers. I am back to operating the top manually for now. My questions (maybe Tool Pants or Mark in Sunnyvale will have some answers) are: 1. Have you seen something like this in your experience with these tops? 2. What is good starting point as far as the location of the half moon gear with the top almost closed. 3. Any suggestions on how I might proceed? Thanks in advance. Regards, 1schoir.
-
What size torx bit to remove MAF
1schoir replied to davej_anderson's topic in 986 Series (Boxster, Boxster S)
At least on the early model cars (MY97-MY99), the torx bit that is required is actually a security torx bit. The size is T20 or, more correctly TS20. If you look at the head of the two screws, you will see that there is a protrusion in the middle of the screws which makes the security bit necessary. It could just be that the set you bought is just slightly off. Regards, 1schoir. -
How hard can it be?
1schoir replied to Kim's topic in 996 Series (Carrera, Carrera 4, Carrera 4S, Targa)
Seems like a golden opportunity to give your daughter another chance. Might turn a difficult situation (your surgery and recovery) into an unexpected positive. Regards, 1schoir. -
Cleaning MAF
1schoir replied to phillipj's topic in 996 Series (Carrera, Carrera 4, Carrera 4S, Targa)
Phillip: Read Mike Focke's Boxster Pages, he has a very comprehensive page on MAF's, including how to clean them, what type of cleaner to use, etc, with photos. Here is the link: http://mike.focke.googlepages.com/checkeng...ssairflowsensor Go down to the part that is entitled "The Do It Yourself Guide to MAF Cleaning and/or Replacement". That should cover everything you need to know. Regards, 1schoir. -
Side Windows Come Up By Themselves
1schoir replied to mustang66's topic in 986 Boxster Convertible Top Issues and Solutions
If for some reason you end up not repairing or replacing the microswitch, there is a Porsche part that serves the same purpose as the small piece of soft plastic that you have made. It's a red plastic clip, and it clicks onto the microwitch to prevent the top from accidentally being actuated when someone is using the "speedster humps". I don't know the part number, but I have seen the part. It looks a little bit like those small plastic can openers that people hang on their keychains. Regards, 1schoir. -
Your second code sounds like an "aging" sensor which I understand does not light up the CEL but is still defective in that the aging sensor reacts more slowly than it should and sends "delayed" info to the computer. The correct O2 sensor for the earlier Boxsters (not sure if it covers MY2000) is Bosch part number 13806 and costs about $148 on oxygensensors.com, with free shipping. When you remove the original part from the car, you will see the Porsche Part number AND the Bosch Part Number stamped on the side of the sensor. There is someone on eBay selling what they call "same as OEM" O2 sensor for Porsche for $98 plus shipping. They state that the connectors are the same as OEM and that no cutting of wires or splicing is necessary. Regards, 1schoir. P.S. I have same problem with Amazon.com and the Bentley manual, although they advertised that it was "available". Can't beat the price, though.
-
Side Windows Come Up By Themselves
1schoir replied to mustang66's topic in 986 Boxster Convertible Top Issues and Solutions
I found the post, which was written up by "Dan Hinkebein" on 19AUG06. It's very thorough and it has some helpful photos as well. Here is the link: http://www.renntech.org/forums/index.php?showtopic=10458. You are right, if you keep the microwsitch pressed in and the windows don't go up erratically, it must be the switch, or more correctly if you refer to the post by Dan Hinkebein, it's one of the soldered joints that has "split". BTW, I posted this for someone else on PPBB and they managed to just heat the soldered joint for just a few seconds and their repair was successful. Good Luck! Regards, 1schoir. -
Side Windows Come Up By Themselves
1schoir replied to mustang66's topic in 986 Boxster Convertible Top Issues and Solutions
Mustang 66 I have a few answers, but not all: Last question first: On a MY97, just to the right of the handbrake lever, and just to the rear of the "ashtray" are two spaces which are either occupied by "lenses" which are blanks or, if you have the heated seats option the two spots are occupied by the rocker type switches to turn on the heat settings to the seat (either to "off" = no light, "warm" = yellow light dot, or "hot" = red light dot). So if you don't have the heated seats option, that is probably what you are referring to as the two "infrared" lenses in that location. For reference, they are a mirror image of the power window switches which are located just forward of the "ashtray." As far as the windows going all the way up... I've been riding around for more than a year without the clamshell push rods attached and the clamshell occasionally jostling up slightly when the roof is down and the clamshell is down and that has no effect on the windows, as they function properly. I just replaced my top and am now in the process of working on getting the top to work in the automatic mode. Having taken the transmissions apart, I did not find any sensors (or any other electrical or electronic parts for that matter) in them or in the immediate surrounding area, so I do not believe that the "Top Open" light is related in any way to the transmissions. It is also not actuated by the little lever that sits on top of the motor (at the center under the clamshell). It may be connected to some rotation of the motor as it spins the cables, but I'm not 100% sure. To answer your question though, the "Top Open" light should go off when the top and clamshell are in the proper position (with the convertible top either completely up or completely down and the clamshell resting on the top or the back of the top) if your transmissions and the motor have spun to the correct position. By the way, if you need to reset that light, you can disconnect the battery for a minute and then start over to determine whether everything is in the correct position and the light remains off when it is supposed to go off. Just be sure to have your radio code handy. Your odd window action may be related to the microswitch that is located up inside the receptacle where the latch locks the roof closed. To test it, try to push and hold the microswitch in with your index finger while you press the power window button up. You will probably find that with the microswitch pushed in, the window will go all the way up. The microswitch has been known to have one of its solder connections "split" apart and then it becomes intermittent. This could explain why your windows go up randomly when you are driving around (from the bumps). I believe there is a post somewhere that shows how to test and repair the switch but I can't locate it right now. If you think it will help, let me know and I will track it down. Regards, 1schoir. -
Thanks for reminding me, 1schoir! I would have kept the battery connected... I do have the radio code and tested it to make sure it works when I took out the radio to test a Pioneer. I haven't decided what I am going to replace the factory radio with yet, so I put it back in for the time being. I was thinking of getting a JVC b/c I have a JVC 12 CD changer already, but Pioneer is better. Of course, an audio upgrade involves amp, sub, and speakers upgrades as well, without those JVC will probably be just as good as the Pioneer... With all the $$ you are going to have saved by fixing the top yourself, you should treat yourself to some nice tunes. Regards, 1schoir.
-
UPDATE: Tested wiring harness as per procedure above, got correct voltage readings. Did not test, but replaced 02 Sensor AFTER catalytic converter on psgr side (cylinder bank 1-3). (Bought Bosch Part #13806, about $150). Cleared CEL and it has not come back on since. Now about 75 miles. So, it would appear that the Durametric readout is incorrect when it points to 02 Sensor BEFORE catalytic converter. Thanks, Loren. Regards, 1schoir.
-
98 Top Stuck in UP position
1schoir replied to azzar0's topic in 986 Boxster Convertible Top Issues and Solutions
Thanks for clarification, Mark. Regards, 1schoir. -
Thanks for your thoughts, 1schoir. Unfortunately the problem is deeper than a simple out of synch issue. I posted my findings here: http://www.renntech.org/forums/index.php?s...amp;#entry75534 I will updated that post as I move forward. Right now I am waiting for the parts to arrive. I read your post from the link. Wow! Sorry to learn what you have uncovered. However, it seems like you are on the right path and that you will be able to resolve it. Be absolutely sure that if your neighbor is going to weld anything on the car, you make sure that your battery is disconnected. The last thing you want to do is to fry any of the expensive electronics in your Boxster. Keep in mind that you will need the radio code after you reconnect the battery. Will stay tuned. Regards, 1schoir.
-
98 Top Stuck in UP position
1schoir replied to azzar0's topic in 986 Boxster Convertible Top Issues and Solutions
Mark: When you say "After the gear pops out, you spin the lever in the opposite direction (if down is CW, spin it cw).", which lever must be spun in the opposite direction? Also, when you have someone push the button in the "up" direction, how long do they push the button? Regards, 1schoir. -
why? if they are working i would leave them alone. if one (or both) of them break, then i would replace them. update: (just read your other thread). if the half-moon gear keeps coming off, then yeah, it might be wise to replace them. Yea, one of the old gears is 'weak' - it keeps popping... I am not sure why, but it looks like the passenger side is strong, it could almost pull everything on its own, but the driver side can't keep up, and that's what is causing the problem. I found the newer transmissions (pair) on eBay for $500, pulled from a MY00 or MY01. It looks like a good deal, because Sunset charges $368 a piece just for the transmission, plus I have to get the bolts and cables separately (another $75 or so for all of them). I don't even want to know what my local dealer charges - perhaps somewhere around $500 a piece and $100 for each cable (I'll ask, just out of curiosity). Thanks Is it possible that your half-moon gear on your driver's side has gone to the end of its travel as a result of you pushing the button and that it is thus so out of synch that it keeps "popping" because it has reached past the last tooth on the half-moon gear? I would reccommend unbolting and taking apart the two transmissions (only three small phillips-head screws and a plastic cover plate) and then matching up the "faulty" (driver's side in your case) half moon gear to the correct distance of travel that is showing up on the psgr side half-moon gear. It's a simple matter to remove the two transmissions and then, with the psgr side cable disconnected from the motor, use the button in the correct direction (up or down) to get the driver side half-moon gear to the correct spot. Then put everything back together and see if both sides work in synchronicity. It's worth a shot before you go to the expense and extra work involved in putting in the new style transmissions. Regards, 1schoir.