Welcome to RennTech.org Community, Guest
There are many great features available to you once you register at RennTech.org
You are free to view posts here, but you must log in to reply to existing posts, or to start your own new topic. Like most online communities, there are costs involved to maintain a site like this - so we encourage our members to subscribe or donate. All subscriptions and donations go to the costs operating and maintaining this site. We prefer that guests take part in our community and we offer a lot in return to those willing to join our corner of the Porsche world. This site is 99 percent member supported (less than 1 percent comes from advertising) - so please consider an annual subscription or donation to keep this site running.
Here are some of the features available - once you subscribe RennTech.org
- View Classified Ads
- DIY Tutorials
- Porsche TSB Listings (limited)
- VIN Decoder
- Special Offers
- Paint Codes
- Registry
- Videos System
- View Reviews
- and get rid of this welcome message
It takes just a few minutes to register, and it's quality Porsche information at a low cost.
Contributing Members also get these additional benefits:
(you become a Contributing Member by subscribing or donating money to the operation of this site)
- No ads - advertisements are removed
- Access the Contributors Only Forum
- Contributing Members Only Downloads
- Send attachments with PMs
- All image/file storage limits are substantially increased for all Contributing Members
- Option Codes Lookup
- VIN Option Lookups (limited)


1schoir
-
Posts
2,739 -
Joined
-
Last visited
-
Days Won
9
Content Type
Profiles
Events
Forums
Exterior Paint Colors
Downloads
Tutorials
Links Directory
Collections
Classifieds
Store
Everything posted by 1schoir
-
How did the tech diagnose the RMS? Was the transmission removed to make a positive diagnosis as opposed to the IMS flange/bearing? Regards, Maurice.
-
Jim: A lot of people use a regular hose clamps and it does the job. It is definitely tricky to get that OEM clamp onto the lower end of the bellows. The key is to get the car up high enough and to approach it from the proper angle. The last one I did with Boxtaboy on his 2001 Boxster required removal of a plastic connector that also got in the way. Regards, Maurice.
-
and congratulations on realizing one of your dreams! The indicated oil pressure on the gauge will increase or decrease based upon oil viscosity, oil temperature, rpm's and engine load, so the fact that your pressure is increasing as you go from idle to 3500-4000 rpm's is normal. Although yours is a 2005, the owner's manual for a 2009 997 only calls for a minimum of 3.5 bar at 5000 rpm, but makes no mention of a maximum pressure. Regards, Maurice. Regards, Maurice.
-
Jared: The possible causes of hesitation (as in "delayed response" when pressing on the gas pedal) are rarely the same cause between an automatic and a manual transmission car. The only ones they may have in common are ignition and timing related, with fuel starvation due to a clogged fuel filter being another, less common possibility. More likely, with a manual transmission, delayed acceleration is commonly caused by a slipping clutch disc plate due to wear or contamination. It is relatively easy to isolate that as a possibility by putting the car in 4th or 5th gear at about 20 or 25 mph and then stomping on the gas pedal. If you see the revs go up immediately, but don't see a corresponding increase in vehicle speed then you have your culprit. When the clutch is on its way to needing replacement, but not quite shot, the car's road speed will slowly catch up to the revs. By contrast, with an automatic, the first things to investigate are the level and condition of the automatic transmission fluid. Regards, Maurice.
-
You could easily avoid at least some of this drama by investing in a UView Airlift tool for about $100 on Amazon.com. You can even purchase it by following a link from RennTech.org. Fantastic, well-machined, foolproof tool that will make any future air bleeding from your coolant system easy as pie, all in less than 1/2 hour. The other obvious benefit is that you don't have to permit any of those "Pros" to do what they will to your car, and you can make sure that it's done exactly according to your standards. Finally, you will also have that feeling of satisfaction and security in knowing that the job was done right and that it's one less thing to worry about. Not having the car out of your hands also has some additional benefit which is plainly evident. Regards, Maurice.
-
New engine
1schoir replied to roadsession's topic in 996 Series (Carrera, Carrera 4, Carrera 4S, Targa)
+1 on No Cosmoline! Regards, Maurice. -
Crunch goes the Porsche
1schoir replied to JeTexas's topic in 996 Series (Carrera, Carrera 4, Carrera 4S, Targa)
JE: You would be well advised to have the Farmer's Insurance adjuster look at the car to assess the damage at the body shop you intend to use. Most body shops, especially the better and more successful ones have long-established relationships with the adjusters of each insurance company and they can always do better than you can do as an individual. Don't forget, these body shops are now all equipped with software that helps them give very detailed estimates at the few clicks of a mouse and they are very good at having the adjuster come back if there is additional damage discovered ("supplements") after the bumper is taken off, etc... Also, make sure that you have LOTS of hi-resolution photos of your own before anyone touches your car so that you can document the damage accurately in case of a dispute. Regards, Maurice. -
'98 Boxster Convertible Top
1schoir replied to 1schoir's topic in 986 Boxster Convertible Top Issues and Solutions
You can align the V-levers by spinning the inner speedometer-like cable inside the black vinyl cable housings in a cordless drill. Do a search here for the procedure, which involves pulling the cables out from the sides of the electric motor. After you align them, you can double check your work by observing the clamshell when it is in the process of closing all the way down. When it gets about two inches away from the trunk lid surface, you can measure and adjust accordingly by spinning one of the cables until the clamshell is level and even. Regards, Maurice. -
Posted by Stephane 1515: thanx,I am not a mecanic, so i'll describe in my own words... my convertible top cover goes up and the top goes down 1/4 of the way and then i hear a loud clik, and it stops, i have to do it manually . to put it back on, i have to do it manually all the way to the 3/4 and then it works with the button...of course the top light is always on when i drive...and i noticed that the 2 gears that turn the pushrods are not in the same position, is it normal? thanx, any advice would be great Stephane Stephane: Unless one or more of the four pushrods (or parts of those pushrods) are broken, it is not possible to move the top manually, assuming the convertible top gears are not stripped. First verify that all of the following parts are intact and/or not missing: left and right side front pushrods with the plastic ball cups attached, intact, and connected (pressed on) to the steel balls at the base of each side of the B-pillar; left and right side black "hydraulic" pushrods are connected at the steel ball at the rear arm of each V-lever and at the body-colored support arm that is attached at its upper end to the underside of the clamshell. Also verify that each V-lever has no "play" when you manually forcibly try to rotate it either clockwise or counterclockwise (preferably with the pushrods disconnected). That will tell you whether the half-moon gear inside each of your "A-Version" transmissions is stripped or any of the teeth are broken off. If you are not sure about which parts are which, do a search here for "pushrod" and you will find photos of the various parts. If you have a Bentley manual, there is a good diagram of the various parts. In the alternative, take some photos of the parts and post them here so that we can see if there is something amiss. To answer your other question: The gears and levers that move the pushrods should be in the same exact position, but should be a mirror image of each other. If they are not, then your mechanism has to be re-synched. The light remaining on all the time also involves timing and the position of the B-pillar microswitch, and sometimes a faulty double relay. Regards, Maurice.
-
kcs: Again, I would suggest first swapping the relay from the passenger side into the underside of the driver's seat as it is relatively quick and easy. That will eliminate the relay as a possible culprit. From what you describe, it's possible there is a break in continuity outside of the seat heaters (i.e., in the wiring leading to and from the heaters and to and from the relay under each seat. Check the TSB that "jpflip" has listed in one of the posts above for the most likely sections to check because of the seats sliding back and forth and possibly damaging the wires. If that does not do it, you can still try next to isolate the two parts of the seat heater (the seat part and the backrest part) and test for resistance with an Ohmeter as Saved4it has spelled out in the posts above. In your case this does not sound as likely because of the swap you did with no change in results, but it's worth repeating the tests. Once you find which of the two sections has no continuity, you will have identified the bad section (or the bad/chafed/damage wire section mentioned above) and then you can replace it. Labor and care intensive, and time consuming but trust me when I tell you that it will beat the pants out of going to the dealer for this! . Regards, Maurice.
-
2001 Boxster bleeding to death...
1schoir replied to aaroncaserta's topic in 986 Series (Boxster, Boxster S)
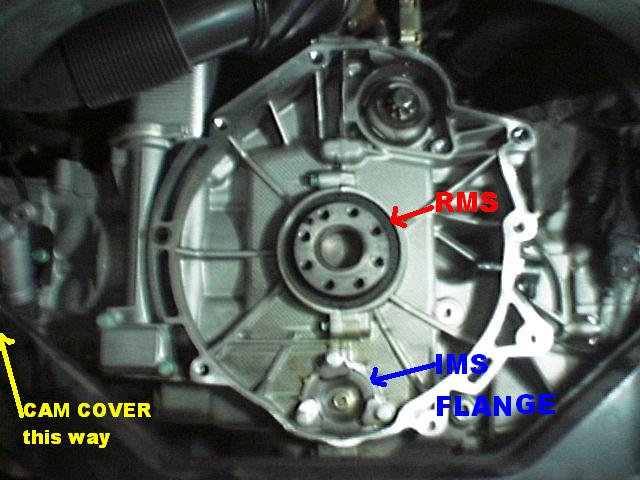
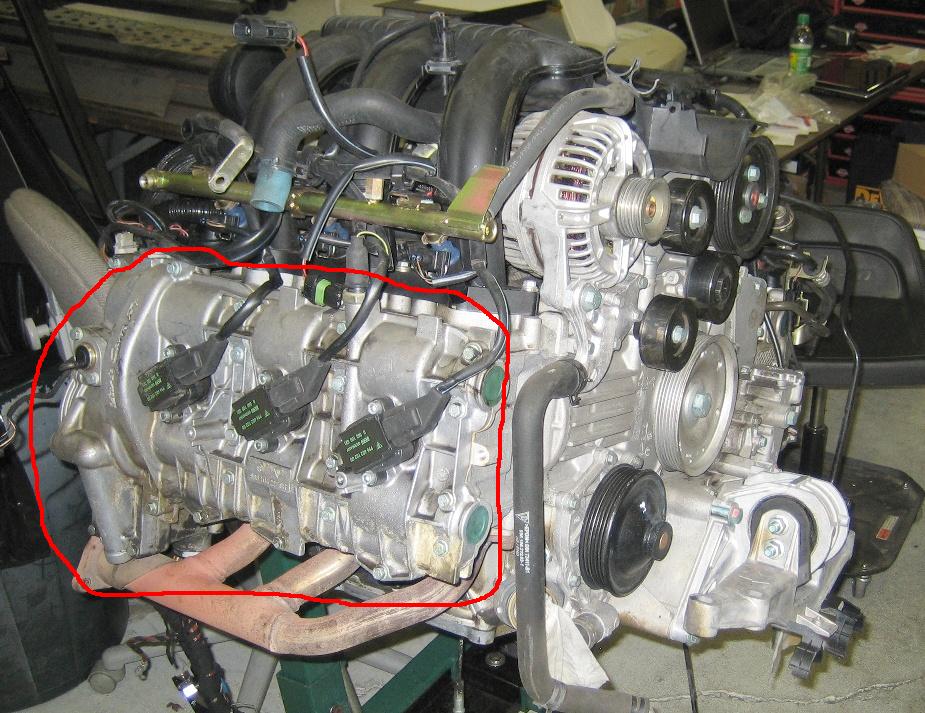
Aaron: For what it's worth, anecdotal evidence about IMS failures find them less likely to happen on Tiptronics and on cars that are always on the track. Definitely find yourself a good independent mechanic and enjoy the very special car you have now! As far as the dealer not being able to tell the difference between a cam cover leak on the one hand and either an RMS or IMS leak on the other hand, if you will just look at the layout of the engine you will see that the cam covers are on the "outer edges" of the engine, while the RMS and IMS seal and encapsulated bolts are at the rear centerline of the engine, one above the other. I don't know how they can definitively say that it's now the RMS because, short of pulling off the tranny, there is no way to tell whether the leak is coming from the IMS area or from the RMS. So, it might help if you ask them to put the car up on their lift and ask them to show you where the cam covers are and approximately where the RMS and IMS bearing and flange would be located. Take a look at the photo and diagrams posted on Mike Focke's website for an idea of what the cam covers look like and where they are located, here: http://sites.google....2/camcoverleaks Here is that photo: By contrast, here is a photo of the rear of the engine, with the transmission off, for an idea of where the RMS and where the IMS flange is located: Good luck and don't let the dealer snow you. You work too hard for your money to let them take it from you without having earned it! Regards, Maurice.
-
How to remove side panels in door to get to Window?
1schoir replied to TXGold's topic in 996 TT, 996 TT S, 996 GT2
Noob: Here's the link to that thread: http://www.renntech.org/forums/index.php/topic/16599-window-has-a-mind-of-its-own/page__p__83099__hl__%2B%2Bwindow+%2B%2Bregulator+%2B%2B996+%2B%2Bstop__fromsearch__1#entry83099 Take a look at post #5 for a photo of the location of the bump stops. Regards, Maurice. -
How to remove side panels in door to get to Window?
1schoir replied to TXGold's topic in 996 TT, 996 TT S, 996 GT2
Noob: What you missed was that there are two positions (slots) for the bump stop that limits the travel of the window at the completely down position. The correct slot position is different between the 911's and the Boxsters and it's the exact same regulator, with the same part number, for both models. If you don't install the bump stop in the correct position, the window will not travel all the way down so as to "disappear" inside the door on a 911. Do a search here and you will find photos of the correct position for the lower bump stop. I posted that about two years ago, but I can't find the link right now. If I find it first, I'll post it. Regards Maurice. -
Spitting Gas
1schoir replied to johonole's topic in 996 Series (Carrera, Carrera 4, Carrera 4S, Targa)
This issue has been linked to a defective Evap Canister, a fuse, and/or dislodged or twisted up fuel lines to and from the fill orifice or inside the fuel tank. Regards, Maurice. -
996 with LS1 engine conversion
1schoir replied to brianjw4's topic in 996 Series (Carrera, Carrera 4, Carrera 4S, Targa)
Thanks! Sent you a PM regarding kits. That's right, and the aftermarket support for these is huge. If you could send me that PM about the kits, I would greatly appreciate it. Also wondering if this kind of conversion is doable on a Boxster. Regards, Maurice. -
Special Thanks to Loren
1schoir replied to rwrsmart's topic in 996 Series (Carrera, Carrera 4, Carrera 4S, Targa)
+2 to Loren. Keep up the good work! Regards, Maurice. -
Rust Underneath My 996
1schoir replied to valley996's topic in 996 Series (Carrera, Carrera 4, Carrera 4S, Targa)
+1 on the POR-15. Use the original formula Black Gloss and it WILL stop the rust. I have used dozens of rustproofing paints and solutions over the last 40 years and this POR-15 is the only one that I have run across that does the job. Follow the instructions on their website to prepare the surface before painting. It requires minimal prep (i.e., you don't have to remove all of the rust etc.,) but you MUST wear gloves and not get any on your hands or any other part of your body. Once it hardens, you can only get it off by abrasion. If you get it on your hands it has to wear off. No connection to the company, but definitely a satisfied customer. I think that the key is that it cures by drawing in moisture from the surface and thus seals the surface from further rust. Regards, Maurice. -
caliper powder coating
1schoir replied to ddozier's topic in 996 Series (Carrera, Carrera 4, Carrera 4S, Targa)
Dozier: For reference, do a search here...there's a guy ("ekam"?) here and on 986forum.com who was recently selling a set of beautifully powder coated rear calipers. If I find the post first, I'll post the link to it. Regards, Maurice. Update: Here's the link: http://www.renntech....__1#entry185710 Should give you an idea of the cost and quality of work you can expect. -
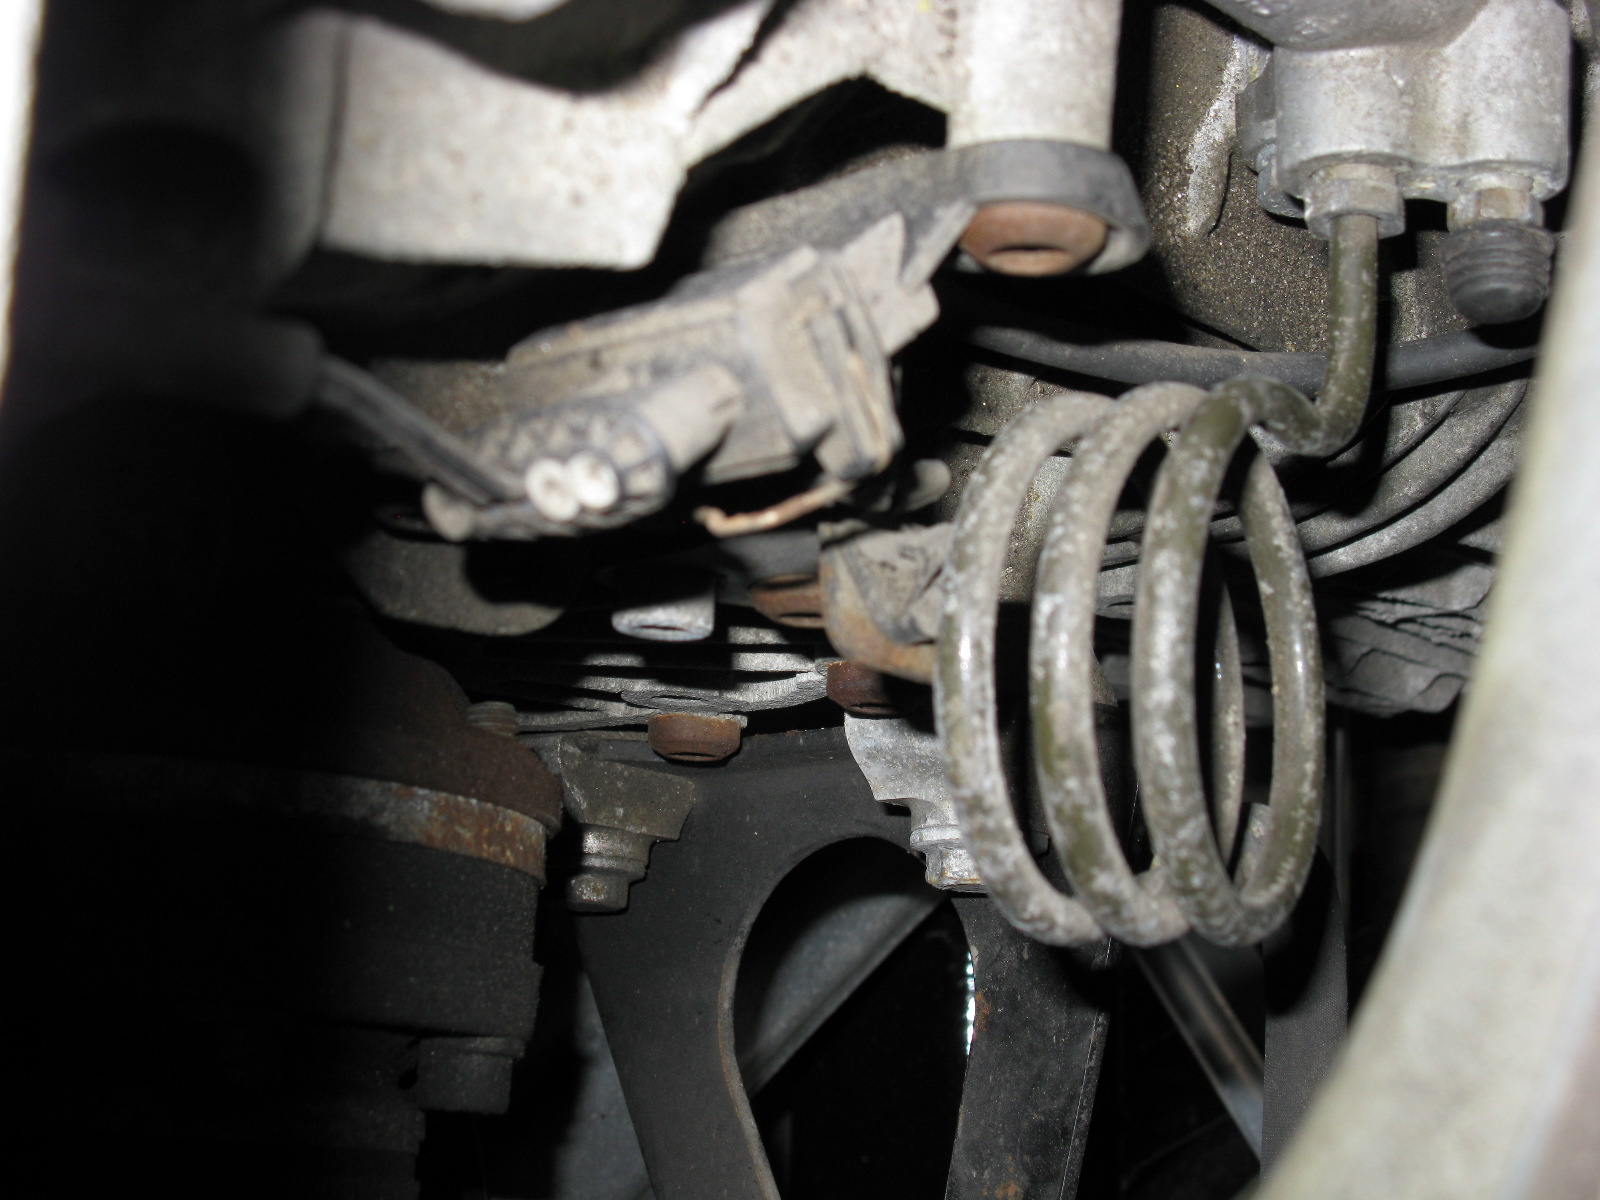
LOREN OR ANYONE. WHERE IS The clutch bleeder valve ? In the Bentley manual the pic is too close to tell. Yellow and blue fluid is available to make sure you had thoroughly bled that old fluid. Clutch bleed valve is on the slave cylinder near the top of the transmission. On a Carrera that would be left side on a Boxster - right side. The Boxster clutch slave cylinder and bleed valve are on the left side (driver's side on U.S. cars), high above and forward of the inboard side of the left rear half-shaft. You will see a sort of "wound-up coil" of brake fluid line to the left of it, leading close to the location of the bleed nipple. Follow that coil to the clutch slave cylinder. For another reference point, you can see the black cutout bracket which is the transmission support bracket. One side is bolted to the side of the transmission, the other side rests on top of one of the two transmission mounts. Here is a photo of that coiled brake fluid line leading to the clutch slave cylinder at the top right corner of the photo. The bleed nipple is directly to the right, under that little protective rubber dust cap (you can see the inboard side of the left rear halfshaft at the bottom left of the photo): Regards, Maurice.
-
*HELP* BoxterS 98, roof will not open
1schoir replied to adriano's topic in 986 Boxster Convertible Top Issues and Solutions
Dan: Good that you have made some progress and are getting familiar with the mechanism. Your current symptoms sound like the V-levers are "over-rotating", probably because the double relay is getting the signal from the B-Pillar microswitch a little too late in the cycle. You may be able to make an adjustment by carefully bending that little silver lever on the B-Pillar microswitch so that the part of the B-Pillar on the frame that trips it makes contact a split second earlier. That will cut power to the motor just a little earlier and that will then stop the rotation of the V-levers. Two questions: 1. When you say that you had the little silver leg on the microswitch "fixed", exactly what did you do? 2. When the top is almost all the way closed, does it start to come back slightly before the pushrods pop off the steel balls at the base of the B-Pillars? Regards, Maurice. -
Jim: If you are using an OEM clamp on the lower part of the bellows, make sure that you have a pair of hose clamp pliers handy or the little blue plastic tool that comes with part number 99951263000 (spring hose clamp with tool). Without one of those tools, it's VERY difficult to get that clamp seated properly over the bottom of the bellows. Check out this thread if you haven't already seen it: http://www.renntech.org/forums/index.php?/topic/17331-aos-replacement-tips/page__pid__187451#entry187451 Regards, Maurice.
-
short term winter storage
1schoir replied to Pancho's topic in 996 Series (Carrera, Carrera 4, Carrera 4S, Targa)
Pancho: Definitely fill the gas tank as that will minimize condensation inside the tank. Also, it would be a good idea to treat the gas (just before you fill it before storage) with either StarTron by Starbrite or Sta-Bil fuel stabilizer for ethanol-laced gas. . Those products will help to prevent any breakdown and separation of the gas. (Note that I am assuming that you have the curse of ethanol in Canada). Before you disconnect the battery, read the article in a recent issue of Excellence magazine about the possible ill effects of doing so that some have experienced. +1 for inflating the tires and putting them up on scraps of carpet. Regards, Maurice. -
Pics of my top with some problems
1schoir replied to Dale_K's topic in 986 Boxster Convertible Top Issues and Solutions
Dale: Excellent! Let us know how you progress. Regards, Maurice. -
Pics of my top with some problems
1schoir replied to Dale_K's topic in 986 Boxster Convertible Top Issues and Solutions
Dale: One of the purposes of the missing strap is to pull the edge of the top on that side into the guide channel over the window. It's easy enough to sew a new one in with a little sewing awl. Not all Boxsters have that "little string" thing going from left to right under the top canvas. It depends on the year and whether it's a 986 or a 987. Take a look at this link for photos and dimensions for replacing the strap: http://sites.google.com/site/mikefocke2/thetop-itsmaintaince%26replacement , and go to the section entitled "When the Top Edge doesn't Fall into the Guide Channels". The "loose change sound" may be caused by (an) improperly adjusted tension rope(s). Regards, Maurice. -
996 with LS1 engine conversion
1schoir replied to brianjw4's topic in 996 Series (Carrera, Carrera 4, Carrera 4S, Targa)
Brian: While this may not appeal to some purists, that is one impressive accomplishment! Aside from the obvious challenge in getting it to physically fit it there, it boggles my mind to see that you have been able to get the DME/CPU units to work together. If you only look at some of the threads here and on other forums, you will see that even something as comparatively minor as a CEL causes major headaches. The real bonus for you is that, unlike the rest of us, you never have to be concerned about the IMS bearing and the can of worms that surrounds that issue!!! Regards, Maurice.