Welcome to RennTech.org Community, Guest
There are many great features available to you once you register at RennTech.org
You are free to view posts here, but you must log in to reply to existing posts, or to start your own new topic. Like most online communities, there are costs involved to maintain a site like this - so we encourage our members to subscribe or donate. All subscriptions and donations go to the costs operating and maintaining this site. We prefer that guests take part in our community and we offer a lot in return to those willing to join our corner of the Porsche world. This site is 99 percent member supported (less than 1 percent comes from advertising) - so please consider an annual subscription or donation to keep this site running.
Here are some of the features available - once you subscribe RennTech.org
- View Classified Ads
- DIY Tutorials
- Porsche TSB Listings (limited)
- VIN Decoder
- Special Offers
- Paint Codes
- Registry
- Videos System
- View Reviews
- and get rid of this welcome message
It takes just a few minutes to register, and it's quality Porsche information at a low cost.
Contributing Members also get these additional benefits:
(you become a Contributing Member by subscribing or donating money to the operation of this site)
- No ads - advertisements are removed
- Access the Contributors Only Forum
- Contributing Members Only Downloads
- Send attachments with PMs
- All image/file storage limits are substantially increased for all Contributing Members
- Option Codes Lookup
- VIN Option Lookups (limited)


1schoir
-
Posts
2,739 -
Joined
-
Last visited
-
Days Won
9
Content Type
Profiles
Events
Forums
External Paint Colors
Downloads
Tutorials
Links Directory
Collections
Classifieds
Store
Everything posted by 1schoir
-
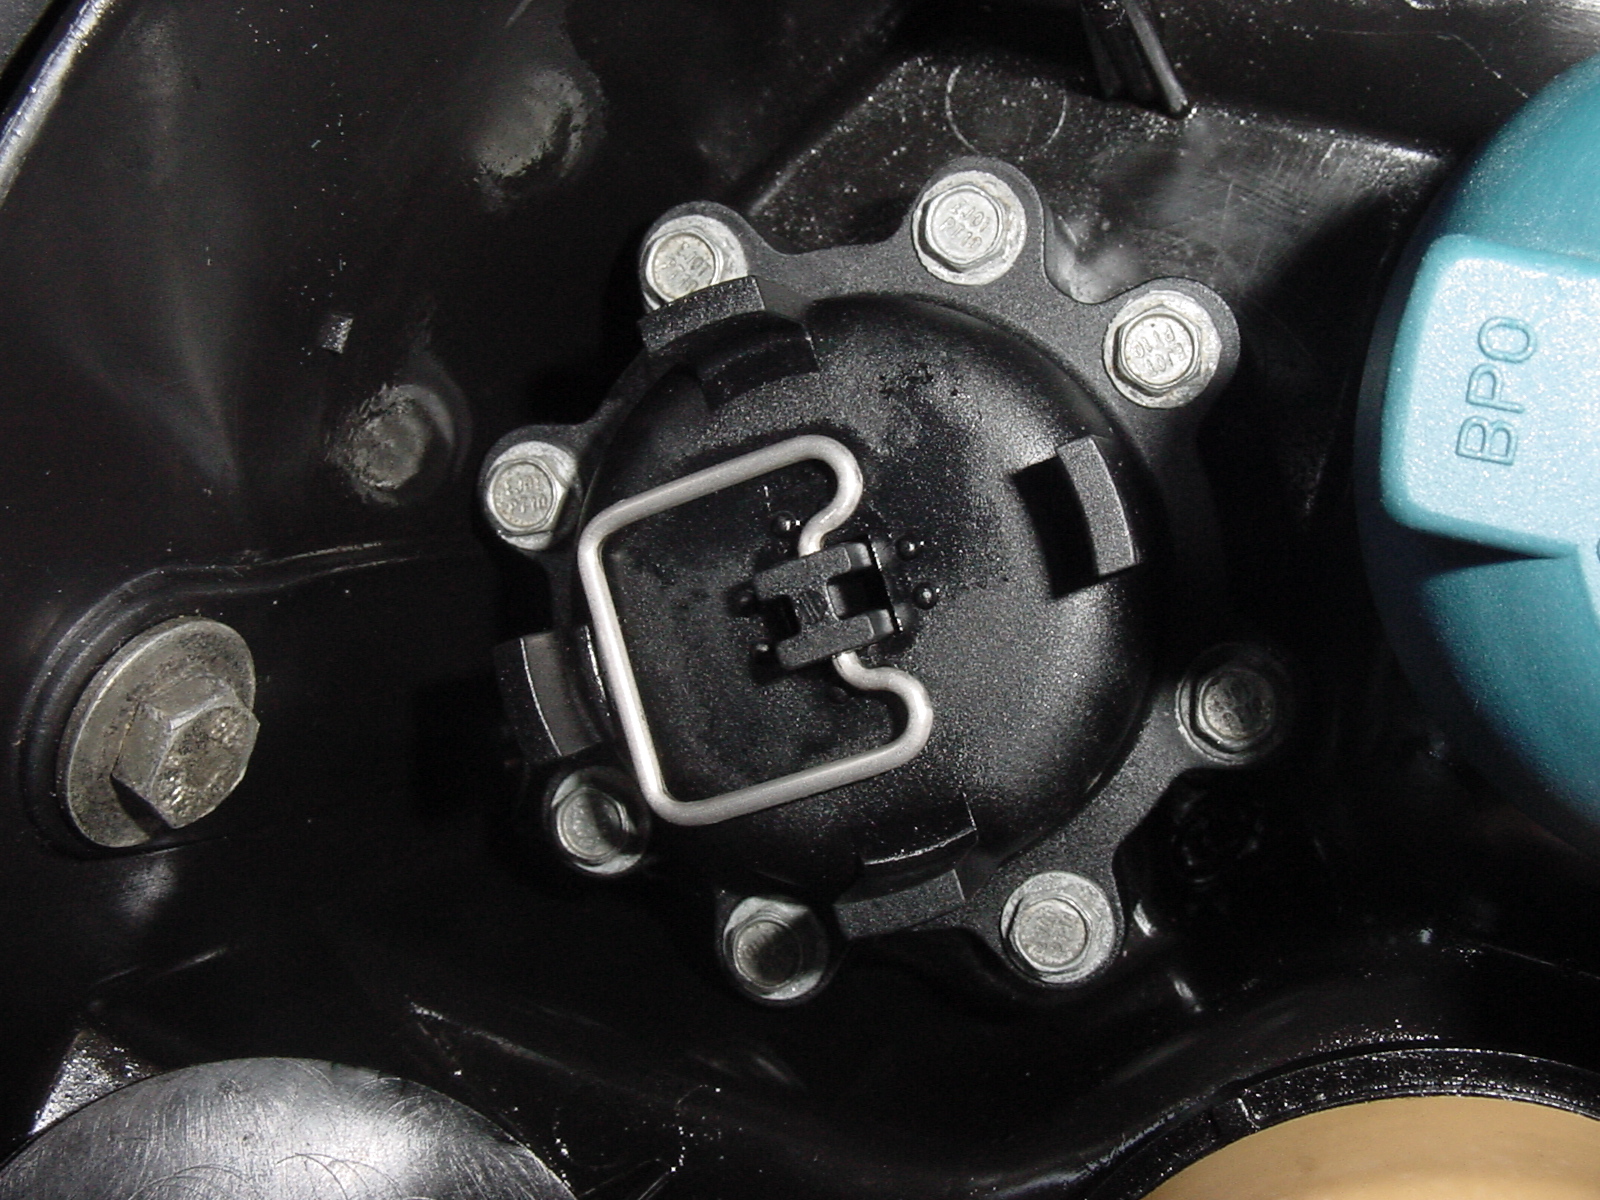
Dedes: Since your blower motor is blowing, no need to worry about that part for now. Since you don't have any antifreeze odor (or fumes/coating on the inside of the windshield) then your heater core (which is just a very small radiator) is probably not leaking, so it should be okay too. From what you have described above, it's possible that you had air somehow trapped in your coolant and, as a result, the heated coolant was not circulating properly throughout the cooling system, and thus not circulating through the heater core. That would explain why the air was not as hot as you are accustomed to getting. Check the level in your coolant reservoir, and also maybe bleed the system. A good (and easy) way to start is to simply lift the bleeder valve lever, which is located under the thin black plastic cover on top of the reservoir tank. Here is a photo of the bleed valve and lever: You can see the lever's straight metal portion on the left side of the photo, which is the one opposite the "S-shaped" portion. That's the part you lift up, with the S-shaped part remaining in contact with the top of the plastic assembly. You can drive around for 30 or 40 minutes with the lever in the up (vertical) position, and then simply flip it back down. Be sure to check your coolant level again after the car has cooled down for a few hours. If you find that the level dropped, you have most likely hit on the solution to your lack of heat problem. Do not open the coolant fill cap while the engine is hot, you could get scalded. Put a rag over the cap as you are unscrewing it for extra safety. If it's less than a quart or two, you can just top it up with straight distilled water. Regards, Maurice.

-
Dedes: The fan ("blower motor") that blows either hot or cold air into the cabin is located under the dashboard, at the passenger's (right) side. Here is a diagram of the blower motor (part #8) and its housing, along with the heater core (part #2), through which hot coolant must flow, to produce hot air into the cabin: Please clarify whether, when you put your heater blower speed at the highest setting, you get a lot of air blowing through the vents, except that the air is cold, and whether, when you lower the blower speed setting, less air is blowing through the vents. Regards, Maurice.
-
coolant hose part numbers
1schoir replied to kristian's topic in 996 Series (Carrera, Carrera 4, Carrera 4S, Targa)
Kristian: Here are the radiator hose part numbers: 996-106-621-57-M66 Radiator Hose, Upper (intake), Left, (6 speed only, NOT Tiptronic) 996-106-625-57-M66 Radiator Hose, Lower (return), Left, 996-106-622-54-M66 Radiator Hose, Upper (intake), Right 996-106-626-53-M66 Radiator Hose, Lower (return), Right For the remaining coolant hose part numbers, go to this link: http://www.pelicanparts.com/PartsLookup/HT...5-05-Frame3.htm Regards, Maurice. -
wow, how do you guys find these threads, i search and find nothing! So we have narrowed it down to that connector, i've got power on th car side, no power on the door side. any idea what size of torx? i dont seem to have anything that is fitting nicely and it is hard to see exactly what i'm dealing with Sometimes doing a search doesn't yield any results. However, if you remember the names of any posters who have contributed to a particular thread, it's easy to do a search by going to "advanced search" and entering the username in the search box on the right side. Good to see you are getting to the root of the problem. Regards, Maurice.
-
kedf1: Read this thread, your symptoms sound the same and it's probable that you will need the same solution: http://www.renntech.org/forums/index.php?s...c=16876&hl= Thanks to "97Boxsterred" for posting the fix. Regards, Maurice.
-
extended warranty experience
1schoir replied to Mike D's topic in 996 Series (Carrera, Carrera 4, Carrera 4S, Targa)
Mike: It is very important to verify that the Warranty Company is financially sound and has adequate reserves. There are a number of horror stories floating around on the message boards where posters have paid big $$$ for a warranty, only to find the company "dissolved" within a few months. Best to check with your state's Better Business Bureau and your state's insurance department. Also do a search on "Ripoffreport.com" Regards, Maurice. -
Potential buyer needs reasuring
1schoir replied to andy_k_1's topic in 996 Series (Carrera, Carrera 4, Carrera 4S, Targa)
Andy: Definitely get that PPI by a knowledgeable Porsche tech and then dive in and enjoy the ride! Good luck! Regards, Maurice. -
Buzzing noise coming from inside drivers side sill
1schoir replied to PORSCHE16V's topic in 986 Series (Boxster, Boxster S)
Matt: Here is a photo of the central alarm control module: Note that the seat has been removed for this photo, and for reference, you can see the two levers at the bottom of the photo. (Click on the photo to blow it up). On U.S. cars it is located under the left seat. Since you say that the buzzing is near the two latches that release the front hood ("bonnet") and the rear trunk lid ("boot"), then it is probably under the right seat. If you don't see it there, check under the left seat. Regards, Maurice.
-
Help! Major water under passenger seat
1schoir replied to Pablo's topic in 986 Series (Boxster, Boxster S)
Pablo: If you have managed to take off the V-lever and have figured out how to peel back the foam liner without removing the entire convertible top frame, you should certainly be capable of tracking the source of this problem. You have already figured out that the drain or drain hose has become dislodged. Remember my caveat to not operate the dash switch for the convertible top while the V-levers are removed. Otherwise, again, you will incur additional work in re-synching the top. You don't need a body shop removing the rear quarter panel for this task. If I were in your shoes, here is how I would proceed: On the driver's side, since you have determined that drain is not dislodged, I would snake down a heavy gauge (12 gauge should be sufficient) stranded wire with no sharp edges at its leading end down into the drain from above. Once you see where the wire comes out from the bottom, you will have a better idea of where to look for the routing of the drain on the problem side, i.e., the passenger's side. Then, go over to the passenger's side and jack the car up safely onto a jackstand. Then remove the right rear tire. It would be a good idea, for safety's sake, to put the removed wheel and tire sideways under the car near where you are working. From under the car, take a look at where the passenger's side drain exits (by comparing it to the exit of the drain where the wire came out on the driver's side). Then, remove the wheel well liner on the passenger's side and see if it exposes the drain hose and if you can put it back in place so that it drains properly. The wheel well liner is only held in place by a few 10mm plastic nuts and a couple of black plastic push pins. Let us know if you have any success, as I am reasonably sure it is something relatively simple. Regards, Maurice. -
Buzzing noise coming from inside drivers side sill
1schoir replied to PORSCHE16V's topic in 986 Series (Boxster, Boxster S)
Matt: Removing that trim is fairly straightforward. Do a search in this forum using the words "hood latch" or "hood locked" and you will find instructions. Regards, Maurice. -
Help! Major water under passenger seat
1schoir replied to Pablo's topic in 986 Series (Boxster, Boxster S)
Peter: Is it possible that your foam liner that surrounds the rear drain hole got sliced up or punctured when you were having problems with your convertible top operation? If the top is operated with one of the connecting rod arms disconnected (or partially dissassembled), one of the dangling parts can puncture the foam liner. That would cause water to migrate into the passenger compartment. If that is the case, you can do a temporary fix by using black silicone adhesive sealant (made by Permatex). Regards, Maurice. Thanks Maurice, but the foamliner is fine. It's when I get the snake about 3 inches down the drain when it just gets stopped like I hit a wall. Also when air is blasted in down the drain, I can't feel any air come out the bottom of the car. Any other ideas? In the meantime I will try to snake it again but no success so far. Peter: I know you have been down this road before, so it shouldn't be too difficult for you (haha!). How about removing the 19MM bolt that holds the V-lever onto the top transmission, and then undoing the slotted 2 large round plastic pins at the rear of the foam liner (near the shock absorber) and then seeing if you can partially peel back the foam liner from the inner rear quarter panel. You don't have to peel it away under the front corner (under where the white plastic cups would be). Then you can get a good look at the other side of the drain hole and determine if part of the drain tube has become dislodged. That may be why you can't snake a wire easily down there. IIRC you may also have to remove the three nuts that hold the top transmission onto the rear quarter panel and put the transmission aside onto the engine compartment lid temporarily. As long as you don't operate the convertible top switch, you don't have to worry about re-synching the top mechanism. I know it seems like a PITA, but that alarm control module under the driver's seat is well worth protecting if you want to keep your level of frustration at a reasonable level. Regards, Maurice. P.S. Happy and Healthy Supercharged New Year! -
code 1126 and 1133 story
1schoir replied to extrememoto's topic in 996 Series (Carrera, Carrera 4, Carrera 4S, Targa)
Extreme: Have you looked into a possible air leak coming from your oil filler cap, or possibly your oil filler tube? There is a TSB for the 996 that advises that you will get a CEL if the oil filler cap is loose, not properly seated, or has an o-ring seal that does not provide a complete seal. The fault codes that may result include: Motronic 5.2: P1124, P1126, P1127, P1128 Motronic 7.2: P1125, P1132, P1127, P1134 I don't know if this second thought would help you at all, but on a 986 Boxster, a cracked oil fill tube can also produce the fault codes that you listed, i.e., P1123 to P1130 for a DME 5.2 and , and P1126, P1128, P1130, and P1133 for a DME 7.2. Regards, Maurice. -
Help! Major water under passenger seat
1schoir replied to Pablo's topic in 986 Series (Boxster, Boxster S)
Peter: Is it possible that your foam liner that surrounds the rear drain hole got sliced up or punctured when you were having problems with your convertible top operation? If the top is operated with one of the connecting rod arms disconnected (or partially dissassembled), one of the dangling parts can puncture the foam liner. That would cause water to migrate into the passenger compartment. If that is the case, you can do a temporary fix by using black silicone adhesive sealant (made by Permatex). Regards, Maurice. -
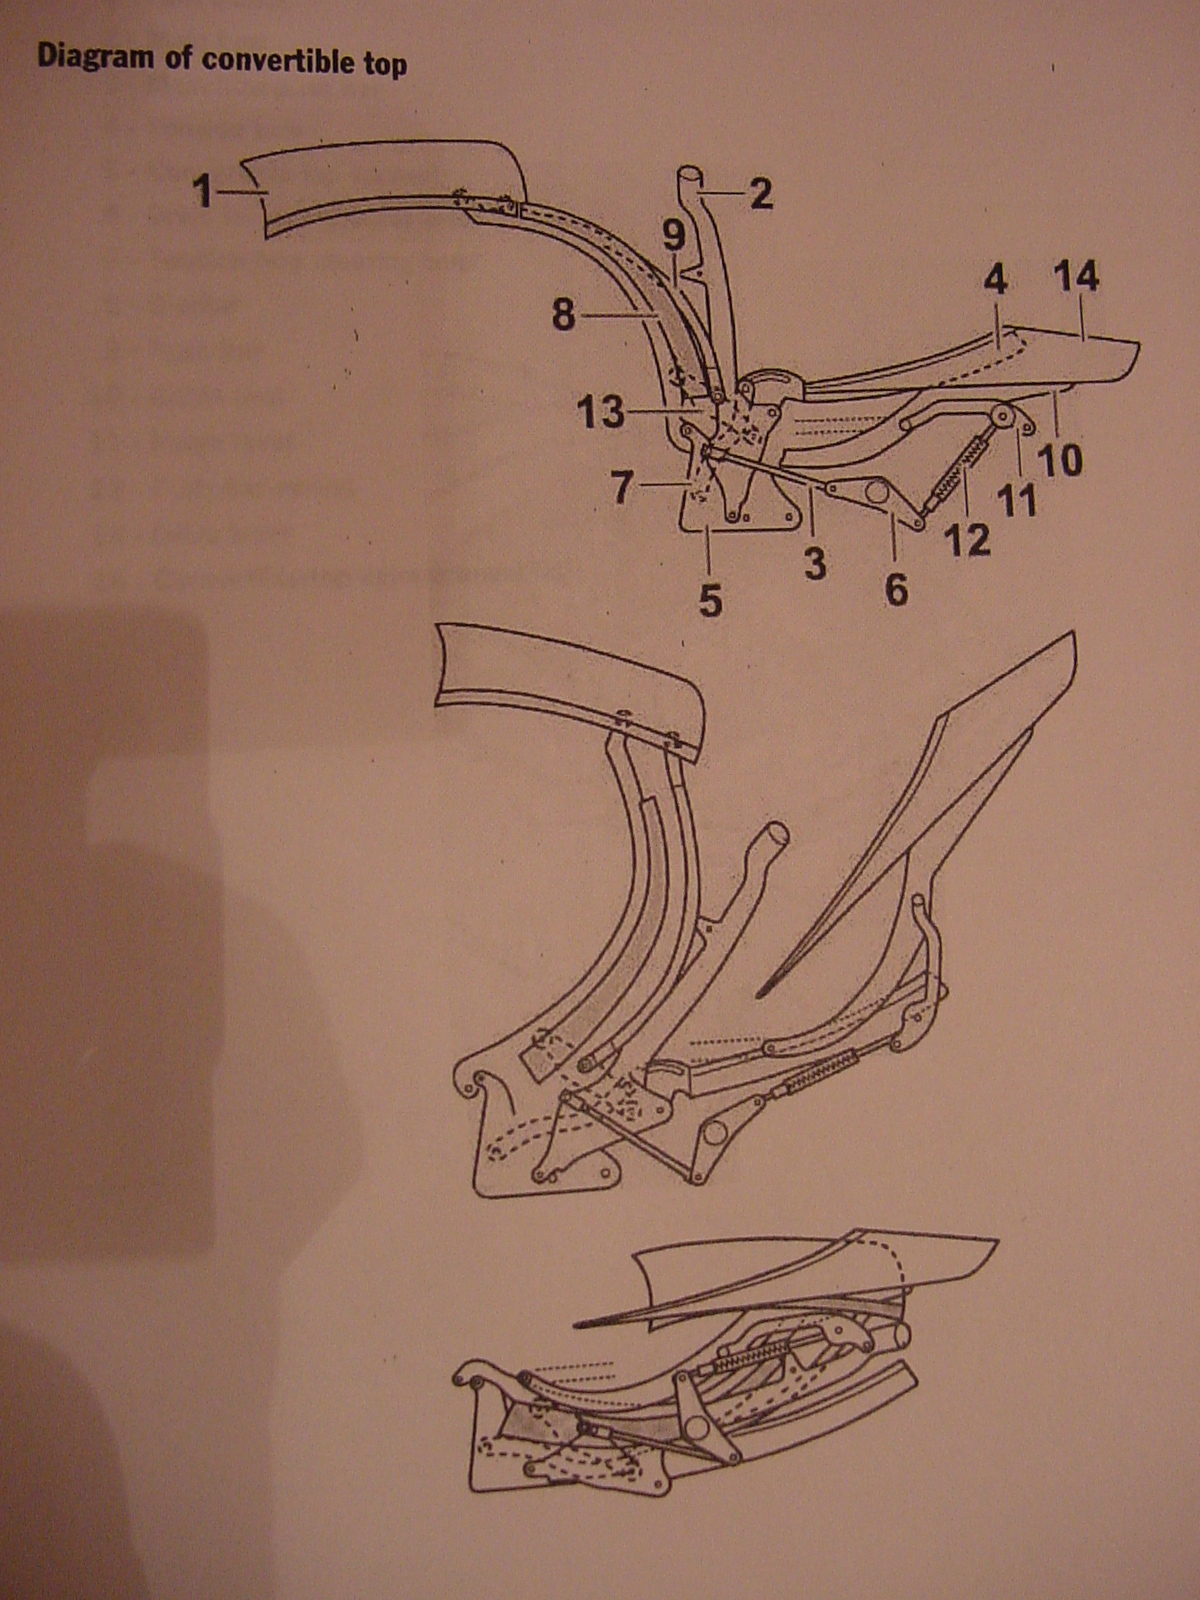
Cartel: To get the top to open manually, you must disconnect the white (or red if yours are original and have never been replaced) plastic cups at the base of the B-Pillar and the black hydraulic pushrods where they connect to the V-levers. Disconnecting the white plastic cups will allow you to operate the convertible top manually. Disconnecting the black hydraulic pushrods will allow you to operated the clamshell manually. Here is a diagram of the mechanism, which should help you orient yourself as to what you are looking for: The V-lever is part #6, the black hydraulic pushrod is part #12, and the white (or red) plastic cup is located on the forward end of part #3. Part #14 is the clamshell, and Part #1 is the canvas top. To have a better chance to see the parts that must be disconnected, you will have to pull aside the (vinyl) rain curtain. That curtain is loosely held in place by yet another cable that is located at the rearmost corners of the (carpet-covered) engine compartment lid (on the car body, not on the lid). That cable is held on to a small metal ball and you must pry it apart from that metal ball. Here is a photo of the flexible cable that leads to the metal ball (hidden under the metal cup at the bottom of the cable) at the side of the curtain: That particular connection is easy to separate, unlike the black hydraulic pushrod. Once you have the curtain's cable separated, you may also have to remove the black plastic cosmetic covers that are simply clipped onto the arm that supports the clamshell. To access the white plastic cups, sit sideways in the driver's seat with the door open and your feet on the ground. Look down from above the side of the car (just behind where the rear quarter panel meets the rear of the door if the door were closed) and you should be able to see the white (or red) plastic cup. Pry that cup off by levering it outboard. You will nee a fat screwdriver or pry bar. Then you will have to reach between the roll bar hoops, or possibly reach through them, to get at the connection of the hydraulic push rod to the V-lever. That connection is a real bear, so you will have to apply a great deal of pressure to separate it. Be careful not to hurt yourself there, but you just have to get the connection apart, again with a far screwdriver or, preferably an angled screwdriver. I have also had success using a non-automotive tool called a cat's claw, which is usually used to pull nails. Once you have the various parts disconnected, DO NOT press the dashboard switch without CAREFULLY marking (and photographing) the position of the V-levers relative to the sides of the body that they are mounted on. Otherwise, it will be much more difficult to re-sychronize the V-levers. Regards, Maurice.
-
Iatros: Since the clamshell is coming up, it is not the cables. When the motor runs, it spins the cables, which drive the transmissions, which rotate the V-levers, which in turn operate the clamshell from one end of the V-levers and the convertible top from the other end of the V-levers. I am pretty sure that your white (or red if early Boxster and never replaced) plastic cups, which are pressed onto a metal ball at the base of the B-Pillars, have either popped off, or have broken apart. Your top is no longer connected to the V-levers, which is why you are able to operate it manually. If it is your white plastic cups, there is a guy in Belgium who has reproduced the cups, otherwise Porsche only sells the complete connecting pushrod assembly. If you need his information, PM me and I'll give you the details. Regards, Maurice.
-
Climate control does not control?
1schoir replied to ofpiste's topic in 996 Series (Carrera, Carrera 4, Carrera 4S, Targa)
The cabin temp sensor may be at fault. Thanks KM....would you happen to know off hand where this sensor is located? Dennis Dennis: In a Boxster, The sensor for the cabin interior temperature is located inside (behind) the right dashboard vent. It is part of a small fan assembly that serves to blow interior air over the sensor. It is probably in the same location in your C4. Regards, Maurice. -
Thanks, Loren. Regards, Maurice.
-
Carlos: Search for a post here by "Juniinc" where he actually replaced the vinyl window with the top still on the car. He subsequently developed a kit which he says contains everything you need to do the replacement. Most of the tops that are replaced by the DIY'ers on this board and others are replaced because of the vinyl window and the consensus is that there is generally no signs of appreciable wear on the rest of the top. So...if a place is telling you that the tops "wear out" and "the material beneath the canvas disintegrates" find another shop. They are not looking out for your best interests. If you have the occasion, ask that installer to show you precisely where your canvas has "disintegrated." I am sure you will get some double talk and another story then. Replacement of the vinyl window without replacing the entire top has been done successfully numerous times (with the top removed and with the top on the car). You can also contact Pedro on PPBB.com for a good recommendation. He has a website: "pedrosgarage.com" Regards, Maurice.
-
Be sure to let us know how you make out with the windshield washer. For the Topic Liner, maybe send a Private Message to Loren. Regards, Maurice.
-
Michael: I think you may be putting the cart before the horse. Take Loren's advice and first check the coil pack and spark plug at cylinder one. As he hinted, if it were bad gas, would there be more than one cylinder misfiring? Check the coil pack and the spark plug so that you can at least eliminate that as a possible cause, then you can go from there. Regards, Maurice.
-
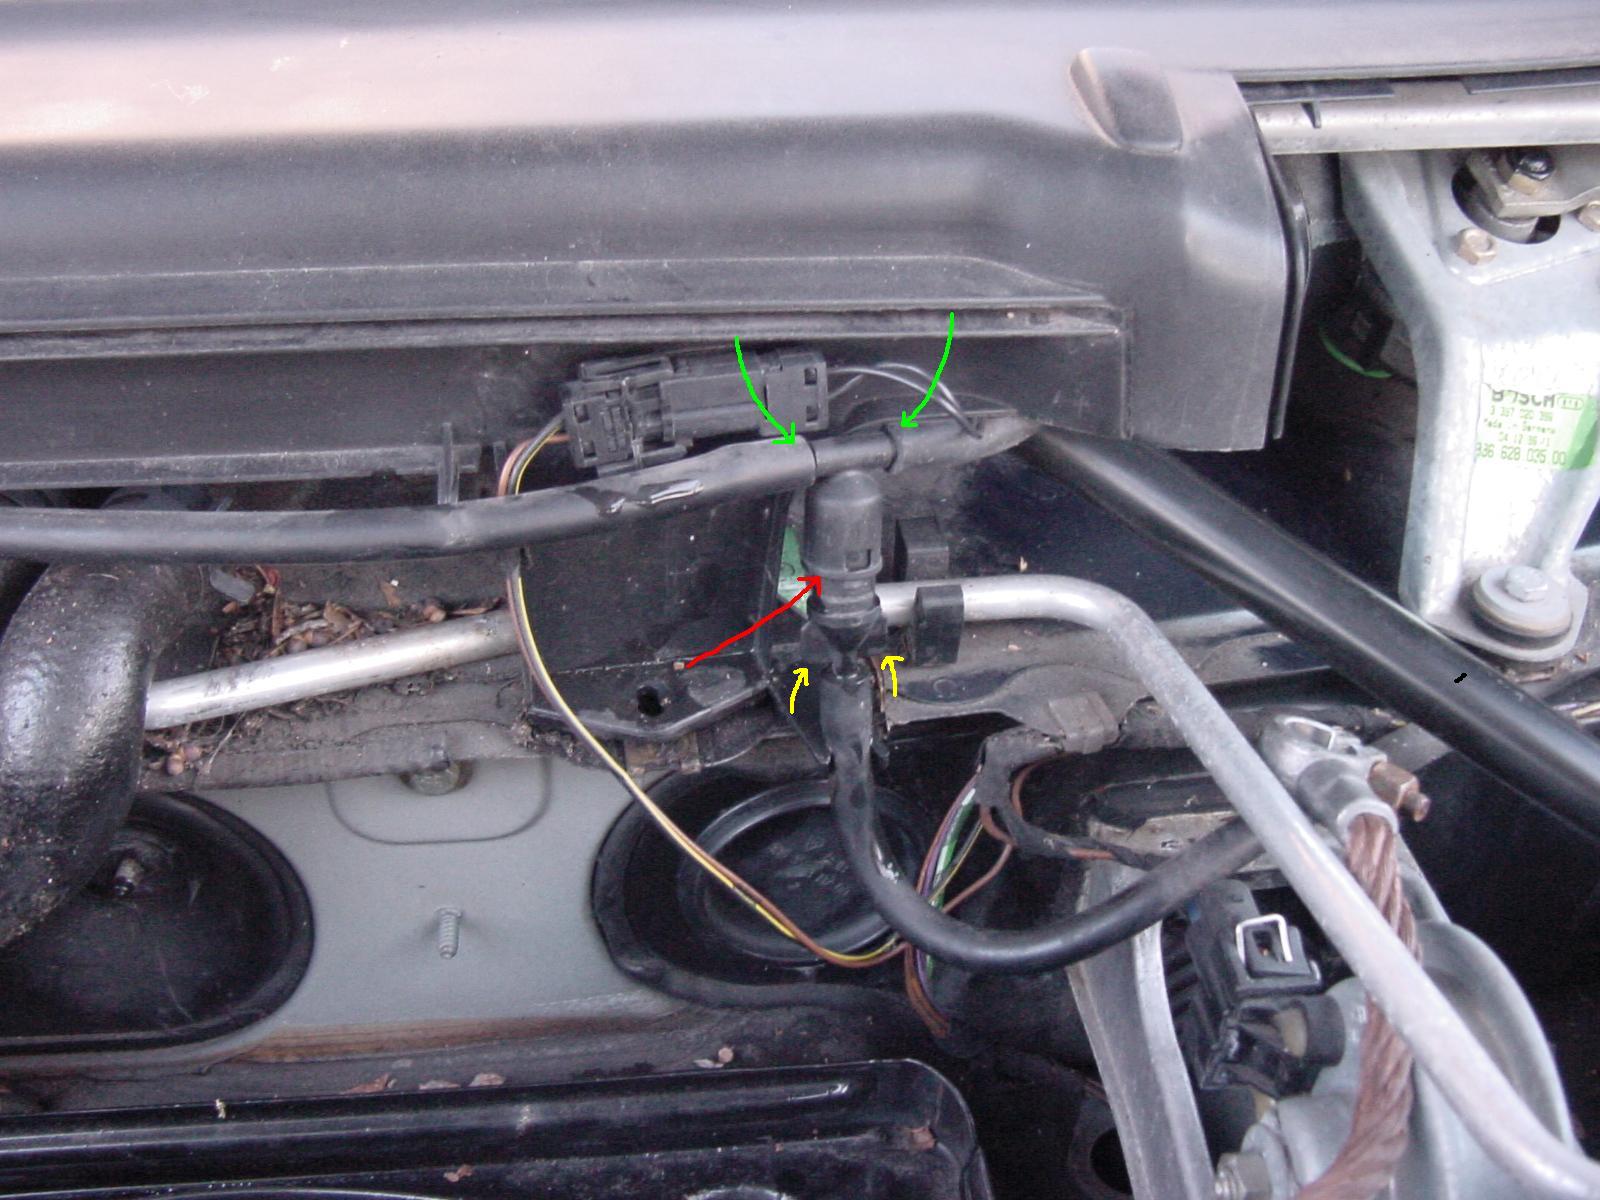
Rusty: Don't despair about the difficulty you had with the rear speakers, it's part of the learning process and, even though it may have been a disaster, I'll bet you learned a couple of things that will help you in the future. As for your current problem with the windshield washers, if you have access to compressed air, you can clear any possible clog. You can pull off the hose connection to the plastic T connector that leads to the two nozzles. The T connector is located at the base of the front bulkhead (just behind the battery), towards the driver's side. Here is a photo of the connector and its location (click on the photo to get a full sized picture): You can undo that connector by holding the hard plastic connector at the point just above the red arrow and rotating the part coming from below by 1/4 turn by turning the lower part by its ears indicated by the two yellow arrows, and then pull it apart. Apply compressed air to the connector towards the nozzles and that should clear out any clog from the nozzles. If you have trouble getting a good seal on the hard plastic connector with the compressed air, you can pull each of the rubber lines that lead to the nozzles by pulling them apart where indicated by the green arrows. Those just pull apart with some effort, as they are held on by "barbs" on the plastic connector in that location. By applying compressed air to each of the two rubber lines, you will clear out each nozzle in turn. If that does not fix the problem, then either your washer reservoir is cracked and not holding fluid, or, more likely the rubber hose that runs from the reservoir tank to the T connector above has slipped off the nipple that is on the bottom of the washer fluid reservoir. You have to gain access to the reservoir, and this requires removing the rear portion of the front wheel well liner on the driver's (left) side. First turn your steering wheel to the maximum left position, as that will provide you better access to the wheel well liner and the reservoir underneath it. You have to unscrew a few plastic nuts and a plastic push pin (rivet) to permit that part of the wheel well liner to slide out. Once you have removed that part of the wheel well liner, you will see the black rubber hose, which is supposed to be connected to the nipple that protrudes from the reservoir. If you want easier access, you could remove the left front wheel, but be sure that the car is securely supported on a jack stand before you stick your hands under there. It's a good practice to also slide the removed wheel sideways under the car's rocker panel near where you are working for extra safety. Push this hose back onto the nipple, and, if you want to avoid this problem in the future, you can secure it with a very small hose clamp. You should use an all stainless hose clamp, which is available from auto parts stores as well as from Home Depot. Fill the reservoir and test the operation of the windshield washers before re-installing the wheel well liner. One last note. If you can, change the title of your post to "Windshield Washer Pump Failed?" as that will make it easier for future posters who are searching for a similar fix to find your thread. "Water Pump" might be confused with the "coolant" pump on the motor. Good luck. Regards, Maurice.
-
window won't drop 1/2 inches
1schoir replied to f_laurens's topic in 986 Series (Boxster, Boxster S)
Here are links to two very helpful procedures, with lots of photos and instructions: One for door paner removal only: http://www.ecoutez.net/boxster/door-panel-removal/ And this next one for door panel removal and for replacement of window regulator, with part numbers: http://www.bombaydigital.com/boxster/projects/window/ Good luck, and please let us know how you make out, or if you discover anything new in doing the installation. Regards, Maurice. -
window won't drop 1/2 inches
1schoir replied to f_laurens's topic in 986 Series (Boxster, Boxster S)
f laurens: Do you get the same result if you pull on the outside door handle or if you pull on the inside door handle (i.e., the window will not drop the requisite 1/2 inch)? If that is the case, then it is most probably the window regulator and it must be replaced. This has been dealt with here before, so here is a link to a thread that you should read to get familiar with the problem and its solution: http://www.renntech.org/forums/index.php?s...&hl=1schoir If you decide to DIY, there is also a link to a procedure that describes all of the steps involved in removing the door panel for access. If you need that link, let me know and I will find it for you. Regards, Maurice. -
Here is a link to an online manual for a 986 Boxster: http://www.cannell.co.uk/Boxster_Manuals/9...rs%20manual.pdf Regards, Maurice.
-
Where is the passenger compartment monitoring sensor located? Anyone have a part number for reference? Regards, Maurice.