Welcome to RennTech.org Community, Guest
There are many great features available to you once you register at RennTech.org
You are free to view posts here, but you must log in to reply to existing posts, or to start your own new topic. Like most online communities, there are costs involved to maintain a site like this - so we encourage our members to subscribe or donate. All subscriptions and donations go to the costs operating and maintaining this site. We prefer that guests take part in our community and we offer a lot in return to those willing to join our corner of the Porsche world. This site is 99 percent member supported (less than 1 percent comes from advertising) - so please consider an annual subscription or donation to keep this site running.
Here are some of the features available - once you subscribe RennTech.org
- View Classified Ads
- DIY Tutorials
- Porsche TSB Listings (limited)
- VIN Decoder
- Special Offers
- Paint Codes
- Registry
- Videos System
- View Reviews
- and get rid of this welcome message
It takes just a few minutes to register, and it's quality Porsche information at a low cost.
Contributing Members also get these additional benefits:
(you become a Contributing Member by subscribing or donating money to the operation of this site)
- No ads - advertisements are removed
- Access the Contributors Only Forum
- Contributing Members Only Downloads
- Send attachments with PMs
- All image/file storage limits are substantially increased for all Contributing Members
- Option Codes Lookup
- VIN Option Lookups (limited)


1schoir
-
Posts
2,739 -
Joined
-
Last visited
-
Days Won
9
Content Type
Profiles
Events
Forums
External Paint Colors
Downloads
Tutorials
Links Directory
Collections
Classifieds
Store
Everything posted by 1schoir
-
Top replacement about to take place
1schoir replied to jimyboyle's topic in 986 Boxster Convertible Top Issues and Solutions
Jim: You can use the shorter, old style, sliders as long as your new top has the 4" elastic strings that are attached to the edge of the top on each side behind the side windows. If your new top does not have them, you should cut those elastic strings off the old top and sew them in to the same spot on the new top, otherwise you run the risk of not having the cable not tucking in behind the sides of the window frame when you close the top. Are you sure you had the right part numbers for the updated sliders? The foam seal definitely exists, but I think it may come as a part of a kit, which contains other parts that Porsche recommends you replace when you are replacing the top. When I did my top, the two seals came as part of the kit I mentioned, but my new top was a Porsche Factory top (bought on eBay from a guy who totalled his car before he had a chance to install his "expensive" top). The photos that I included in the DIY should give you a good idea of what they look like, and you can improvise by making your own set. I've had others ask about that part number, but I was never able to track it down. You can use weatherstripping foam made by Frost King, available at Home Depot, to duplicate the parts. There was a wax paper lining on the bottom of each, which revealed an adhesive on the underside of the foam rubber. The Frost King weatherstripping has the same setup. I have additional photos which will show you what they are made of and taken from other angles so that you can estimate the shape to make new ones. Let me know if you want to go that route and I will look for and post the photos. Regards, Maurice. -
Another door lock/unlock issue
1schoir replied to c0dewarr10r's topic in 996 Series (Carrera, Carrera 4, Carrera 4S, Targa)
Mark: Don't be intimidated by the door handle trim. There is only one tricky part (see the phrase in caps below). There are two large (#30, IIRC) torx screws that must be accessed and removed in order to remove the grab bar. The first one is located under the plastic cover that surrounds the door pull. This is the only piece that is a little tricky to remove without breaking off a tab that helps to hold it in place. Looking from underneath the plastic cover, you'll notice a small indentation in the center, towards the rear of that piece. You can work a small flathead screwdriver in there at the appropriate time, and, at that time, you can gently just separate it slightly from its contact surface with the door panel. First, though, put some significant pressure on the top (horizontal) rearmost surface of that plastic piece. Then, work the small flathead screwdriver in the indentation from underneath to separate it and then grab the whole plastic piece and rotate it upwards, pulling the bottom towards you and up, WHILE KEEPING THE DOWNWARD PRESSURE ON THE TOP REARMOST HORIZONTAL SURFACE OF THE PIECE. Note that the pressing down while rotating the piece is what keeps the small tab that is under that section from breaking. From what I have read, they break 50% of the time, but if you do it this way, they will not break. Once that plastic cover is off, unscrew the #30 long torx screw located there. To access the other screw, you must remove the small vinyl/plastic semi-circular ring that is located at the forwardmost point of the cubby. Just slip in a small PLASTIC blade under the left side(as you are facing the inside of the drivers' side door) near its uppermost portion (just below that left corner) and then rotate the top of the part towards you with some friction. That semi-circular ring is flexible and has an "up" position that is indicated with an arrow on its underside, so you can't put it back wrong. Now unscrew the #30 long torx screw located under the ring. Once you have both large torx screws removed, just grab a hold of the grab bar and pull it towards the front of the door and it will slide right off. To re-install, you will see it has two hooked tabs on the bottom rearmost surface of the grab bar that fits into two slots on the top of the door pocket. Regards, Maurice. -
mbodo: Pulling off the two rubber plugs and making the adjustment to the two torx screws (once you understand what the components look like inside the door) takes less than 15 minutes and doesn't involve leaving the car at the dealer. That's always a plus for me. LOL! Let us know how you resolve the issue. Regards, Maurice.
-
Top replacement about to take place
1schoir replied to jimyboyle's topic in 986 Boxster Convertible Top Issues and Solutions
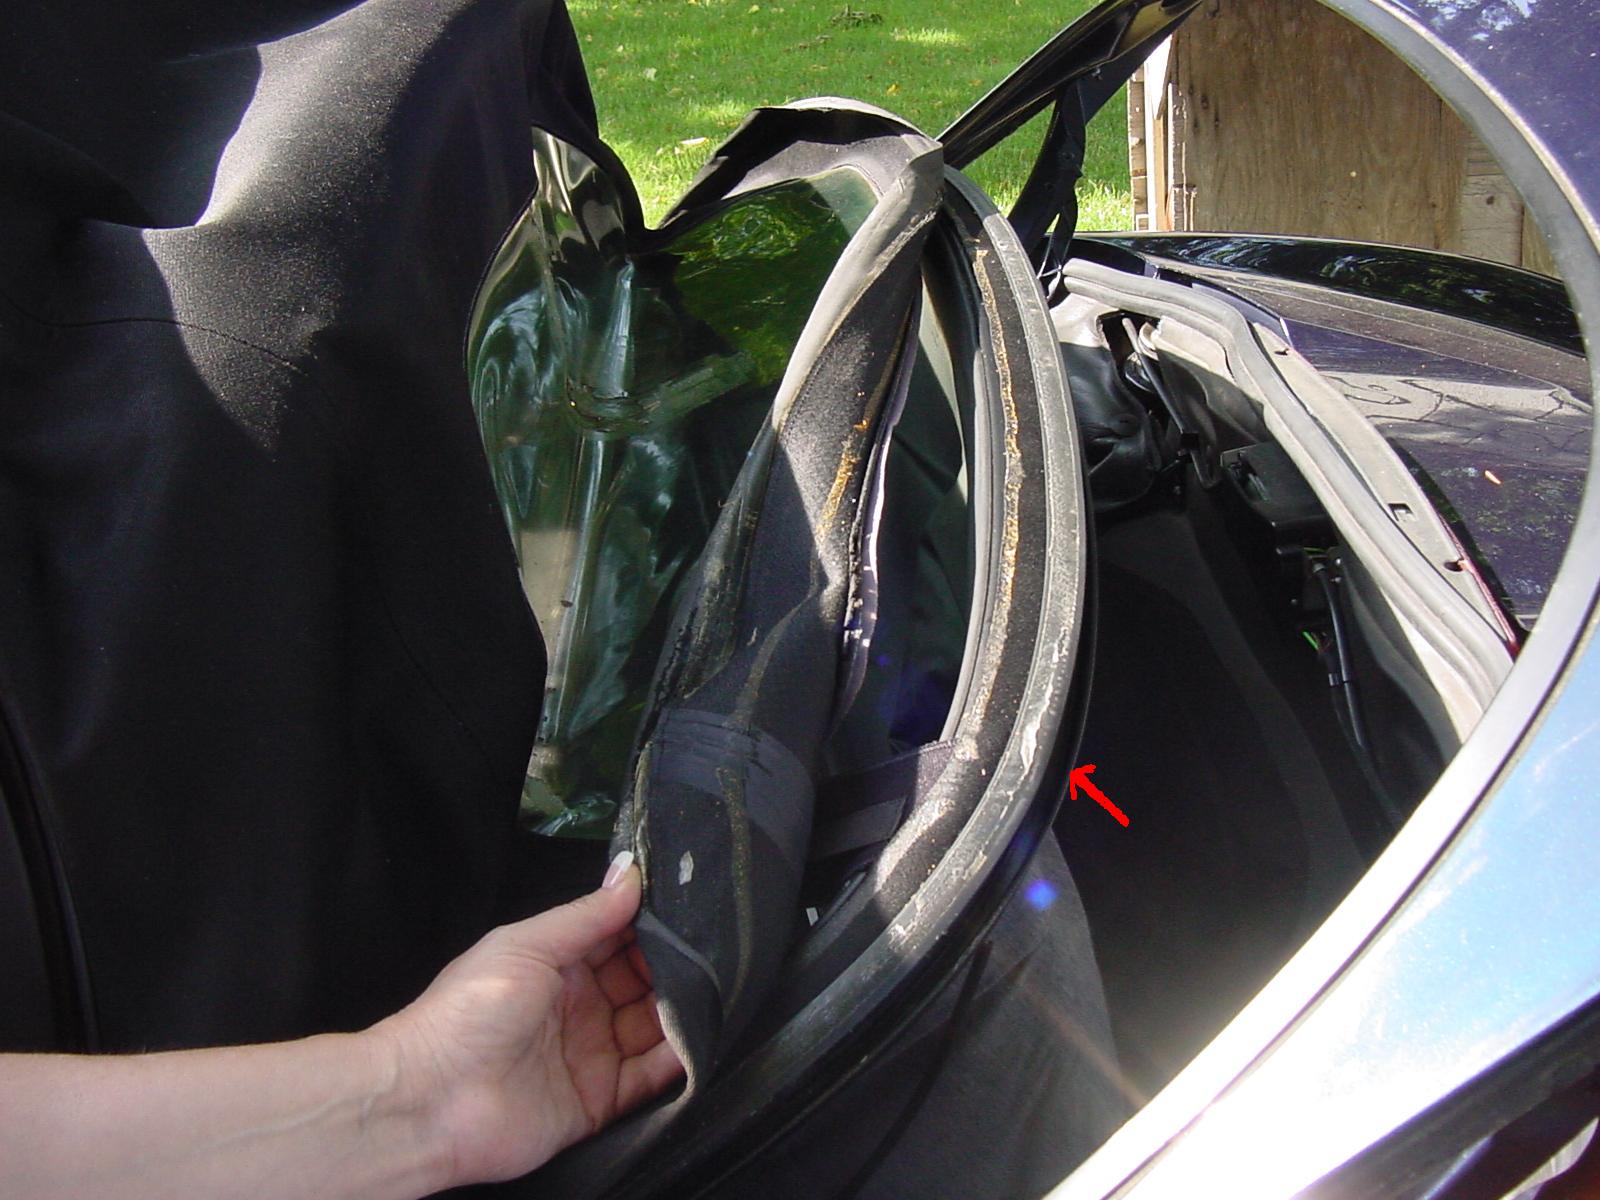
Jim: The factory installation normally has double-sided tape (not contact adhesive). When I replaced my top, there was double-sided tape in the base of the rearmost slot, underneath the flap of canvas, and also a strip of double-sided tape on the top horizontal surface of the T-shaped seal that is pressed into the middle slot. As juniinc says, there is no glue UNDER the T-shaped seal, it just presses in. Here is a photo of what that area looked like when I first removed the rear section of canvas of the top. You can see the remnants of the double-sided tape on the top surface of the T-shaped seal that has not yet been pulled out of the middle slot (click on the photo for a good look). The double-sided tape in that location helps reduce the possibility of wrinkles. 3M makes a decent double-sided adhesive tape, 3M part # 06384, available at any auto body paint store. If you want to look at a detailed write-up for top removal and installation, go to this link: http://mike.focke.googlepages.com/replacingthetop-adiy For more details on the area that you are inquiring about, look specifically at section 8 of the DIY. Regards, Maurice.
-
Peter: I believe that the "cabrio adjustment plates" don't regulate the forward movement of the clamshell, but rather serve to adjust the height of the top surface of the forwardmost parts (left and right) of the clamshell relative to the surrounding sheet metal. You may be able to get access to the underside of the plastic plates by partially peeling away the foam liner that sits just under the lip of the inside of the rear quarter panel forwar of where the V-levers attach to the body. Regards, Maurice.
-
Good work! It seems that almost every time that one pulls and re-installs an engine, this type of thing happens. It's good to walk away from it sometimes and then go at it again. The sound of the engine firing must have been sweet indeed. Congratulations! Regards, Maurice.
-
Gus: DO NOT EVER BUY A CAR BECAUSE SOMEONE IS APPLYING PRESSURE! It doesn't matter what the car is or how good a deal you think you may be getting, you should only buy a car because you feel comfortable that you are getting the car you want. After all, isn't it reasonable to suppose that the more pressure the dealer applies, the more likely it is that is THEY who are getting the good deal and not you. Take your time, get a proper PPI done and buy it when you feel satisfied with your decision to close the deal on your (substantial) purchase. If, for some reason this one goes away, I guarantee you a better one will come along. I never believed my father when he would tell me this throughout the decades of buying cars, but I now know from experience that truer words have never been spoken. Also, take into account that at this particular time, at the beginning of the winter season in the northeast, you are the one who is in the driver's seat (figuratively speaking, of course). The more you detach yourself from the pressure this dealer is trying to apply, to more you will enjoy the experience of being a new (for you) Porsche. Good Luck! Regards, Maurice.
-
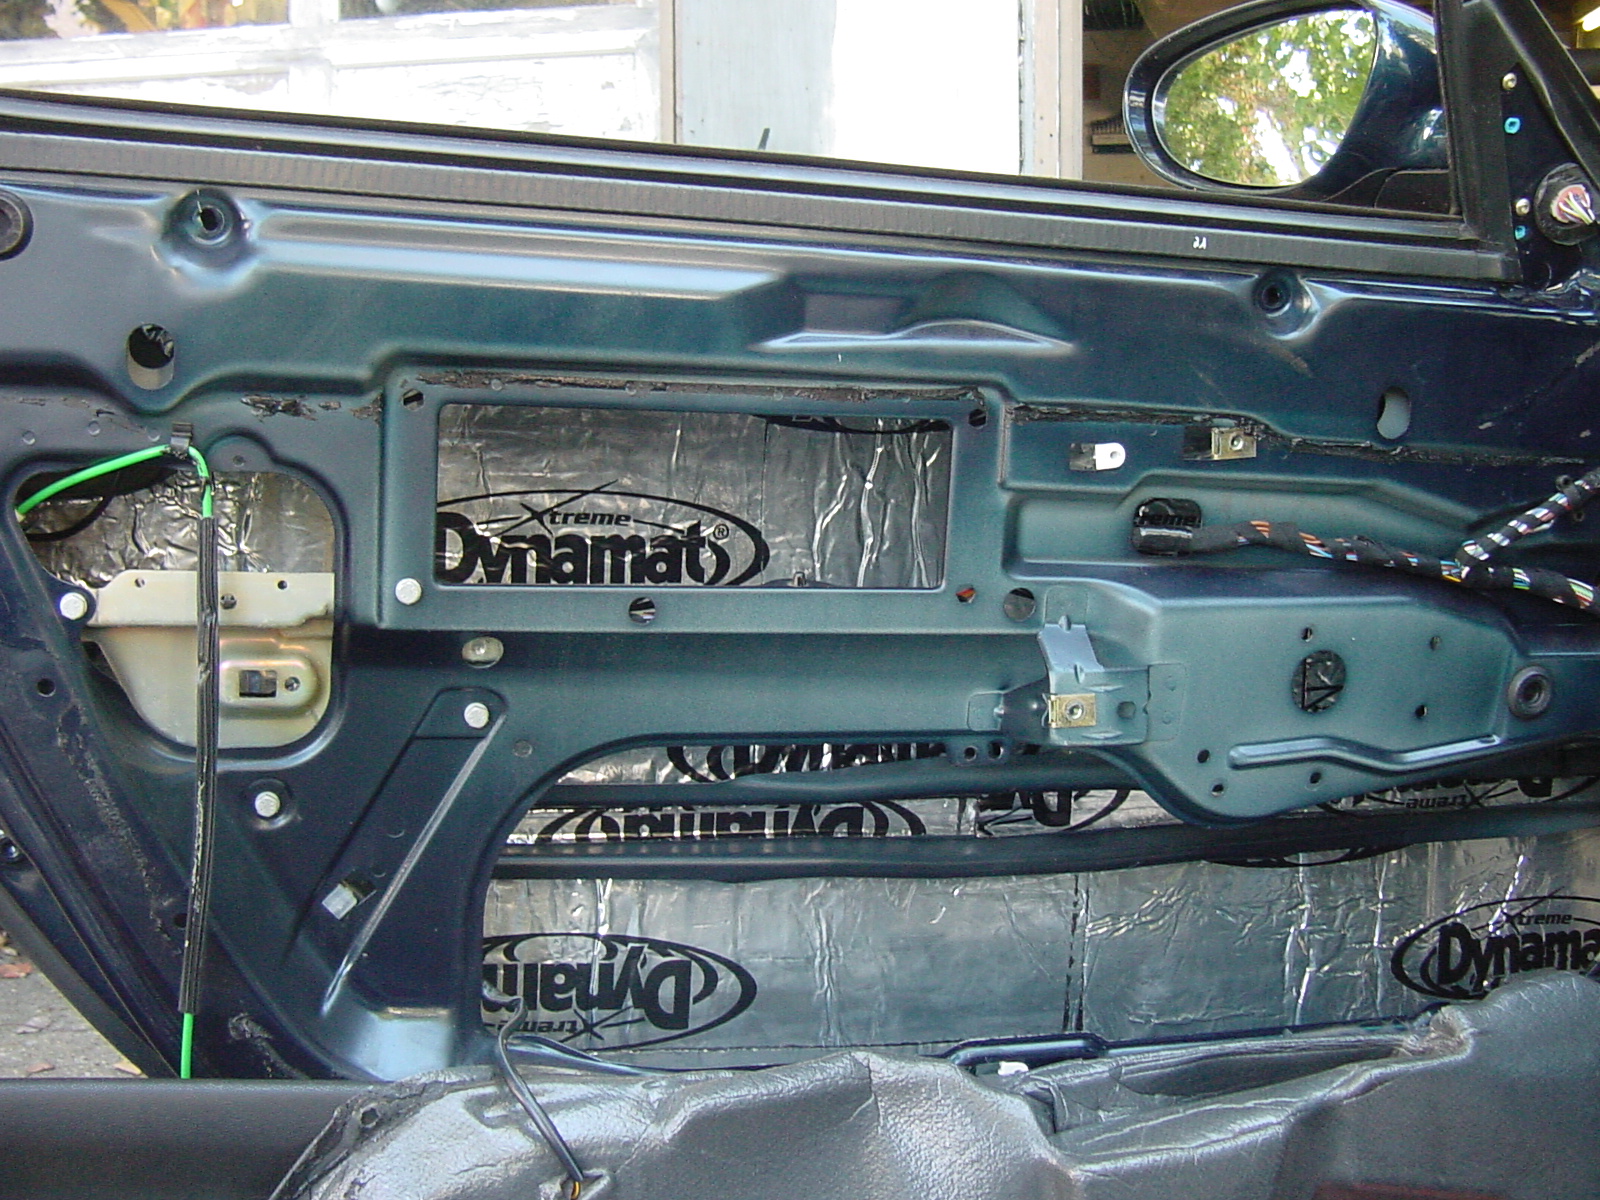
Would someone post a picture of the door after the removal of the interior trim. Thanks Mark Mark: Here is a photo of a Boxster door, after removal of the interior trim. Note that some soundproofing has been added, otherwise it's very similar to the 996: Also, I found that if you just remove the foam liner on three of the four sides (top, left and right), you won't spend any time lining it up again, and it will be perfectly fitted exactly where it originally was. Regards, Maurice.
-
It may be worthwhile to verify that you are getting fuel (for your 2001 S/2000 S motor). You can bypass the fuel pump relay and thus power the fuel pump directly. Pull off the fuel pump relay that is in the relay carrier above the fuses (driver's side footwell/kick panel). It's the fuse that is immediately to the left of the double relay for the convertible top, so the fuel pump relay is third from the right, and third row up from the bottom, with no relays in the bottom row. Then, you can make up a length of wire and, to be safe, put in a 15amp fuse inline before you connect the two terminals on the relay panel. The terminals on the relay are labeled 30 and 87, with the corresponding tabs on the relay panel that you have to jump being numbered 3 and 5. Before you jump the wires, if you have already replaced the rearmost plastic underside panel, remove it. Then disconnect (i.e., separate) the fuel return line at the driver's side front of the engine and get ready to catch the fuel in a suitable container. As soon as you jump the wires, the fuel pump will start to run and you should get fuel coming out of where you disconnected the fuel return line. If you want to go further and check the volume, the specification is about 9/10ths of a quart with 30 seconds of fuel pump operation. Of course, BE EXTREMELY CAREFUL WITH SPARKS, HOT LIGHT BULBS, ETC. when you are doing ANY OF THIS WORK. :angry: If you have fuel, you will have eliminated that as a possible cause for non-start and it should not take too long to run this test, and then you will know that it is only an electrical (or electronic) cause for the fuel pump not getting a signal to run. Regards, Maurice.
-
Have you checked the clutch interlock switch? The symptoms sound similar (i.e., accessories on, etc.). Also, it wouldn't hurt to connect a jumper cable from the negative terminal of the battery to the engine, just to make sure you have a good ground there. Regards, Maurice.
-
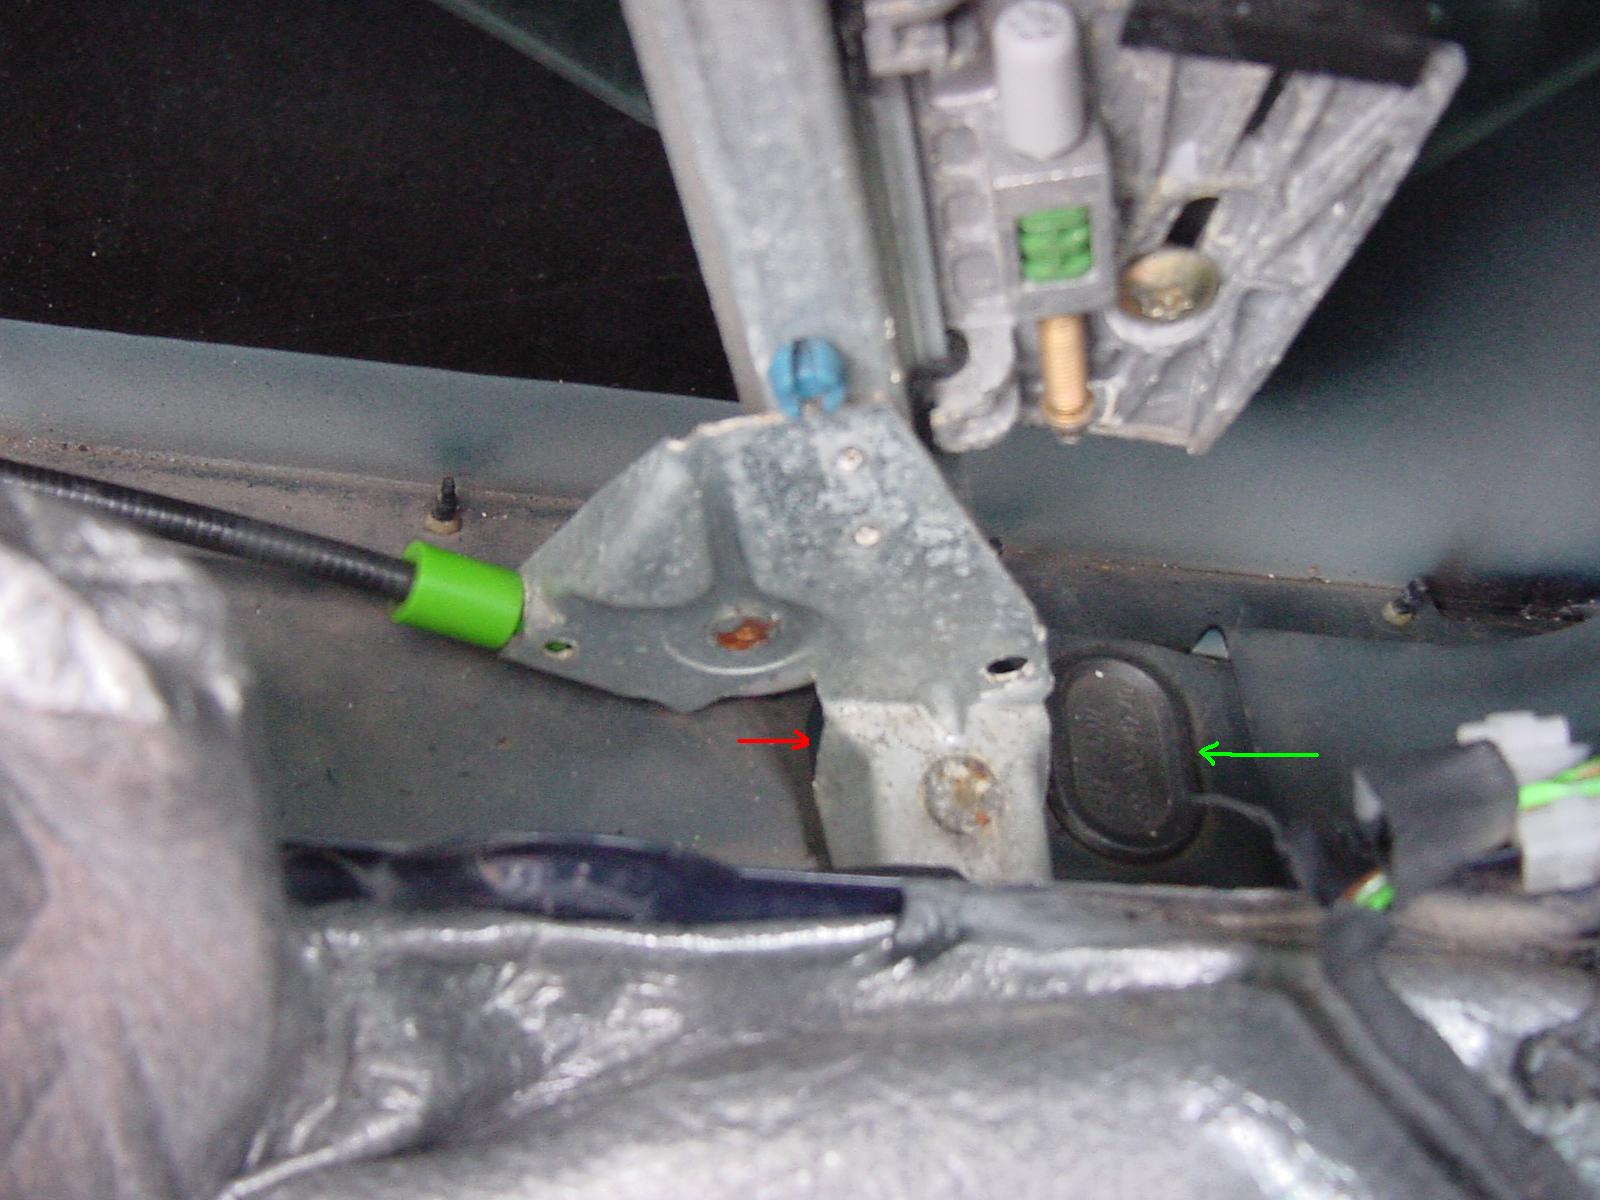
Maurice, You are right, it is very odd (and not really worth the trip back to the dealer at this point). The noise is coming from the top of the window about 2/3 of the way back. Based off of everything the car was in the shop for, this is the only "logical" thing I could deduce is a culprit. The headliner was replaced (this time) for "bunching" on the passengers side towards the rear of the cockpit. The first time it was replaced due to stitching failure in the center between the driver/passenger seats. Mbodo: I still don't understand how a repair to the headliner would cause the window to no longer make a tight seal across the entire top surface of the window, but, if you want to try the following adjustment, it may solve your wind noise problem. This is from a post that I wrote up a little while ago: "There are four rubber plugs located on the door bottom surface. To adjust the height of where the window stops, you must first remove (pop out) the two OUTBOARD plugs. Then, reach through the holes with an E6 Torx driver and turn the screws, one at a time until you achieve the desired adjusmtent. (Note, if you don't have an E6 Torx driver, a regular [1/4 inch drive] 5mm socket will work in a pinch, and will not strip the fastener). To keep track of how much you have adjusted, mark the top of the window with masking tape or, preferably with a wax pencil, tracing the top surface of the window where it meets the seal at the top. There is a little more than 1/2 inch of adjustment through this method. Note that the Torx adjustment screws are on an angle, raked back at an angle similar to the rear edge of the door. Here's a photo that should help you get oriented: Note: The green arrow shows the outboard plug that must be removed, at the forward part of the driver's door. The red arrow shows the very edge of the inboard plug (which should only be used to adjust the inboard/outbard angle of the window by means of loosening and then shifting each leg of the window regulator). With a little patience, you should be able to minimize or eliminate the wind noise". Mbodo, In your case, you may only have to adjust the rearmost screw. IIRC, you have to turn CCW to get that side to adjust upwards, but I'm not 100% sure. If you want to read the whole thread, it's at this link: http://www.renntech.org/forums/index.php?s...amp;#entry85725 Good luck! Regards, Maurice.
-
Excellent work! Nothing like persistence to arrive at a successful fix. Thanks for the lead on te pin removal tool. When you get all the parts, please post the part numbers here for future reference. Regard, Maurice.
-
convert. top pins
1schoir replied to loan_shark's topic in 986 Boxster Convertible Top Issues and Solutions
John: That is definitely not normal. We just dealt with this part yesterday. Take a look at this thread, it also has the part number: http://www.renntech.org/forums/index.php?s...amp;#entry88160 Regards, Maurice. -
Helen: No, the adjustment is not done on the cable itself. The cable is a pre-set length and does not change. The adjustment is done on the hexagon head bolt that sits horizontally near the base of where the cable is attached at its lower end, just to the side of the engine compartment. All you will see of the bolt is its hex head (14 mm). Regards, Maurice.
-
Muffy: The part number is 986 561 191 02, and it's called a "tension rope", although it is made of steel wire. There is a fair amount of tension on these cables as they are used to put tension on the tensioning bow (the rearmost semi-oval metal hoop at the base of the convertible top) so as to brace the canvas top and to press the rubber seal against the clamshell. You can adjust the amount of tension on the tensioning bow by turning the hex-head bolt at the lower end ( near where the metal ball cup presses on and off). Turning the bolt will in turn raise or lower the metal ball that the cup presses on to, thereby adjusting the tension. Regards, Maurice.
-
Boxster back drains? please help
1schoir replied to Pablo's topic in 986 Series (Boxster, Boxster S)
Pablo: Just close the convertible top to the point where the clamshell is raised to its highest point (that will give you the best access). Then unclip the vinyl apron from the rear vertical wall of the convertible top stowage compartment (just forward of the third brake light). There is a clip on each side, about 24 inches from the center. Then take a look just below and slightly forward of where the V-levers are attached to the sides of the body, and you should see a drain hole on each side, in the foam liner. You can then use compressed air or a SOFT piece of wire to unclog them. Regards, Maurice. -
ROW = Rest Of World (as opposed to US/Canada specs). Regards, Maurice.
-
You first have to determine the cause of the wind noise. It seems odd that replacing the headliner would have any effect on the seal between the window and its rubber gasket at the top. Also, what was the problem with the first two headliners (the original and the first replacement)? Is the noise coming from the top of the window, or the rear vertical surface where it contacts the rubber gasket? Regards, Maurice.
-
Those two sides of the connector do look pretty horrible, from a corrosion point of view. Considering the condition of the pins, it would be best to pull the pins out one by one (both the male and the female sides) and clean them with a small wire brush (or a dremel with a soft wire brush attachment), and then coat them with an electrical contact cleaner/protector such as DeOxit and DeOxit Gold. They are available as a kit at Radio Shack. To pull the pins out, you are going to need a proper pin removal tool. Without the proper tool, the pins and the connectors will get mangled and you will get very frustrated. Here is a website that covers electrical connector removal principles and it shows how you insert the tool, etc. Take a look at Principle #3, it may be the one for this type of connector and its pins: http://www.tkr-tools.de/online-katalog/entriege.htm Also, here is a website that sells pin removal tools: http://www.toolsource.com/wire-terminal-tool-p-67231.html If you don't want to go to the trouble to remove the pins, you could try to clean both the male pins and the female pins while they are still in place, but that would not be the best approach. Finally, you are also going to have to re-connect that one red wire into its proper pin, and when you are all done, you have to make sure to provide a proper seal for that connector so that you don't get this corrosion again. If you can't or don't want to replace the connector, maybe a thin bead of silicone around the perimeter of the connector's mating face will do the trick. Regards, Maurice.
-
I have a 97 Boxster relay diagram (both the footwell relay carrier and the rear trunk relay panel #2) and I don't see any "black right side" relay that is related to the power windows. What is the position of the white relay you checked? Also, the fuse diagram for MY97 shows fuse D1 as a 30 amp fuse for the power windows. Regards, Maurice.
-
Will: From the diagram that Loren posted at 8:32 p.m. on your "Rear Spoiler Comes Up at Speed" thread, it looks like the mystery connector is the one that goes to the "Tailgate Opener", as that one in the diagram shows the exact wire colors that you describe (i.e., a red wire, and a blue wire with a black stripe). What do you think? Regards, Maurice.
-
Will: From the diagram that Loren posted, it looks like the mystery connector is the one that goes to the "Tailgate Opener", as that one in the diagram shows the exact wire colors that you describe (i.e., a red wire, and a blue wire with a black stripe). Regards, Maurice.
-
A flywheel cannot "slip". It is fastened by 8 hefty bolts to the end of the crankshaft, and also one keyway. So, unless all eight bolts have somehow backed out, and the flywheel is now held in place by spit, it is not slipping. If the crankshaft itself is moving side to side or up and down, the flywheel will move in the same way with it, but it is still not "slipping". Ask them for a more rational explanation. Regards, Maurice.
-
I just finished installing my switch asembly w/ a wretched back of course! Saved over $400 quoted to repair the problem by consulting this site. Thanks for the related links and info. The VW parts guy said that the part would not work on my BoxsterS 00 being it is not a VW He was wrong, problem solved. Pitpen: Good job! Be sure to do your research before taking any dealer's word for what will and will not be interchangeable. There are many parts that are common to VW's, Porsche's and Audi's, and probably many more to come with the new corporate structure. The trick is find out what they don't want you to know, otherwise they wouldn't be able to charge you from three to ten times the price for what is EXACTLY the same part, except for its wrapper or box. For example, the heater blower motor for a Boxster is the same as the heater blower motor for a Jetta Wagon 2.8 liter. Porsche charges about $317 for the part, VW charges $121. Both parts have a prominent "VW" logo embossed on the part. Regards, Maurice.
-
Convertible top repair issue
1schoir replied to yan's topic in 996 Series (Carrera, Carrera 4, Carrera 4S, Targa)
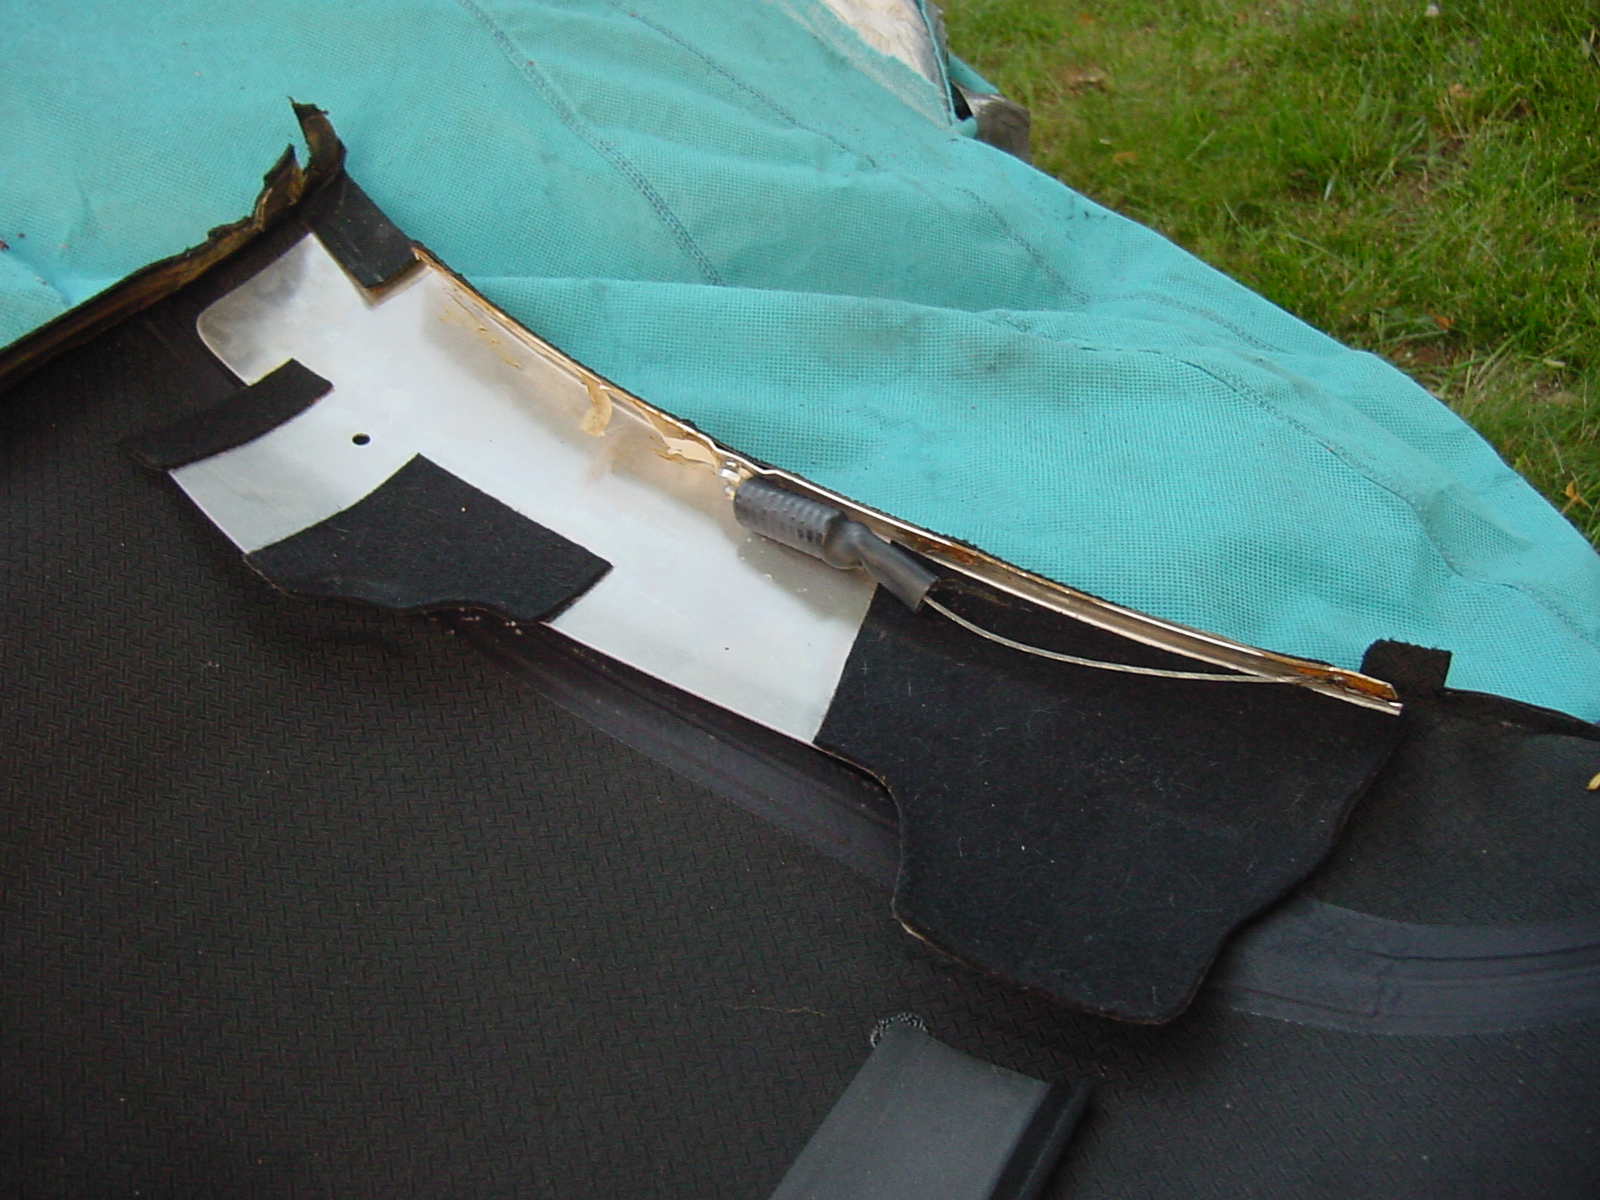
Yan: I'm not 100% sure if the tension rope and where it attaches on the other end is similar to a Boxster's top, but if it is, it is a DIY which is not too difficult, but does take some time. No special tools required. On the Boxster, that tension cable terminates at a connection to an aluminum "shoulder plate" which is glued into and screwed in to one of the metal folding frame members of the convertible top mechanism. To access it, you will have to peel off the front of the canvas (where it meets the windshield frame) and undo the rubber gasket that covers the part of the metal folding frame to get access to the four screws that hold the aluminum shoulder plate in place. Take a look at Mike Focke's Boxster Pages and read up on the Convertible Top DIY pages there to see if your 996 top is similar. I posted some additional instructions and photos there when I installed my top this past summer, but if you need additional photos that might help you figure it out, let me know and I'll post some more specific photos. Here is one photo that shows how the cable it attached at the aluminum shoulder plate end: Note that the black plastic covering on the end of the cable is heat shrink tubing that covers a spring (the spring keeps some tension on the cable). Here is the link to Mike Focke's Boxster Pages for the top: http://mike.focke.googlepages.com/replacingthetop-adiy Regards, Maurice.