Welcome to RennTech.org Community, Guest
There are many great features available to you once you register at RennTech.org
You are free to view posts here, but you must log in to reply to existing posts, or to start your own new topic. Like most online communities, there are costs involved to maintain a site like this - so we encourage our members to subscribe or donate. All subscriptions and donations go to the costs operating and maintaining this site. We prefer that guests take part in our community and we offer a lot in return to those willing to join our corner of the Porsche world. This site is 99 percent member supported (less than 1 percent comes from advertising) - so please consider an annual subscription or donation to keep this site running.
Here are some of the features available - once you subscribe RennTech.org
- View Classified Ads
- DIY Tutorials
- Porsche TSB Listings (limited)
- VIN Decoder
- Special Offers
- Paint Codes
- Registry
- Videos System
- View Reviews
- and get rid of this welcome message
It takes just a few minutes to register, and it's quality Porsche information at a low cost.
Contributing Members also get these additional benefits:
(you become a Contributing Member by subscribing or donating money to the operation of this site)
- No ads - advertisements are removed
- Access the Contributors Only Forum
- Contributing Members Only Downloads
- Send attachments with PMs
- All image/file storage limits are substantially increased for all Contributing Members
- Option Codes Lookup
- VIN Option Lookups (limited)


brendel
-
Posts
78 -
Joined
-
Last visited
Content Type
Profiles
Events
Forums
Exterior Paint Colors
Downloads
Tutorials
Links Directory
Collections
Classifieds
Store
Everything posted by brendel
-
 I don't think moisture is an issue as in the normal use of a car the oil will pick up moisture anyway ( see your 997 user guide) it will disappear after a highway trip Here in Europe Porsche is advising mobil1 5W50, the higher hot viscosity seems important, BMW is advising Castrol Edge 10W60 for all its M models, so an even higher hot viscosity than Porsche I have heard about the scorched cylinders on the M97.01 and wonder if these are not linked with the rupture of the oil film by using too thin oils like 0W40 or 5W40 The move to 5W50 in Europe seems recent (a couple of years) and I wonder if this is not an easy remedy to all these M96 and M97 engine failures ( excluding the IMS related issues of course)
 -
Great, don't forget that you own a wolf in sheepskin so every time you will open the throttle the "dark side" of the car will come back
-
High speed
brendel replied to Henrik68's topic in 997-1 Series (Carrera, Carrera 4, Carrera 2S, Carrera 4S)
Hi there, I reached 275KPH on the Autobahn, I felt I approached top speed What an engine noise!!!vibrations and wind noise, it seems to me that the car knew it was on the autobahn, like it was kind of happy :thumbup: the throttle seemed very responsive, I felt like I was driving another car and for once seeing what its potential was Yes you do get a feeling that the steering gets lighter, I also felt what Uwon described that the rear seems to be jerking around ( engine mounts?) Another feeling is that the brakes are very soft and I really wonder how quick you can stop the car at that speed, I then understood why they sell all these big brake upgrades Take care -
If your engine works well why would you do that?, the 05-08 design has proven to be highly reliable Buy yourself peace of mind with Porsche Guarantee ( up to 10 years and 125 000 Miles )
-
great, enjoy
-
I have what you need, I would need your email though, if you can send me a private mail you will need to go and download the file it is 55 MB
-
Hi, I am very surprised that the factory mufflers did not do the Job, a lot of noise is coming from the air intake, this is why Porsche has a kind of muffler on the intake ( this is where you have written porsche on the silver intake manifold ) so getting back to a normal airbox is what you need ( get it on ebay )
-
I have 2 kids, 4 and 7 and we go everyday to school with the 997C4S, I bought inflatable seat boosters ( bubble bum or something like that) they fit nicely and don't damage the car Regarding the choice of cars, the porsche will be more sportive and less comfortable for everyday use than a Mercedes or audi or BMW... If you want a week end car for occasional track days the porsche is the best choice Best value for money is the 997 C2S with manual gearshift, models after 2006 seem not to have the IMS issue, in all cases buy it at porsche with the guarantee, so you can sleep at night, I had many free fixes on my car and some could have been very expensive The essential options are Porsche Sport Exhaust, Sport Plus mode, all the rest is a question of taste and frankly not needed ( leather dashboard though is beautiful ) A 996 is also a nice car, but look at this this way, the 996 is the gen 1 and the 997 is the gen 2 with many touch ups that makes it even better, in which the interior If you intend to sell the car after a couple of years, best is to choose, black or silver, no fancy interior colors, manual gearbox, and most import low mileage, high mileage porsche are simply not selling
-
and the manual S version with the X50 power kit option
-
Calling High Mileage Club!
brendel replied to slahti's topic in 997-1 Series (Carrera, Carrera 4, Carrera 2S, Carrera 4S)
2006 C4S tiptronic 83 KMiles, everyday drive in snow, sun wind and rain ( switzerland) -Front suspension at 80 KM ( all arms, bushings, domes, damper...) -Middle cardan shaft replaced at 75KM due to rubber spacer wear -Tiptronic gearbox ( was singing ) -multifunction nob on steering had to be changed -IMS sealing ring was leaking and was changed ( not the bearing, just the sealing ring) -I feel my front CV joints are to be changed -I have a noise in the back suspension when i brake over bumpy ground and think the top suspension bushing are to be fixed too -Mufflers are shot and need replacement, I rewelded them myself, the PSE has 2 exhaust pipe per side and they are bound by a metal strap that got loose and was droning, doing that I saw the mufflers are rusted and porous -My oil pan is leaking and need a new loctite 5900 sealing All changes have been done under guarantee so far I pushed for many of these changes to happen , but the car was driving ok, someone else would probably not have noticed I was often upset with all those things happening but came to the conclusion that if you drive any std car the way you drive a porsche you would not reach 80KM even not talking about other exotic sport car brands Cheers -
Hi Henrik, The minimum thickness is engraved on the rotors min 32mm for the front ( new 34 ), for the back I think it is 28 mm new and Min 26 mm Regards
-
Panel gaps
brendel replied to Alex Mazzei's topic in 997-1 Series (Carrera, Carrera 4, Carrera 2S, Carrera 4S)
Hi Alex, Sorry for the delay I was just not around See if this works gaps.doc -
Panel gaps
brendel replied to Alex Mazzei's topic in 997-1 Series (Carrera, Carrera 4, Carrera 2S, Carrera 4S)
Well it seems that picture did not go through Let me rework that over the week end -
Panel gaps
brendel replied to Alex Mazzei's topic in 997-1 Series (Carrera, Carrera 4, Carrera 2S, Carrera 4S)
See what you can do with this I had to copy the pictures separately so it is not perfect I double checked, but the description ( e.g. front lid to wing) should always match what you have on the picture Good luck 50 IN Diagram - body gap dimensions - as of MY 2005 - Diagram - body front gap dimensions - Diagram - body centre gap dimensions - Diagram - body rear gap dimensions - Diagram - Cabriolet gap dimensions Tools Designation Type Number Explanation Star gauges for body gap dimensions commercially available tool NR.127-1 top of page Diagram - body front gap dimensions Gap dimensions, body front Note Set gap dimensions on the lids, doors and covers, or accessories in accordance with the gap specifications. · Given a clearance in the opening that is too great or too small, the movable body or the accessories must be centred accordingly. · · Ensure that the gaps do not taper or do not narrow at local points. · The given values are guidelines which should be observed as far as possible. · The guidelines apply to repair and assembly work. · Use star gauges to measure the gap dimensions, Star gauges for body gap dimensions NR.127-1 lid to front apron Explanation Type Basic value Tolerance 1 Tolerance 2 front apron Gap dimension A 4.5 mm +/-1 mm front apron Lid only lowered Gap dimension B 2 mm Main headlight to inner wing Explanation Type Basic value Tolerance 1 Tolerance 2 to inner Determine left and right gap Gap dimension A 4.5 mm +/-1 mm Diagnostic system: reading out fault memory and activating systems dimensions, body front 4710 headlight to front apron Location Explanation Type Basic value Tolerance 1 Tolerance 2 Main headlight to front apron Gap dimension A 4 mm +/-1.5 mm Main headlight to external wing Explanation Type Basic value Tolerance 1 Tolerance 2 Main headlight to external wing Gap dimension A 4 mm +1 mm Main headlight to external wing Only lowered Gap dimension B 1 mm Main headlight to top wing Explanation Type Basic value Tolerance 1 Tolerance 2 Main headlight to top wing Gap dimension A 4 mm +/-1 mm Main headlight to top wing Only lowered Gap dimension B 1 mm Front lid to wing Explanation Type Basic value Tolerance 1 Tolerance 2 Front lid to wing Gap dimension A 4 mm +/-1 mm Front lid to wing Only lowered Gap dimension B 0.5 mm Wing to front lid Explanation Type Basic value Tolerance 1 Tolerance 2 Wing to front lid Determine left and right gap Gap dimension A 4 mm +1 mm Wing to front lid Only lowered Gap dimension B 0.5 mm flap to wing Location Explanation Type Basic value Tolerance 1 Tolerance 2 Filler flap to wing All the way round Gap dimension A 3.5 mm +/-0.5 mm Front apron to side direction indicator Location Explanation Type Basic value Tolerance 1 Tolerance 2 apron to side direction indicator Gap dimension A 1.5 mm Wing to side direction indicator Gap dimension B 0.5 mm +0.5 mm Wing to outer side panel Location Explanation Type Basic value Tolerance 1 Tolerance 2 to outer side panel Even transition from front to rear Gap dimension A 4.5 mm +/-1 mm top of page Diagram - body centre gap dimensions Gap dimensions, body centre Note Set gap dimensions on the lids, doors and covers, or accessories in accordance with the gap specifications. · Given a clearance in the opening that is too great or too small, the movable body or the accessories must be centred accordingly. · · Ensure that the gaps do not taper or do not narrow at local points. · The given values are guidelines which should be observed as far as possible. · The guidelines apply to repair and assembly work. · Use star gauges to measure the gap dimensions, Star gauges for body gap dimensions NR.127-1 Door to wing Explanation Type Basic value Tolerance 1 Tolerance 2 Door to wing Gap dimension A 4 mm +/-0.5 mm Wing to outer side panel Explanation Type Basic value Tolerance 1 Tolerance 2 Wing to outer side panel Gap dimension A 4.5 mm +/-1 mm Wing to outer side panel Only lowered Gap dimension B 2 mm Door to outer side panel Location Explanation Type Basic value Tolerance 1 Tolerance 2 to outer side panel Gap dimension A 4.5 mm +/-1 mm Door to outer side panel Doors only lowered Gap dimension B 2 mm -
Panel gaps
brendel replied to Alex Mazzei's topic in 997-1 Series (Carrera, Carrera 4, Carrera 2S, Carrera 4S)
Hi there I have what you need but it is in the workshop manual in PDF, I need to find a way to cut and paste, there is a security lock Worst case I will do it manually over the week end -
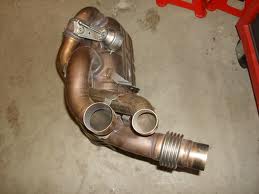
Hi all, Being fed up with the droning noise I had between 3 and 4 Krpm I decided to take a look seriously at it I first thought it was coming from the tailpipes, no no, they sound like an empty tin can but no they are not the cause I remembered having read about potential break of the exhaust pipes reinforcement ( since there are 2 of them on the PSE), that reinforcement is a thick piece of metal that kind of wrap up the pipes together, I really looked carefully a couple of time before but could not find any issue, when taking away the tailpipes i could see it better and it was clearly broken at 2 places on the 2 sides, this will require welding which I am planing to do But To be sure that I am not going to weld for nothing I decided to open the crack and put some silicon ( loctite 5940) to kind of dampen the noise The good news is that it works and it lasts, silicon will stand high temperatures and will stand time This is now day and night for me, that droning was just annoying, I am not ashamed to rev in public anymore :D This quickfix could be a solution for those not wanting to weld and it takes maximum 5 minutes I am planning to do the welding and will document it in the DIY section Picture from ebay, the reinforcement can be seen just above the big pipe

-
Changing front brake pads on a 997 C4S/C2S Link to support DIY tutorial
-
Changing front brake pads on a 997 C4S/C2S
brendel posted a tutorial in Carrera (997-1) - Maintenance
Hi there week end warriors, I hope this post will allow some to jump into the wonderful Porsche DIY world First of all check list of what you need to buy _Do you have the right brake pads oem or aftermarket? oem number 99635194912 _Do you have the extra set for pad change: Pin, clip, spring oem: 99635195911 _Dampening plates, the old ones can be reused with double sided tape but the plate starts rusting, so I would advise to buy new ones, it is not inexpensive the set will cost about 150 USD ( 4 pieces) oem number: 99635108900, you need it 4 times _Brake sensor if you have the light on your dashboard oem number :99761268000 you need 2 This will be about 600 USD without the disk add another 500 USD for a pair of disks Tools: _small pliers _small philips screwdriver ( for getting the pin out) _hammer _very small flat screwdriver to get the pad sensors out _small syringe and latex gloves, don't start without it, it is to remove the extra brake fluid, this liquid is very corrosive, the syringe will allow you to do a clean job Before you start _Measure if your disks can do another brake season It is written on it, minimum 32 mm, make sure you have enough left, they are 34mm when new, 33mm seems a decent number of one set of pads... _Pass your finger on the disk, there shouldn't be deep grooves, otherwise you will have to change them or get them resurfaced _Makes sure your brake fluid is below the max level, you will anyway have to remove brake fluid after the work Starting Remove the clip that helps the pin passing through the caliper, pull it away with pliers (the clip is on the inside the caliper towards the inside of the car ) Push the pin passing through the caliper, I used an old screwdriver with a hammer, it should go away easily, you can then remove the spring, don't forget to detach the brake control cable before Remove the brake wear sensor, if you did not have the brake light on your dashboard, they should be fine, check if the plastic protecting the metal isn't too much worn out, otherwise you will have to replace them They are difficult to remove, they are clipped on the brake pad and can be removed with a small screw driver pushing on the piece that the preventing them to get out Now very important, you don't need any special tool to reset the caliper pistons, Pliers will do the job, just open then instead of pushing on them, it is very easy but you have to reset the piston to the maximum, if you don't the new brake with the dampers won't fit it, while you do that check that the fluid does not get close to the top You can now remove the damper plates, just pass whatever fits between the piston and the plates ( be careful not to damage the piston sealing rings) Old and new Now delaminate the silicon paper from the new dampening plate once, and glue them in the exact same position ( be accurate otherwise they won't fit in the pistons), it helps to remove the paper when the plates are in place Then place them in the pistons and take off the silicon paper Now you can place the new pads in, push them to the bottom the damper plate might stick on the way Place the new spring, pin, clip, put the inner pad control sensor in the inner pad and pass the brake cable in the spring ( little hook like on the picture) Put back the outer control sensor in the new pad Brake a few time until the brake pedal is hard Adjust the brake fluid by removing some with a syringe, keep it at max, if you spill some liquid rinse with water and dry You are now done!!!! The pad brake in is a about 120 miles, brake gently in that period -
Changing front brake pads on a 997 C4S/C2S Hi there week end warriors, I hope this post will allow some to jump into the wonderful Porsche DIY world First of all check list of what you need to buy _Do you have the right brake pads oem or aftermarket? oem number 99635194912 _Do you have the extra set for pad change: Pin, clip, spring oem: 99635195911 _Dampening plates, the old ones can be reused with double sided tape but the plate starts rusting, so I would advise to buy new ones, it is not inexpensive the set will cost about Author brendel Category Carrera (997-1) - Maintenance Submitted 06/24/2012 01:49 PM
-
- 1
-

-
Thanks I will and keep you updated
-
Thanks Loren, Yes I have seen both TSB the March and the July one, my whole struts and coils were replaced twice within one year at Porsche, this was performed under guarantee, I assume this is the first thing they look at and the end liks have been changed one year ago The car is still under guarantee but my dealer just don't know where to look and they have been in contact with the factory tech crew... I noticed that my front right CVjoint has longitudinal play, ( quite a lot, 1/4 inch ) the left one can hardly be felt, but I was told that only axial play maters with CVjoints I was thinking also, could that come from the steering rack or steering column, or front diff? they are somehow screwed to the cross member ? To describe the phenomenon again, I get a rattle at low speed only in Sport PASM, I guess I cannot hear it anymore when driving faster, It does not happen on speed bumps but only on potholes, It is somehow amplified if I hit a pothole while turning And again, all the potential culprit have been replaced by new parts ( both control arms , sway bushing, end links, struts, coils, strut bearing and top bushing, inner and outer tie rods) Thanks
-
Just a little update The front of the car is now all new Strut, strut bearing, strut tower..., Sway bar bushings, end links, Coffin arm, control arm, tie rod inner and ends And the car still rattles when I put in PASM sport, I car ear it at low speed over potholes, not speed bumps though I really do feel there is something loose out there, I did drive with an empty trunk... any idea?
-
C2 sway bar end links
brendel replied to CDN_Stig's topic in 996 Series (Carrera, Carrera 4, Carrera 4S, Targa)
Hi RFM, I have just seen that you wrote arm (s) This will cost me again an arm and a leg :jump: I will check the diagonal arm first, it should be this one getting all braking stress, but at the same time the fact that the front ones had no issues makes me thinks Porsche finally designed something bulletproof (including the GT3 engine of course) , In the front the coffin arms were shot and I had to change them recently due to rattling, squeaking and all kind of other noises Cheers -
C2 sway bar end links
brendel replied to CDN_Stig's topic in 996 Series (Carrera, Carrera 4, Carrera 4S, Targa)
Thanks RFM, Do you mean the "coffin shaped" arm or the diagonal arm? Sorry for asking -
C2 sway bar end links
brendel replied to CDN_Stig's topic in 996 Series (Carrera, Carrera 4, Carrera 4S, Targa)
I have the same issue on my C4S 997, Loud clunk on both rear sides, I can make it happen 100% of the time if I am driving downhill and slightly braking on a moderately bad road ( 30 MPH), it does not happen if I don't break. The main part under braking stress is the Diagonal Arm ( track arm) but I recently changed my front ones and they were like new after 80KMiles, so I doubt it is worn So Far I changed the sway bar bushings but it did not change anything, next step the sway bar links, but I will first dismantle everything to check for play not to purchase part unnecessarily I will keep you updated