Welcome to RennTech.org Community, Guest
There are many great features available to you once you register at RennTech.org
You are free to view posts here, but you must log in to reply to existing posts, or to start your own new topic. Like most online communities, there are costs involved to maintain a site like this - so we encourage our members to donate. All donations go to the costs operating and maintaining this site. We prefer that guests take part in our community and we offer a lot in return to those willing to join our corner of the Porsche world. This site is 99 percent member supported (less than 1 percent comes from advertising) - so please consider an annual donation to keep this site running.
Here are some of the features available - once you register at RennTech.org
- View Classified Ads
- DIY Tutorials
- Porsche TSB Listings (limited)
- VIN Decoder
- Special Offers
-
OBD II P-Codes - Paint Codes
- Registry
- Videos System
- View Reviews
- and get rid of this welcome message
It takes just a few minutes to register, and it's FREE
Contributing Members also get these additional benefits:
(you become a Contributing Member by donating money to the operation of this site)
- No ads - advertisements are removed
- Access the Contributors Only Forum
- Contributing Members Only Downloads
- Send attachments with PMs
- All image/file storage limits are substantially increased for all Contributing Members
- Option Codes Lookup
- VIN Option Lookups (limited)


ciaka
-
Posts
469 -
Joined
-
Last visited
-
Days Won
14
Content Type
Profiles
Events
Forums
External Paint Colors
Downloads
Tutorials
Links Directory
Collections
Store
Everything posted by ciaka
-
as they said, DIY section stands for Do It Yourself, where people post articles on how to do things. I went to that section, typed in 'battery replacement' and scrolled down. Clicked on one article that said 'Battery Replacement with Pictures'. Hope it helps you.
-
So after a lot of thinking and figuring out, decided to go the safer route and do exhaust and bolt ons first. Finished talking to the man behind leistung and discussed the options they have for my CTT. He gave me a lot of great tech info about them. Best of all, agreed to make one of the SR1 exhausts for my CTT, and modify it to be even more aggressive. Cant wait for the thing to come here already. Cant wait to hear the sound. Darn, this is the worst part of any purchase. LOL, just said D* A* M* N*, but filter starred it out....lol.
-
Would getting ecu tune that is geared to having diverters, second cats out, exhaust, even if you have not installed them, affect the car? If i had that ecu flash, would not be getting other parts for rest of year likely.
-
Si i have been eying to put on exhaust (maybe leistung sr1), then later second cat delete, diverter valves, and after that ecu tune.The more i think about it, the more doubt i have.Now, i am starting to think that it would be better to put on the ecu flash and take time to put other parts on later.The dilema i have in deciding exists because some say they have different flashes for different mods.So i keep wondering which would be better, and if it would be bad to put on ecu flash thas assumes i have DV, second cat del, free exhaust, even though i do not, and if it would hurt the car. If i put on the flash i would likely not be able to put on other parts til end of year. That is why i am so undecided. What would you recommend? Getting back to roadracing, there is only so much money and i will have to stick to budget unless i am ok with wife making me sleep in tool shed.
-
Can someone tell me in great detail the mechanisms involved, the actions, etc that manipulate the traction control on the CTT? I really want to know everything involved to be able to understand in great detail how it is engaged, how the decisions are made and what sounds, feeling are involved when it is working. Thanks. Its the nuances I am interested in.
-
Cardan shaft failures?
ciaka replied to spooltime's topic in 9PA, 9PA1 (Cayenne, Cayenne S, Cayenne Turbo, Cayenne Turbo S)
No need to monitor, just listen for banging sound during acceleration and you will know. Then drive carefully home and park til fixed. Easy fix, but takes a while if you never did it before. DIY I posted should work. All seems perfect now. Good luck. -
which number would that be? Posted some pics here for reference?

-
Sorry...been busy with some other things...will he check and post up asap.
-
03-06 Cayenne Transfer Case Fluid Change Although easy, still see people asking for steps. So here it goes. Each pic has comments in order. Easy to do, takes about 15 minutes. Hope this helps someone else. Author ciaka Category Cayenne (9PA, 9PA1) - Maintenance Submitted 03/30/2013 09:39 PM Updated 09/27/2016 07:05 PM
- 1 reply
-
- 1
-

-
Had some time to do the transfer case fluid change DIY. Posted it up and added a link too. Have fun.
-
OK. While doing my TC fluid change, got a chance to inspect this shaft thing again. I loosened the bolts holding the bushing to bearing bracket (before I did so, I marked the areas to see if after realignment, there was any difference). Made sure the bolts are nice and loose but did not remove all the way from holes. Using both hands, moved the shaft in all directions, and also reached up there to move the bushing itself while shaft was being moved. The idea was to let the shaft settle into a natural position. Marked the location of bolts before started to tighten them, so during tightening, I know where they need to be. After the process, one of the bolts seemed to be about 1mm more towards rear than it was originally. Tightened them all nicely. Took to the road, and tried a few hard accelerations - some in a straight, some in a turn (hopping to reproduce the subtle noise). I was not able to reproduce the noise at all. Tried a few times and no luck. I will keep trying once in a while to see if the noise comes back. The realignment seemed to be miniscule but who knows...it may have made a difference. For now, no noise. I will update if that changes.
-
03-06 Cayenne Transfer Case Fluid Change
ciaka posted a tutorial in Cayenne (9PA, 9PA1) - Maintenance
Although easy, still see people asking for steps. So here it goes. Each pic has comments in order. Easy to do, takes about 15 minutes. Hope this helps someone else. -
So how long any of you on the Toyota ATF, have had the car on so far in miles and in months (after changing from Porsche fluid)? Any comments after your interval (smoother, not smoother, cannot tell diff, etc)? Just wondering.
-
i have had a hard time trying to reproduce this. Very seldom. Was able to repro a couple times when accelerating in a turn (hard acceleration). Was able to repro once I think when going straight (again, hard acceleration). Did not manage to look at speedo but it was with foot down on gas. When I reproed each, I tried again, and each time was unable to replicate (not able to replicate successively one attempt after another to obtain the vibration). I am still thinking it may be the road conditions???? How does the traction control work on the CTT? Does it apply brakes when accelerating? Is it possible the vibration I am feelling can be coming from the tires momentarily losing grip and the car trying to adjust the power? I am on Vredestein sessanta tires, and those suckers provide a ton of traction when needed. During normal driving, I do not have any vibration on steering wheel, no imbalance of any sort, which would imply control arms issues, etc. The vibration sounded very small, but similar to the shaft noise that I heard when that went (much subdued though, and under hard accel). I was thinking of the following plans: 1. Crawl under there again, loosen up the bushing mount screws to see if the shaft realigns itself to a different position than it is in now. 2. Asking the company to send another shaft in However, I wanted to run by you fine folk here for ideas/help.
-
So I bought the Hopkins 7 blade connector that also has a 4 straight connector on side as pictured above. When I hooked up to the trailer, I observed: - left directional works fine - right directional works fine - stop lights work fine - tail lights (ones that are supposed to go on once you turn the headlights on) are NOT on. Trying to figure out what the issue is. Bought one of them 4 straight testers, plugged in and the only led that is not on is the tail lights one. The others are on when plugged into the hitch connector. So what could it be? Is the connector I bought not the right one for the CTT? I thought they were universal in a way that if they plug in, they will work. Connection from car harness to the rear of the connector I bought seemed to be identical. Plugged right in. Thanks for help in advance.
-
So about a month ago, the drive shaft went on my car. Purchased a reman shaft from a shop in CO. Replaced according to service manual instructions. Also replaced the flex disc with the install. Did not use the alignment tool for the bearing but made sure it was the last thing to tighten up (after playing with it to make sure it settles into a neutral position). After replacement, all seemed fine when driving regularly (no sudden accelerations, etc). I took the car on a road and tested fast acceleration in a straight, and noticed a small amt of vibration. Repeated 2 times more to verify. All was done at night. Got me concerned. Emailed the company thinking I may have an unbalanced/bad? shaft (they replied to call but I did not do so yet at that time). However, took the car on the same road during day and noticed that the road has some small ripples near side of road, which to me would explain the vibration, especially if one was to drive fast on that road. So I explained the vibration with those ripples. Took the car to a different road. This time on hard acceleration in a straight, there was no vibration at all, even with the pedal all the way down. Repeated several times, and each time same result - no vibration. My thoughts were, all is fine, all is GOOD!! As a preventative measure, took the car to my tire shop to do all tire rebalance plus tire rotation. After driving some time (maybe couple weeks), I happened to accelerate into a curve fast, and noticed similar type of vibration appearing again. Got thinking again. Tried to repeat. In straight line, nothing. Curve, nothing. It appears as though the vibration happens intermittently. I am trying to determine whether it may be the shaft, etc. I plan to crawl under there again to visually inspect bushing and realign again. The vibration is subtle, noticeable and comes from somewhere under the car I assume (not guaranteed center of car, but kind of felt similar to shaft only very subtle), when it does decide to appear. QUESTION: Does anyone have any further suggestions for troubleshooting, to help determine if I do have an issue? I do not particularly feel like spending another 500 on another shaft (even though this guy does have a 1 yr warranty). I am confident the install was proper (I am a very meticulous person to do any work on my car - do it right not fast). As always, help is much appreciated. Thanks in advance.
-
The forum is to be used be all to get info/advice from others who know already. If someone already asked the question, great. We all know the search functions well, and if I spent enough time, I would maybe have dug up some info. After brief search, nothing wrong with asking. Who cares if question was asked before already. Remarking that one needs to use search function assumes they did not, which many times is not correct for many of those who ask. Posting remarks like that scares them to go elsewhere, as they are not productive remarks for anyone. People can have a million questions and comments about brakes for a Cayenne, none of which may specifically deal with question one wants to ask. I consider forum pollution, when someone is not replying specifically to a thread, but talking about other stuff that is not directly addressing the thread questions. Makes it harder for others to find the accurate answer. Doing a simple search on 'rotors' gets you 4 pages of info. If you start reading, you notice that many threads have nothing to do with what parts need or are recommended to be replaced when changing pads/rotors. You get things like roll calls, some pd questions after changing rotors, etc, etc. Point is, doing a search bring up a ton of stuff that is totally unrelated to the specific question - recommended or required parts to change when replacing rotors/pads. Sometimes you have answers but these are buried below 4 pages of a totally unrelated post. It would be so easy for those who already know, to just write 1 sentence - 20 seconds. Or do nothing - even simpler. Maybe you are a whizz at searching forums. 1000 better than I. If so, sorry for being worse than you in searching forums, just do not have the time to spend to learn forum searching on as advanced level as you. That is what we are all here for, help those who have questions. Anyways, you did help me out on a couple occasions, and I salute you for that. If you know everything, great - I wish I did know half the stuff you do then, but please do not throw the 'use the search button' reply. If I have offended you, my apologies, that was not my intent. Please keep in mind that others may be seeking info and may not/will not know as much as you. We should not make it a hard thing to ask questions. Questions are always good. Have a great day.
-
sometimes a quick two words are much quicker and serve many more people than responses telling one to go search since someone sometime has said something similar. Already did quick search and happened not to find, hence the post. Forums are a place for info exchange and yes, sometimes questions are duplicated, but not to cause headaches for all. If you do not feel like answering why not just go to different thread. Sorry to be harsh, but find it annoying when I see this on forums. Yes, you know the answer, but the one who asks does not. If you know, why not just say it (quick and useful). The 'use search...' - not helpful to community. I answered many many questions on many forums even though covered. Being helpful is simple.
-
05CTT Does anyone know if there is a requirement/recommendation to change any hardware when rotors/pads are being swapped? I mean bolts, pins, bushings, rubber seals, etc. Any places things should be lubed with hi heat grease? Planning to do this next week and while I am at it, might as well do it properly. Thank you.
-
Excellent! So I don't have to return the connector kit then. Any preference as to which brake controller is a good one for CTT here? Just in case in the future I decide to have a need to use it? Saw some pretty fancy ones, and some basic ones without any understanding what different features are and what is useful and what is just a gimmick. As to the 4 pin straight, I think I will just use the kit I just bought, and it can still be used if I decide to add the brake controller (which based on your remarks should be as simple as buying and connecting one in the front).
-
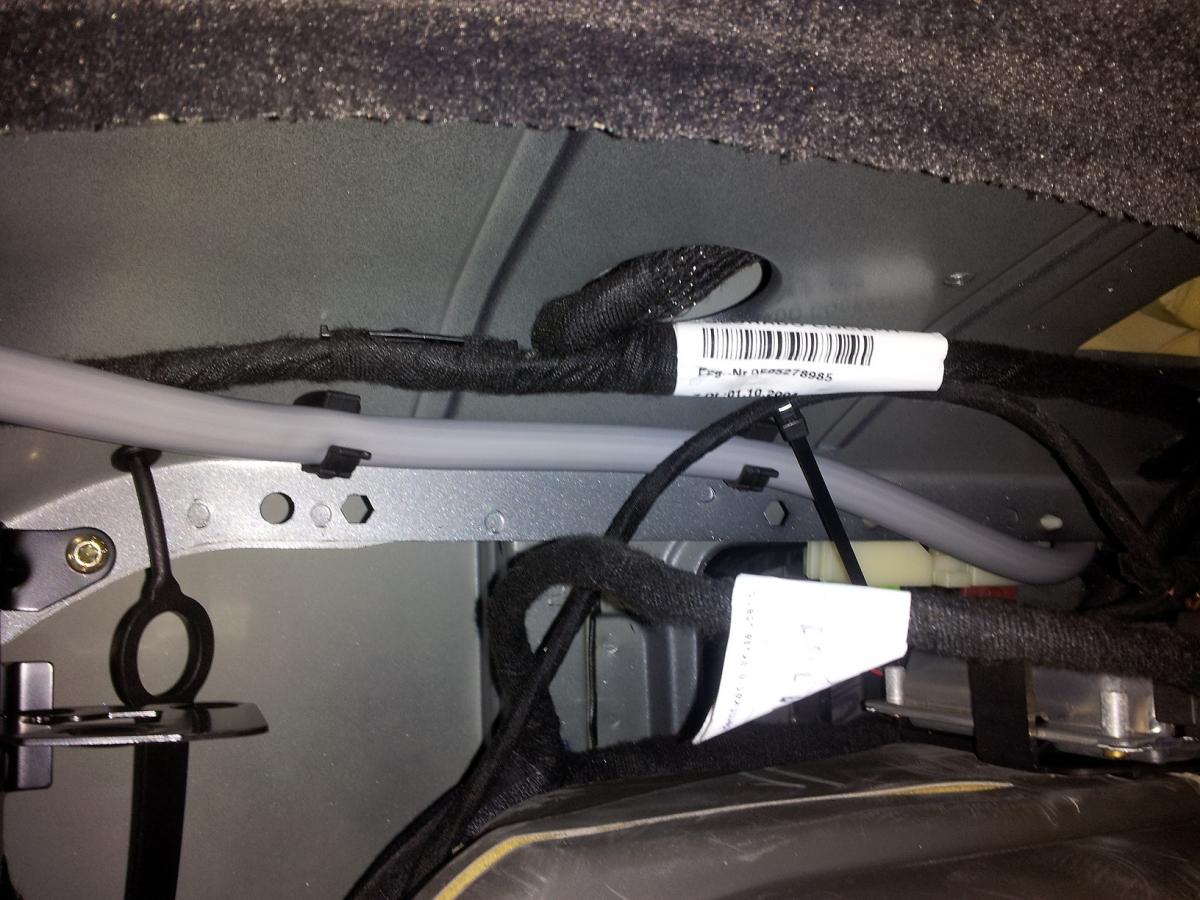
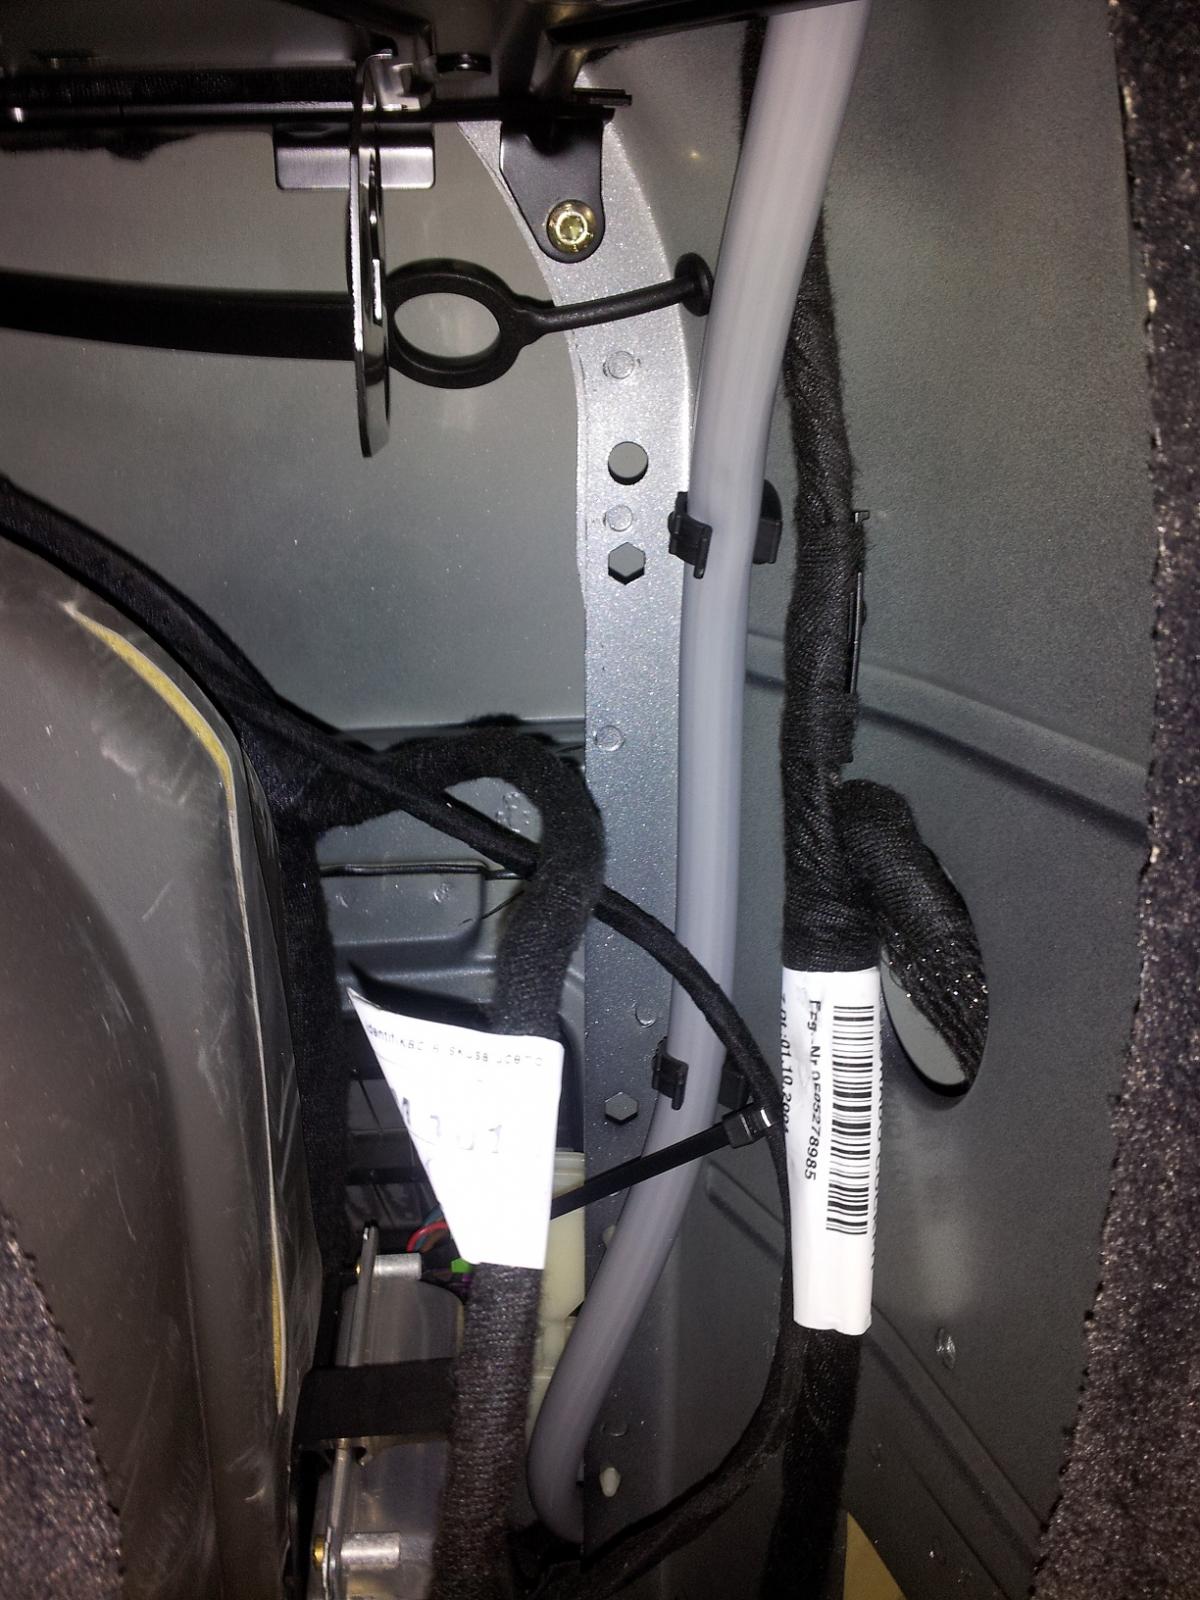
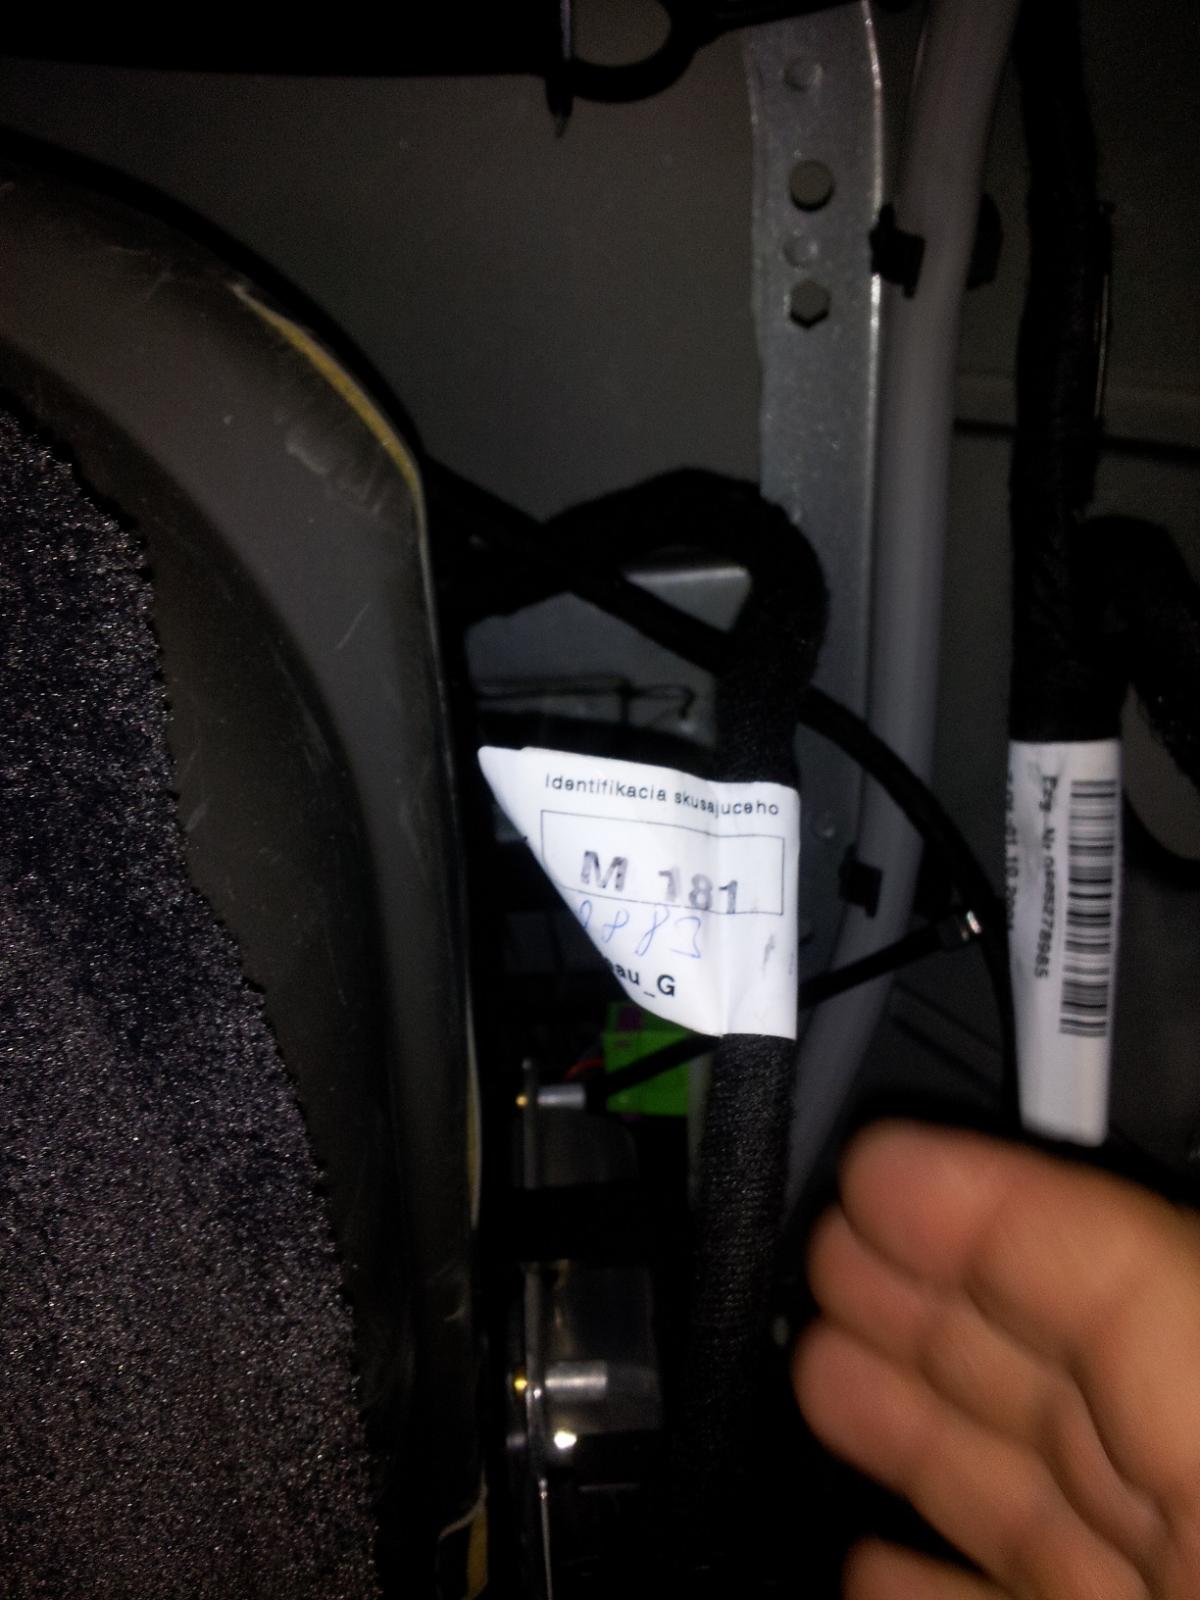
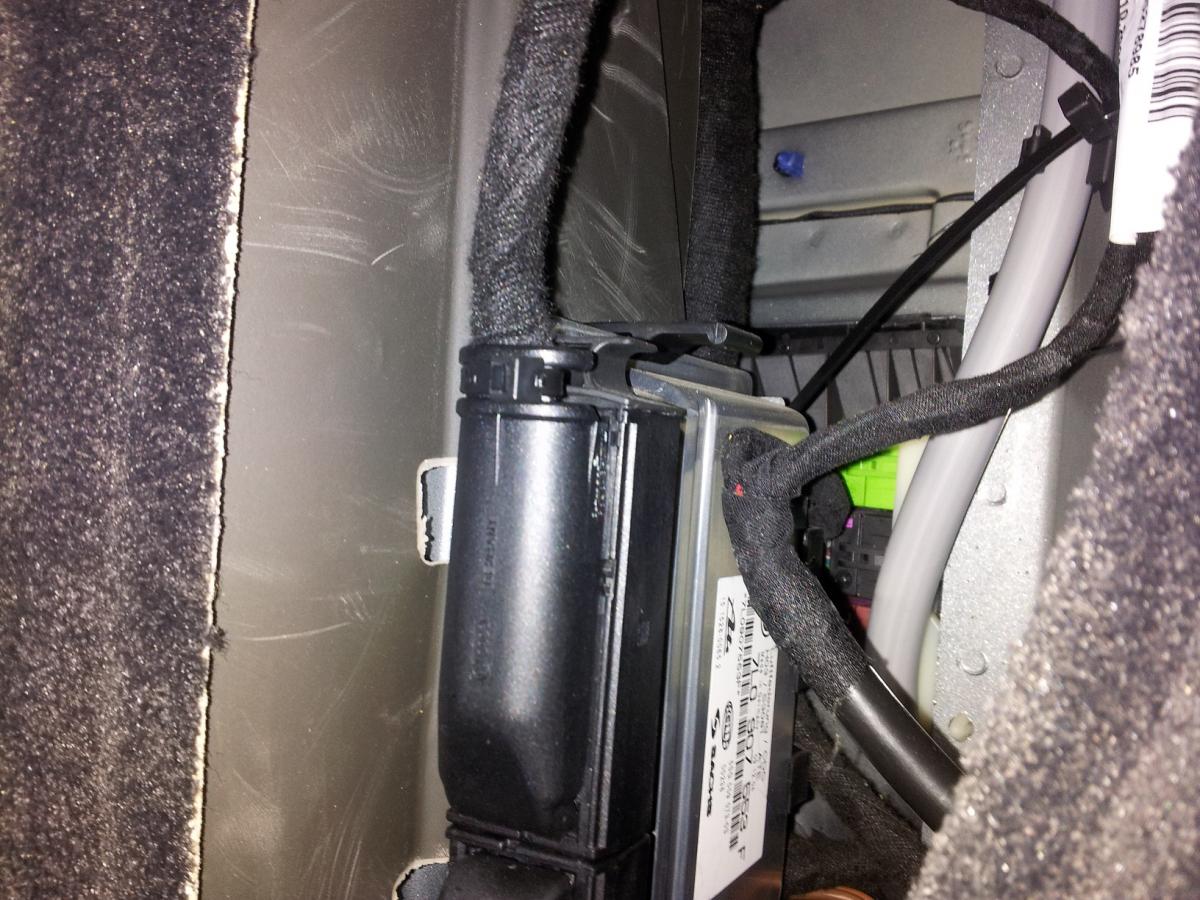
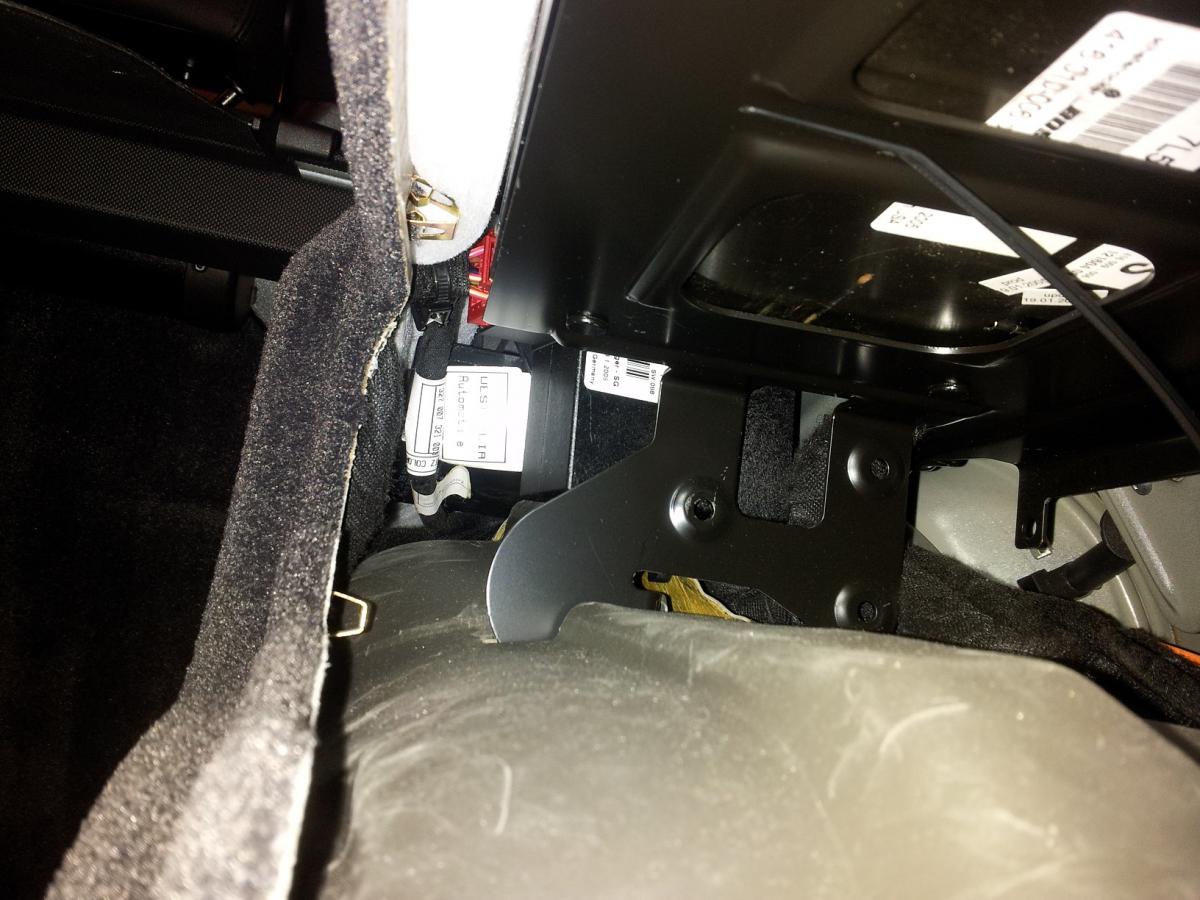
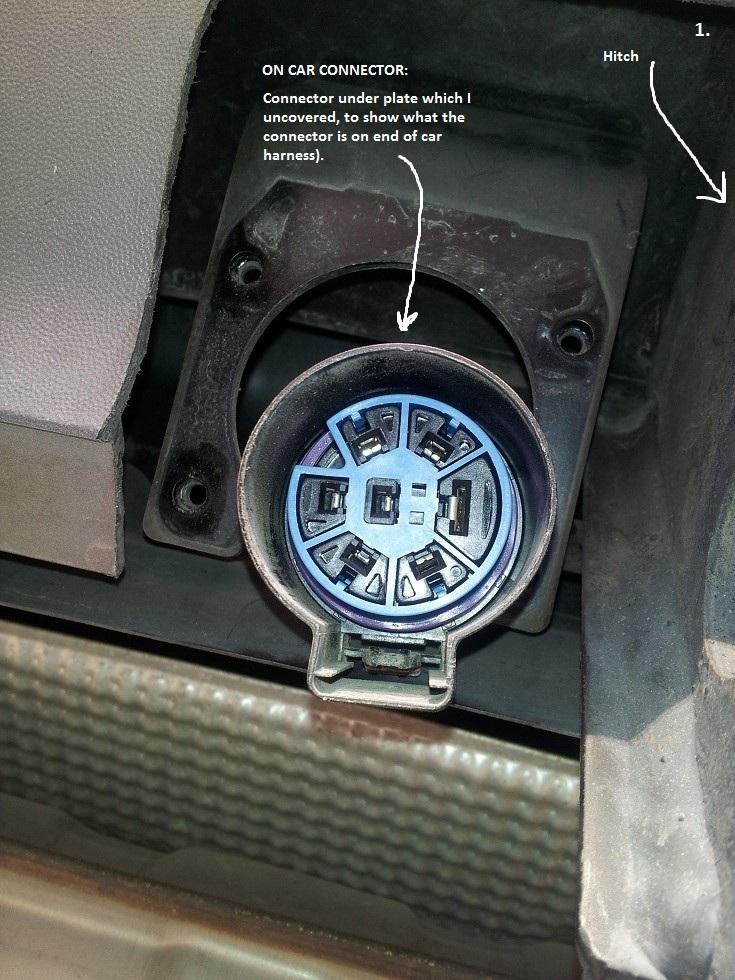
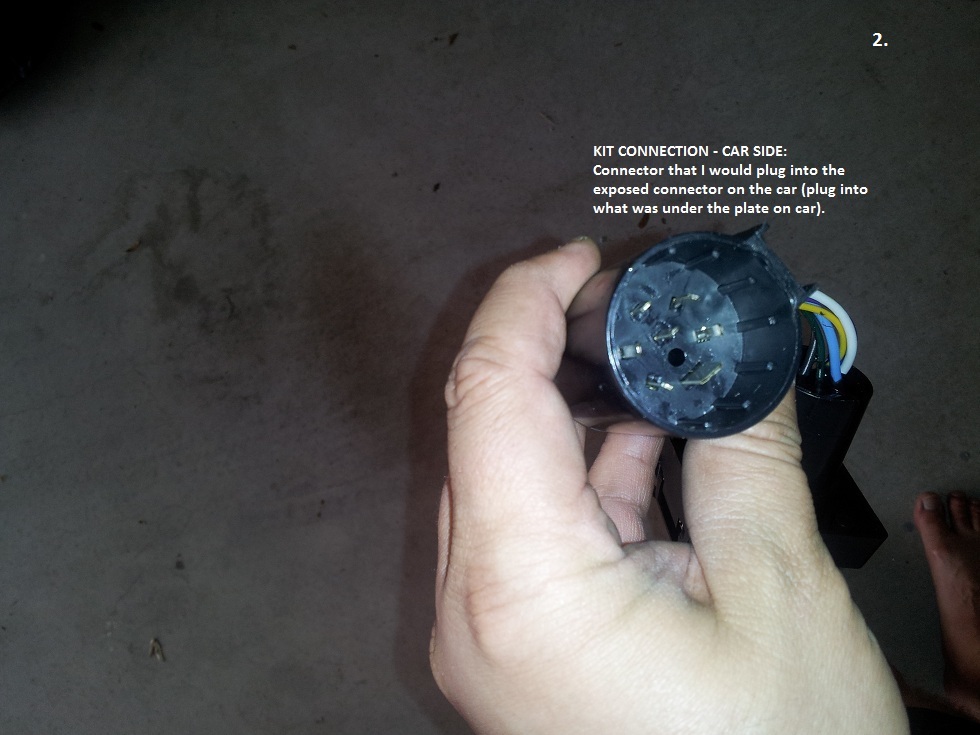
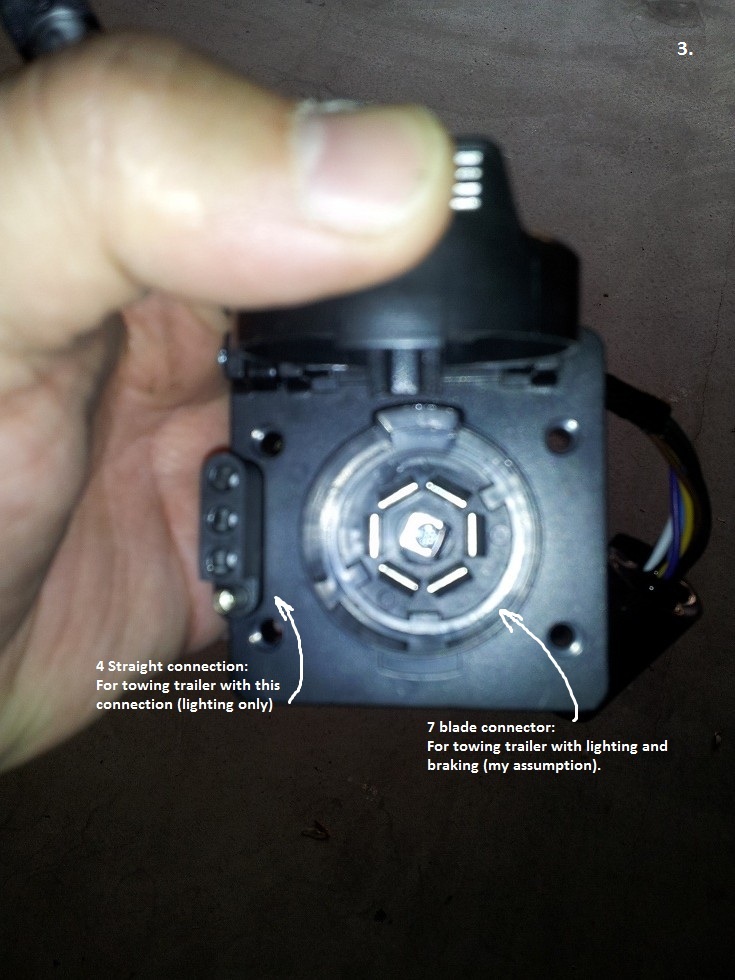
I have the 05CTT. When I got it, the hitch already installed (OEM), as well as wiring harness. Looks like the hitch was never used (no scratches at all and connector seems never used either). The other day got to look into it a bit more. Unscrewed the little plate covering the wiring connector on the car.... and saw what I show in PIC 1. So here are my questions: 1. Does the car come with harness that already has ability for brake control? 2. Is there anything else I would have to buy to gain the brake control capability if I needed to have it, with this harness/setup? 3. If I only wanted to use the hitch to tow trailer with straight 4 connector, do I still need to buy a kit that used brake control, or just any kit that plugs into this connector in pic, that translates into 4 straight connector? PIC 2 shows what I just purchased. It is a connector that is supposed to plug into the 7 blade connector I exposed, and on the other side - PIC 3 - has a 7 blad connection (assuming to trailer which includes brake control, lighting, etc), as well as a connection to a 4 straight connector for a trailer with this connection. 4. Will that setup work on my car? Do not want to screw anything up here...the package does not have Porsche cayenne listed at all, but the connectors on the car side seem to line up exactly, as the ones from the harness under the plate that I exposed. Help will be greatly appreciated here. Thanks in advance.
-
Cardan Shaft (aka Drive Shaft) Replacement I had a chance to work on replacing my cardan shaft, as the one in the car gave me the famous symptoms of 'midget in console banging with a hammer'. Important things to remember: - replace flex disc at same time (worn out shaft bearing will cause wobble that in turn stresses the rubber disc out when you drive - I inspected mine and there were cracks when looking closely) - take your time, no rush - follow each step in sequence - read each step completely before doing the work for that. Author ciaka Category Cayenne (9PA, 9PA1) - Common Fixes and Repairs Submitted 02/12/2013 10:31 PM Updated 10/03/2016 10:19 PM
-
Here is my DIY for this job. Not bad, but takes time and knowing which things to do when, to make job easy. Cayenne Cardan Shaft Replacement DIY
-
Here is the DIY for the cardan shaft or drive shaft on 03-06 Cayenne - all sub models... CLICK HERE
-
I had a chance to work on replacing my cardan shaft, as the one in the car gave me the famous symptoms of 'midget in console banging with a hammer'. Important things to remember: - replace flex disc at same time (worn out shaft bearing will cause wobble that in turn stresses the rubber disc out when you drive - I inspected mine and there were cracks when looking closely) - take your time, no rush - follow each step in sequence - read each step completely before doing the work for that. There are things that will speed your work once you are aware of them. If you do not normally work on cars, no problem. Expect about half a day worth of work. If you work on cars already and are a DIY person, expect about 2 hrs worth of work. Expected cost savings by DIY: about $1200 - $1400 total. REPLACEMENT PARTS INFO: 1. Drive shaft - purchased from www.coloradodriveshaft.com - cost: $475 including $100 charge for core (you get that money back after you return your old/bad part). Nice thing is that they provide a pre-paid and pre-addressed label for UPS, which you put on the shipping box you receive to ship old part back, and they do hi speed balance the shafts as well. They state that their shafts are much sturdier than originals, and will not fail, but I have no way to verify that. 2. Flex disc - purchased from ebay - cost: $90 shipped. 3. Rear drive shaft bolts - I did not replace mine with new ones, just made sure to tighten them up nice (tightened to 10 ft-lbs more than in spec)...seemed all fine, even with their coating. Service manual calls for replacement of these bolts though, so the call is yours. I hope this will help the next one with this issue. QUESTIONS/ANSWERS SECTION: 1. Q: A question - was there any concern with centering the center bearing in the tunnel? Porsche has a special tool for this (basically looks like a big foam block the fits the tunnel and the driveshaft to make sure it's running true and straight. My plan if I need to do this is to mark the location of the mounting plate under the car, and reinstall it in the same spot (and bolt up the bearing assembly to the same spot on that plate.) A: I address porsche tool (to align bearing) in picture 11 and 12. If you have the tool, great. If not, you can still do it. Without tool, you have to ensure that you bolt the bearing to bracket as the last thing in this DIY. You make sure you affix the bracket back into same location you took it out of (making marks around edges and bolts). Tighten the 6 bolts to spec (in pics). Then you put in the two bolts for the bearing but make sure they are nice and very loose. Then, reach up into the space and move the shaft and bearing in up/down then left/right motions (move it in all directions). Observe where the bearing settles by noting where the bolts stop on bracket. Do this a few times and you will see that they will settle same spot. Remember, the bracket is what aligns the bearing up/down. The porsche tool does not align that. Also, after you have tightened down the rear and front of shaft, and after the bracket is in, the only way for the bearing bushing to go is sideways. Since it has 2 bolts, the sideways motion is not that much. By reaching and moving it up, you allow the bushing to settle in its natural position (least strain). After you note where the bolts rest, take a flat screwdriver and mark the bolt positions on the bracket (do this so that during torquing down you do not affix to improper position - important as this is where most screw ups will occur). After marking the bolt positions, take your socket and gently start tightening both bolts few turns each. When they are snug, make sure they align with the marks you made and continue to torque down until they no longer move out of their positions. Then just torque down to spec (in pics) and you are done. Bearing aligned and job finished. Thanks again. *** EDIT*** - I was gone for a while and all my pics had been removed from my tutorials. Regardless how it happened, here they are.