Welcome to RennTech.org Community, Guest
There are many great features available to you once you register at RennTech.org
You are free to view posts here, but you must log in to reply to existing posts, or to start your own new topic. Like most online communities, there are costs involved to maintain a site like this - so we encourage our members to subscribe or donate. All subscriptions and donations go to the costs operating and maintaining this site. We prefer that guests take part in our community and we offer a lot in return to those willing to join our corner of the Porsche world. This site is 99 percent member supported (less than 1 percent comes from advertising) - so please consider an annual subscription or donation to keep this site running.
Here are some of the features available - once you subscribe RennTech.org
- View Classified Ads
- DIY Tutorials
- Porsche TSB Listings (limited)
- VIN Decoder
- Special Offers
- Paint Codes
- Registry
- Videos System
- View Reviews
- and get rid of this welcome message
It takes just a few minutes to register, and it's quality Porsche information at a low cost.
Contributing Members also get these additional benefits:
(you become a Contributing Member by subscribing or donating money to the operation of this site)
- No ads - advertisements are removed
- Access the Contributors Only Forum
- Contributing Members Only Downloads
- Send attachments with PMs
- All image/file storage limits are substantially increased for all Contributing Members
- Option Codes Lookup
- VIN Option Lookups (limited)

krazyk
-
Posts
48 -
Joined
-
Last visited
-
Days Won
1
Content Type
Profiles
Events
Forums
External Paint Colors
Downloads
Tutorials
Links Directory
Collections
Classifieds
Store
Everything posted by krazyk
-
Free 996 Service Manuals
krazyk replied to krazyk's topic in 996 Series (Carrera, Carrera 4, Carrera 4S, Targa)
No problem then. If I remember correctly, I think it was the older 996 1999-2001 service manuals and parts manuals that were all over the place. I was finally able to find the newer ones but don't want to cause an issue. -
Free 996 Service Manuals
krazyk replied to krazyk's topic in 996 Series (Carrera, Carrera 4, Carrera 4S, Targa)
Thank you Loren, dont want to cause any problems. Anyone know if they are in the public domain now because of age? I dont see a copyright warning. Loren I will be happy to PM you my links and let you approve before I post them. -
I might be wrong but I think Pelican is still selling the Ceramic Hybrid, OEM type bearing, and tools. Guess I better hurry and buy mine because there is no way in hell I would pay any shop to do this job. Correction, I did order so I know they still sell them.
-
Free 996 Service Manuals
krazyk replied to krazyk's topic in 996 Series (Carrera, Carrera 4, Carrera 4S, Targa)
I have one that is 99-2001, and one that is 99-2005, some misc., TT, GT3, etc. -
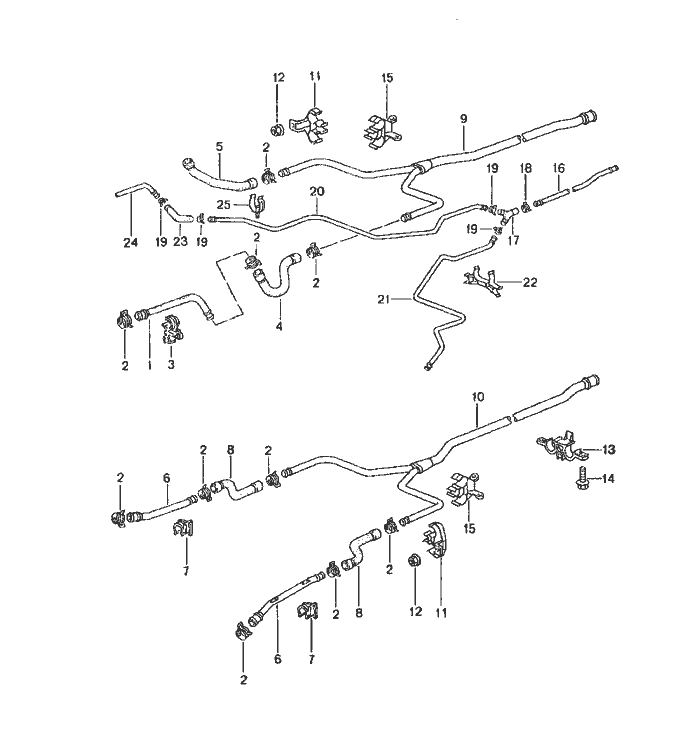
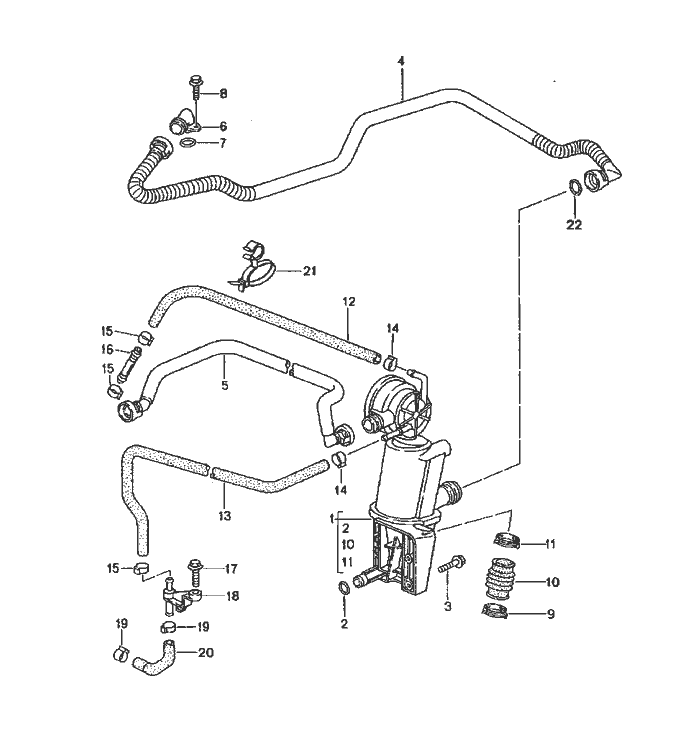
Coolant Hose Diagram
krazyk replied to Hilux2400's topic in 996 Series (Carrera, Carrera 4, Carrera 4S, Targa)
If I am correct, technically thats not the AOS. It is just referred to as an "oil separator" or "oil-vap. separator" and part of the emission system. AOS also refers to the parts in the engine sump. I hope these pics help.
-
Free 996 Service Manuals
krazyk posted a topic in 996 Series (Carrera, Carrera 4, Carrera 4S, Targa)
Loren and guys, I have several 996 service manuals stored in .pdf format but not sure where to post links or the correct section to include them. Suggestions or guidance please so as not to violate TOS for forum? -
Yes, thank you. I posted lite grease because you should not use any of the thicker types or wheel bearing grease. I will pull the unit again after awhile and check on the bearings. I tested it before reinstall and its super quite except for the silly vacuum cleaner sound.
-
Repair, Dont Replace the SAI , Easy DIY This is a relatively easy DIY that may save a failing secondary air injection motor, commonly referred to as the SAI. Removal and installation is easy and covered many times elsewhere, so I wont repeat it. I would only do this repair if I heard the tell-tale screech/squeal on SAI start-up. The noise is indicating the SAI has a problem anyway, whether its the bearings or fan discs, the unit may need service soon. The noise could be from the sealed bearings or fan discs. After SAI removal, se Author krazyk Category Carrera (996) - Common Fixes and Repairs Submitted 01/14/2013 09:28 AM Updated 03/17/2017 05:03 AM
-
Repair, Dont Replace the SAI , Easy DIY
krazyk posted a tutorial in Carrera (996) - Common Fixes and Repairs
This is a relatively easy DIY that may save a failing secondary air injection motor, commonly referred to as the SAI. Removal and installation is easy and covered many times elsewhere, so I wont repeat it. I would only do this repair if I heard the tell-tale screech/squeal on SAI start-up. The noise is indicating the SAI has a problem anyway, whether its the bearings or fan discs, the unit may need service soon. The noise could be from the sealed bearings or fan discs. After SAI removal, separate the mounting bracket from the SAI assembly. Remove retaining clips from assembly case. You see the motor shaft and fan discs retaining nut. Don’t remove the snap ring. Just remove the nut. Remove all fan discs and spacers, carefully noting the order and position of each piece. I usually stack or lay the pieces in order so I don’t forget. You may want to photograph or make notes. You should now see only the motor left in the motor case. Remove the two retaining screws. Replace the retaining nut on the motor shaft and carefully secure in a vise. Gently pull the motor case from the motor. You will see that it is just a basic rotor/stator electric motor. You can now see the sealed bearings on each end of the electric motor. The shaft end and support end. Carefully remove the seal from the SHAFT END sealed bearing. I used a jewelers flat blade screw driver to remove the seal. Just be gentle with it and it wont break. You can now see the exposed caged ball bearings. Mine were dry. I carefully packed the bearings with a lite quality grease while rotating the shaft. I then replaced the seal and verified it was seated. The seal cant come out later because a spacer rides against it. Then look at the support end sealed bearing. You will not be able to remove the seal but you can carefully separate it enough to “inject” grease into the bearing. You can use a needle-tip adapter on your grease gun or a large gauge syringe (18g or 20g) with lite grease. I even put a little extra grease on the support end of the shaft because it is isolated in the closed housing end. Verify the motor turns smoothly, reassemble, and install. You can test it prior to installation with a 12V DC source if you want to. Some miscellaneous notes: This will probably not help a seized sealed bearing(s). This is NOT a critical complicated engine part and is not hard to DIY if you take your time and carefully note the dis-assembly. I will run mine for awhile then take it apart again and see if my “extra” grease attracted more dust or dirt. If my bearings would have been ruined, I still would not have trashed the unit. I would have rebuilt the electric motor itself, replacing the brushes and bearings which is much harder than the DIY. -
Another IMS DIY
krazyk replied to Stakeman's topic in 996 Series (Carrera, Carrera 4, Carrera 4S, Targa)
Wardhog, man that is awful. I have the exact same car but with 56,000 miles. I too was considering doing the IMSB myself at an upcoming clutch change. Did you have any symptoms at all before failure? Leaks, odd noises, etc? Please post more info and/or pics if you have anything. I know it sucks but maybe others can learn something from you. -
996 Complete Coolant Flush DIY
krazyk replied to krazyk's topic in DIY Articles - Carrera (996) - Maintenance
OK, I feel better knowing 80% to 90% is normal. I thought the same about pumping through the system but thankfully I didnt have intermix it felt it might be overkill for a regular maint. flush. Thanks for the tips. I have some others to post including a complete PS fluid flush I have never seen done before, so hopefully it will be approved. Thanks again. This forum is a gold mine for the DIY guys or those willing to learn. -
996 Complete Coolant Flush DIY
krazyk replied to krazyk's topic in DIY Articles - Carrera (996) - Maintenance
JFP, for some reason the Airlift guide said 20 or 30 seconds (not sure which). I did wait a little longer until I was sure. I can edit that part if allowed. logray, I did mention the heater on HI and did this on mine. Maybe I need to clarify that part. I just wasnt sure if it helped or not. Your right, it is very difficult to get all the coolant out. I drained the rads from the bottom hose too but still missed @1 gallon somewhere but not sure. No indication of air in system so far. I was curious if anyone else measured the exact amount they were able to get out without a more extensive disassemble of the system. If I change the water pump and T-stat soon, I will do it again and measure more carefully. -
996 Complete Coolant Flush DIY I did not see a 996 coolant flush with pics so heres my contribution. My car is a 2003 C4S 6 speed and should be similar to all NA 996's as far as coolant flush is concerned (Tips have 3rd radiator). I decided to replace the coolant because I had no idea how long it had been in my nine year old car. It was the yellow color so I assume it was the correct type for the time but who knows. For refill I chose Pentosin Pentofrost even though its a little pricey at @$45 per gallon. Make sure you buy th Author krazyk Category Carrera (996) - Maintenance Submitted 01/03/2013 11:51 PM Updated 01/04/2013 12:02 AM
-
Posting New DIY's and Where?
krazyk replied to krazyk's topic in 996 Series (Carrera, Carrera 4, Carrera 4S, Targa)
I submitted a DIY coolant flush but is there something I need to do to get it approved? -
I did not see a 996 coolant flush with pics so heres my contribution. My car is a 2003 C4S 6 speed and should be similar to all NA 996's as far as coolant flush is concerned (Tips have 3rd radiator). I decided to replace the coolant because I had no idea how long it had been in my nine year old car. It was the yellow color so I assume it was the correct type for the time but who knows. For refill I chose Pentosin Pentofrost even though its a little pricey at @$45 per gallon. Make sure you buy the G12 version for Porsche not the A1 version. The color is called purple/violet but it is really pink. I was only able to get about 5 gallons out of my coolant system but not sure why. I suppose you could disconnect more of the system but since mine wasnt contaminated by anything I figured 5 was enough. To do the job right you will need to remove the drain plug, pull the underbody panels, front fender liners, and disconnect several coolant hoses while catching 5+ gallons of old coolant. Its not a hard DIY but if your not familiar or comfortable dealing with this type of job defer it to a pro. You will also need some type of coolant flush / refill kit capable of pulling at least 20-25HG. Im sure the critics are going to say you dont need to do it this way and you can just lift the rear of the car, burp the system 10 times, refill, etc. but I wanted to do it using the vacuum fill method. To complete the job you may need: Uview 550000 Airlift 3 gallons Pentosin Pentofrost G12 3 gallons Distilled Water 5MM allen wrench for drain plug torx and other tools to remove panels hose clamp pliers @5 gallon bucket or a few smaller ones Air Compressor for Airlift Extra panel clips and plastic nuts (optional) Worm Screw clamps (optional) Before you begin its a good idea to turn the temp to HI but I dont know if this really makes a difference since your draining the entire system and using vacuum refill method. You can measure the amount removed if you want to be sure you get as much as possible out. Safely raise and support car to a comfortable work height. Remove drain plug with 5MM allen wrench and allow to drain into bucket. You will probably get 2 or 3 gallons from here. Loosen plastic coolant tank cap to aid draining. While the engine is draining, begin removing underbody panels and front wheel liners to better access radiators. Dont worry. The rear capacity will not over flow a 4 or 5 gallon bucket. Once your satisfied, replace drain plug. While under the car it is also a good time to inspect the rubber coolant hoses, etc. for wear and replace anything you need. With underbody panels removed, you should be able to see the 2 larger coolant lines near the center but towards each side of the car and the 2 smaller lines. Look for the clamped junctions at the lowest points of each line. One at a time I disconnected the lowest large and small lines on each side. I allowed each to drain as much as possible before reconnecting. You may need a hose pick or small screwdriver to "break" the seal between the inside of the hose and the pipe. If you believe the factory clamps are fine you may choose to reuse them. You can also replace them with good quality "worm screw" clamps. I then moved to the front and disconnected the bottom rad hose at upper clamped junction. You can easily maneuver the disconnected hose to below the bottom of the rad to drain it. After draining reconnect hoses. Measure how much total coolant you drained to get a general idea of how well its going so far. If your satisfied, make sure drain plug is in and all hoses are connected. Remove plastic coolant tank cap and very carefully attach the Airlift to the opening using the appropriate adapter. Its a tight fit but is possible without removing the engine hatch. Check valve positions, connect fittings and compressor air line per instructions. You should see @25HG vacuum pulled on system. You will see collapsed rubber rad hoses which is normal. After close valve and disconnect air, watch vacuum gauge for at least 20 or 30 seconds. I mixed my Pentosin and water 50/50 in a large container and made sure the container was higher than the coolant tank refill neck. I used my rolling work tool tray to rest the bucket on and had it next to car ready to connect to refill device. Try and get refill hose full of coolant by submerging it before you connect it. You want to prevent as little air as possible from being pulled into the system. Connect suction hose to Airlift valve, and ensure that end of suction hose remains submerged during refill. You will see the system filling as air pressure equalizes. If needed, add more coolant to bucket to keep suction end submerged. After you are satisfied you have replaced the drained coolant, remove Airlift and top off if necessary. This is the point I tried the service manual procedure to ensure no air remained in system during refill. I tried the raise the rear of the car method, varying RPM's, and constant checking of coolant level, burp valve, etc. I could find no indication of any air remaining in the system so I think the vacuum fill worked. I will of course keep a very close eye on the new pretty pink coolant in the tank for awhile. I hope most of this makes sense. Im sure others may have better ways or methods than what I used. Feel free to say so. I wont be offended. Note: The mess you see under the car is from the old coolant splashing, not leaks.
-
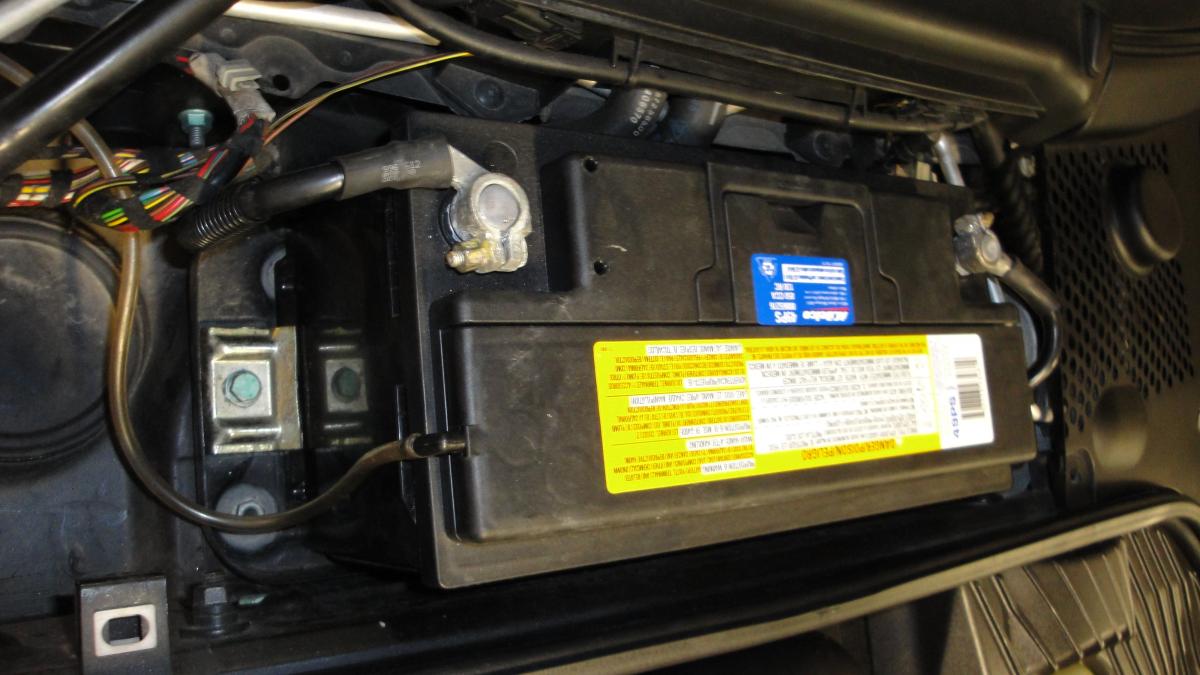
Battery change
krazyk replied to Chuck996's topic in 996 Series (Carrera, Carrera 4, Carrera 4S, Targa)
I did the same. A little extra weight was not a concern, so installed the largest battery that would fit. I used the last hole for the mount and as Chuck and fpb said, you can hold a nut under the tray from the end.
-
Posting New DIY's and Where?
krazyk replied to krazyk's topic in 996 Series (Carrera, Carrera 4, Carrera 4S, Targa)
I found out the hard way about Rennlist. The most important subjects seem to be nonsense about naming your car and other BS. I guess thats what the Rennlist forum is for, just generic P-car talk and not really any serious DIY projects. Oh well, lesson learned. I have several DIY's I will be posting soon. Thanks for making me fell welcome on the "Tech" forum. The information here is fantastic. -
I thought I saw the "rain sensor" wiring diagram in the manual. Now I will have to look again.
-
Value Headers?
krazyk replied to ldrhoades's topic in 996 Series (Carrera, Carrera 4, Carrera 4S, Targa)
Dharn, do you have any links to dyno runs of some of the headers? So its safe to say, aftermarket headers would only benefit track use? If so, I wont bother. Thanks. -
I have some very detailed specific DIY's with photos that I would like to share in the appropriate forum. I had posted some in the 996 forum at Rennlist but they were ridiculed by some of the "experts" who wouldnt dream of turning a wrench. I didnt realize at the time that the Rennlist 996 forum is not a Tech forum for DIY'ers so I guess it was my fault. I tried to make sure my DIY's are not repeats of what was previously posted here unless they have something more to offer. They are on my 2003 996 C4S. I do not want to post these in the wrong section here and cause a similar problem as at Rennlist 996 forum. The DIY's are such as: Power Steering fluid complete flush, motor mounts, cooling system flush with Airlift, under body parts, front dif fluid change, etc., and some others. So, any tip or protocol on posting DIY's? If you tell me dont even bother as youve seen them all, I wont be offended.
-
Value Headers?
krazyk replied to ldrhoades's topic in 996 Series (Carrera, Carrera 4, Carrera 4S, Targa)
Ventura, can you be more specific? I was also looking at some of the lower cost headers and wondering if theres any power gain at all? -
I have one and it is worth the cost. Great info.
-
Another IMS DIY
krazyk replied to Stakeman's topic in 996 Series (Carrera, Carrera 4, Carrera 4S, Targa)
Hey Stakeman, what was the part number for the clutch align tool at Oreillys, please?