Welcome to RennTech.org Community, Guest
There are many great features available to you once you register at RennTech.org
You are free to view posts here, but you must log in to reply to existing posts, or to start your own new topic. Like most online communities, there are costs involved to maintain a site like this - so we encourage our members to subscribe or donate. All subscriptions and donations go to the costs operating and maintaining this site. We prefer that guests take part in our community and we offer a lot in return to those willing to join our corner of the Porsche world. This site is 99 percent member supported (less than 1 percent comes from advertising) - so please consider an annual subscription or donation to keep this site running.
Here are some of the features available - once you subscribe RennTech.org
- View Classified Ads
- DIY Tutorials
- Porsche TSB Listings (limited)
- VIN Decoder
- Special Offers
- Paint Codes
- Registry
- Videos System
- View Reviews
- and get rid of this welcome message
It takes just a few minutes to register, and it's quality Porsche information at a low cost.
Contributing Members also get these additional benefits:
(you become a Contributing Member by subscribing or donating money to the operation of this site)
- No ads - advertisements are removed
- Access the Contributors Only Forum
- Contributing Members Only Downloads
- Send attachments with PMs
- All image/file storage limits are substantially increased for all Contributing Members
- Option Codes Lookup
- VIN Option Lookups (limited)


creekman
-
Posts
474 -
Joined
-
Last visited
-
Days Won
1
Content Type
Profiles
Events
Forums
External Paint Colors
Downloads
Tutorials
Links Directory
Collections
Classifieds
Store
Everything posted by creekman
-
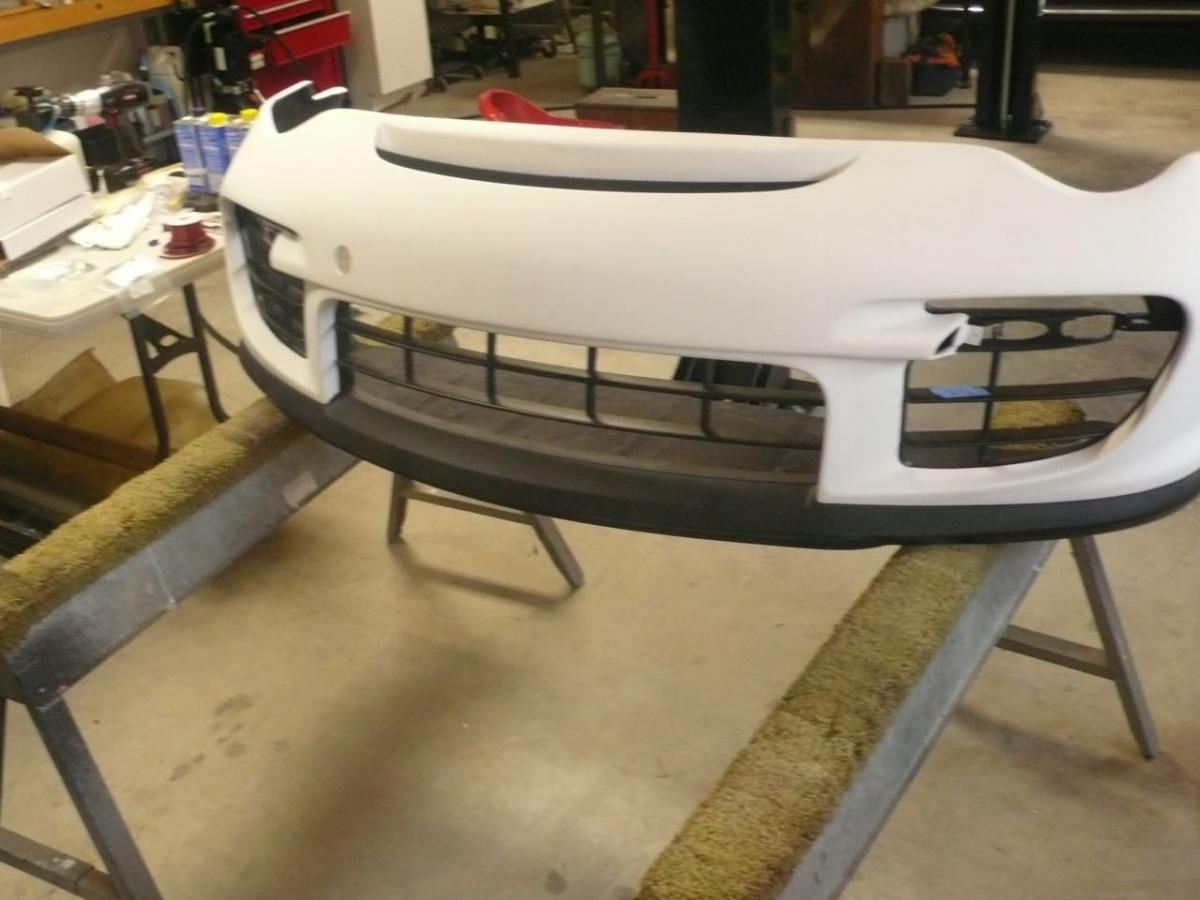
 997 GT2 Modified Bumper Install Instructions First a little back ground… I’ve installed a LS3/480 HP V8 in my 2003 C4S. As part of the conversion I installed a custom 3rd radiator where Porsche had installed an oil radiator for the Tiptronic cars. I wanted to utilize the grill venting on the GT2 bumpers for better airflow for the 3rd radiator. On my last trip to California in Dec., 2014 I purchased an aftermarket 996 GT2 FiberGlass front bumper. I met with the owner of the company, I showed him my car and subsequently ordered a 996 GT2 bum Author creekman Category Carrera (996) - Mods Submitted 05/26/2015 08:28 PM Updated 05/27/2015 06:27 AM
 -
I’ve installed a modified 997 GT2 F/G bumper that fits my wide body 2003 996. I opted for the Porsche factory LED lights that were included with this bumper. The LED lights came with a control box, but I still had to connect them so they would work as DRL’s. The following is how I did that. I’m guessing if you used LED strips or other LED’s that were housed in an assembly the following install would be the same. Connecting your new LED lights is pretty easy. I’m assuming that you already have the LED control box, but does allow you to switch the LED’s from your ignition key switch. You’ll need a relay, some 20 ga. wire. All of our connections were solder with heat shrink insulation. Any auto parts will have a 30A relay (I used a CarQuest - P/N BWD R681P [$13.33]), all relays are marked with the same terminal numbers. Most relays will have 5 terminals, in this case you’ll only use 4 as shown on the schematic. I would find a relay that has a mounting tab, also be sure it has large blade terminals that will fit the regular spade connector. Again you'll want to use a full shielded/insulated electrical connectors. If you wanted there is a compatible female connector for the relay, but it was $26 and had heavier gauge wire than you need. I removed the fuse panel at the driver’s foot well kick panel and made the connection to fuse E8 (empty fuse) from the back of the fuse panel, I'm guessing you could jury rig a connection from the front of the panel, but that’s not for me. I used 20 gauge wire… That’s about it. I might add that my very smart friend and Renntech member, Michael Paton did the schematic otherwise I would have never figured this out. While “I was there” I followed through and completed the RennTech Side Marker Light mod. The sidemarker mod is in the DIY Tutorials here: http://www.renntech.org/forums/tutorials/article/176-how-to-make-your-sidemarkers-flash/ I might add that we deviated from the Tutorial by picking up the wires at the headlight plug. The mod calls for getting into the headlight plug on either side of the battery area. You have to fish wires from that area to the side marker light body which is about a 3’ run. We had a tough time getting the connecting plug apart which is necessary since you’re in tight quarters. If you pick up the same wire at the headlight socket it’s less that a 12" run. Follow the same directions for wire color, but find the same wire at the headlight socket. The downside to the headlight socket connection is that you’ll have to remove the front tires and the forward fender liners. The fender liners come out very easily with 6 nuts/bolts/plugs. I still think it’s a cleaner and easier way to go… Either way it’s a great mod... (click to enlarge or download image)
-
LED Daytime Running Lights I’ve installed a modified 997 GT2 F/G bumper that fits my wide body 2003 996. I opted for the Porsche factory LED lights that were included with this bumper. The LED lights came with a control box, but I still had to connect them so they would work as DRL’s. The following is how I did that. I’m guessing if you used LED strips or other LED’s that were housed in an assembly the following install would be the same. Connecting your new LED lights is pretty easy. I’m assuming that you already h Author creekman Category Carrera (996) - Mods Submitted 05/10/2015 06:13 AM Updated 05/10/2015 06:14 AM
-
Daytime Light Mod...
creekman replied to creekman's topic in 996 Series (Carrera, Carrera 4, Carrera 4S, Targa)
Well I'm answering my own question... I always seem to come up with odd ball questions so I don't get much response. It is what it is... Here's another question on the same issue, will the Renntech mod for turning your marker lights into daytime lights and directionals work on a 2003. I ask this question because if the switching of the lights are part of the CANbus system then the mod might not work? Can anyone tell me if the lights are not controlled by the CAN bus? Thanks, -
I'm installing a 997 bumper cover modified for the 9096 headlights which includes new LED running lights. I thought I might change over the side marker lights to daytime lights as well. I've read several postings which appear there's more than one way to do this. I'm wondering if anyone likes one method or another better. 1. There's a great post that seems very comprehensive - U.S. 986-966 Front Fender Side Marker Light Circuit Modification 2. E-bay purchased a module that turns on and off the lights with the key ignition. 3. Jumping the fuse panel. I couldn't find the definitive procedure for this, but sounds like an easy fix? I would appreciate any updates on the above methods... Thanks,
-
Howdy, I'm a 996 guy, however I'm installing an after market 997 F/G GT2 bumper on my 996. It has the LED blade lights in the grill. Can someone tell me if the LED lights are both directional and running lights, or just one or the other? Also what does the smaller 5W light do, is that a European parking light? Thanks,

-
Clock MPH/KPH
creekman replied to hi8ha's topic in 996 Series (Carrera, Carrera 4, Carrera 4S, Targa)
Just for grins why not disconnect the battery and reconnect just in case the ECU isn't happy... Do you have an OBDII reader, that might tell you something. -
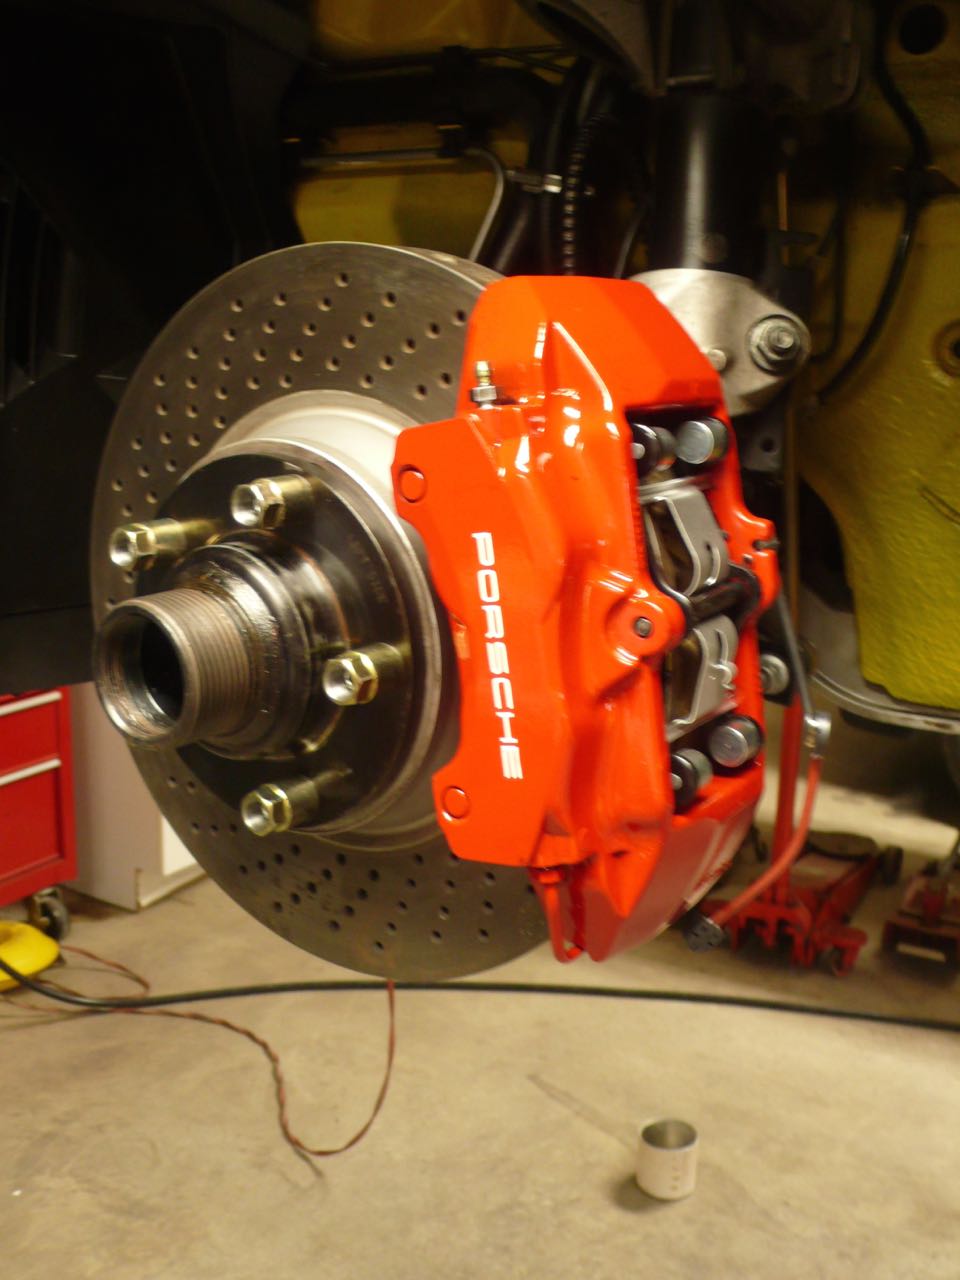
Brake Caliper Porsche Lettering...
creekman replied to creekman's topic in 996 Series (Carrera, Carrera 4, Carrera 4S, Targa)
Caliper lettering update... I waited for 4 weeks for my supplier to get the PORSCHE decals for my brake calipers, after vague responses on a ship date I went to the internet and bought a set on line. What I ended up with is 4.3" long die cut vinyl letters. I believe the letters were originally 4". That was ok since my car is not concours... Actually I liked the longer lettering strip and the die cut letters went on nicely. Albeit they can be tricky to install. I had one of the letters leap off of the mounting sheet and stick to the caliper, I carefully removed it and repositioned it on the mounting sheet. I used Dupli-Color VHT clear spray giving the face of the caliper two coats, looks great... I bought the lettering from a Florida based internet vendor (not from China), they furnished 4 lettering strips. If I was to do it again I would order 5 strips, 4 to use, 1 to lose. I might add that this vendor referred to his lettering as decals, but they were die cut letters. I'm ok with that, but you should know what you're getting if that is important.
-
Engine mounts for the 996?
creekman replied to Chicagospeed996's topic in 996 Series (Carrera, Carrera 4, Carrera 4S, Targa)
Chicagospeed... I have a set of motor mounts out of my 2003 C4S with 60,000 miles that are good, and I would sell cheap... -
Brake Caliper Porsche Lettering...
creekman replied to creekman's topic in 996 Series (Carrera, Carrera 4, Carrera 4S, Targa)
Uwon, seems like a good idea whether you're tracking your car or not to use the VHT clear. Thanks for the suggestion... -
Help with driveshaft removal
creekman replied to AWDGuy's topic in 996 Series (Carrera, Carrera 4, Carrera 4S, Targa)
AWDGuy, Can you rotate the driveshaft to get better access to the remaining bolts? Do you have open end wrenches that you can use instead of the ratchet and socket? -
Help with driveshaft removal
creekman replied to AWDGuy's topic in 996 Series (Carrera, Carrera 4, Carrera 4S, Targa)
Yes... the drive shaft is connected to the front diff on a spline and will slip out. Although when I removed mine I didn't plan on re-installing it so I took it all the way out. In your case you might tie up the flange end and leave it connected at the front differential.
-
I don't know if it happens to you, but occasionally I get spray bottles of spray on wax, and other auto cleaning materials that are dispense from a plastic spray bottles clogged up and won't work. I had a Meguiar's detailer bottle stop working, after messing with running water down the pick-up tube I finally threw the pump head into a pan of water and turn the stove on hot, not a boil... And low and behold the pump started working again. I know that this won't end world hunger, but I thought maybe someone else might find the information useful...
-
Brake Caliper Porsche Lettering...
creekman replied to creekman's topic in 996 Series (Carrera, Carrera 4, Carrera 4S, Targa)
Ronnie, Thanks for the reply, do you use a clear coat out of a shaker can or a 2 part good stuff? Do you have a source for the decals? -
Does anyone have any information on whether the "die cut" lettering is better or worst compared to the "decal" lettering? Since Porsche does not sell this, I've found several sources on the internet as well as in England. So any suggestions on which material is best and where to buy? Thanks,
-
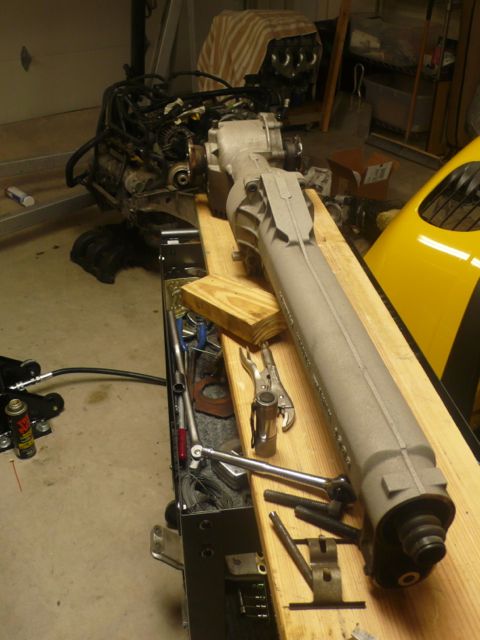
Transmission removal on a C4
creekman replied to machster's topic in 996 Series (Carrera, Carrera 4, Carrera 4S, Targa)
I would put the car on jack stands so it's level, I think it would make it easier re-installing the transaxle. As far as height, I would measure the height of the transaxle, add the height of the floor jack and put a another 6" or so for clearance and call it good. You'll need to remove the front driveshaft. I would put some other backup shoring under the car just to make sure if the car falls off the jack stands you don't get squished. It happens so be safe. The transaxle output shaft has fine splines and can be a bugger to get lined up. Sometimes turning the axle flanges while installing the trans can help seat the shaft into the clutch disc. Speaking of the clutch, depending on how many miles you have on the clutch I would change it while the trans is out. If you have more than 60,000 miles on your clutch, then change it... Have you thought about how you're going to shore up the rear of the engine? There's a transupport at the forward end of the transaxle, you'll want to take that down. The reason being is that there is a belly pan tab that interferes with the vertical clearance. None of this is brain surgery, just take your time. Put the bolts in marked baggies or put them back where they came from. There's a hydraulic line which serves the clutch slave cylinder that is on top of the trans, hard to see and hard to get at. Best you have a "line wrench" for that. It might be 11 mm? Good luck, -
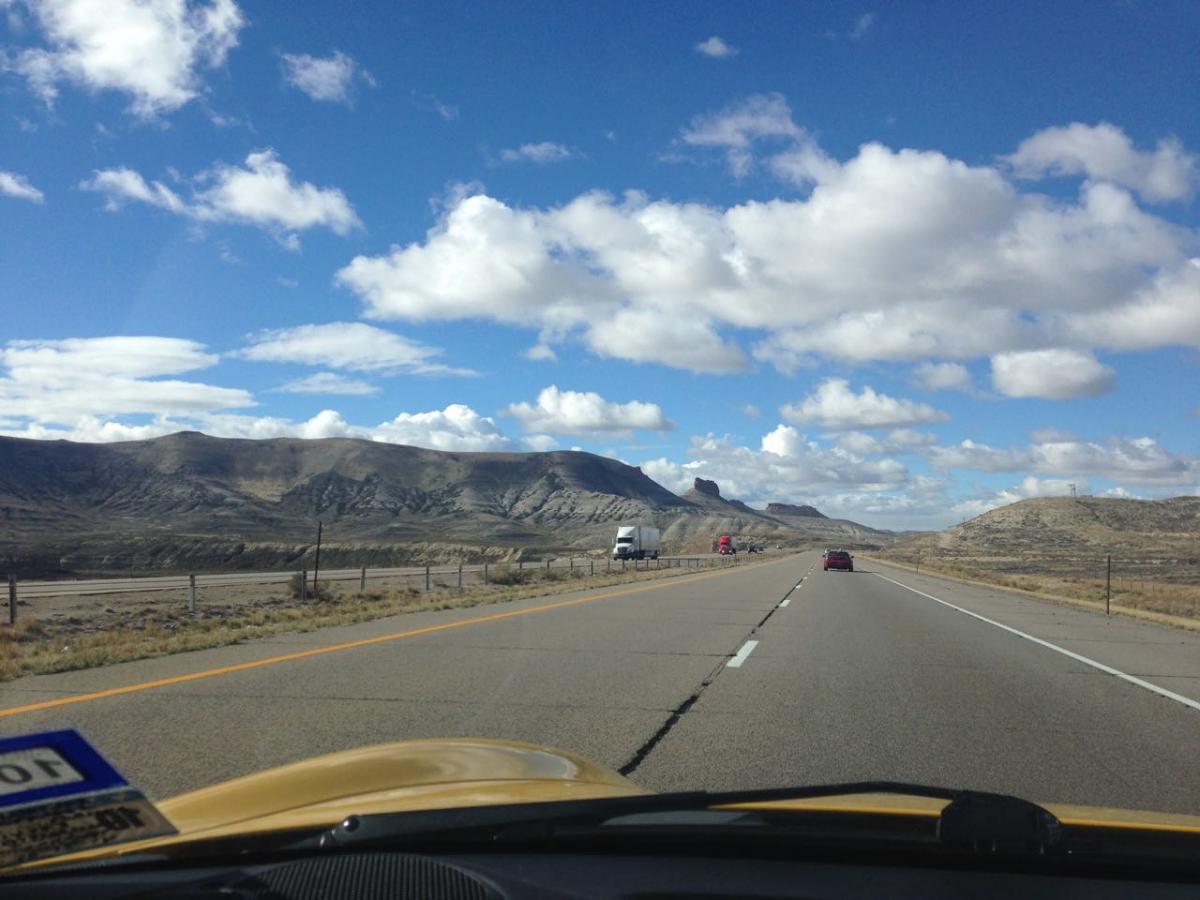
Drive cross country?
creekman replied to d_phlat's topic in 996 Series (Carrera, Carrera 4, Carrera 4S, Targa)
I don't drive my car a lot around town, but I love the road trips in the car. The trip takes on a new excitement when you drive your car. And the memories are better... Here's a pix up on I-80 in Wyoming last September.
-
Drive cross country?
creekman replied to d_phlat's topic in 996 Series (Carrera, Carrera 4, Carrera 4S, Targa)
I just put 5,000 miles on a road trip around the Western U.S. with my "03" C4S, albeit it has a LS3 V8. However the car is a joy to drive x-country, I'm 6-2 and a lot older than you. I can stretch out my legs by putting my feet under the pedals while on cruise control. I would plan your trip by checking out places you would like to see. Museums, historical sites, etc. But if you have no interest in any of these things then I would just jump on the crowd killer and call it good. You didn't say how you would get your car to California if you didn't drive it? With wx on your smart-phone you can plan your route. If you go across I-80 in the winter it can be nasty. I live in Texas so if I go West it's always on I-10 which can be pretty boring unless you're into cactus and rabbits, however most of it has a posted 75-80MPH speed limit. I always plan my trips around seeing friends and family. Plus I get free lodging... -
I'm not how sure this applies to your situation, but I have lowered my LS3 motor, but I remove the upper mounting bolt of the two 12mm (?) bolts that are at the forward transmission mount. Then the whole assembly can pivot on the remaining bolt. Otherwise you'll torque the rubber mount...
-
Remove the following: 1. Remove the front bumper - you can Google, “remove 996 Porsche front bumper” and find several sites that explain the process. 2 people can do it in 15 minutes. 2. Remove the front fender liners on left and right fender wells. There’s one plastic rivet under the horizontal area of the liner that is hidden in a recess. Tough to see and can be tougher to remove. A little penetrating lubricant can help, you want to remove the center pin in the rivet body. The rest of the fastening are either 10mm nuts or Torx screws. 3. Unplug the large power plug to the fan. First to get at the plug you need to slide the entire plug back and forth until the plug pops out of its mounting track. If you muscle the plug out you’ll break off the plastic brittle tabs. Maybe again shoot a little lubricant behind the plug. Once it’s free you need to depress the keeper clips on either side of the plug. I couldn’t get enough grip and force to depress the clips and pull apart the plug so I use channel locks and that did the trick, albeit on one plug I broke the keeper clip. They’re very fragile and become brittle with age. One of my gripes about the electrical plugs on the 996, they’re very cheesy… the plugs aren’t, but the keeper clips are... 4. Remove the radiator hoses next, start with the lower hoses. Be sure to have a 5 gallon bucket on hand, lots of old towels. Remove the horse-shoe clips (see pic No. 4) The tool I use to do this is a Craftsman cotter key removal tool. The horse-shoe clip has two ears on the open end of the horse-shoe so you can’t just muscle the clip out without first getting the ears out from the detent. Start at the open top part of the clip and run your tool around to the open end of the clip. Once the end of the clip is out on one side it’s easy to undo the other end and lift off the clip. Now you can wiggle off the hose, don’t try and turn the hose, just wiggle and pull since the hose fitting slips into a straight groove. Rather than just pull the hose off in one tug I break it lose and let the coolant drain a little at a time, when the coolant is down to just a dribble I pull the hose the rest of the way out. No matter what you do it’s messy… Remove the top large hose the same way. That’s two hoses down, one 1/2” hose to go… Each radiator has a small 1/2”± hose (vent - steam line) that is connected to the top tank with the same horse-shoe clip, but just very small. Don’t try and undo the hose at the radiator, just remove the other end at the fender well. Then while the radiator is on the work bench you can remove the small hose. 5. Remove the radiator support bracket. I might add that when you squirt some lubricant on the fender liner plastic rivets you might shoot a little on the 3 rubber donuts/grommet that support the radiator. Next I would remove the speed clips that secure the studs of the radiator supports at the rubber donuts. To remove the mounting clips I used a gasket scraper tool, or you might use a small putty knife. Just lift the top layer of the clip so it clears the end of the mounting support stud, then push or tap the clip in the same direction that you inserted the putty knife. Note there are large steel washer on both side of the rubber grommet. 6. Ok the hoses are off, the three retaining clips have been removed, now it’s time to remove the large steel brace on the rear side of the radiator. There’s four attaching nuts, bolts, and one Torx screw. Once the radiator bracket is loose hold on because the radiator is fairly heavy, it’s a one man job, but two would be better.
-
966 Water Radiator Removal Remove the following: 1. Remove the front bumper - you can Google, “remove 996 Porsche front bumper” and find several sites that explain the process. 2 people can do it in 15 minutes. 2. Remove the front fender liners on left and right fender wells. There’s one plastic rivet under the horizontal area of the liner that is hidden in a recess. Tough to see and can be tougher to remove. A little penetrating lubricant can help, you want to remove the center pin in the rivet body. The re Author creekman Category Carrera (996) - Common Fixes and Repairs Submitted 12/21/2014 09:15 PM Updated 12/21/2014 09:15 PM
-
Battery disconnection and alarm
creekman replied to Upnorth's topic in 996 Series (Carrera, Carrera 4, Carrera 4S, Targa)
I guess that could happen depending on how dedicate the thief was... However going after your GT3 that might raise his dedication level... -
Battery disconnection and alarm
creekman replied to Upnorth's topic in 996 Series (Carrera, Carrera 4, Carrera 4S, Targa)
Wow, life is complicated enough without having to deal with battery alarms... I wonder what the logic is since when the car alarm is armed the battery would be safe from intruders? Thanks Loren... -
Battery disconnection and alarm
creekman replied to Upnorth's topic in 996 Series (Carrera, Carrera 4, Carrera 4S, Targa)
Upnorth... I'm guessing you can remove the key. I've always just disconnected the battery without the alarm going off? I might add if you're going to disconnect the battery I would first lower the door windows a tad so you can open and close the doors without the door glass binding on the door rubber. -
Turn signal indicator blinks rapidly
creekman replied to royp4's topic in 996 Series (Carrera, Carrera 4, Carrera 4S, Targa)
Then I'm sure that someone from the "braintrust" will answer you. However you might check all your lights to be sure they're all working so you begin to narrow down the problem. You might even remove the light bulbs and be sure that the contacts are all clean. You can buy electrical contact clean in an aerosol can at your favorite auto parts house. I'm guessing it's a bad bulb, bad flasher, or bad ground, there's not much else that can go wrong.