Welcome to RennTech.org Community, Guest
There are many great features available to you once you register at RennTech.org
You are free to view posts here, but you must log in to reply to existing posts, or to start your own new topic. Like most online communities, there are costs involved to maintain a site like this - so we encourage our members to subscribe or donate. All subscriptions and donations go to the costs operating and maintaining this site. We prefer that guests take part in our community and we offer a lot in return to those willing to join our corner of the Porsche world. This site is 99 percent member supported (less than 1 percent comes from advertising) - so please consider an annual subscription or donation to keep this site running.
Here are some of the features available - once you subscribe RennTech.org
- View Classified Ads
- DIY Tutorials
- Porsche TSB Listings (limited)
- VIN Decoder
- Special Offers
- Paint Codes
- Registry
- Videos System
- View Reviews
- and get rid of this welcome message
It takes just a few minutes to register, and it's quality Porsche information at a low cost.
Contributing Members also get these additional benefits:
(you become a Contributing Member by subscribing or donating money to the operation of this site)
- No ads - advertisements are removed
- Access the Contributors Only Forum
- Contributing Members Only Downloads
- Send attachments with PMs
- All image/file storage limits are substantially increased for all Contributing Members
- Option Codes Lookup
- VIN Option Lookups (limited)


Schnell Gelb
-
Posts
309 -
Joined
-
Last visited
About Schnell Gelb

Recent Profile Visitors


Schnell Gelb's Achievements
Member (1/1)
18
Reputation
-
CEL : P0410 + P1411
Schnell Gelb replied to siddharth's topic in 996 Series (Carrera, Carrera 4, Carrera 4S, Targa)
Here's a contrarian perspective assuming the car is running well otherwise: 1. Just live with it if it will pass the Smog Test when required or, 2.Replace/upgrade the suspect,inexpensive components that can be reached with the engine still in the car or. 3. Wait to do more with the SAI problem until you need to remove the engine for some other reason or, 4.Accept that if your car is an 01 or 02 it may be an ECU coding problem. The fix for that is unknown - ECU Doctors ? -
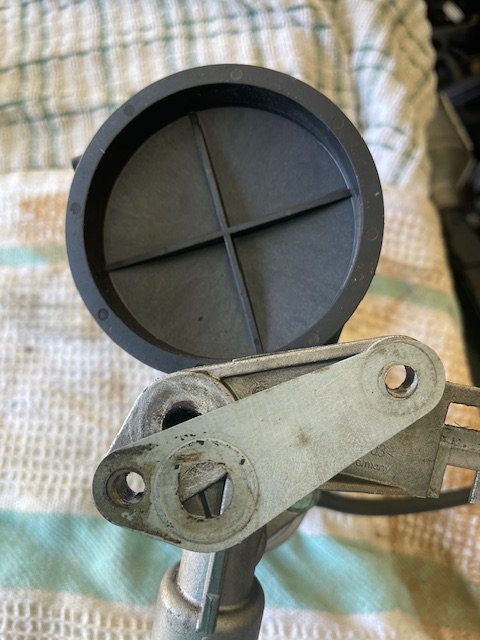
It passes Smog ! All monitors set without a complicated Drive Cycle - just a random 10 mile drive in the country. But why so easy ? Speculating: 1. it is very easy to not notice that triangle shaped gasket has been displaced and obstructs the valve port. See photo above. 2. regular silicone hose may have been collapsing and preventing vacuum reaching the electric changeover valve. Use 3.5/9.5mm, colored hose.This may explain why the "inc" code appears after letting the engine idle from a cold start. The very high vacuum collapses the hoses so the change-over valve is inoperative. If you do a fast idle -2500-2900 r.p.m. the vacuum is much lower so the changeover valve gets enough vacuum. The new, extra thick wall silicone hose eliminates this and you can verify because the vacuum hose is accessible now.. Whatever the cause: 1. now it is much easier to verify functionality of S.A.I. components because critical parts of the system are on top of the intake manifold, not inaccessible underneath it.Yes it looks funky but now you can vacuum test it all with the SAI system operating. 2. the Seafoam test was confirmation that at least some secondary air was reaching the exhaust manifolds. How else would you verify that ? btw, suggest you invest in a good 1/4" drive magnetic socket set(or at least a magnetic 10mm socket and a selection of 1/4"drive extensions.Makes r&r of the Intake manifold easier.No dropped bolts ! If you are dexterous you can even use it for the bolt at the end of the manifold,close to the alternator. That means you don't have to r&r the alternator.If you aren't dexterous and patient, just give this job to someone who is ! Next job a Uaos perhaps?
-
Demetris ,Suggest you use your new Durametric check timing "deviations". That will give some evidence of the condition of the timing gear.
-
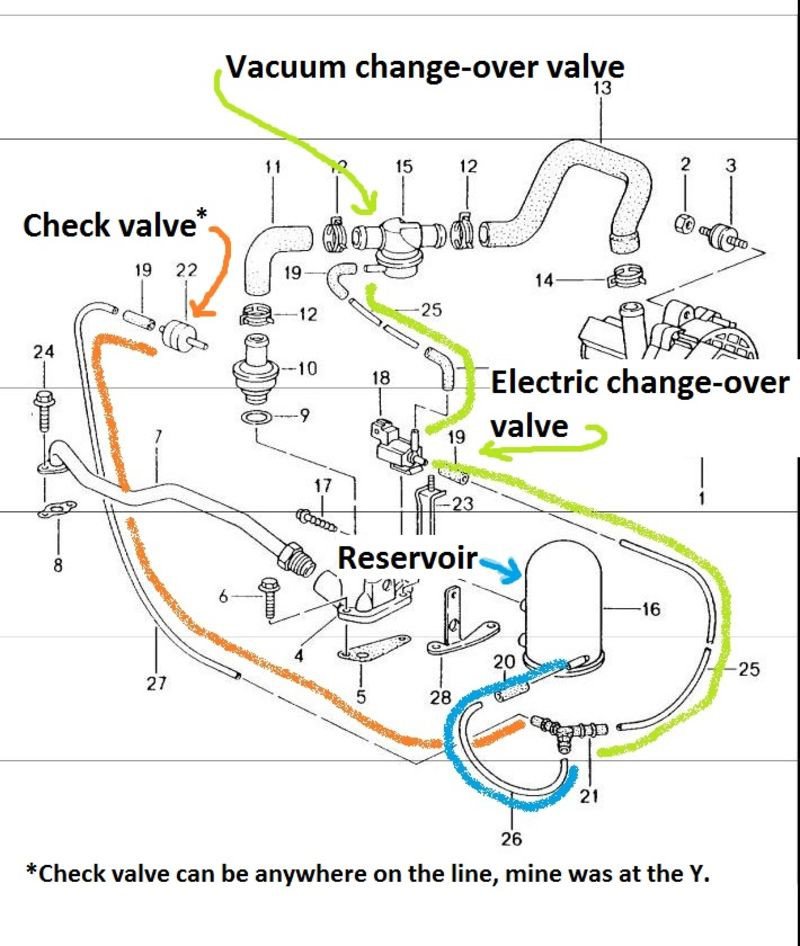
Note #15 the Kombi valve is different in the parts diagram below to the one above. Beware of part # 99611323350 "Gasket Hexagon" ! It is actually a triangular shape not hexagonal. If you fit it upside down(see photo below) or allow it to move when fitting ,it will partially cover the passenger side SAI port causing code P0410. The Drivers side would not be affected so not related to P0411. To check this I marked the edges of the gasket with red marker and used a pencil beam inspection light to check the gasket hadn't been dislodged. A thin smear of high-tack gasket sealant like Loctite 1525607 may help ? But before you do any of this, use compressed air to confirm the port for Bank 1 and the tube for Bank 2 are flowing out of the exhaust tips. You'll need an assistant for this and a high flow ,low pressure air source. Maybe a Shopvac outlet as an alternative source? Use the same rig to check after you've refitted the Kombi valve and gasket by using a vacuum pump to open the valve. Then attach the electric change over valve. I rerouted mine so the hose is long enough to sit on top of the intake manifold after I refit it. It is easy to unclip from the bracket that holds it close to the Vacuum Accumulator.Activate the valve with a 9v battery(smoke alarm size) and check you still get air flow out of the exhaust. I suspected the problem on my SAI system may be the ECU is not supplying power to the Electric Change-Over valve during a cold start. Yes, Durametric will make the relay audibly click and illunimate a Bosch EV! Noid light but is the ECU doing it in a normal cold start ? I needed to rig a test light into it's circuit to make sure the valve is powered for 60+seconds during a cold start, not just when it is 'forced' by Durametric. To manually trigger the valve with a simple switch, use a male EV1 pigtail (Ballenger Motorsports $10). If this speculation is correct , it will be easy to add a manual switch near the instrument panel in the car to activate the valve because the valve will be relocated on top of the Intake manifold, not totally inaccessible beneath it . This wouldn't solve the issue some mention of the SAI needing to run occasionally during some cruise conditions. But at least the cold start problem would be solved in a practical (albeit Rube Goldberg) way ?

-
Here is parts diagram of the SAI components with the old Change-over Valve and separate :Check valve.The so called Kombi valve combines both functions in a single part # 99711324990 $115. Suggest eliminate as many elbows and hard plastic lines as possible by using very thick wall silicone hose. Use barbed brass fittings instead of plastcicthat may become brittle.
-
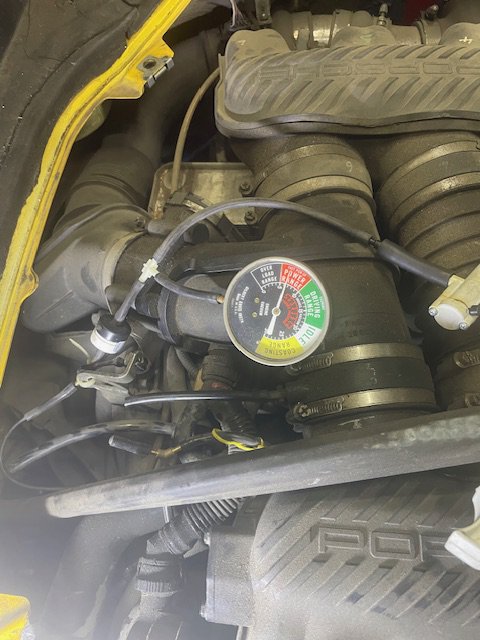
Mine is a 2002 Boxster S. The codes are P0410 and P0411. The short version : the vacuum hoses were collapsing at low speed idle and/or gasket blocking port - see far below for details. Here's some info. and ideas to help those forgotten souls who battle with their S.A.I. system every 2 years to pass Smog. I've upgraded &/or replaced every single part of the S.A.I. system. Specifically I replaced all the vacuum lines and silly elbows with high quality silicone hose and brass, barbed fittings.Beware ,silicone hose is not very ridgid so it's walls are prone to collapsing under high vacuum and you would never see/diagnose that ! Suggest you use very thick wall hose. I replaced my regular dimension silicone hose with 3.5mm i.d. with 9.5mm o.d. by HTS.If you select the blue or yellow color it is easier to trace in the dark area under the inlet manifold. I posted this suggestion many years ago and on my car it is still working well. What I didn't explain was that I deliberately re-routed and extended the vacuum lines so they are draped on TOP of the passenger side inlet manifold, not buried underneath it. I also inserted 'test tees' on top. The photo below shows how easy it is to do vacuum tests on different sections of the system.You can connect a smoke machine($80) to indicate large vacuum leaks. It is enormously beneficial to be able to test the vacuum system BEFORE you start removing the inlet manifold to chase suspected leaks. By pinching off sections you can test individual components to see if the system holds or passes a vacuum applied with a simple vac pump (cost less than $50). I also replaced all the suspect components. Before you order components or even look at a parts diagram, be aware the components changed after 1999 MY and again in 2005. In my case I have the newer shut-off valve a.k.a. Kombi valve.The best parts diagram I found is on Auto Atlanta but be very careful to find the correct year parts diagram :"Porsche Boxster 986 M96.21/22 air injection 00-02 M96.23/24 03-" You may have found other parts diagrams but without model years, part names or part numbers. Confusing. So below is my list of suspect components with full info. to help you . Please correct them in this Thread if you find an error. Diagram annotated by another SAI warrior is in next Post below. Test all new and old components before you fit them because once you do all the work of reinstalling the intake and maybe the alternator ...... The prices are from Auto Atlanta .You may find cheaper generics elsewhere. .#1 "Air Injection Pump" . This seldom fails and is easy to test.The air flow should be like a hairdryer on the high setting. 99660510401 .The Porsche replacement is $2500 ! A good, used one is $25(Specialized German on flebay) , a generic, new one is $70. .#22 the black and white drum shaped "Check Valve" that connects close to the engine air intake.Make sure you don't install it backwards ! 96411095002 $23 .#16 "Vacuum Tank" with the oval or dome shaped top. Infamous for hairline cracks at the base which are invisible and require testing with pressure under water.Be sure to test the new one before you fit it ! 99311014003 $23 .#18 "Change over Valve" . This has 2 vac ports(in+out) and an a polarized 12v connection. 99660512301. $34. If you test a new valve with a vacuum pump+gauge, you may see it hold high vacuum for a few moments then very slowly bleeds away. Strange.Significant when trying to locate leaks in the entire system ! .#15 "Shut Off Valve" aka Kombi valve . 99711324990, $115. Once you've replaced the suspect components and connected all the new vac lines and new fittings , suggest you do a complete vacuum/power test Here's a controversial test once the Intake manifold is refitted and you are ready to start for the first time. The idea is to get instant physical evidence (from a cold start ) that SAI pump air is passing through the entire exhaust system. Pour one dose of Seafoam down the SAI Pump hose and reattach it. Start the cold engine. If the system is flowing correctly , you should get an unusually dense but brief cloud of white smoke from the exhaust.Most of the Seafoam will drain vertically into Bank 1 so this is not confirmation that the system to Bank 2 is perfect. Durametric on the forward O2 sensor for Bank 1 &2 is a more reliable test.
-
Glad it worked for yo and thanks for posting the details. Wish I knew exactly which component is marginal and how to resolve it. My guess is that regardless of your fault code, your car performed the same .That's my situation too.
-
Speculating - the P1130 (lean on Bank 2 ) may be caused by a detached/deteriorated vacuum line . Sometimes diagnosing this SAI issue requires physically digging into the components . None of the parts are very expensive or complicated and the system itself is covered in many posts. The problem is awkward access. Probably due to replace all the rubber and plastic parts anyway ?
-
This 'fix' has been discussed here on Renntech previously by several others. Do not exceed 3000 rpm until the SAI pump completes after a cold start- or it will fail to work. In my experience it is a very useful band aid for getting through the Smog Test if you have undetectable SAI issues. I'd expect that eventually you'll get a MIL and "not ready' issues in future. I just disregard these and do the drive cycle just before going to the Smog test.I'm fortunate that I now live in an area where the impractical official Drive Cycle can be done safely and without interruption. It seems to trigger the MIL after 3 more cold starts ,so go straight to the Smog Test ! Clearly there is some component or design feature that is marginal. I don't know why the just under 3000 rpm while stationary at a cold start fix works. I am suspicious of the small diameter holes that channel the SAI air into the exhaust ports.If they get partially plugged with carbon this problem may be created. There are other threads on cleaning these lpesky ittle ports. If you decide to r&r the exhaust manifolds to do this cleaning ,be sure to read about problems with rusty,snapping bolts and upgrades to stainless studs. The SAI/Smog issue is such a nuisance that I also replaced/upgraded almost every component in the SAI system. You only want to do it once !
-
Secondary Air Test Readiness monitor incomplete
Schnell Gelb replied to mesutter's topic in 986 Series (Boxster, Boxster S)
Swatchman, Thanks for posting your findings. I'm interested in your method of getting the car to pass the smog test despite an as yet undiscovered(?) cause of SAI "Not Ready". This no-faults-found yet still "Not Ready" issue seems peculiar to models around MY2002. Maybe a programming quirk that was subsequently fixed? In a desperate sequence of attempts to fix any component faults I replaced most of the system and upgraded to silicone vacuum hose and brass fittings.I also replaced the various valves and the vacuum reservoir(cracked). All good work but useless in fixing the "Not Ready" problem. The drive cycle is impractical in the urban environment so your method of activating all the components of the SAI system via DURAMETRIC, while the engine is HOT is a very interesting technique. I wonder if this is what the Dealer's PIWIS does ? And can any other scanner do this ?My Foxwell NT510 won't. The SAI system does operate occasionally during cruise so maybe we were wrong to focus on cold start as the time a fault is triggered ? Regardless of the explanation, your technique may be sufficient to get a car to pass the smog test - and that is a huge benefit every 2 years. Thanks for taking the time to share with us here on RennTECH. -
Special Tool for Fuel Pump removal
Schnell Gelb replied to moosport's topic in 986 Series (Boxster, Boxster S)
The "special tool" to remove and replace the lock ring above the fuel sender on top of the fuel tank - yes a blunt chisel and hammer may work but ... Make sure you cut the gob of clear silicone that stops the ring rotating. Consider buying a universal tool to remove the lock ring.I bought one for less than $20 on line. If you didn't buy a replacement seal for the sender make sure the old one is in perfect condition wash it and when dry spray with some silicone lube in case it rotates when you tighten the ring.Using some rubber-compatible lube on the underside of the ring may be a good idea. The ring needs to be tightened firmly but not so much that the seal puckers so the idea is that the lube may help achieve that If you have any trouble rotating the fuel pump to dislodge it from the cam locks, a generic strap wrench (like for an oil filter) works well. You only need to rotate it a few degrees to free it. While you are in there - check both drain holes near the fire wall for debris and consider putting some filter mesh in them to prevent debris from plugging them. If you have trouble seating the sender it is probable that the rubber seal lip is hung up on the metal lip of the tank. The sealing ring will not thread correctly if this happens. With a headlight you may be able to see the protruding lip .More likely you can feel it with your finger tip Beware of the very cheap pumps on Amazon. You'll notice that none of the reputable Porsche enthusiast vendors carry those unknown asian brands. Hope this helps -
There is an upgrade cap "04" .See my earlier post. That would be an inexpensive start.
-
"Not Ready" , "Incomplete" No CEL. The mystery unravels. Cleared an SAI code caused by not allowing the SAI to complete correctly. Several monitors read "INC" on my scanner. All is good with O2 sensors etc according to Durametric. Persistent "INC" problem for EVAP and Cat. 'Just drive it a while' said the friendly Smog Tech - the one who looked in the rear trunk to do the engine inspection ! Last time it took 1500 miles and 2 years to get all the monitors ready. I think I have discovered why. Since this problem was first discussed years ago on Renntech many videos and posts have appeared on the www. Many seem to be click bait. The best ones mention trivial(?) conditions that have to be met in the 7 parts of the Drive Cycle. For example - Start the car on level ground,idle for 2-1/2 minutes,do not exceed 30/60 mph, coast to stop without using the brake (!!) ,no a/c, no cruise control, do not go below 20/40 mph,do not stop,no hills and more. Finding a road where you can safely do the Drive Cycle is difficult and there is no mention of the need(?) to perform the Drive Cycle in one continuous event - no interruptions/no deviations.Certainly ,normal driving would not replicate the Drive Cycle. So early on a Sunday morning when the road was deserted I followed the Drive Cycle with every extraneous /additional (trivial?)condition satisfied. It worked. It took about 45 minutes because you have to(??) do it twice, sequentially (?). It helps to use a timer and odometer. The scan tool may need to be turned on/off to reset and detect the readiness monitors have set "Complete / O.K." Ideally you need a scan tool that is live so you don't do the dangerous Drive Cycle any longer than necessary. My Foxwell 520Pro was unimpressive.I had even tried driving with Durametric running on my laptop. Not safe ! The best listing (there are many)of the Drive Cycle sequence I found was: Porsche 911 Emission Monitors Not Ready WWW.SMOGTIPS.COM (RESOLVED - Click To View) My Porsche 911 just failed the smog test because the emission monitors were incomplete... specifically the oxygen sensor monitor. I've driven it for at least 100 miles but I still can't get the monitors complete. Do you happen to know the exact drive...
-
Error P1502 2000 Boxster S
Schnell Gelb replied to rtremaine's topic in 986 Series (Boxster, Boxster S)
Since the TB was so dirty, suggest inspecting and probably cleaning the MAF . -
Error P1502 2000 Boxster S
Schnell Gelb replied to rtremaine's topic in 986 Series (Boxster, Boxster S)
Also consider trying the simplest/cheapest things -check battery condition and terminal connections. Replace the notorious ignition switch?