Welcome to RennTech.org Community, Guest
There are many great features available to you once you register at RennTech.org
You are free to view posts here, but you must log in to reply to existing posts, or to start your own new topic. Like most online communities, there are costs involved to maintain a site like this - so we encourage our members to subscribe or donate. All subscriptions and donations go to the costs operating and maintaining this site. We prefer that guests take part in our community and we offer a lot in return to those willing to join our corner of the Porsche world. This site is 99 percent member supported (less than 1 percent comes from advertising) - so please consider an annual subscription or donation to keep this site running.
Here are some of the features available - once you subscribe RennTech.org
- View Classified Ads
- DIY Tutorials
- Porsche TSB Listings (limited)
- VIN Decoder
- Special Offers
- Paint Codes
- Registry
- Videos System
- View Reviews
- and get rid of this welcome message
It takes just a few minutes to register, and it's quality Porsche information at a low cost.
Contributing Members also get these additional benefits:
(you become a Contributing Member by subscribing or donating money to the operation of this site)
- No ads - advertisements are removed
- Access the Contributors Only Forum
- Contributing Members Only Downloads
- Send attachments with PMs
- All image/file storage limits are substantially increased for all Contributing Members
- Option Codes Lookup
- VIN Option Lookups (limited)


986Jim
-
Posts
247 -
Joined
-
Last visited
-
Days Won
1
Content Type
Profiles
Events
Forums
Exterior Paint Colors
Downloads
Tutorials
Links Directory
Collections
Classifieds
Store
Everything posted by 986Jim
-
+1 for the Evo. Have it on my 99 2.5L and I love it.
-
Check Engine Light Code P0102 Mass Air Flow Sensor
986Jim replied to mmoore's topic in 986 Series (Boxster, Boxster S)
The K&N will screw up your MAF! It's true. Also, remember don't get too close to the edge of the world as you may fall off... -
Cant wait to see/hear it.
-
Latest project - leather door pull covers
986Jim replied to John V's topic in 986 Series (Boxster, Boxster S)
How is your hand no where near it? Your refering to the big black piece right above the silver handle that basically integrates the silver handle into it? When you reach for it with yoru phone in your ear and you have 3" finger nails guess whats gonna get it? I trust you clip your nails tho eh John? Then you should be safe ;) -
Latest project - leather door pull covers
986Jim replied to John V's topic in 986 Series (Boxster, Boxster S)
The reason they do that is because people inharintly never look where they are grabbing for the door handle, and always have other things in their hands at the same time (keys, etc) and if that were covered in leather originally it would get horibly scratched from people who are not paying attention (which is a lot of people) and look horible. If your careful it will never be scratched but can you image it like that in cars for the masses? THey would look horible. Think about this. Ever notice the key holes on cars without keyless entry? They are always scratched a lot and in a huge area around the key hole. I see them all the time with 30-40 scratches sometimes 3-4" away from the key hole on all sides. Seriously who are these people trying to unlock doors and missing by 3"s? I mean, really? -
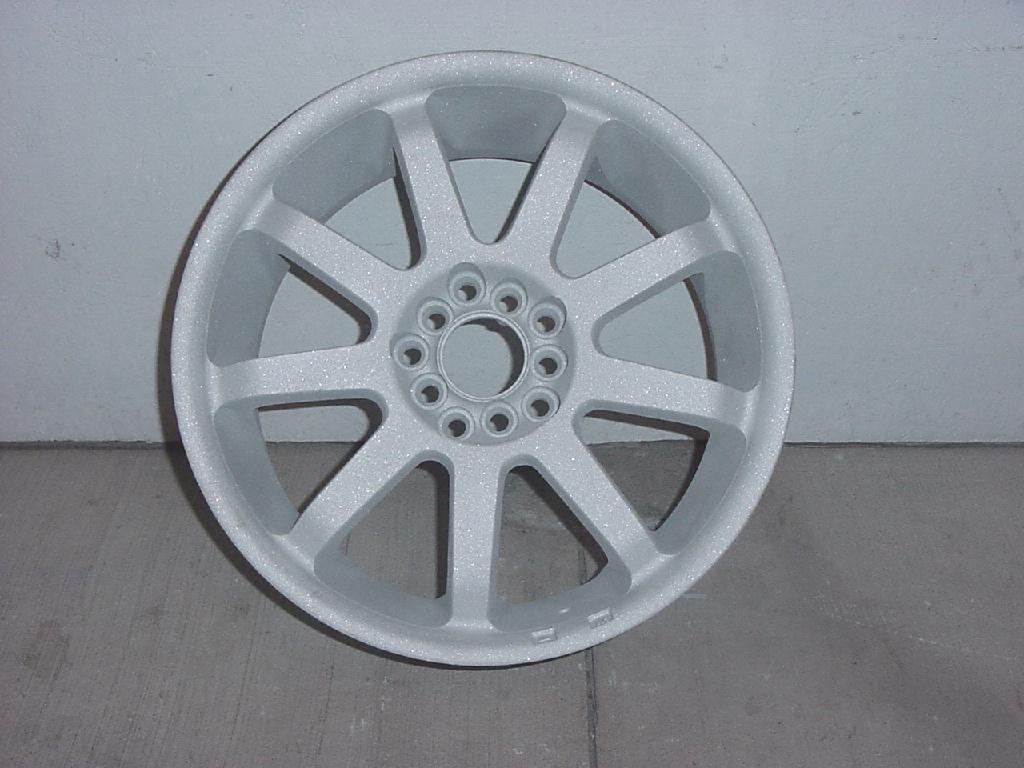
Time to paint my Sport Design rims BLACK
986Jim replied to panameras's topic in 986 Series (Boxster, Boxster S)
The multi step process looks awesome but takes a lot more time, so costs more money. I'd love to see those in person. Thats like the candy colors but in gun metal, I'll bet that looks crazy.. Not cheap for sure, but you pay for what you get. The only think about dark colored wheels is you MUST always have tire shine on your tires or they look brown. So just more reasons to clean the car more often. -
Time to paint my Sport Design rims BLACK
986Jim replied to panameras's topic in 986 Series (Boxster, Boxster S)
thanks Loren, i am aware of that the wheels need to be disassembled prior painting.. but how important is " torque sequence" on bolts? or does porsche wheels need particular care in that area? is that something an experienced wheel painter should know? I covered much of this in my previous post. I have taken wheels appart a lot of times, just follow my sequence and you will be fine. -
Painting Calipers on a 2003--What color was original?
986Jim replied to wpruitt's topic in 986 Series (Boxster, Boxster S)
Porsche uses Black Red and Yellow on their cars as OEM colors depending on your brake setup. -
Time to paint my Sport Design rims BLACK
986Jim replied to panameras's topic in 986 Series (Boxster, Boxster S)
No, you can't do that yourself, it was my buddies business, I just went there and he showed me how to do it and I snapped some pics on the way. It was about $50 a wheel here Canadian. So I'm sure you could find somebody local to do all 4 for around 150 or so ish US$... -
Perfect Indoor Boxster Car cover for $35
986Jim replied to 986Jim's topic in 986 Series (Boxster, Boxster S)
Thats eactly what that cover I put on my car is. Just indoor to keep the dust off for the winter and protect it as I wheel out the garbage and other things so it doesn't get scratched. Perfect for that. This one was espically perfect fitting for a boxster prob about 20 bux or so in your walmart. -
Wonder if I could make a piece to replace that? I have access to automotive style plastic and I think I may be able to pull something off on my mill that would resemble that with out too much difficulty. Hmmm... that gives me an idea...
-
Deer also will scare the rodents away...
-
Time to paint my Sport Design rims BLACK
986Jim replied to panameras's topic in 986 Series (Boxster, Boxster S)
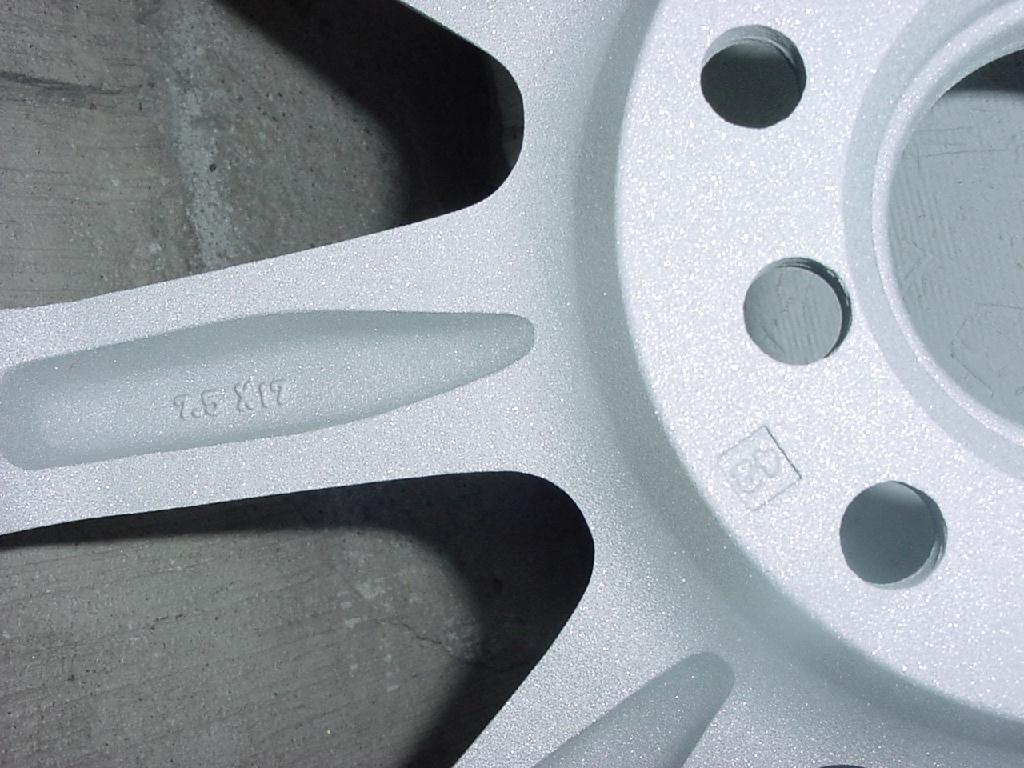
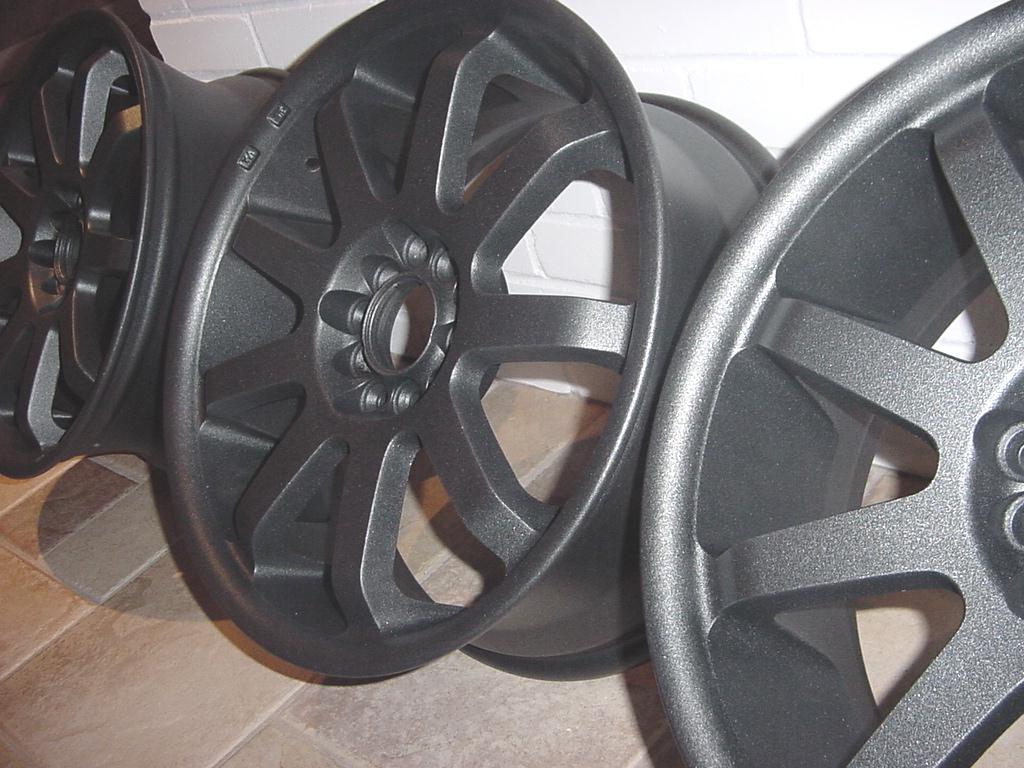
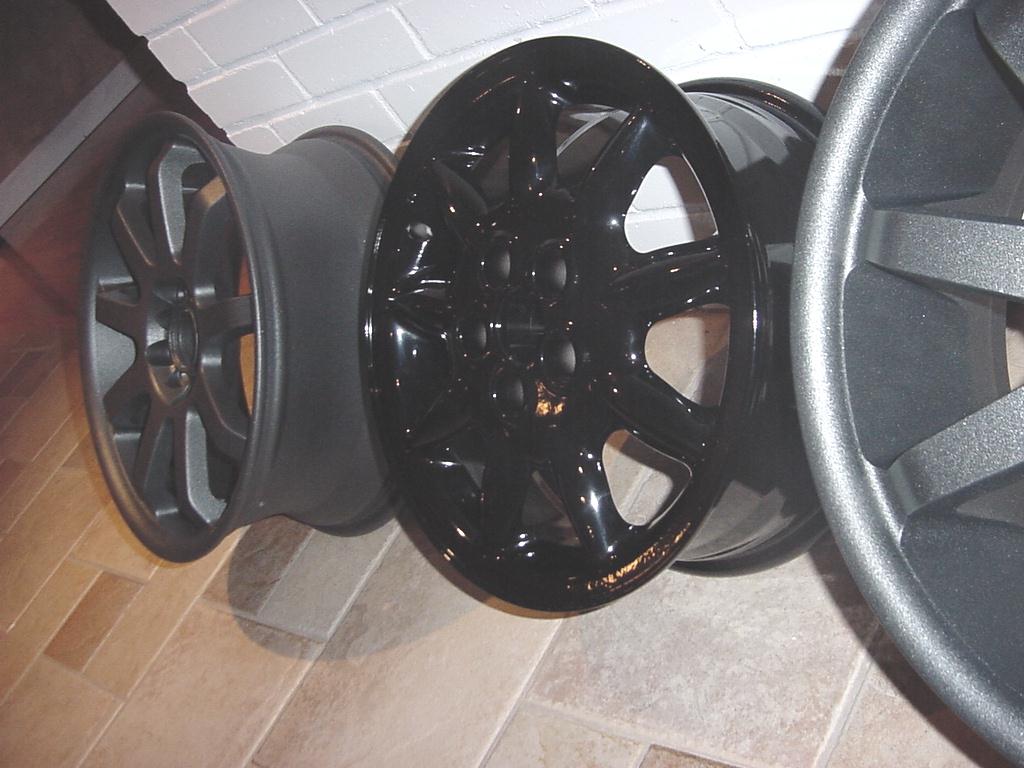
Powder coating will not weaken them, thats bunk. It heated up between 149 and 204°C and cure times range from 30 seconds to 5 minutes depending on how thick the application is. In the case of the rim, it was about 3 mins. This is not much different than sitting in the sun or all the heat that the brakes generate which is then translated into the rim through conduction. We could pick them up with our bare hands about 1 minute after they came out as in only 3 minutes just the surface of the rim was warm so the heat didn't stay very long. When you powder coat wheels you blast them first, inspect them for cracks at that time, then coat after they are ok. Coating is around .10 to .19 mm thick, so it's not going to hide any cracks, nor will it add any significant weight. 2 piece wheels should be disassembled. Mark the center section in relation to the outter so it goes back exactly the same way plus mark all the screws so they all go back in the same hole. They are generally torqued about 30 or so ft/lbs depending on the rim. If you do this right, then you won't need to re-balance the wheels afterwards. If you do it right, you can pull it appart, mark it all so it goes back together exactly the same way, powder coat it and it will last forever. Powder coating is 10,000 times more durable than paint could ever be. We use a PPG on our import traction bars which hang under race and street cars and take a whole heep of abuse, they are pounded by everything you can think of and NEVER chip. They only lose the coating when the bars acctually touch the ground on really lowered cars. We can smash the bars off a curb the metal dents and the coating doesn't chip or break. Paint will never do that ever. Powder coating is absolutly the answer, if you can't afford it then the home paint job will do the trick. VHT and Duplicolor make some trick paints for exactly that application. I had a pair of wheels painted like shown above and they eventually chiped and looked pretty crappy. Thats why I had them powder coated afterwards and they lasted forever. Because of the paint chipping off they had to sand blast them to smooth them out from the paint chips all over the place. The wheels weighed exactly the same afterwards, so it didn't add any weight vs. paint. Here are my rims I did. They were blasted right to the bare metal then coated gun metal metalic. They were on my car for 2 years almost 25,000km and never had a chip or mark on them. I didn't have to remove the coating from the lug holes or anything, there is more than enough clearance for that. The lug nuts never even marked the powder coating never mind stripped it off. Also a pic of my buddies rim we did in Gloss Black powder coating. And a quick pic of the car they went on.... Didn't exactly go on a wimpy car either.. Thats a 150hp direct port setup incase you don't know what your looking at. The car ran almost 12's flat on that setup on pump gas (with slicks). Those rims saw a lot of street use and abuse it would spin the tires on the highway so I'm sure the rear wheels took some rocks flying off the front.
-
Time to paint my Sport Design rims BLACK
986Jim replied to panameras's topic in 986 Series (Boxster, Boxster S)
I'm not so sure I would paint them so much as have them re-finished in black with a powder coating or something like that. Standard paint won't stick to the OE surface very well. You will need to glass bead or sand blast the rims first to their base, then powder coat or paint, then clear if you used paint. If painting you will want an OE wheel specific paint. Powder coating will stand up much better. I had some of my VW rims blasted then coated in gun metal and they turned out great and lasted for years without so much as even a scratch or chip on them... -
So I grabed this Walmart car cover for a Compact Car on a whim just to see how it fit as I needed a cover.. It was $35 CAD so likely be cheaper for those of you in the USA. The material is soft and it fits perfectly almost as though it's made for the car. It doesn't have the pockets for the mirrors, so I folded mine in, but overall it's almost the perfect length for the car. I would say it's maybe 4" too short, but overall it covers 100% of the car and doesn't touch the ground at all. For $35 it's seriously close enough. Here are some pics... Snug as a bug in a rug...
-
I have to agree!
-
yeah no big deal. Thats nothin some miracle JB Weld won't fix up. I would probablly put a hose clamp around that tho for a while just to make sure vibration etc doesn't cause the casting to crack anymore. I say that, even though I highly doubt that would even happen.
-
If it was break fluid then your breakes would suck, so I'll give power steering fluid a go.. Have a look at the rack, and lines and pump. Brake fluid is possible, but check the resivoir and lines for it. It won't really be after the master cylinders main line if you still have really good brakes typically.
-
Boxster is their highest producing model, they just built the 200,000 one this month. They also don't loose their value that quickly. If you buy a really good condition, one owner with options car it wont be cheap. Crappy versions of the car that have gone through a few owners and have a sketchey background are the cheap models. Whatever the cheapest one out there is, expect to pay 25% more for the one you really want. If you can get a 2000 S for 20k then buy the one for 25k kinda thing...
-
Here you go, you can thank me later http://www.precisionporsche.com/boxkit.html
-
She is sick and tired if you cheating on her with that mini-van. Shame on you.
-
They last because most guys will clearcoat after they put the decal on so the clear basically locks it there. If you were just to stick it onto the finished product I would doubt it would last.
-
One this thats nice is the stereo is right where you rest your hand on the shifter in a nice position. That will be great while driving. Looks good.
-
AeroKit II Rear Spoiler Installation
986Jim replied to clubhead's topic in 986 Series (Boxster, Boxster S)
Back in the day when body kits and spoilers were all the rage, I installed a lot of spoilers on some really ugly cars. In about 50% of the cases there were braces for the trunk lid running right where the spoiler would be attached to. Many of these spoilers were universal so they never hit a spot on the trunk with no bracing. It's no big deal however. Put masking tape on the paint before you place the wing on it so you don't scratch it up. Center the wing on the lid and mark it where you want it. Measure and double check to get it straight and centered. Don't trust your eye, trust your measuring tape, but look at it too to make sure it's "seems right" Draw around the mounting point of the spoiler onto the tape so the part that will eventually sit on the lid of the trunk is clearly outlined on your masking tape. Lift off the spoiler. You should be left with a whole buch of masking tape and a couple of ovalish pencil marks the shape of the base of the spoiler. Measure the mounting holes to the base of the spoiler then repeate those measurements onto the masking tape of the car. Basically you want to know exactly where in relation to the base the mounting holes are and translate that onto the outline on the masking tape on the trunk. This is the most critical part, it must be right. If you do screw it up you can ovalize the holes you will shortly be drilling in your trunk lid to create some "play" so all the bolts will line up through the lid. Drill a small say 1/4" hole in the lid in your four or six mounting points of the spoiler. Probablly 2 per side, so 4 holes. Just make em small to start. Make sure you drill with the masking tape on the lid still. THen put something thin (like speaker wire) up through the holes with the spoiler sitting on the lid again and make sure you hit your mark, just feel for the holes in the bottom of the spoiler kinda thing. Then take a hole saw and cut the under side of the lid with a hole saw say about 1/2" to 3/4" of an inch. This will allow the head of the screw and you screw driver to go though it onto the flat part of the steel as if there was no bracing there. Finally enlargen your mounting holes to the correct size based on your mounting hardware and sit the spoiler back on and tighten it down to test it first. If everything lines up remove the spoiler peel off the masking tape. If one screw it hard to go in, round out the other holes to give some extra play, that should allow everything to line up. The tape should keep the paint from getting scratched through the process and the bit from wandering or paint chipping etc. You should be left with 4 perfect holes in the top of the lid, and 4 holes on the underside, with the braces cut out much larger to accomodate the head of the screw. Put some pain in the screw holes so it doesn't rust and let it dry over night. Then install your new spoiler and away you go. Hope that helps. Honestly it's not that hard and once you have a look at it you'll have no prob. -
Glad you got it sorted out. I read your post but couldn't think of anything. Simply replacing a bulb then the light is totally off is pretty bizzare. Goes to show you, be careful when putting the new bulbs in as you don't wanna get anything inside the light hole or under the bulb. A small change of angle on the bulb is a large change once it's shining down the road.