Welcome to RennTech.org Community, Guest
There are many great features available to you once you register at RennTech.org
You are free to view posts here, but you must log in to reply to existing posts, or to start your own new topic. Like most online communities, there are costs involved to maintain a site like this - so we encourage our members to donate. All donations go to the costs operating and maintaining this site. We prefer that guests take part in our community and we offer a lot in return to those willing to join our corner of the Porsche world. This site is 99 percent member supported (less than 1 percent comes from advertising) - so please consider an annual donation to keep this site running.
Here are some of the features available - once you register at RennTech.org
- View Classified Ads
- DIY Tutorials
- Porsche TSB Listings (limited)
- VIN Decoder
- Special Offers
-
OBD II P-Codes - Paint Codes
- Registry
- Videos System
- View Reviews
- and get rid of this welcome message
It takes just a few minutes to register, and it's FREE
Contributing Members also get these additional benefits:
(you become a Contributing Member by donating money to the operation of this site)
- No ads - advertisements are removed
- Access the Contributors Only Forum
- Contributing Members Only Downloads
- Send attachments with PMs
- All image/file storage limits are substantially increased for all Contributing Members
- Option Codes Lookup
- VIN Option Lookups (limited)
All Activity
- Today
-
 Art Chiz96 changed their profile photo
 -

996 Complete Coolant Flush DIY
JFP in PA replied to krazyk's topic in DIY Articles - Carrera (996) - Maintenance
Welcome to RennTech To my knowledge, there is no "kit", you have to order all the components separately. A good parts desk, like board sponsor Sunset Porsche in Oregon, could quickly put together everything you are looking for. That said, I also would not be using silicone for coolant lines. -
 William Clark joined the community
 -
 Kossuth joined the community
 -
 MM997911 joined the community
 -
 Jack Read joined the community
 -
 Giorgio Damuzzo joined the community
 -
 BlueGrapho joined the community
 -
 SWH57 joined the community
 -

996 Complete Coolant Flush DIY
sarnodude replied to krazyk's topic in DIY Articles - Carrera (996) - Maintenance
So... I'm starting to worry about the 25 year old rubber cooling system components. Does anyone sell a kit , or do I have to buy all of them individually. The only silicone kits I see are for tiptronic cars, not for manual... - Yesterday
-
 Jeff Schadt joined the community
 -
.thumb.png.8c738709793edf66eb8ecbaaa6e4a92e.png) Thanks for the quick response, I appreciate it! But yes, both the 99636212400 and my original 98636212401 front wheels are 17x7 ET50, so offset should match exactly on the front. I’m glad to hear that won’t be an issue. And good point about the rears, I double-checked mine (98636212606), and they’re 17x8.5 with ET50 as well, so no 55 mm offset back there either. I’m not running chains, so no worries on that front, but definitely good to know about the fender clearance risk with the optional offset. Thanks again!
Thanks for the quick response, I appreciate it! But yes, both the 99636212400 and my original 98636212401 front wheels are 17x7 ET50, so offset should match exactly on the front. I’m glad to hear that won’t be an issue. And good point about the rears, I double-checked mine (98636212606), and they’re 17x8.5 with ET50 as well, so no 55 mm offset back there either. I’m not running chains, so no worries on that front, but definitely good to know about the fender clearance risk with the optional offset. Thanks again! -
 kerry titheradge joined the community
 -
 Alex Marchois changed their profile photo
 -
 Yes, it was a stupid mistake on my part. One of the long manifold bolts was still holding on by a few threads. Those bolts feel like they are out but they may not be., since they are capture bolts, just ensure they are really disconnected.
 -
-0001-0001.thumb.png.17f5bb25bf8ec261a17c21e6321c8492.png)
Steering faulty
Loren replied to Ava's topic in 9PA, 9PA1 (Cayenne, Cayenne S, Cayenne Turbo, Cayenne Turbo S)
Fault code 0288 Electronic steering column lock (ELV) Possible cause of fault - Short circuit to B+ or open circuit in wiring - Short circuit to ground or open circuit in wiring - Implausible signal - No signal/communication - Plug on steering column lock not connected correctly - Steering column lock faulty - Control module faulty Fault code 0185 Terminal 15 relay (activation) Possible cause of fault - Short circuit to ground or open circuit in wiring - Short circuit to B+ - Fuse F39 (5A) in fuse carrier at left of dashboard faulty - Relay for terminal 15 faulty - Control unit faulty -
Perhaps - what is more important is the wheel offset. The fronts should be fine as both Boxster and 996 use 50 mm offset on 17 inch front wheels. The rear wheels for Boxster are 50 mm standard with an option of 55 mm. With the 55 mm offset wheel you are not allowed to install chains as they will damage the fender. So just be careful of offset for your uses.
-
 Max Viger changed their profile photo
 -
First I want to say thank you for your quick response. The info you supplied was dead on point. Thank you. After using the code to unlock the radio. It worked for about a day. Radio has now gone Black screen and wont turn on. Any Ideas. RAdio fuse is good.
-

Steering faulty
r4nd0m replied to Ava's topic in 9PA, 9PA1 (Cayenne, Cayenne S, Cayenne Turbo, Cayenne Turbo S)
still no solution unfortunately, rebuild the ELV, replaced the solenoids, tested the motor which is fine but not sure if it throws any codes as I don't have an ODB2 to hand right now -
Hey everyone, I’ve got a 2002 Porsche Boxster 986 2.7L Tiptronic and I’m considering swapping out the two front wheels. Currently, I’m running; - OEM 17x7 front wheels - Part #: 98636212401 - OEM 17x8.5 rears: 98636212606 However, I recently picked up a clean pair of 99636212400 wheels, also 17x7 and 5x130, but from a 911, different design and style for the front. My question is: Will running these 996 fronts with the original 986 rears affect the car’s resale value, or be considered a negative? The specs are essentially the same for the front (size, offset, bolt pattern), but I’d like everyone's take on whether the aesthetic mismatch or originality concerns would hurt its value. I plan to keep the original 986 front wheels, so I can always include them if I sell later on if needed. Appreciate any feedback and especially from anyone who’s done something similar! Images:
-
 Jeff Evans changed their profile photo
 -
 https://assets-v2.porsche.com/us/-/media/Project/PCOM/SharedSite/PorscheClassic/Original-Parts-Catalogue/PDF-EN-US/KAT520_USA_986_04_KATALOG around page 440. And mikefocke2 - thetop-itsmaintaince&replacement SITES.GOOGLE.COM The Top- its maintenance & replacement This section provided by Maurice Tops and Hardtops? What is available. Replacing the Top A Do It Yourself Guide When the Top Edge Doesn't Fall into the Guide Channels Top Rattles One Touch Top Control The Hack to allow you to...
 - Last week
-
 Hello all, Wondering if anyone can help - I bought a cheap 1998 Boxster which had most of the roof components removed. I've pretty much got everything back in, and the roof sort of works. However, the B pillar microswitch doesn't ever appear to be pressed by anything. Looking inside, it looks like I'm missing an arm/lever which presses the switch when the top is up. I can't seem to find this part anywhere or see how it's fixed on, partly because I'm not 100% sure of what it looks like. Can anyone help with what parts I need? Thanks!
 -
 Update here https://rennlist.com/forums/cayenne-955-957-2003-2010/1480718-while-i-have-the-intake-manifold-off-need-help-w-findings.html Need suggestions on removing big tube!! Other than that I guess I'll replace all the o-rings and gaskets and flush the crap outta it!
 -
Try 5204
-
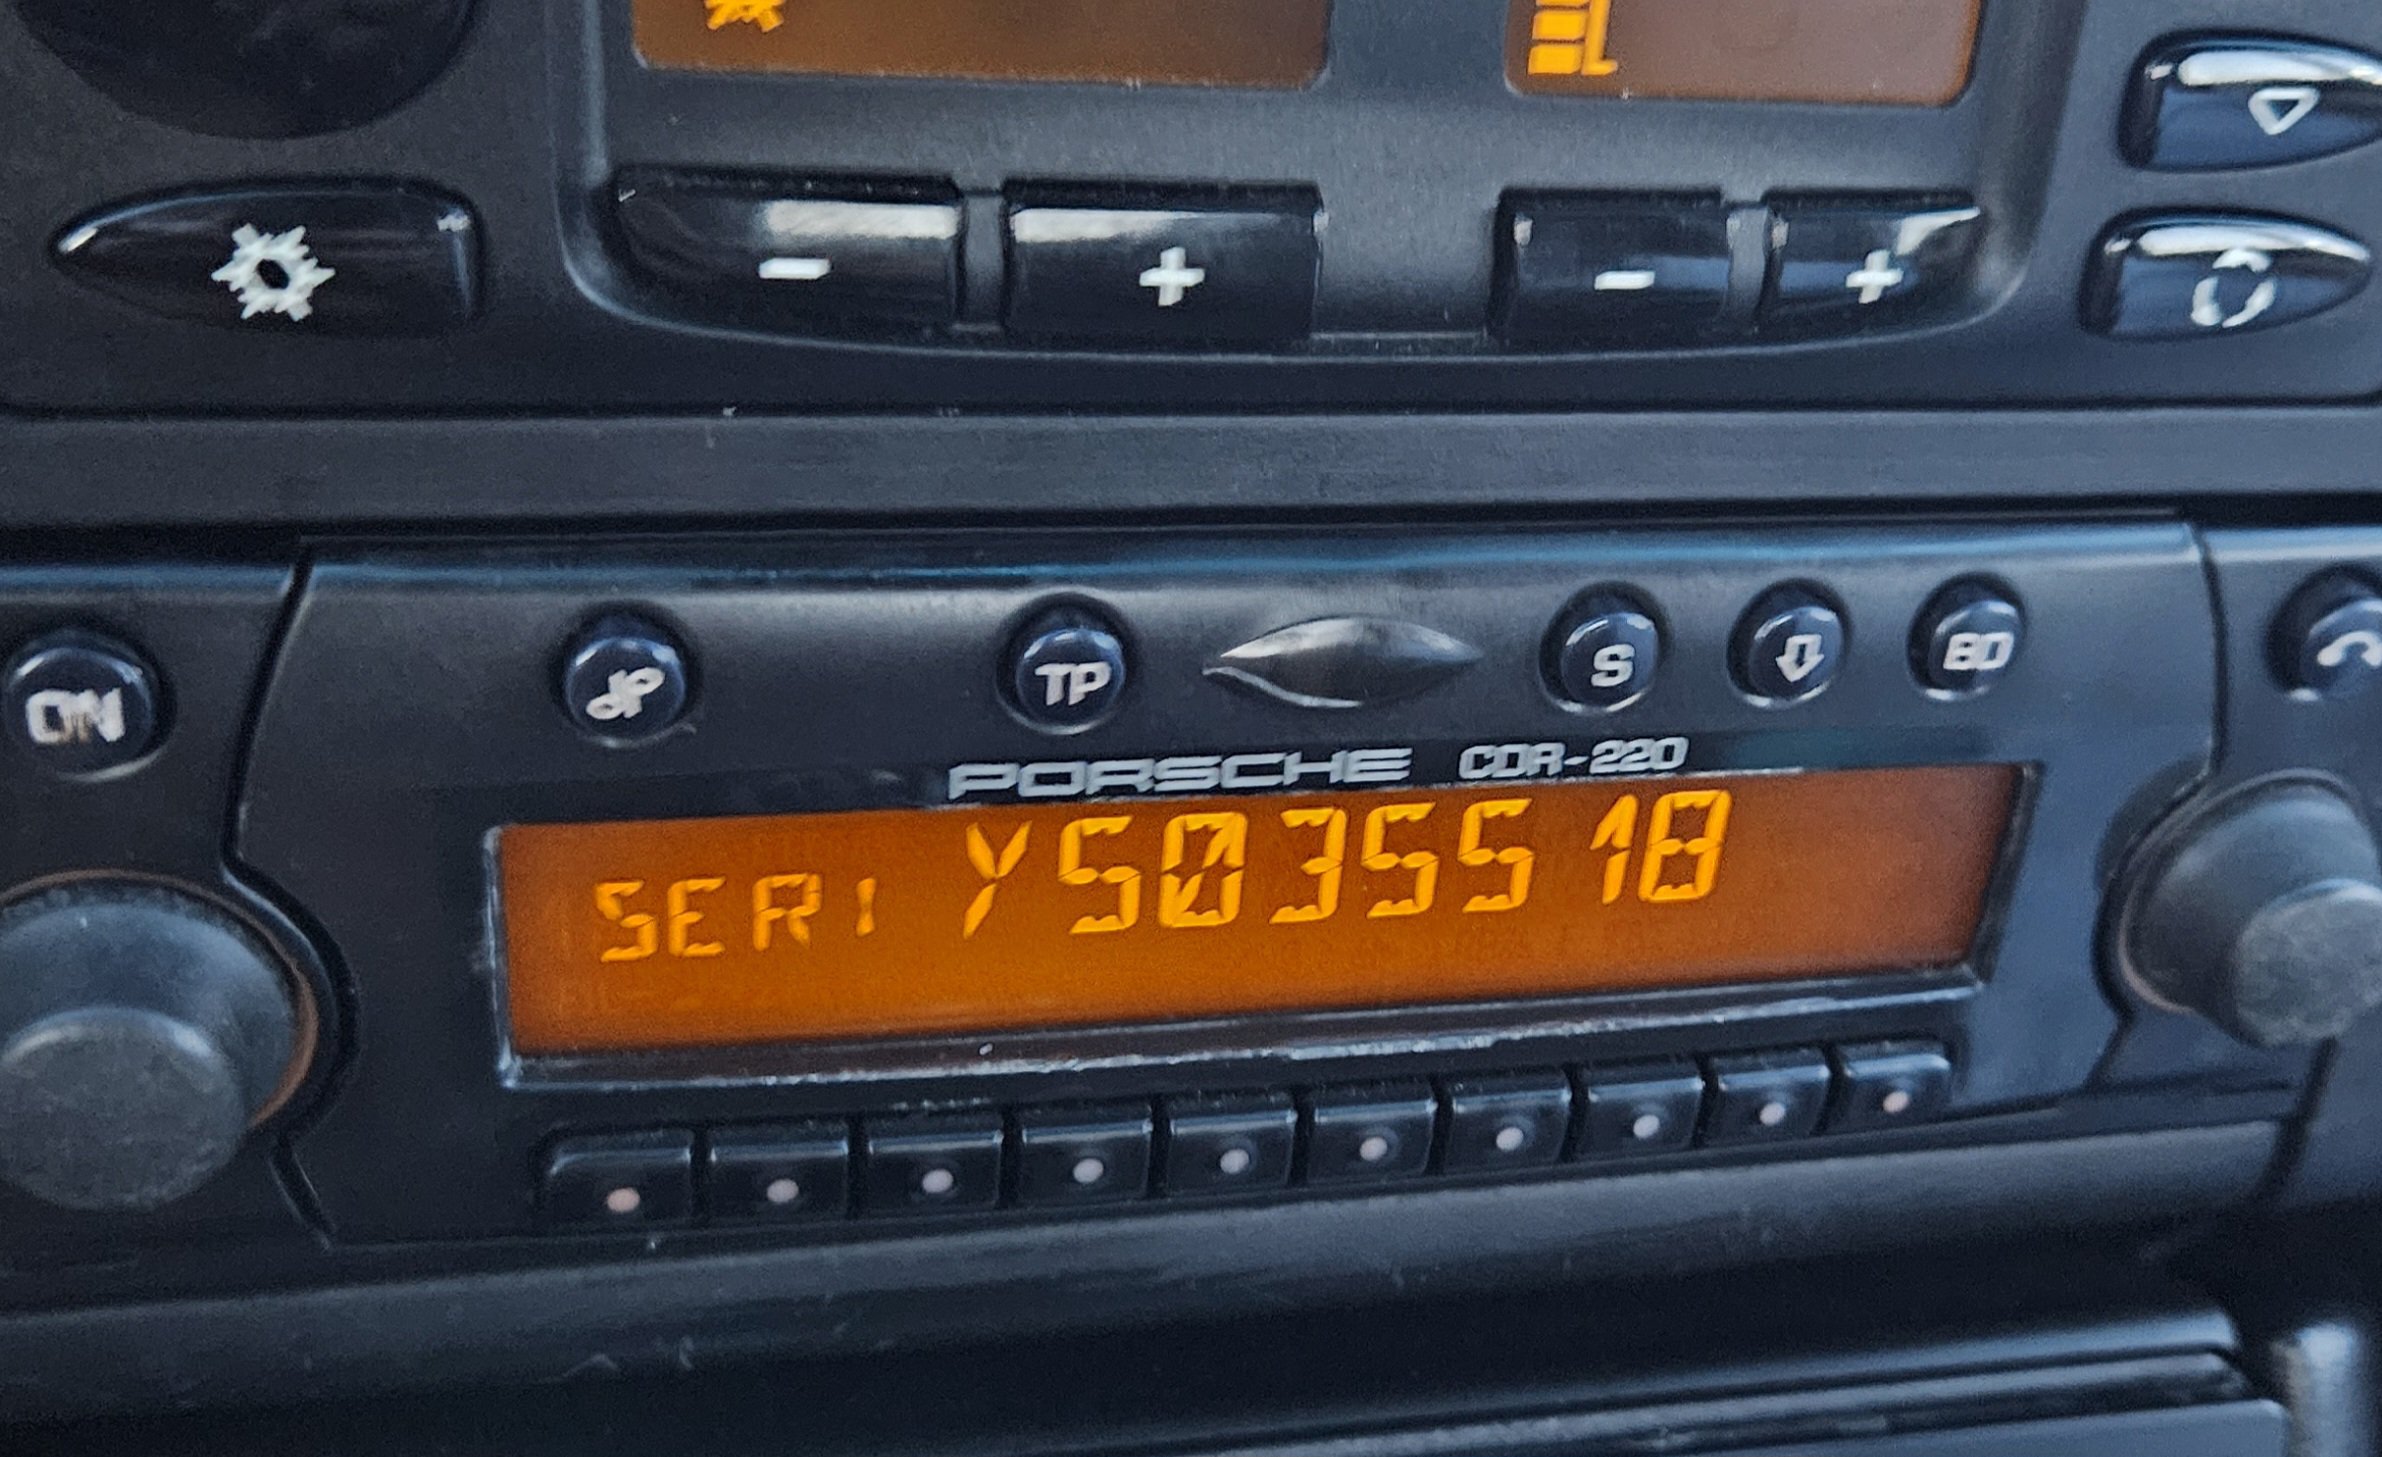
Hi there, I need a code for CDR 220, Becker 1, type 4462, serial y5035518, 24/99, gal 1 00. Thanks in advance

-
 Andres Victoriano changed their profile photo
 -
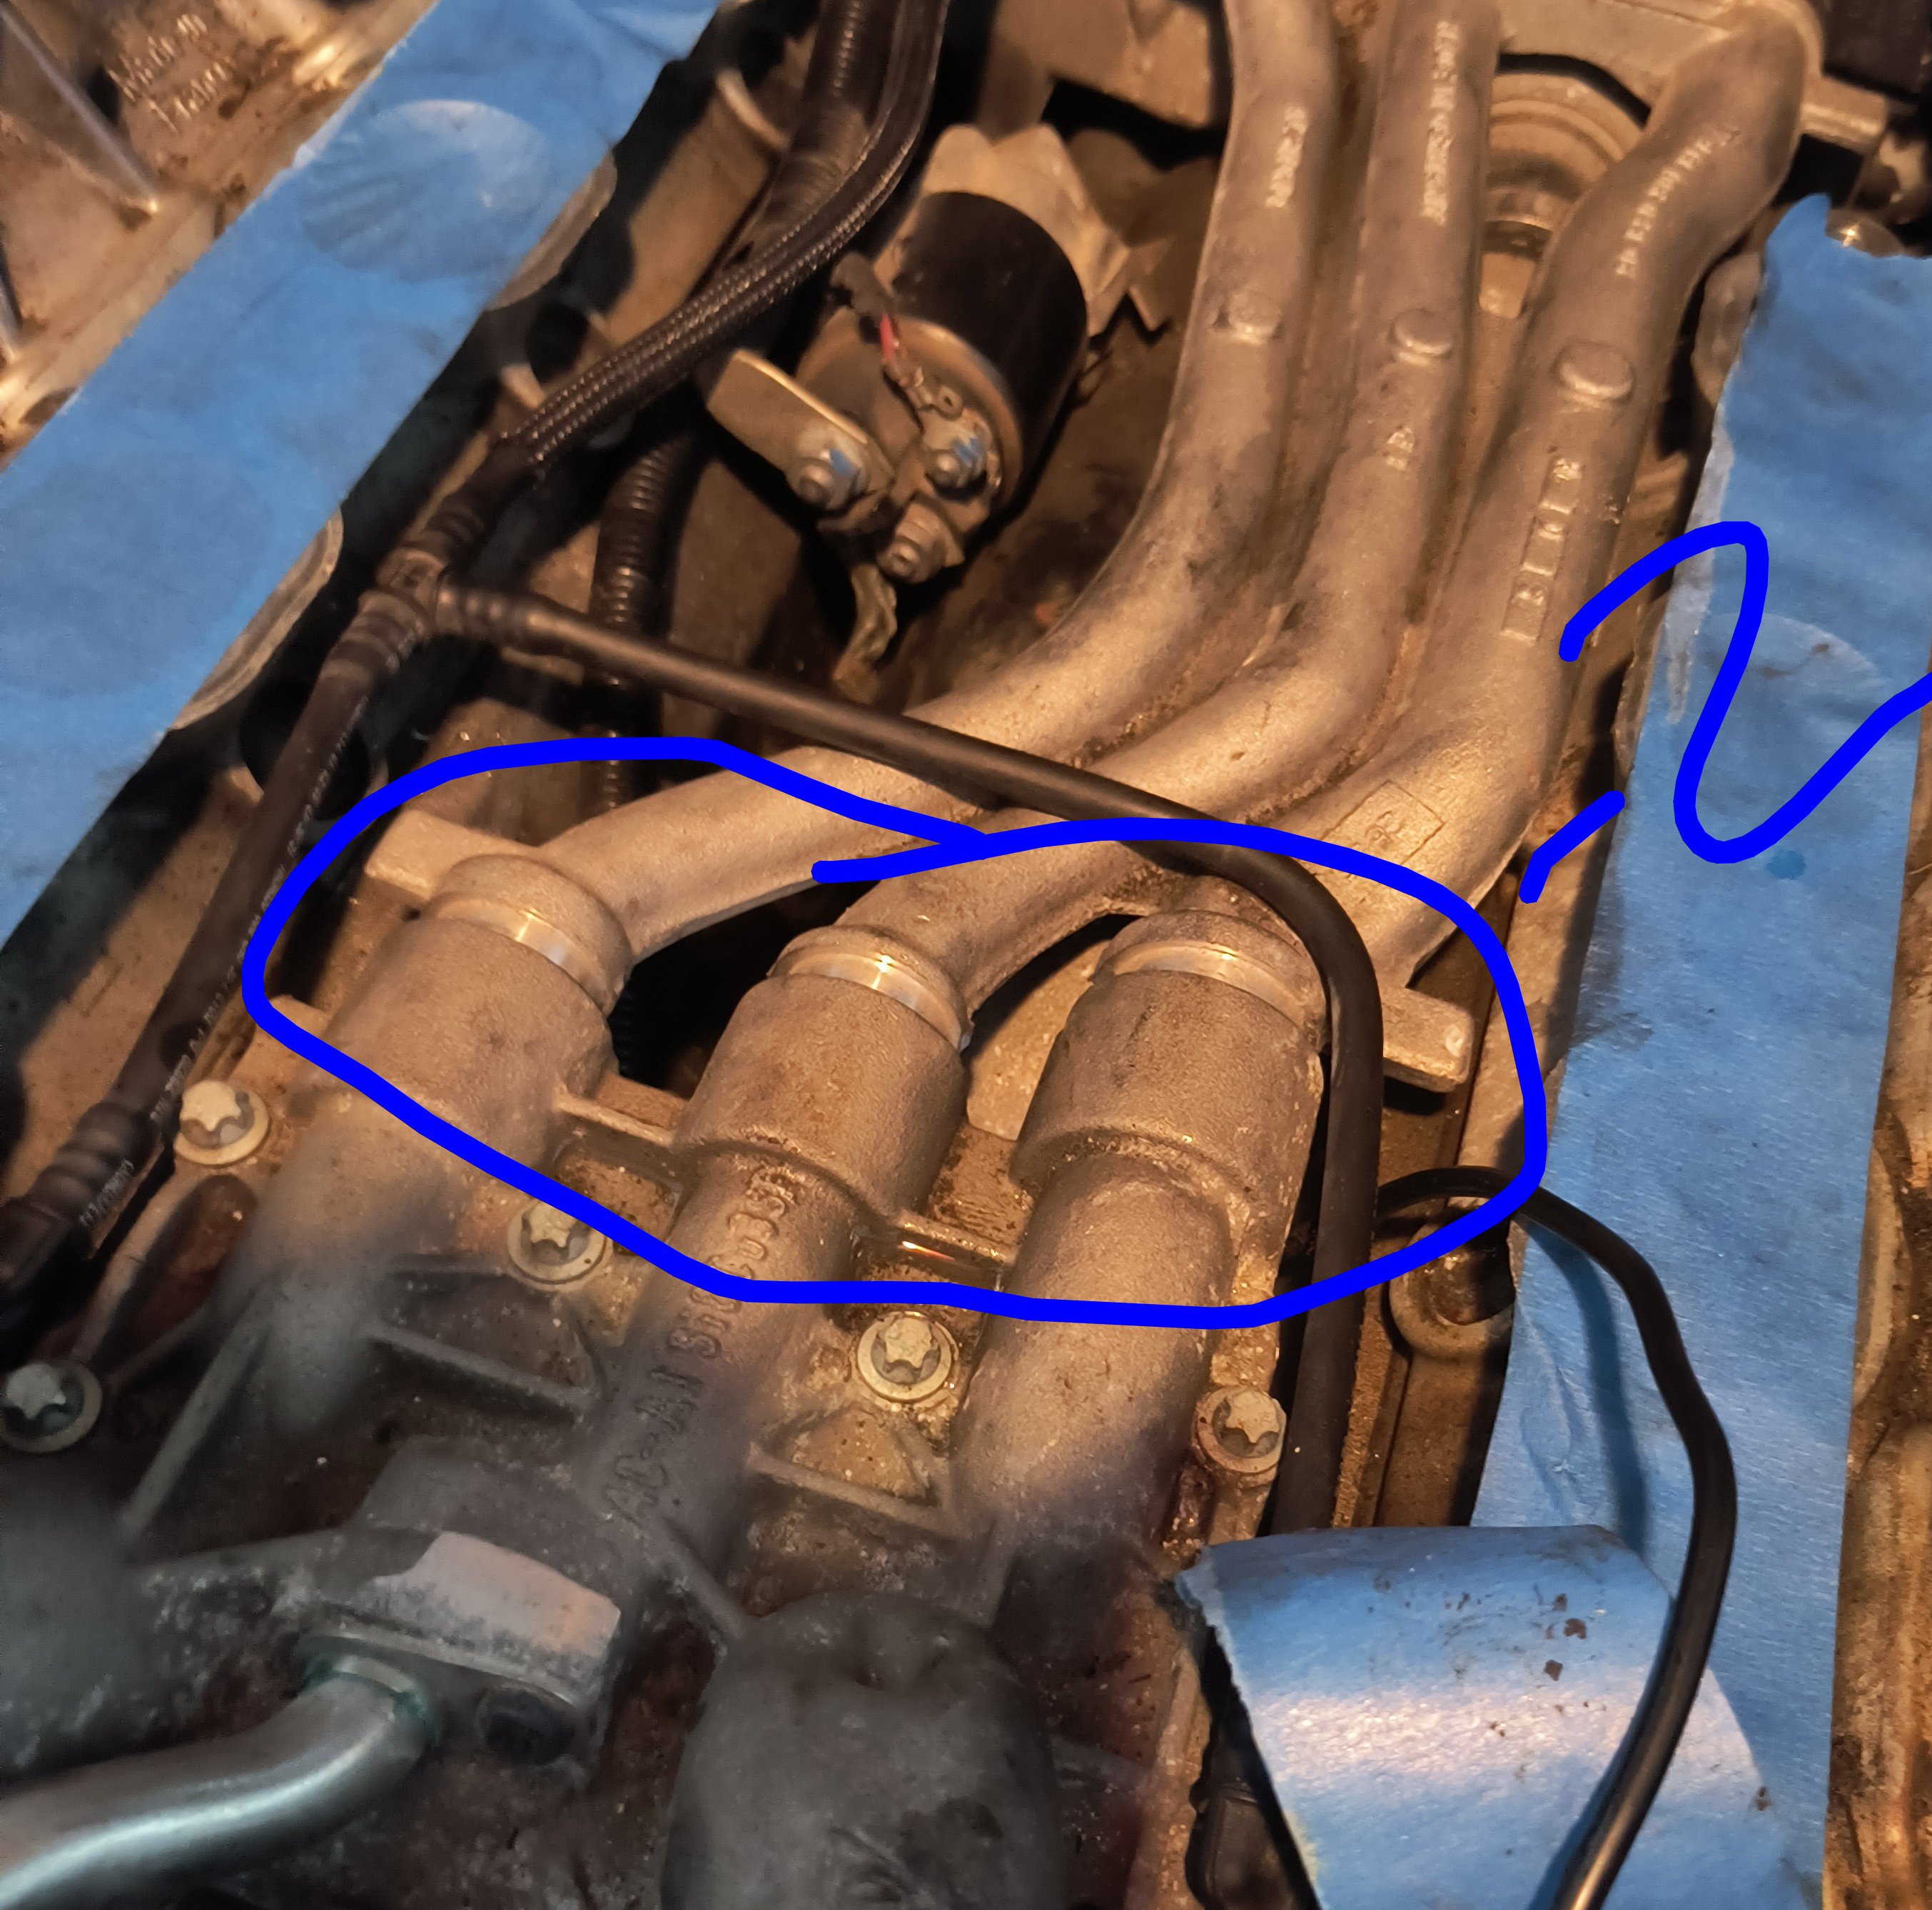
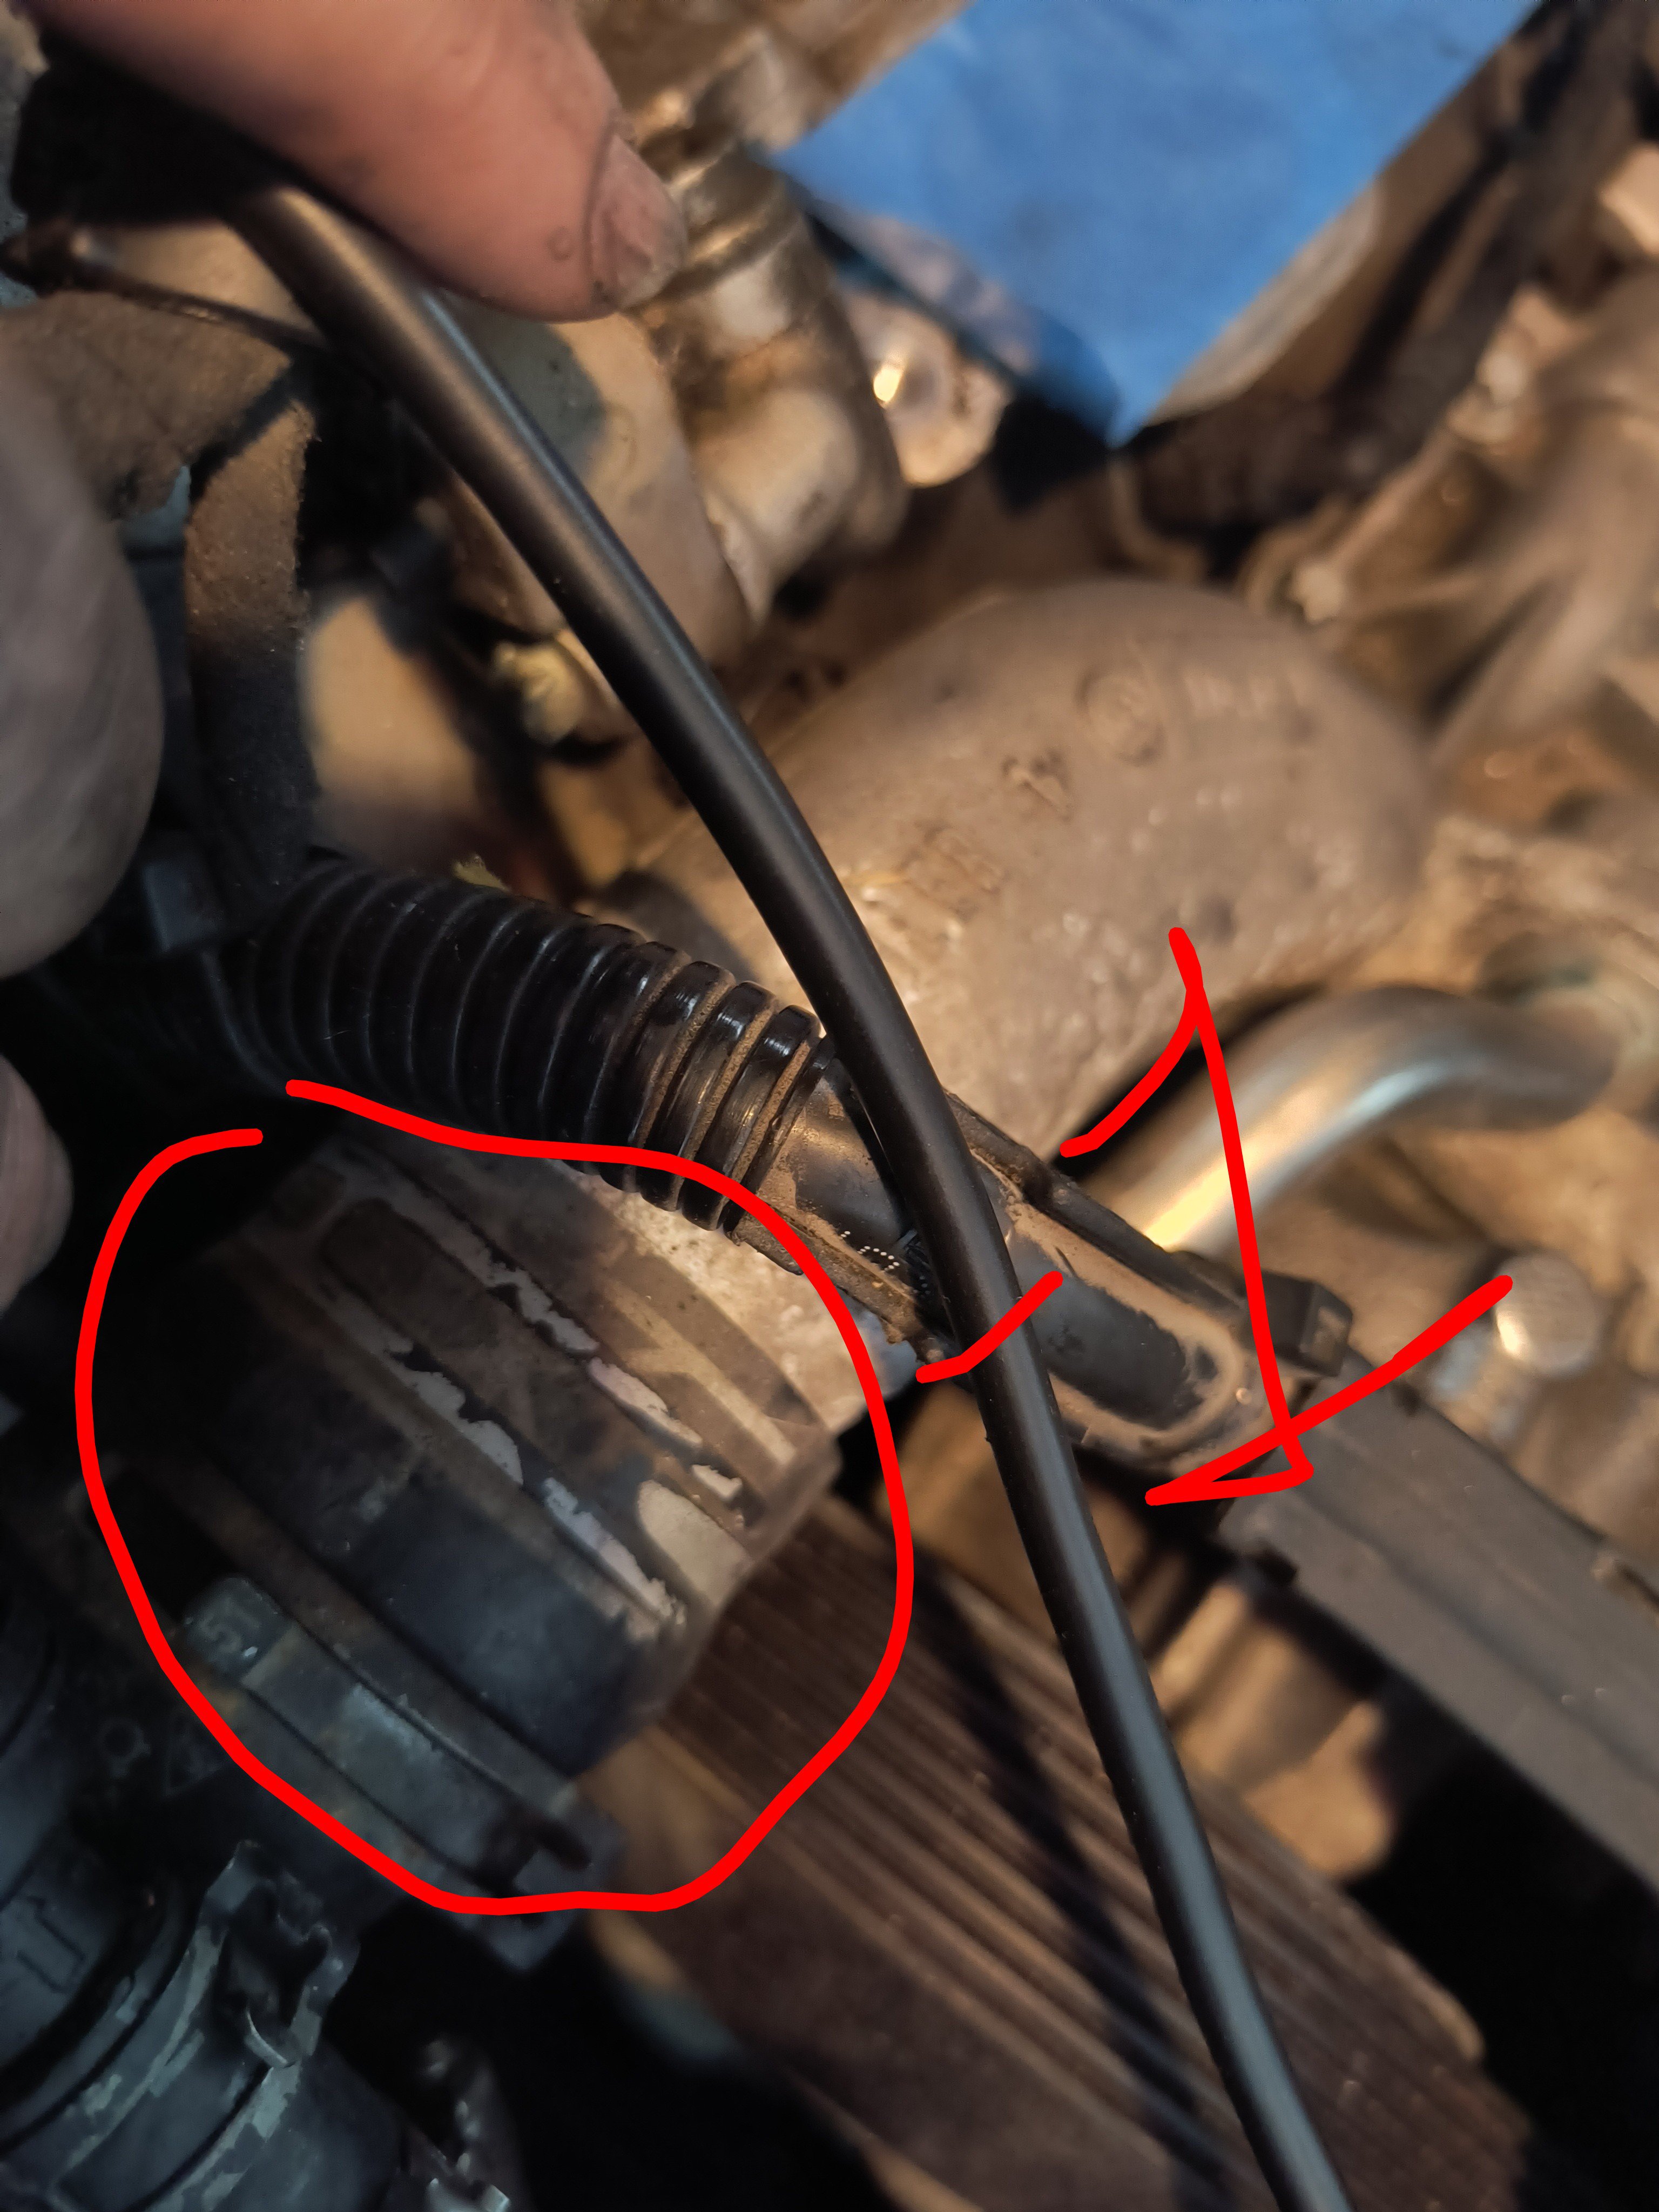
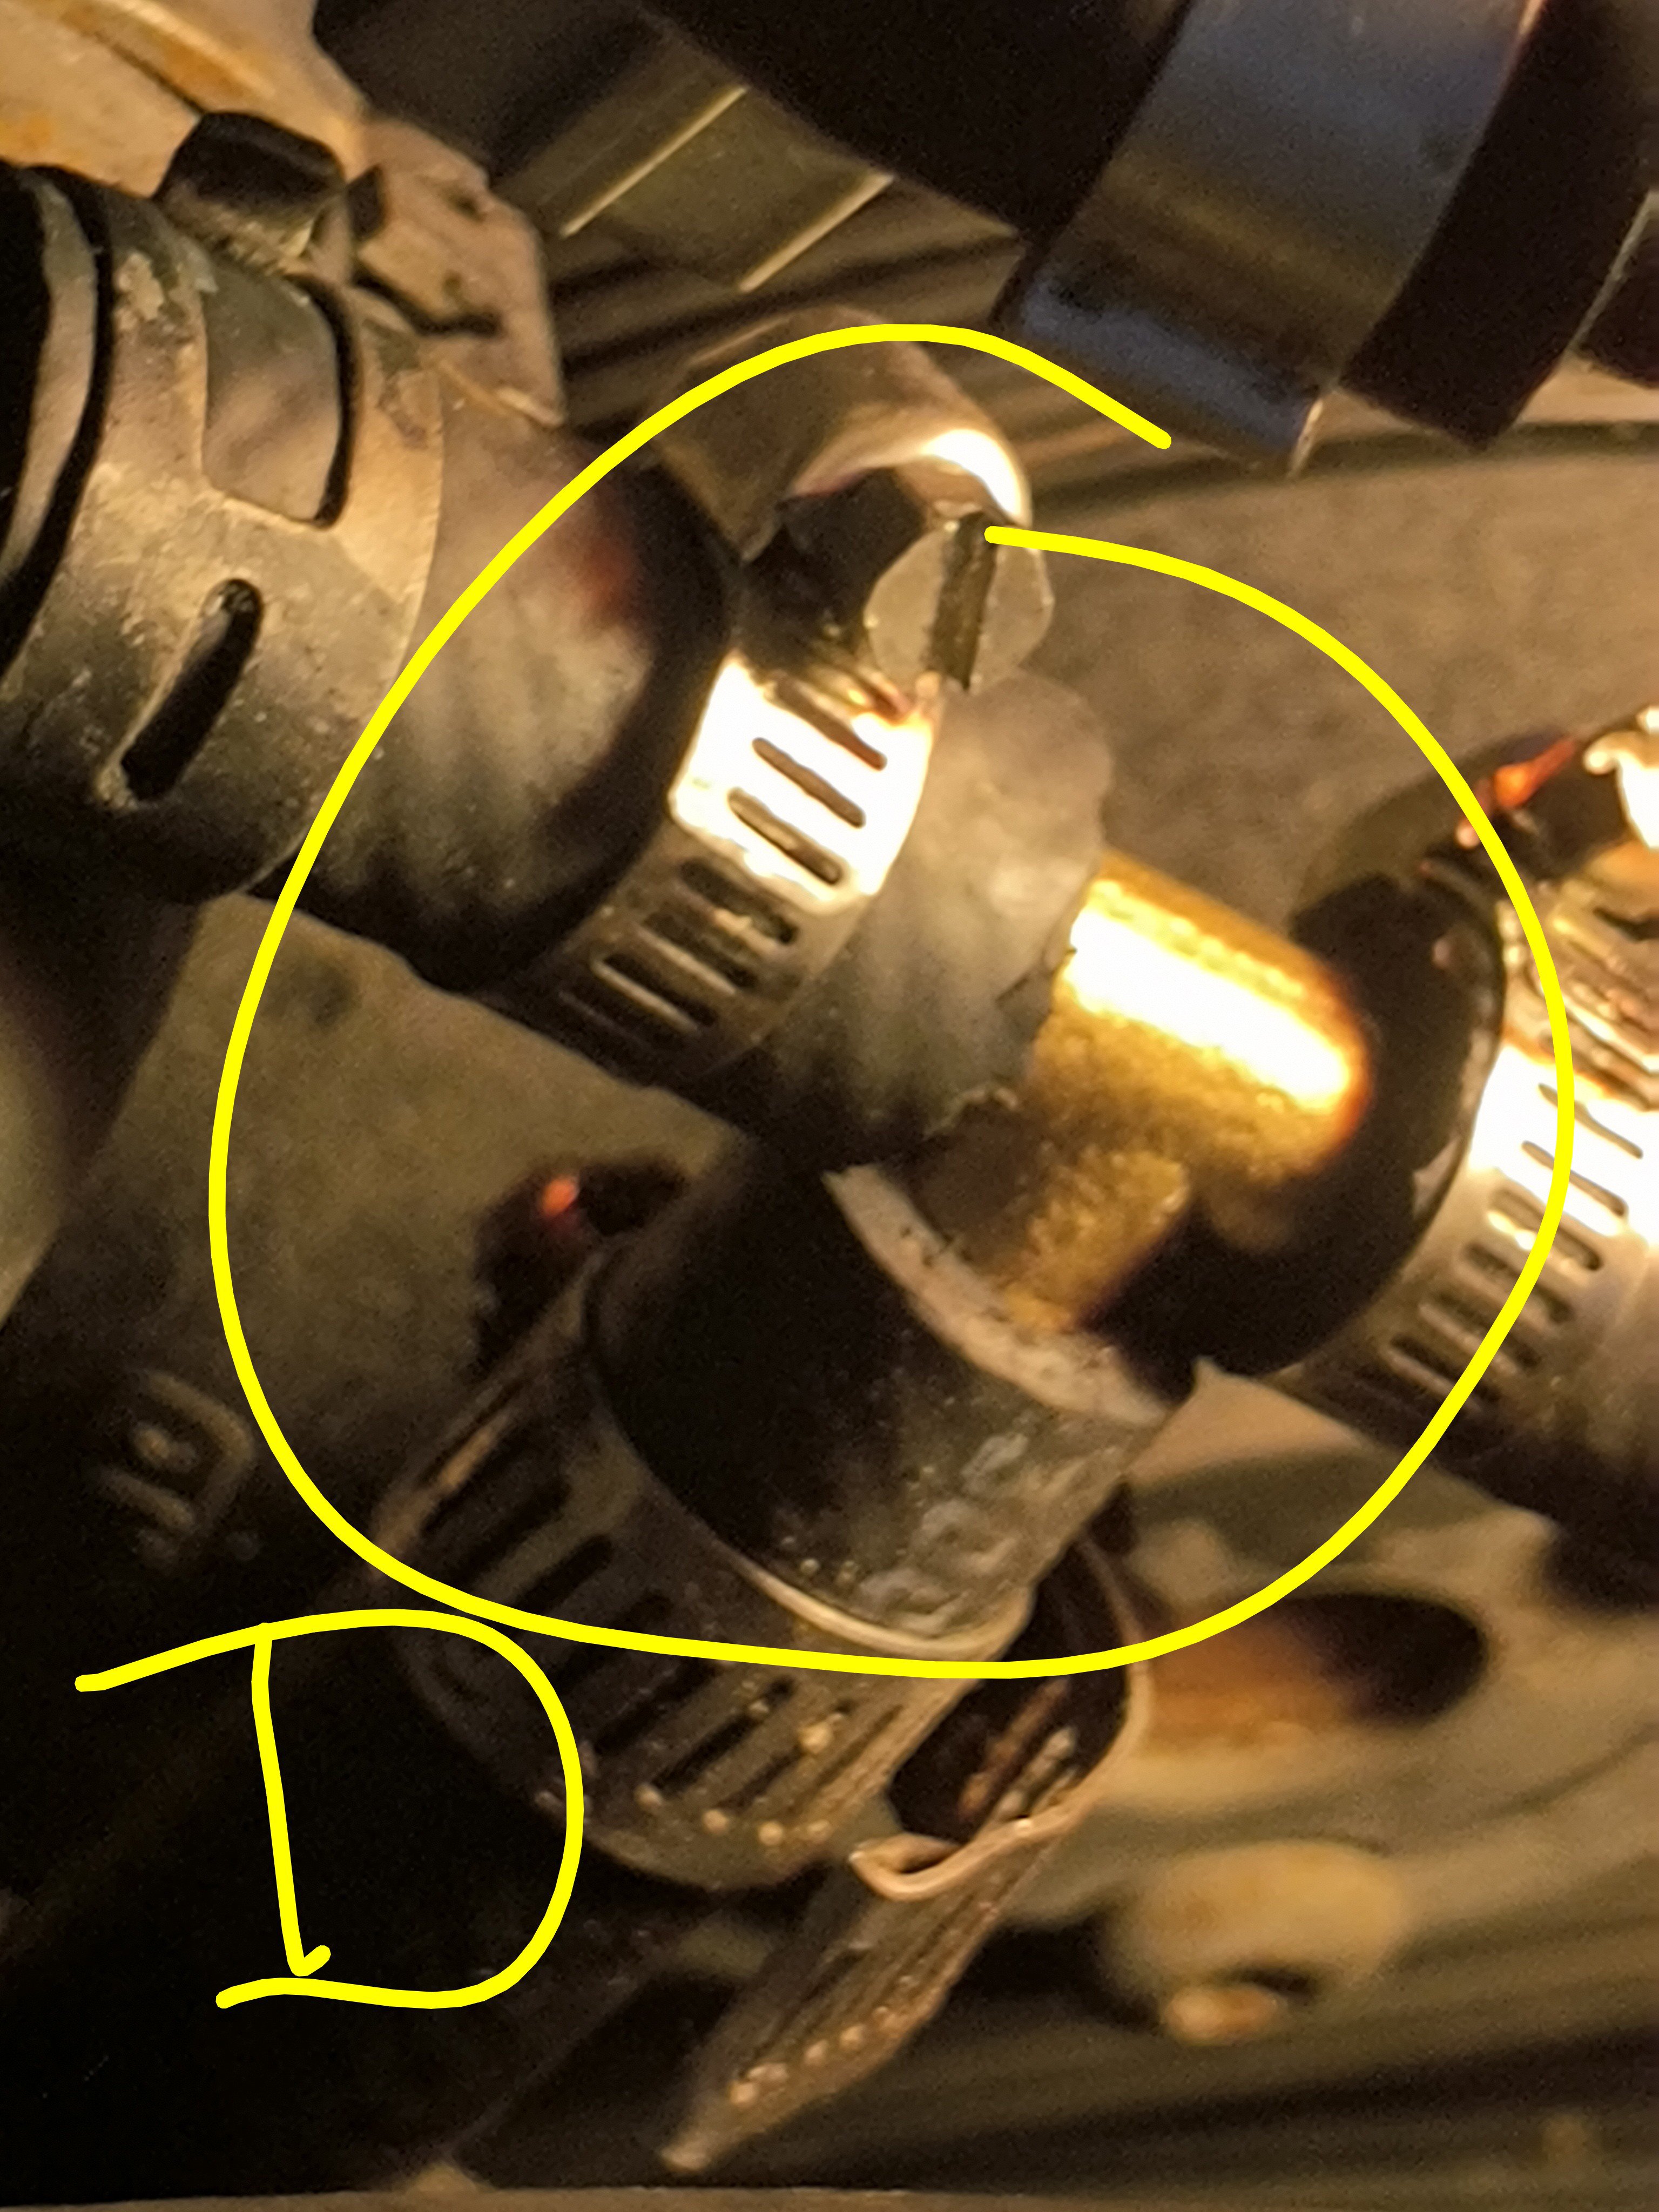
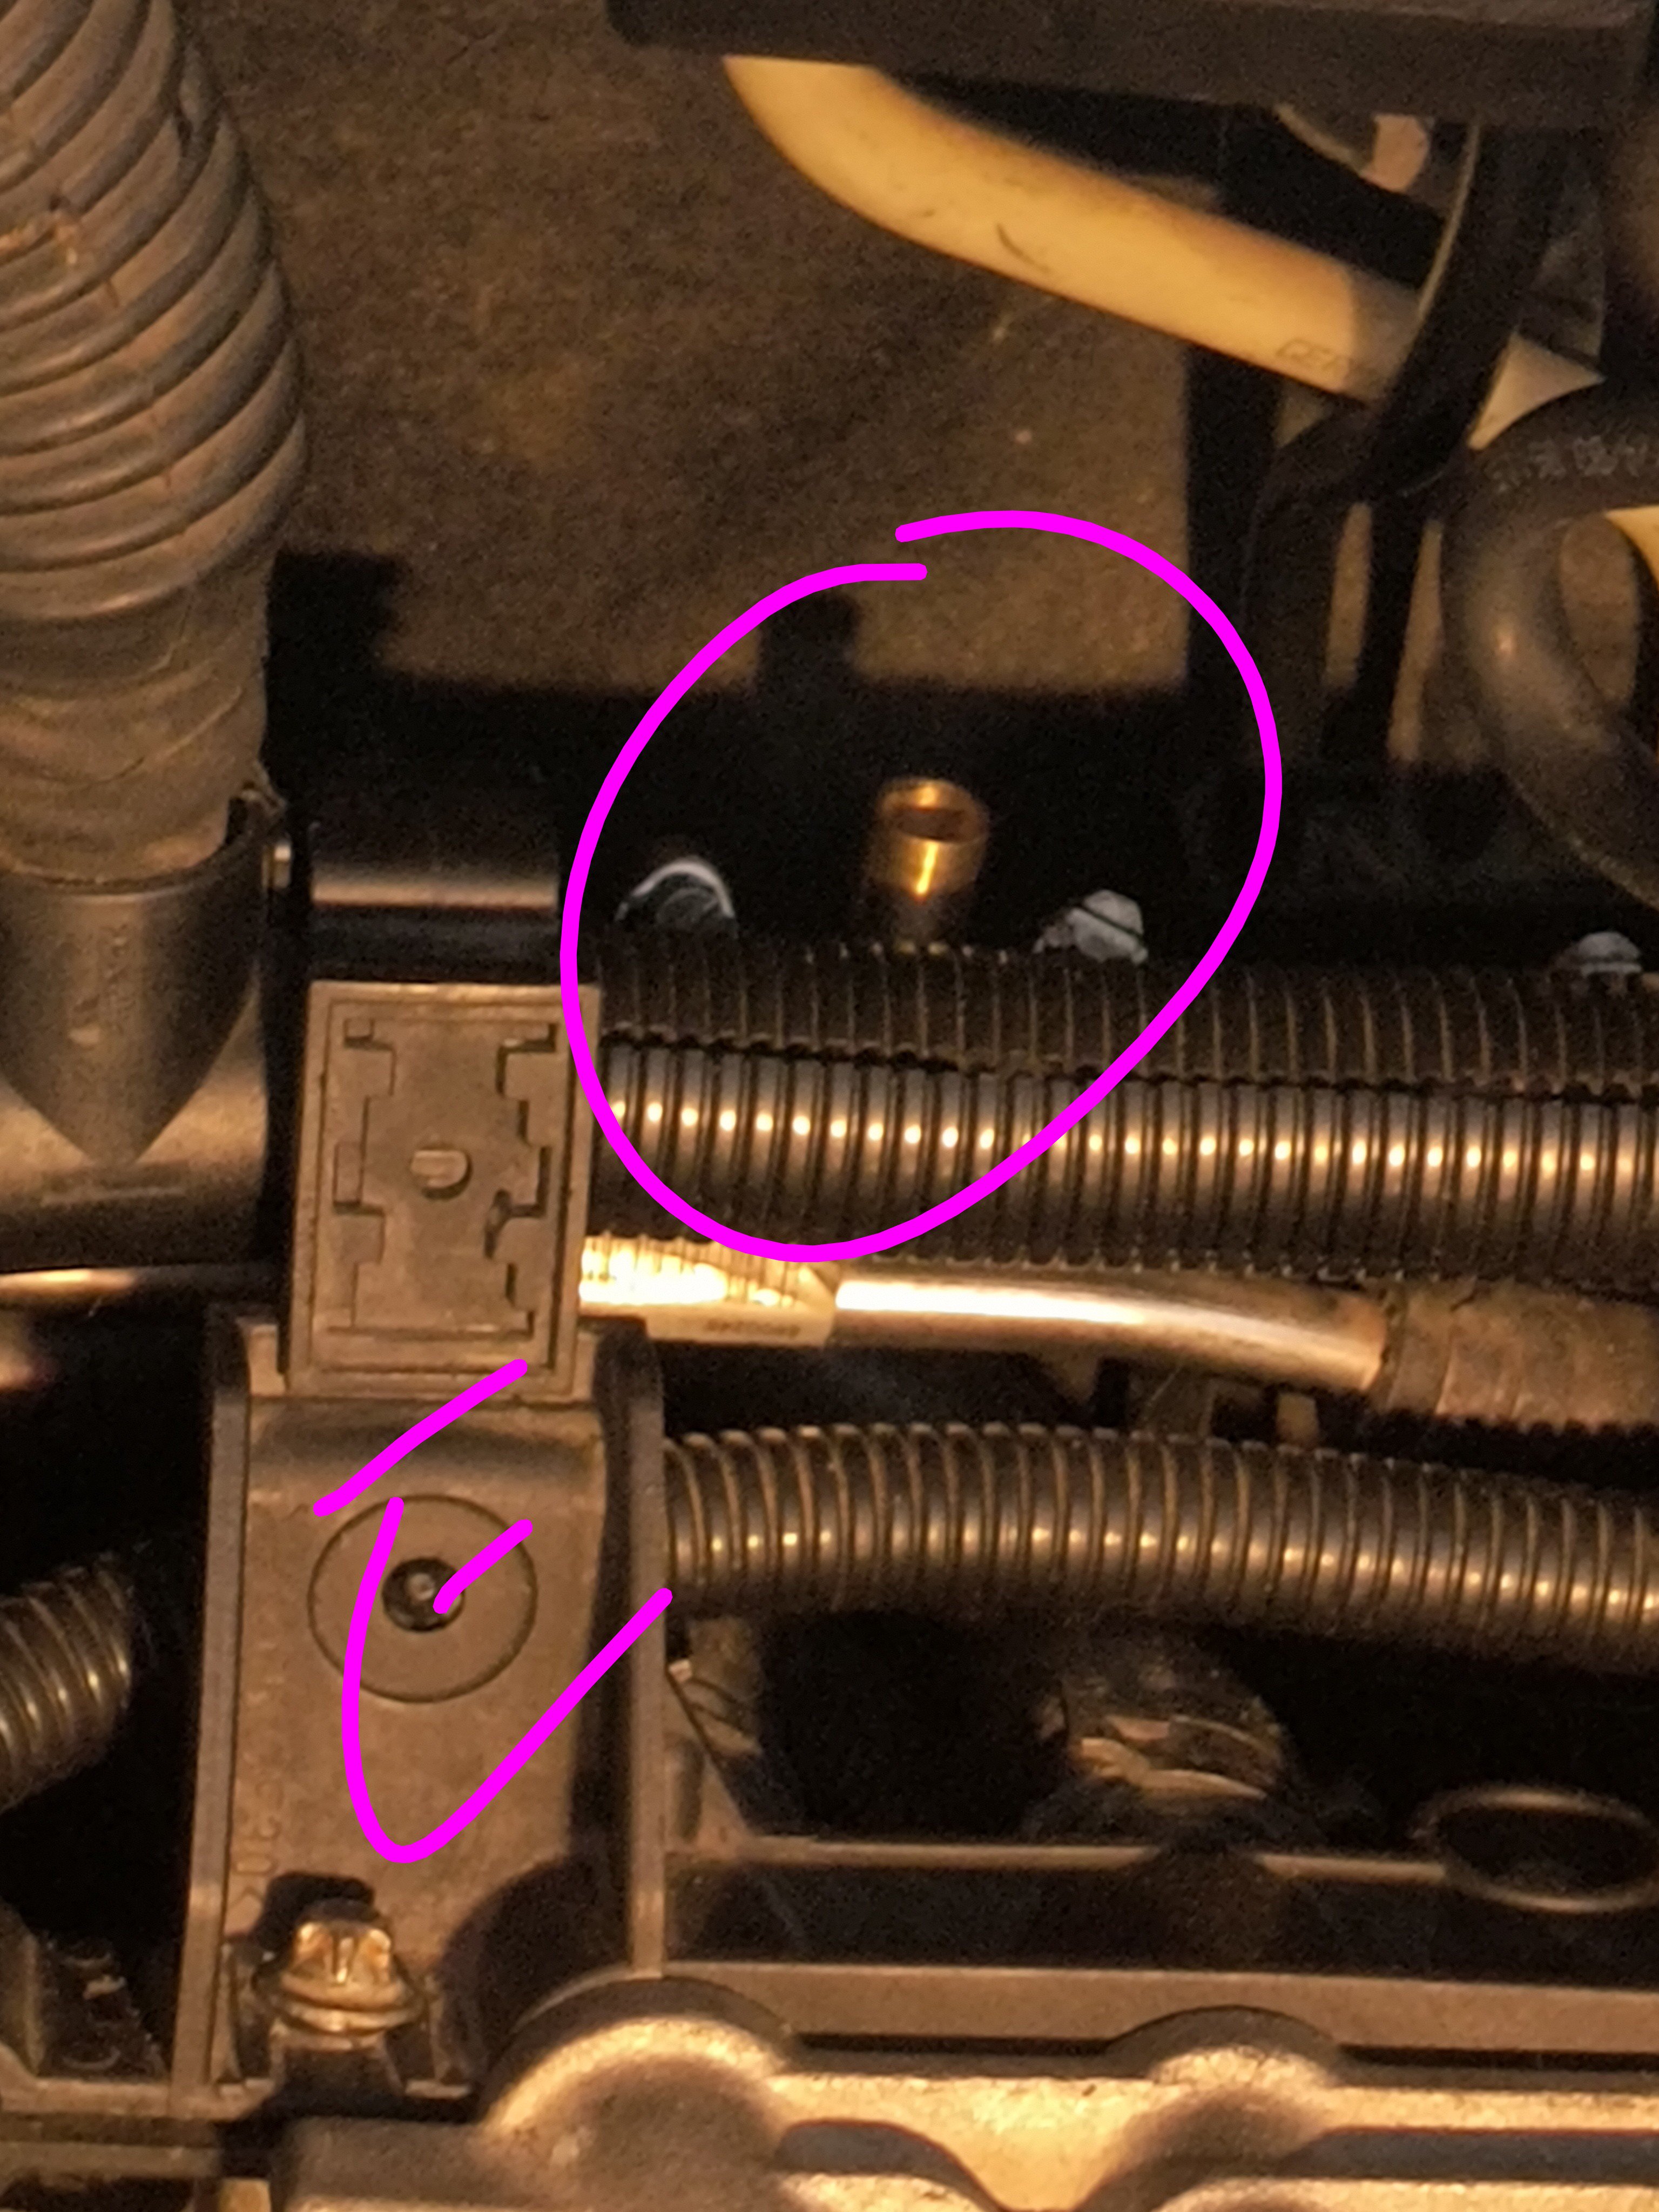
So, I had a coolant leak in front of engine. Changed the intercooler, started filling and ugh coolant leak back center. Smoked it and the right hose had come off of the driver's side pipe! Here we go with the intake manifold.... Fixed that hose and smoked it no leaks, started adding coolant ( we all know it's not cheap) got it full and ....yep coolant leak dead center of engine. Here's were I need help... Area 2) looks to me like whoever changed the pipes didn't push them all the way on and the o-rings finally gave way?? 2A & B) are of the area under the 3 tubes, making me pretty confident this is my problem. But I put would be great! 1) I loosened the clamps on main coolant hoses in front and they were so tight it looks like they're still there!! Should I do something with this?? Well, I'm dumb and obviously switched to labeling in letters now instead of numbers! Ok C) This is the connection of big pipe underneath and I think it looks ok, opinions??plz.... D) I found a hole from someone not clipping it back into the y plenum so this is why fix. E & E1) the t between turbo vent and breather tubes was broken, just a big gap so I fixed that but I don't see anything that would go to the top of the t. Need help. Is it possible still on the intake manifold?? Plz help so I can put this thing back together!! And yes I've already changed the big coolant t and they changed the easy one to get to when they did the pipes
-
All of a sudden, my radio went black. My repairer said it would be too expensive to repair. I found and bought a replacement off of Facebook marketplace place place. I didn’t realize I would need a security code. My mistake my fault. I should of known better Hopefully you can help SER# W5008 105 Type; 4462 CDR220 Thank you in advance for your help
-

Rats chewed up wires
Michael Howard replied to Michael Howard's topic in 996 Series (Carrera, Carrera 4, Carrera 4S, Targa)
Nice thank you very much! I appreciate your help. I hope it’ll work after I do it all lol we will see. -
Rats chewed up wires
JFP in PA replied to Michael Howard's topic in 996 Series (Carrera, Carrera 4, Carrera 4S, Targa)
I do not, we normally stock a variety of wire sizes and colors, heat shrink tubing, connectors, zip ties, and the like that we source from a local electrical vendor, but you can find similar supplies from multiple sources like WireCare.com | Your Local Cable Management Superstore! WWW.WIRECARE.COM WireCare is your online wire & cable management superstore. We have what you need for connecting, harnessing, & beautifying all of your electrical projects. We carry the highest quality... . -
Rats chewed up wires
Michael Howard replied to Michael Howard's topic in 996 Series (Carrera, Carrera 4, Carrera 4S, Targa)
Thank you. I was leaning towards that i really didn’t want to have to get a new harness. Do you have any good kits for the wires? -
Rats chewed up wires
JFP in PA replied to Michael Howard's topic in 996 Series (Carrera, Carrera 4, Carrera 4S, Targa)
It is always best to solder the wires back together and then heat shrink them for weather proofing. A lot of sensors, like the MAF, use factional voltage signals that don't do well when crimp connectors are used, so solder is the way to go. 👍 -
So I just got this 2000 996 Carrera manual and I found out that some mice have chewed through the maf sensor wires, both o2 sensor wires and then the big 6 pin connector next to it all. I was wondering how i could fix this and what that 6 pin connector is for.
-
Here is the documentation from the Porsche DME manual P0327 210 Knock sensor 1 - below limit Diagnosis conditions • Engine speed more than 3600 rpm • Engine load greater than 45 % Possible fault cause ♦ Break in wiring or short to ground ♦ Contact corrosion on the connector ♦ Knock sensor loose ♦ Short circuit to B+ ♦ Knock sensor ♦ When a fault is stored, the ignition angle is retarded for all cylinders in the range in which knock control is active. ♦ Knock control adaptation is inactive. ♦ If knock control becomes active here, this may indicate engine damage (increased noise level) Affected terminals Terminal III/49 and III/50 Diagnosis/troubleshooting
-
 So it seems that initially, it might be easier to get to the harness connector at the DME end. But what can I test at that end with the harness unplugged? resistance to ground? and perhaps compare the two knock sensors values and they should be close right? That way I could perhaps start to pinpoint if it is a wiring issue. I really dont want to go in the valley again. So lets say, I actually check the wiring from connector to connector and it looks good. How do you verify a problem with DME? Just procees of elimination? Im good with mechanical and pretty good with a multimeter; Im just looking for peoples experience that found out what the issue was. Thanks James C
 -
Try 8763