Welcome to RennTech.org Community, Guest
There are many great features available to you once you register at RennTech.org
You are free to view posts here, but you must log in to reply to existing posts, or to start your own new topic. Like most online communities, there are costs involved to maintain a site like this - so we encourage our members to subscribe or donate. All subscriptions and donations go to the costs operating and maintaining this site. We prefer that guests take part in our community and we offer a lot in return to those willing to join our corner of the Porsche world. This site is 99 percent member supported (less than 1 percent comes from advertising) - so please consider an annual subscription or donation to keep this site running.
Here are some of the features available - once you subscribe RennTech.org
- View Classified Ads
- DIY Tutorials
- Porsche TSB Listings (limited)
- VIN Decoder
- Special Offers
- Paint Codes
- Registry
- Videos System
- View Reviews
- and get rid of this welcome message
It takes just a few minutes to register, and it's quality Porsche information at a low cost.
Contributing Members also get these additional benefits:
(you become a Contributing Member by subscribing or donating money to the operation of this site)
- No ads - advertisements are removed
- Access the Contributors Only Forum
- Contributing Members Only Downloads
- Send attachments with PMs
- All image/file storage limits are substantially increased for all Contributing Members
- Option Codes Lookup
- VIN Option Lookups (limited)

-0001-0001.png.112c13ee97acfad0cb1e70d195cc9a0e.png)
Loren
-
Posts
37,845 -
Joined
-
Days Won
637
Content Type
Profiles
Events
Forums
External Paint Colors
Downloads
Tutorials
Links Directory
Collections
Classifieds
Store
Everything posted by Loren
-
-0001-0001.thumb.png.17f5bb25bf8ec261a17c21e6321c8492.png) :welcome: O2 sensors do not cause misfires -they report them. You need to post your fault codes here or everything is just guessing.
:welcome: O2 sensors do not cause misfires -they report them. You need to post your fault codes here or everything is just guessing. -
Intermittent rough idle when engine fully warmed up
Loren replied to timbo's topic in 986 Series (Boxster, Boxster S)
What fault codes? or pending fault codes? -
Wheel bolts
Loren replied to no1joey's topic in 997-1 Series (Carrera, Carrera 4, Carrera 2S, Carrera 4S)
The same -- just realize it is likely a few pounds less. -
Wheel bolts
Loren replied to no1joey's topic in 997-1 Series (Carrera, Carrera 4, Carrera 2S, Carrera 4S)
I use Permatex Anti-Seize Lubricant which is a blend of aluminum, copper and graphite lubricants. A thin coating will affect torque settings slightly - but that is better (IMHO) than corroded and rusted on wheel lugs. -
You can buy a replacement key - just copy the code on your broken key and take that to the dealer. If you do not have the key a good dealer will try all of their keys until they find the correct one and then order you a replacement. Always good advice to write your wheel key code down and keep it for just this occasion.
-
Try 4186
-
Try 9067
-
Wheel bolts
Loren replied to no1joey's topic in 997-1 Series (Carrera, Carrera 4, Carrera 2S, Carrera 4S)
I would just clean them up and apply anti-seize paste as Porsche recommends. -
What is the difference between these two PCM2 part models
Loren replied to kkasten's topic in 996 TT, 996 TT S, 996 GT2
:welcome: 996.642.234.02 was replaced by 996.642.234.03 that was replaced by 996.642.234.04 that was replaced by 996.642.234.05 that was replaced by 996.642.234.06 that was replaced by 996.642.234.07. Theoretically any or all should work - but they may need software and firmware updates. -
Try 5710
-
TPMS fault and error code 800C
Loren replied to racerken's topic in 997-1 Series (Carrera, Carrera 4, Carrera 2S, Carrera 4S)
Nine times out of ten - the battery in the sending units is bad. -
Yep I'm doing another engine swap, can we say X-51?
Loren replied to tholyoak's topic in 986 Series (Boxster, Boxster S)
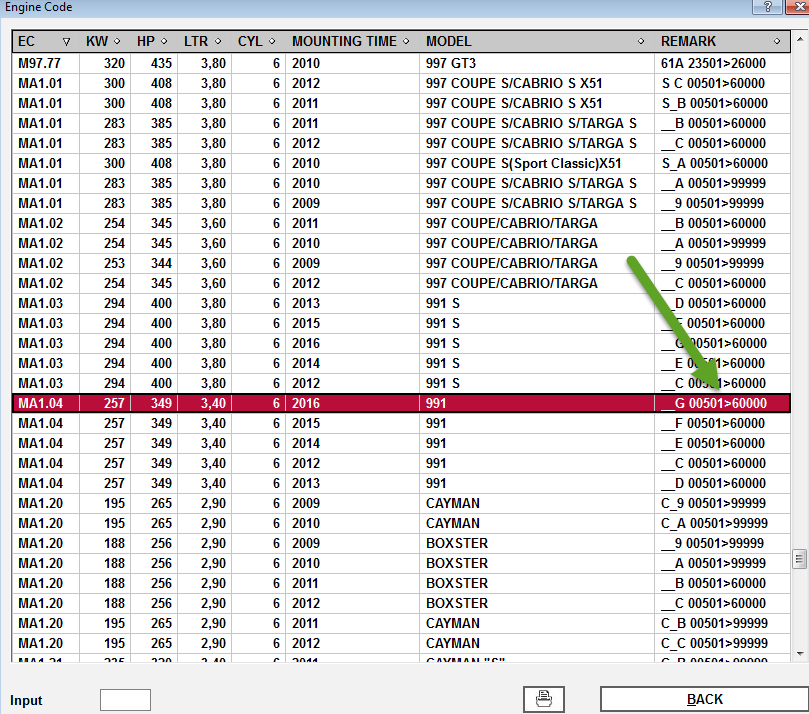
I think that person is mistaken. Here is a list of Porsche engine and their serial number ranges by model year (under "Remark"). Porsche (and we here) have been using this system for years. (click to enlarge)
-
Yep I'm doing another engine swap, can we say X-51?
Loren replied to tholyoak's topic in 986 Series (Boxster, Boxster S)
VIN is not on the engine or transmission but each do have a model and serial number. The model and serial number can be used to get the approximate date of the build or re-build. Carefully copy those down and then post them here and we can lookup and tell all that we can. -
Try 8728
-
on 996 headlights
Loren replied to gcp's topic in 996 Series (Carrera, Carrera 4, Carrera 4S, Targa)
Removing the headlights is covered in your Owner's Manual. -
on 996 headlights
Loren replied to gcp's topic in 996 Series (Carrera, Carrera 4, Carrera 4S, Targa)
996 - Common Fixes and Repairs -- http://www.renntech.org/forums/tutorials/article/38-polishing-acrylic-headlights/ -
Non working coolant temperature gauge
Loren replied to Gwndds's topic in 986 Series (Boxster, Boxster S)
The 2001 cluster will likely work if it is re-programmed to your car. -
Yup... in the Boxster 986 forum please.
-
Try 8624
-
What is the e-brake? E-brake = emergency brake or hand brake or parking brake. All used to describe the emergency brake.
-
Try 0156
-
3.6l cats on 3.4l (Franken-exhaust)
Loren replied to xmac's topic in 996 Series (Carrera, Carrera 4, Carrera 4S, Targa)
While they will likely bolt up fine - I have no idea if it will pass smog tests as the later style cats got different O2 sensors. If you decide to try it let us know if you can pass CA smog. -
Try 0426
-
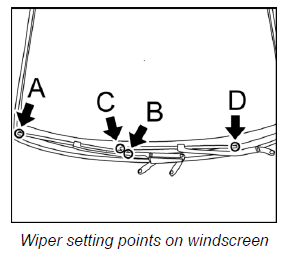
1. Mount wiper arms on the wiper linkage. 2. The windscreen is provided with points to which the wipers must be positioned. Priority 1 is assigned to the driver's wiper at points C and D . Then position the passenger's wiper at points A and B. 3. Mount the washer 2A and O-ring 2B. 4. Screw on and tighten the fastening screw 2 -- Tightening torque: 24 ftlb. 5. Screw on and tighten the fastening screw 3 -- Tightening torque: 13 ftlb. 6. Close the bonnet. 7. Operate one-touch wiping and check the position of the wiper arms again. 8. Open the bonnet. 9. Press on the cap 1.