Welcome to RennTech.org Community, Guest
There are many great features available to you once you register at RennTech.org
You are free to view posts here, but you must log in to reply to existing posts, or to start your own new topic. Like most online communities, there are costs involved to maintain a site like this - so we encourage our members to donate. All donations go to the costs operating and maintaining this site. We prefer that guests take part in our community and we offer a lot in return to those willing to join our corner of the Porsche world. This site is 99 percent member supported (less than 1 percent comes from advertising) - so please consider an annual donation to keep this site running.
Here are some of the features available - once you register at RennTech.org
- View Classified Ads
- DIY Tutorials
- Porsche TSB Listings (limited)
- VIN Decoder
- Special Offers
-
OBD II P-Codes - Paint Codes
- Registry
- Videos System
- View Reviews
- and get rid of this welcome message
It takes just a few minutes to register, and it's FREE
Contributing Members also get these additional benefits:
(you become a Contributing Member by donating money to the operation of this site)
- No ads - advertisements are removed
- Access the Contributors Only Forum
- Contributing Members Only Downloads
- Send attachments with PMs
- All image/file storage limits are substantially increased for all Contributing Members
- Option Codes Lookup
- VIN Option Lookups (limited)


CJ_Boxster
-
Posts
480 -
Joined
-
Last visited
Content Type
Profiles
Events
Forums
External Paint Colors
Downloads
Tutorials
Links Directory
Collections
Classifieds
Store
Everything posted by CJ_Boxster
-
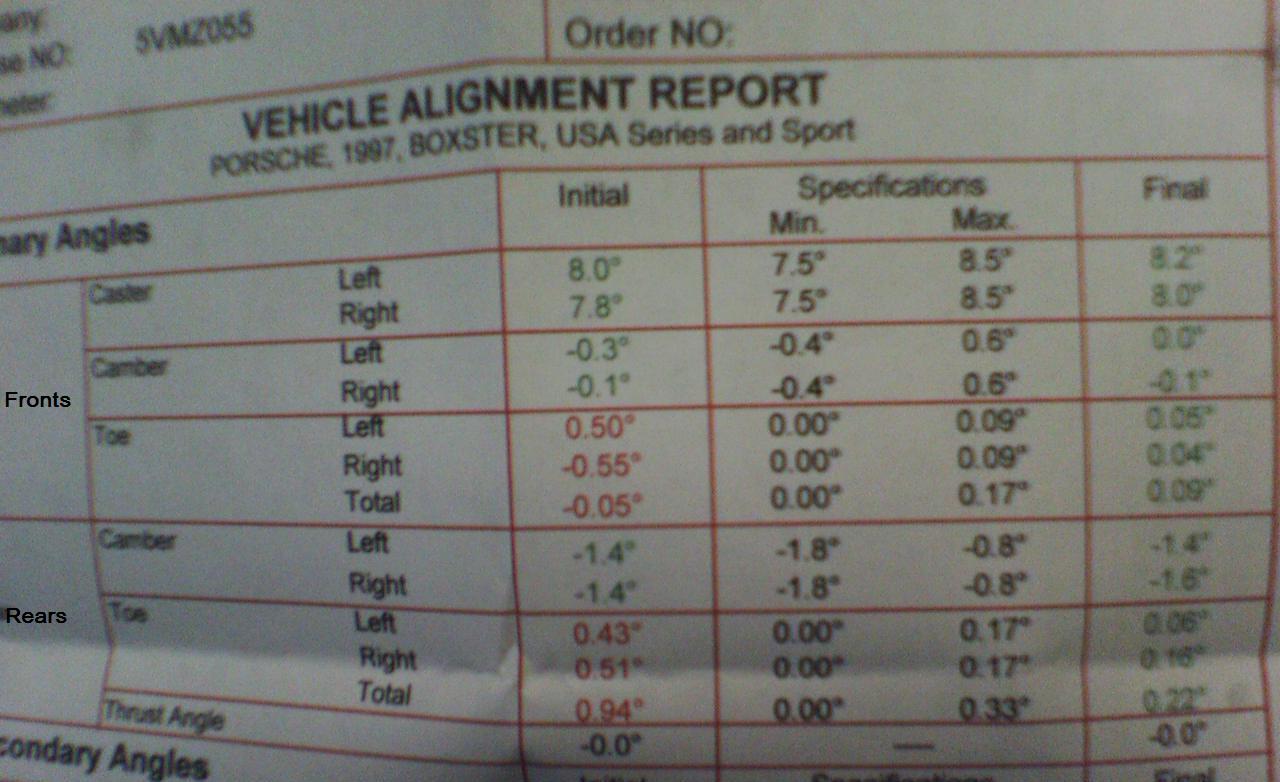
 4 Wheel Alignment done... need 2nd opinions Ok just got done with my 4 wheel alignment, My rear was Rear Toe was outline, and so was my front toe... Attached is the paper they gave me of BEFORE, SHOULD BE, and AFTER. Let me know if my final suspension setup is good please. The car seems to have less turning responsiveness with the alignment. 1997 Boxster, Factory 17 inch Rims. 225/45/17 in front and rears 255/40/17
-
I have a question, if the top cost $3426 to replace/repair at the dealer... How much will the insurance give you? Will your insurance try to cheap skate and give you $400? What did you get from your insurance?
-
Boxster Won't Start...Help Please
CJ_Boxster replied to mclawsey1's topic in 986 Series (Boxster, Boxster S)
Try disconnecting the plug to the MAS and see if the start will start consistantly afterwards with the MAS disconnected. If so, you need a new MAS (mas airflow sensor.) -
Hey people, someone apart of another 986 forum is in the new industry and did this for us during a news segment http://www.myfoxhouston.com/myfox/pages/Co...ntentId=2728538
-
Erratic Idle Problem
CJ_Boxster replied to GOB's topic in 996 Series (Carrera, Carrera 4, Carrera 4S, Targa)
Not sure is this applies to 996's but it does for boxsters... If it is your MAF going bad, you can tell by firs disconnecting your battery, then disconnect the electrical connector to the MAF then reconnect battery and see if the issue comes back. If not, then its the MAF. you wil get a CEL about 20-40 minutes later but the car should run better with the maf disconnected if it infact is malfuntioning -
Hi, Correct me if I'm wrong, but I don't think we're in disagreement at all here. Given the cumulative effect of any rain entering the snorkel, eventually (such as driving in the rain for a couple hours) even a small amount of rain would eventually become a problem. I agree that the filter will stop any Rush of water which might suffocate the motor, but some water does enter and causes no problem (just like water injection does). Happy Motoring!...Jim'99 I agree, and doesnt water break free carbon? I remember in older cars people would dribble small amounts of water droplets into the carburator and i would see carbon deposits fly from the exhaust against the wall behind the exhaust. You could even hear the ticking in the exhuast as larger portions of carbon would break free into the exhuast.
-
Sure enough, his K&N had a slight tear in it, about big enough for a quarter on-end to fit through. See that doesnt apply here, cause the spike accured while the filter had a tear in it. Did the individual replace the filter with a new K&N then re-test? Carlos, with all due respect, you're missing the point. The point is that yes, additional grit coming into your engine can have a direct and measurable effect on engine wear. The K&N filters have proven to filter less well than a factory paper filter. Seems a silly risk to take for no gain. John your right i did miss your point there but im back on track now. About the K&N's being proven to filter less well than a factory filter.... thats just common sence, you cant suck more air through a layer of foam and paper than you can a k&n filter. There is risk associated with this mod and since I have a Automotive mechanic background experience with aftermarket air filtering methods, I feel that I probably will never experience total engine failure or even gradual hp lose. But like we say about mods.... To all his/her own! :thumbup:
-
Haha, i would never do that to my boxster. Weird thing about the mustang, the coolant temps would increase abit without an airfilter... Guess too lean for that a/f ratio.
-
LOL your right, stacking 2 filters as you did will increase air flow cause there is more element area to pull air from. While its true, i wouldnt have thought of doing that. :clapping:
-
Sure enough, his K&N had a slight tear in it, about big enough for a quarter on-end to fit through. See that doesnt apply here, cause the spike accured while the filter had a tear in it. Did the individual replace the filter with a new K&N then re-test?
-
That tube that comes with the filter is not oil, its grease that you apply to the air filter track that the boxster uses, the KN filter is a tighter fit than the OEM filter and the tube of grease on the track helps it slide into the airbox. I didnt install the filter for any performance gains just to help the intake noise increase and I never heard anyone say "Hey that K&N filter wore out my engine" so i dont think SkipC's reason for not using a K&N is valid. I mean i use to drive my 67 mustang without an airfilter, daily driver too and no issues with debris or unfiltered air "wearing out" my engine... <_<
-
Noisy Boxster Rear Suspension
CJ_Boxster replied to w_pienaar's topic in 986 Series (Boxster, Boxster S)
Thank you Bruce. I just want to give something back to the forums since they have been good to me & giving me lots of help and information. -
Noisy Boxster Rear Suspension
CJ_Boxster replied to w_pienaar's topic in 986 Series (Boxster, Boxster S)
Yes i felt about a fraction of a millimeter of play in the passenger side which was the noisiest side, the drivers side didnt really have any play but now the entire rear end feels tighter. Lastnite i was driving spiritedly about the off ramps in my area and the car feels alot more sure footed than before. -
Noisy Boxster Rear Suspension
CJ_Boxster replied to w_pienaar's topic in 986 Series (Boxster, Boxster S)
Hey forum members that are watching this thread, I made a "Do It Yourself" Write-up with pictures of the process, Its alot of steps but takes about 1 hr 30 minutes each side. The Write-up is just very detailed to prevent any snags along the way that any DIY'ers may encounter. http://www.renntech.org/forums/index.php?showtopic=12646 -
Ok This is a DIY on how to replace your Rear Upper Control Arms (Track Arms), However I am not replacing the factory equipment with OEM Rear Upper Control Arms (Track Arms), I will be installing a Set of Adjustable Control Arms purchased from eBay Seller DelubozParts. A MUCH LESS expensive alternative inlew of buying a set of OEM Rear Upper Control Arms (Track Arms). If you have chattering or rattling noise coming from your rear suspension, Chances are that its a worn-out Bearing Cartridge on the Rear Upper Control Arms (Track Arms). Ok Lets Start, Tools list: Floor-jack, 18mm Ratchet, 21mm Closed-End Wrench, Torque Wrench, 2 Vise Grip Pliers. 1) Get your floor jack and tool set out. Break loose the lug nuts and security lug on the wheels. 2) Remove the lug that is sitting higher than all others and insert/screw the threaded metal rod into that hole. 3) Now Jack the car up and once the rear wheel is off the ground, Remove the wheel and remove the Metal rod guide from the wheel hub 4) Remove the 2 plastic nuts that hold this plastic cover against the wheel well then remove Plastic cover. 5) Now you can see the Rear Upper Control Arm circled in red. That is what we will be removing/replacing. 6) Time to locate the bolt & nut that secure the "Fork-end" of the control arm to the suspension. Just look behind the Wheel hub, on the lower control arm and you will see this nut and bolt on top and below the lower control arm. 7) Now unbolt these by using a 18mm ratchet socket and 21mm closed end wrench as pictured below. FYI- Never hit a ratchet with a hammer... the internals will shatter. 8) After the 18mm bolt and 21mm nut are removed, Use your 18 mm ratchet socket to remove the 18mm bolt that holds the Rear Control Arm to the chasis. FYI- Its very very tight, try holding the ratchet on the bolt and sliding the closed-end of your 21mm wrench over the handle of the ratchet, Hold it firmly so the socket doesnt slip off the bolt and manage to get your foot on the wrench holding the ratchet and pull or push (depending on drivers side or passenger side Control Arm) until the 18mm bolt loosens enough so that you dont require the leverage of the wrench attached to the ratchet. 9) Once the 18mm bolt is removed, Slide the control arm out of the car. (Install in reverse order if replacing with OEM Control Arms, torque both bolts to 160NM / 118lb-ft. If installing Adjustables...Proceed to read rest of directions)... Now place old control arm and new adjustable Control Arm side by side and slide one of the 18mm bolts through the Bearing Cartridge of the adjustable Control arm and into the Fork-End of the OEM Control Arm. Rotate the Adjustment bar on the Control arm until the other end of the Control Arm bolt holes light up perfectly. Once they line up, slide other other 18mm bolt through the other end to keep them from rotating anymore and make any other adjustments as needed. EDIT: (An Easier way to get the length correct is to place the long bolts into both ends of the adjustible control arm and adjust them to have a distance of 61.3 cm from the center of the bolt heads. Then tighten the lock nuts and install.) 10) Now tighten the Lock Nut on the the Bearing Cartridge side of the Adjustable Control Arm. Do Not tighten the Lock Nut on the Fork-End. Also rotate the Bearing Cartridge in the same angle that the OEM was while still in the car like so. (FYI -The Adjustment nuts are larger than 1inch wrench so I used 2 Vise Grip Pliers to tighten the nut.) 11) Now slide the Adjustable Control Arm into place by first aligning the Bearing Cartridge side first and screwing the 18mm bolt in only 4 turns. Now Slide the Fork-End over the mounting point and align it with the bolt hole. (FYI- If the Fork-End appears to be too far back or forward, Remove the 18mm bolt from the Bearing-Side and Remove the arm and rotate the Fork-End in half turn intervals and re-install and repeat as needed until the Fork End is very close to perfect.) If needed, You may slide a screw driver into the hole to align the holes to better install the 18mm bolt. 12) Once the bolt is through the Fork-End, Install the 21mm nut and snug down the bolt, Dont torque it yet. 13) Use your Ratchet to tighten the 18mm bolt that is holding the Bearing-End of the Control Arm to the Chasis. Get it as close as you can to 160NM / 118lb-ft of torque with your ratchet cause you cannot get a torque wrench in that confined area. 14) Now using your 21mm closed wrench and 18mm socket on a torque wrench, tighten the bolt to 160NM / 118lb-ft of torque. 15) Now tighten the adjustment nut on the Fork-End of the Control Arm as tight as you can without having the Vise Grip Pliers slip off. 16) Now reinstall the Plastic Cover and its 2 plastic nuts and Place the Guide Rod back in the Top Lug Hole & Reinstall the Wheel with 130NM of torque on the lug bolts. Now go for a drive and enjoy the sound of the other noises you have in your interior like rattling windstop, dash rattles, leaf in your ventalation system :)
-
DIY - Replace Rear Upper Control Arms (Track Arms) Ok This is a DIY on how to replace your Rear Upper Control Arms (Track Arms), However I am not replacing the factory equipment with OEM Rear Upper Control Arms (Track Arms), I will be installing a Set of Adjustable Control Arms purchased from eBay Seller DelubozParts. A MUCH LESS expensive alternative inlew of buying a set of OEM Rear Upper Control Arms (Track Arms). If you have chattering or rattling noise coming from your rear suspension, Chances are that its a worn-out Bearing Cartridge on Author CJ_Boxster Category Boxster (986) - Common Fixes and Repairs Submitted 02/17/2007 09:13 PM
-
Noisy Boxster Rear Suspension
CJ_Boxster replied to w_pienaar's topic in 986 Series (Boxster, Boxster S)
Ok yesterday i installed the passenger side Adjustible Rear Control Arm... which was the noiseiest control arm on the car, The Control arm went right in, I had to remove it to readjust the length cause i didnt measure it correctly at first but once i finished i noticed ALOT of things different about the drive of the car. Now, i dont here the chatter in the rear suspension while going over bumps, I dont hear the clack clack when i rapidly accelerate then release the accelerator. The rear-end feels alittle more solid and doesnt feel sloppy as it did before, Its probably all in my head but i do remember hearing a slight clack when accelerating from 0mph and also when reversing and rolling slightly forward while parking in the street... I dont get any of that anymore. I inspected the old worn control arm and you all might be suprised but bearing had only about a fraction of a millimeter of play... Amazing how much noise can generate from a fraction of a millimeter of play. Saturday I will be installing the drivers side control arm and snaping more photos for a write up. -
Noisy Boxster Rear Suspension
CJ_Boxster replied to w_pienaar's topic in 986 Series (Boxster, Boxster S)
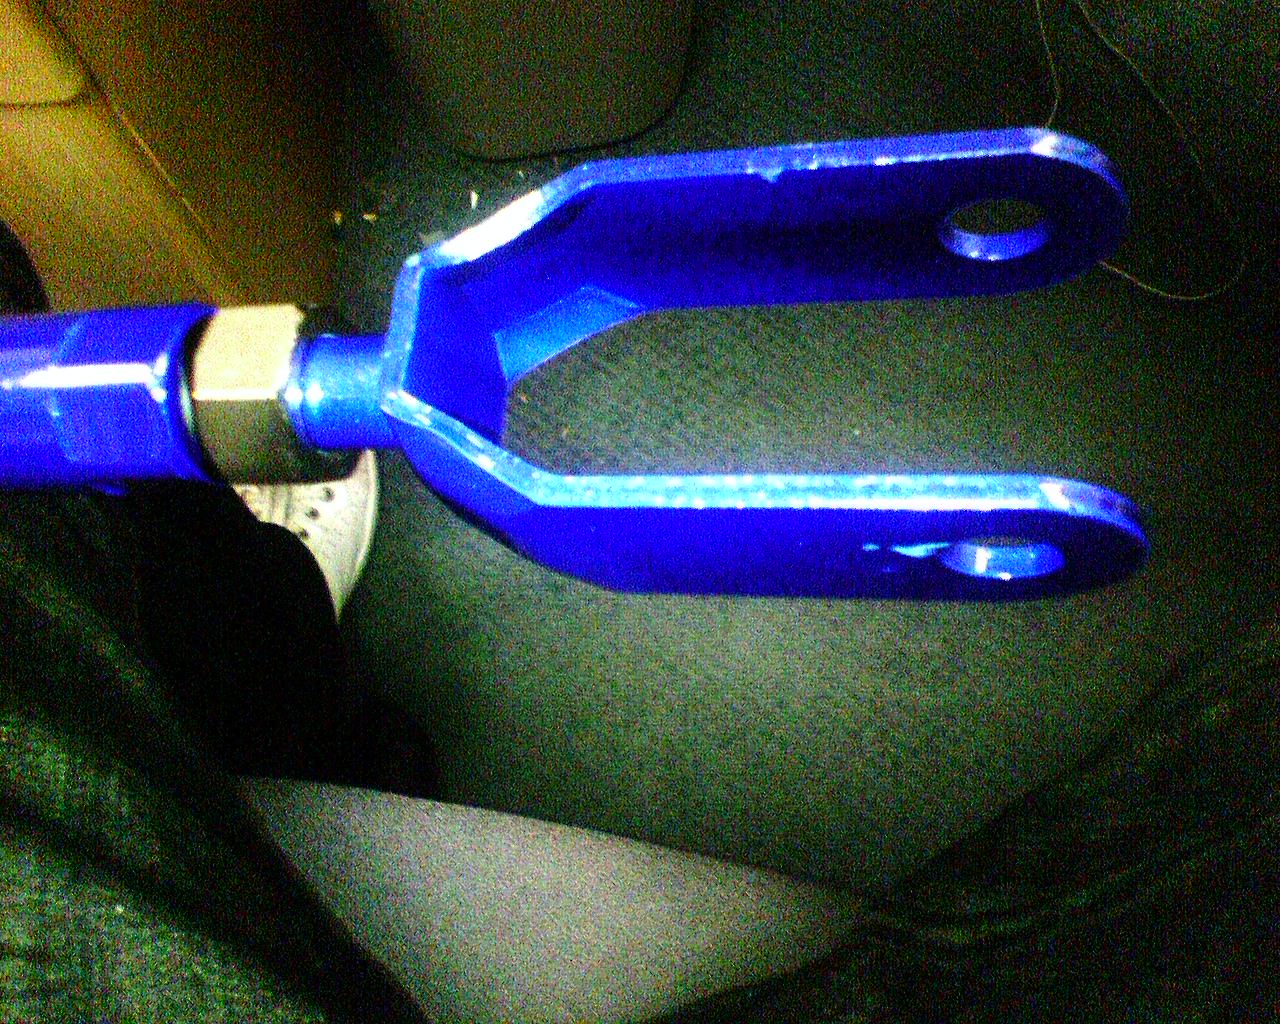
Here, I attached a picture of the fork end of the control arm, I measured it and its slightly over 1/8 inch thick, Im not 100% sure its steel but its heavy and impossible for me to flex or bend with my hands.
-
Noisy Boxster Rear Suspension
CJ_Boxster replied to w_pienaar's topic in 986 Series (Boxster, Boxster S)
Well that was my concurn also before i received them, I was worried the fork end wouldnt be sturdy enough but not anymore after looking at it, The fork end is actually really really heavy and strong, I cant bend it or flex it at all with my bare hands. Its really thick but the pictures dont really show it. -
Noisy Boxster Rear Suspension
CJ_Boxster replied to w_pienaar's topic in 986 Series (Boxster, Boxster S)
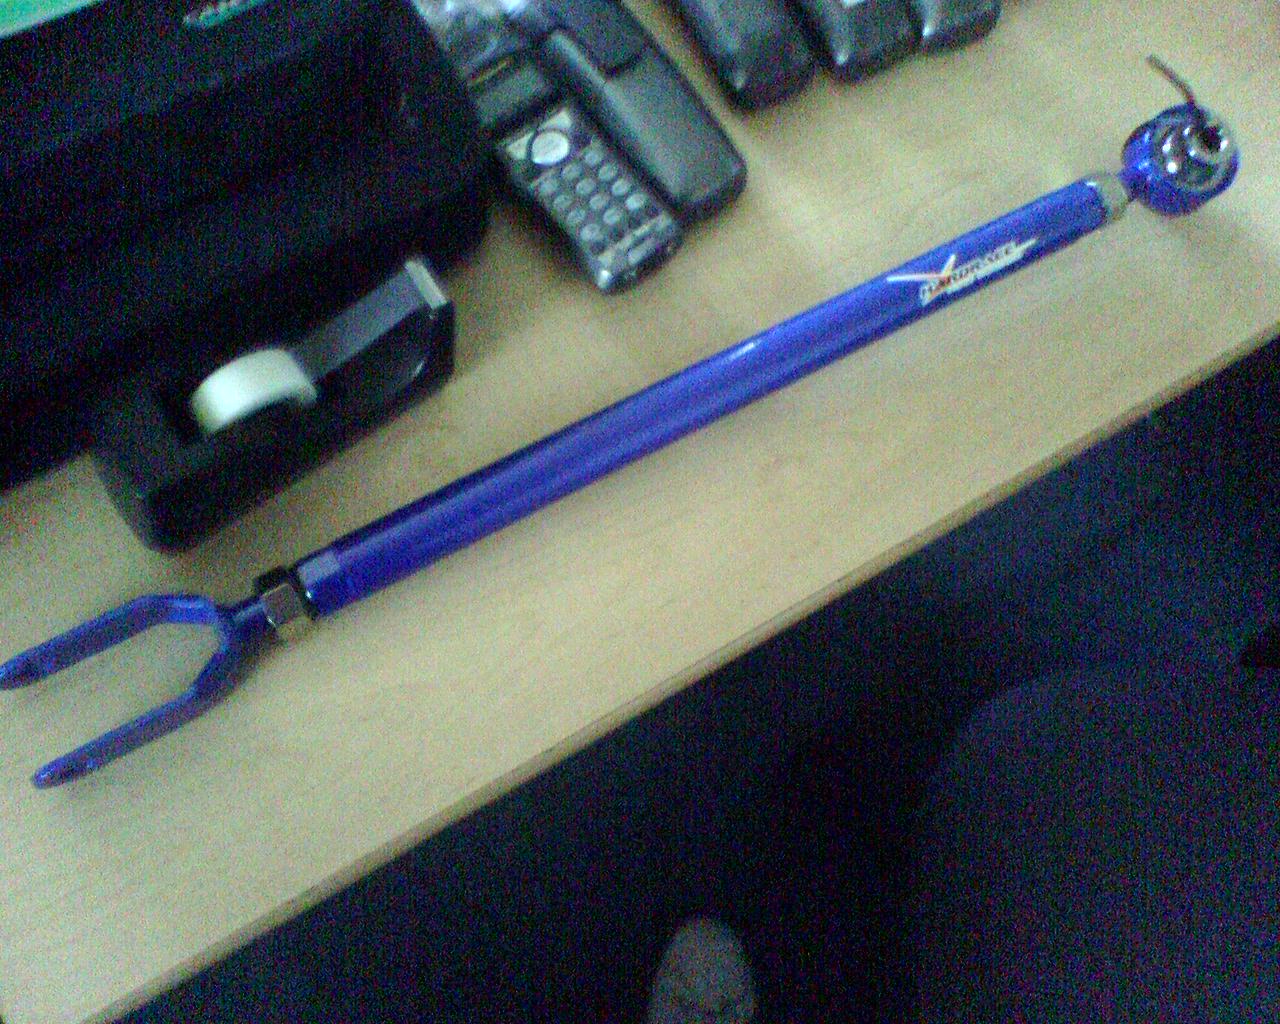
Ok Fellas, Good news, I received the control arms from that vendor i mention in this thread, All i have to say is WOW, these look so good, the steel is heavy gauge, the welds are worthy of suspension parts and not to mention, they look cool in blue. Ill will be making a DIY write-up so that everyone can know how to adjust them to spec before installing them. I attached a picture of the control arms that i bought.
-
To get a set of NEW ADJUSTIBLE control arms is about $269.99 from this guy that posts on this other forum im apart of... http://986forum.com/forums/showpost.php?p=...p;postcount=162 Just click his name and send him a message... you may need to become a member of that forum to send him messages.
-
Various CEL's and a lot replaced..
CJ_Boxster replied to doubleb's topic in 986 Series (Boxster, Boxster S)
Try a smoke test, its possible you have a vacum leak. smoke test is one of the best ways of locating leaks. -
hard run=hard start
CJ_Boxster replied to boxstermao's topic in 996 Series (Carrera, Carrera 4, Carrera 4S, Targa)
how does it run after you finally get it to run after a hard run? Get your compression checked -
Suspension Upgrade
CJ_Boxster replied to Cesarfl's topic in 996 Series (Carrera, Carrera 4, Carrera 4S, Targa)
Well your definatly going to want to change the springs to something alittle less stiff that wont ruin your lowered stance. But the Shocks, Bilsteins are good, they improve ride quality and are self adjusting. -
Im glad you fixed it!