Welcome to RennTech.org Community, Guest
There are many great features available to you once you register at RennTech.org
You are free to view posts here, but you must log in to reply to existing posts, or to start your own new topic. Like most online communities, there are costs involved to maintain a site like this - so we encourage our members to subscribe or donate. All subscriptions and donations go to the costs operating and maintaining this site. We prefer that guests take part in our community and we offer a lot in return to those willing to join our corner of the Porsche world. This site is 99 percent member supported (less than 1 percent comes from advertising) - so please consider an annual subscription or donation to keep this site running.
Here are some of the features available - once you subscribe RennTech.org
- View Classified Ads
- DIY Tutorials
- Porsche TSB Listings (limited)
- VIN Decoder
- Special Offers
- Paint Codes
- Registry
- Videos System
- View Reviews
- and get rid of this welcome message
It takes just a few minutes to register, and it's quality Porsche information at a low cost.
Contributing Members also get these additional benefits:
(you become a Contributing Member by subscribing or donating money to the operation of this site)
- No ads - advertisements are removed
- Access the Contributors Only Forum
- Contributing Members Only Downloads
- Send attachments with PMs
- All image/file storage limits are substantially increased for all Contributing Members
- Option Codes Lookup
- VIN Option Lookups (limited)


FlashingBlade
-
Posts
89 -
Joined
-
Last visited
Content Type
Profiles
Events
Forums
Exterior Paint Colors
Downloads
Tutorials
Links Directory
Collections
Classifieds
Store
Everything posted by FlashingBlade
-
That sounds like a reasonable diagnosis. Is this a warranty item? So far I have not been too lucky for P to step warranty anything clutch related. I have the pre-owned extended warranty which is about to expire (figures). I have a regular 2002 C2. I gather my choices for clutch replacement are as follows: 1) Replace with OEM item 2) Replace with Turbo Clutch 3) Replace with Sport Clutch (which comes with a lighter flywheel). I am inclined to do 1 or 2. Any experiences in the benefits and downsides of 2? How much heavier is the clutch application? How does it affect driveability? Does it last longer than 1? Thanks.
-
The clutch saga continues: I had it checked out at the dealer and they believe either the clutch material disintegrated or the pressure plate warped. Neither one is of course covered under any sort of warrantee. However, the plot thickens. On my drive home I accelerated hard from one light, and the clutch pedal suddenly became very soft and the clutch started slipping. Any speculations on what may have happened? Pressure plate defective? I still feel this is not normal wear and tear. The clutch material was examined about 5k miles ago during an RMS replacement and found to have 50% material left. On my other cars, I usually get around 100k miles out of a clutch, so I find this to be a bit soon. I am familiar with a clutch slipping but not the sudden change in pedal feel.
-
The clutch pedal feels smooth(er). I did some more testing, and what I seem to feel is engine rotation transmitted to the pedal. So the stick slip feel seems synchronized with engine rpm. To answer some of the other questions, I did pressure bleed my brakes recently, but I did not do my clutch.
-
I am trying to diagnose a strange clutch problem for an 02 C2. When I try to engage the clutch with the engine running, it feels as though the pedal releases in sticks-and-slips, making it hard to engage smoothly in stop and go traffic. There also seems to be more clutch chatter. This almost happened overnight. About 10k miles ago the clutch was declared as healthy for an RMS repair. Any idea what the cause could be? Release bearing? Pressure plate binding on the splines? Thanks.
-
Strange Brake Problem
FlashingBlade replied to FlashingBlade's topic in 996 Series (Carrera, Carrera 4, Carrera 4S, Targa)
Yes, they are rust rings. I agree with you all, that probably the best remedy is to get new pads and rotors. While waiting for my mail order I decided to take all the pads out, and grind them flat with my sander. Next I cleaned the rotors and pads with brake cleaner, and reseated the pads. Braking has improved markedly and because the pads started of flat, the height of the ridges in the rotors. has been reduced somewhat. The rust rings are also gone. Not sure I would recommend doing this, but at least it did improve the situation. I am also amazed how easy it is to replace the pads on these cars. You can just about do it with out any tools. -
Strange Brake Problem
FlashingBlade replied to FlashingBlade's topic in 996 Series (Carrera, Carrera 4, Carrera 4S, Targa)
Stock pads. -
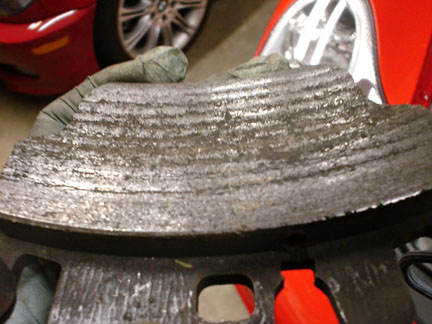
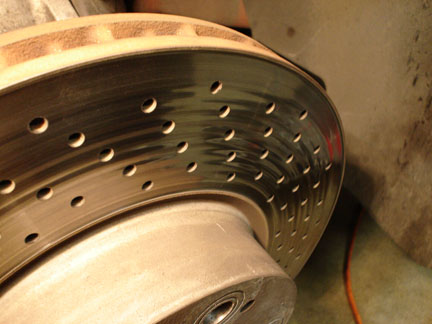
After my last DE event I washed my car. There was a lot of brake dust on the wheels and so I used a strong jet of water to wash most of it off. Some of the spray inadvertently went onto the rotors and actually managed to wash out the brake dust through the cross drilled holes. Needless to say, the disc started rusting almost immediately. So far, this is all normal. I went for a drive afterwards and braking was significantly less effective. I figured the pads must still be wet, and the problem will go away after a couple of stops. It did not, even after 2 more days of (careful) driving. It felt like the brakes were slippery and I needed a lot more pressure to stop. First I suspected air in the lines, but pressure bleeding did not help. I bit the bullet and removed all pads. What I found was uneven wear on all pads. Parts of the pads were smooth (which is how I would expect them to look) but other portions were rusty looking or rough (see middle of pad in the picture). The rough parts on the pad typically corresponded to still rusty looking tracks on the rotors (see middle of the rotor, towards the left of the picture). All the rotors are scored, but they have been this way for a while. They seem to be within the wear limit. Question for the collective intellect: 1) Is it normal for rotors to look this scored? 2) What's the mechanism behind this strange problem? Moist brake dust in the cross drilled holes contaminated the pads which in turn transferred to the discs? 3) Anyone else have had this happen, and what was you remedy? Thanks.

-
Do these things have counter balance weights? From the pictures it does not look like it.
-
Sounds like another Slick50, graphite, snake oil, whatever, additive. I'd be rather careful pouring anything into my engine that Porsche did not explicitly approve. I assume they know a little bit more about tribology than I do. In the case of slick 50, Dupont considered it an unauthorized use of their product and asked the Slick50 guys to stop advertising it using the Teflon name. IIRC, most of the PTFE ended up stuck in the filter doing little good to the engine. This is not to say that some of these additives don't reduce friction. MoS2 for example decreases friction in grease by 50%, but that does not mean that it's necessarily good to add to your engine. There is more to it then that. Regarding the ceramic oil additive...I find it suspect that it's only good for engines up to 2.5l. Huh?
-
I am considering retrofitting a tire pressure monitoring system to my wheels, and I was wondering whether any of your could recommend me one. I am not looking for anything too sophisticated, just something that will give me a warning if the pressure falls below some preset limit (20 psi?), is small and adds minimal weight to the wheels. I got a little bit of scare the other day during a DE event when my car suddenly started vibrating and I thought I had a flat. Fortunately, it was only an accumulation of gumballs that my tires had picked up. Thanks.
-
Brake Pad Change Instructions
FlashingBlade replied to Loren's topic in DIY Articles - Carrera (996) - Maintenance
While you have your wheel off, you may as well take a small drill bit and clear all the holes in your rotors. Some of mine were clogged. When you are done, clean off with some brake fluid. -
This message pertains to a US 2002 996 C2 with CDR-220 + CD Changer. First, I am aware of the various ways to hook up an IPOD with the Becker cables (most notable Oriental Express' excellent write up). I was wondering whether any of you have attempted the following solution? As many of you probably know, the CD changer is not made by Becker, and the connector to it resembles an Alpine AI-NET connector. I stumbled upon the following web site that seems to offer an interesting solution that would allow me to just plug the IPOD in. http://www.discountcarstereo.com/detail.aspx?ID=935 and http://www.discountcarstereo.com/detail.aspx?ID=881 see also the other possibilities further down the page. Even if I can't control the IPOD through the head unit, as long as I can get power and sound through this cable (and the parallel RCA jacks), I'd be happy. I figure a wireless remote control would suffice to flip through songs (I intend to leave the ipod in the trunk, less messing around in the passenger compartment). Any experiences greatly appreciated. Thanks.
-
Battery
FlashingBlade replied to hunteje's topic in 996 Series (Carrera, Carrera 4, Carrera 4S, Targa)
Talking of weight savings, have any of you ever seen a non lead acid car battery? I gather that the Prius and such use NiMh or NiCd, so the technology does exist. Probably wont be cheap as a cellphone battery costs about as much as a car battery. -
Faster Speeds
FlashingBlade replied to Hombre's topic in 996 Series (Carrera, Carrera 4, Carrera 4S, Targa)
Aerodynamics start playing a major roll at those speeds, and so the little pieces of plastic that you may or may not have may influence how the car feels like. You may also want to make sure your alignment is ok. If it's off, the car may feel unstable. -
I am looking for feedback/gotchas for using a Neo unit from www.mp3yourcar.com to connect an iPod to a CR-220 unit in a US 2002 C2 with stock CD changer (no nav, pre-MOST). Ideally I'd like to just leave the iPod in the trunk. Does it work as well as advertised? Is the CD Changer still usable? Does it power on and off with the radio? Does it require removal of the radio, or can the instal be done at the CD Changer? Do the controls with the head unit work ok? How do you jump between playlists, or are you limited to 6 playlists (i.e. is a playlist an emulated "CD")? What are the gotchas? Are all songs accessible through the radio? How do you switch from iPod to CD changer? Thanks.
-
Yes, you will have to upgrade to the 03 relay. The 02 relay does not have the switch override built in (the pins are not connected internally nor does the circuit board have the circuitry).
-
1) When reinstalling the bolts, coat them with some Anti-Seize compound 2) There is a DIY article on polishing your tips using polishing rouge.
-
Thanks to Specialist's posting I was able to perform the bi-xenon conversion on a USA 02 996 C2. Here are a couple additional tips: o Before you start, mark the spots on some wall where your current low beams shine. I just used the wall of my garage. o You don't need to buy a new set of connectors, nor do you need a pin removal tool. You'll need two pins with the following part number: 999 652 744 20 available at your dealer. I bought a handfull in case I screw up. The pin looks like (see pic): o Once you remove the headlights, you will see the connector in the back. The connector can be removed by depressing two yellow clips in the rear. Use a mirror to locate the clips and then use a needle nosed plier to depress the clips by rotating the pliers aft. The connectors slides downwards and then out. o Locate the 3rd hole at the bottom and pry out the rubber plug from the rear using something like a dentist tool. o Crimp a 14AWG wire to the pin. I soldered as well and used some heat shrink tubing for insulation. o Push the pin into the empty slot with a needle nosed plier. Make sure it lined up right. This takes a fair amount of force. I found that rotating the pin 180 degrees sometimes works better. Make sure you don't bend the pin. o Splice this wire to the wire that comes out of the second slot. It is best to solder. Insulate. o I added some silicone caulking to rear of the new pin to prevent water build up. o Slide the connector back in, install the light and you are done. o Adjust the lights so that they shine more or less in the same spots that you marked previously The benefit of this modification is that both halogen and bi-xenon lights will work interchangably and costs only an additional 2US$ (in addition to the lights). It took me about an hour, but that included trying to figure all this out. Caveat: If you don't add this pin, the low beams will work, but your fog and highbeams won't. Hope this helps.
-
I finally obtained a couple of Bi-Xenons for my US 02 996 C2. Like other messages already pointed out, pluging them in will not make the high beams work nor will the fogs work. Like specialist pointed out in an earlier message http://www.renntech.org/forums/index.php?a...ost&id=4375 the xenon high beams use pin 3 in the connector in the car instead of pin 2. Since pin 2 is not used in the bi-xenons and pin 3 is not used in the halogens I plan to add a pin in the unused slot of the connector. Could someone please verify whether the following p/n is the correct pin for this: 999 652 744 20 It's a special order item, so there was no way to eye-ball whether it's the correct pin. If that is wrong, please let me know what the correct p/n is (or if VW/Audi has an equivalent). Will adding this pin make the fogs work as well? I noticed that if I leave one halogen in the car with a xenon, the fogs work. I figure it must be an errand current path. Thanks!
-
I feel more comfortable having a fire extinguisher next to me, and I am surprised that it's not required in the US, unlike in some Europe nations. This DIY contains 3 different methods of attaching a fire extinguisher to the passenger seat of a non-motorized regular 996/Boxster seat. Other seats (e.g., motorized, GT3, sports, whatever) may be different. These seats come equiped with two tabs with holes to which you can attach a bracket that can hold an extinguisher. See the first picture. Ignore the drill chuck for now. The purpose of having an extinguishersin your car is to extingish *small* fires before they get worse. Do NOT expect to extinguish an engulfing fire with these 1 - 2 lbs units. Just stand back and look real sorry. There are different kinds of extinguishers. The most popular ones that are small enough to fit in your car are either powder extinguishers, Halon, or Halotron. Powder extinguishers are inexpensive (e.g., 10$ for a Kidde unit at most hardware stores), effective but they leave a terrible mess. The dammage caused by the corrosive powder may be worse than the fire they extinguish, especially in the passenger compartment. The Kidde units typically don't come with metal brackets which is a must for cars and also required by most clubs. Club rules may also require a minimum size (e.g., > 2 lbs). A better choice are the Halon and Halotron units. Unfortunately, production of Halon has been banned because they dammage the Ozone layer, though you can probably still find a few units (at a very high cost). The current replacements are the Halotron units, however, be aware that the Amerex 2.5 lbs Halotron bottles are a tad longer than their Halon counter parts (15 1/2" vs 14 3/8"). Amerex seems to be the preferred choice for car extinguishers. They also come with metal brackets. http://www.amerex-fire.com/products.html Amerex sells both red as chrome plated extinguishers. Shop around for best prices and be aware of hefty shipping costs! In the US, probably your best bet is to get the Brey Krause R-2020 bracket http://www.bkauto.com/porsche/r2020.php and attach your extinguisher to that. List price is around 110US$. See a typically installation in the next two pictures: Note however that he extinguisher sticks out a bit, and also note the clearance of the Halon bottle to the right. A Halotron bottle is almost 1"larger which means it will be a pretty tight fit. Seat movement seems to be unimpaired, and neither is seating. I was also warned to raise the seat to it highest position when installing the BK unit to releave tension in the spring. It's very hard to compress the seat-raise spring. I also had a look at how they installed an extinguisher in Europe (see next two pics). This particular example was held in place by a plastic strap. It's not the cleanest install, but it was the least obtrusive and visible. The final option that I am aware of is to buy the Porsche bracket (996 521 674 00, about 15US$, you need to go to the stz2 section in PET to find it). See next picture. I decided to go this route, and get the smallest Amerex Halotron fire extinguisher (again, be aware of the club rules). I had to make an adaptor plate from a piece of metal (I used a piece of 0.03" thick aircraft aluminum) to mate the Amerex bracket with the Porsche bracket: see next picture with all the pieces ligned up and assembled before I painted the plate black. The Porsche bracket had a tab sticking out that I flattened. The bad part of all this is attaching the P bracket to the seat and then the rest of the parts without removing the seat. The Porsche specs call for 5mm diameter bolts. However, the holes in the seat are smaller and either require you to drill out the holes or tap them (good luck trying to get a drill in there). The simplest route is to use 4 mm bolts and locking nuts (with a few washers) which you can purchase at most hardware stores. Nevertheless, accessing these bolts and nuts for the P bracket, and then attaching the plate and extinguisher bracket requires some acrobatics and creative use of swivel tools and other tools to put this together. I did tap (5mm .8 pict, see first picture) the center hole under the seat, but it really serves no purpose because the P bracket actually slide above the hole and so a bolt does no good. This is why the Brey Krause methods is significantly easier to install. Nevertheless, I am happy with the results. The unit is tucked away like in a European install.
-
Fire extinguisher install options I feel more comfortable having a fire extinguisher next to me, and I am surprised that it's not required in the US, unlike in some Europe nations. This DIY contains 3 different methods of attaching a fire extinguisher to the passenger seat of a non-motorized regular 996/Boxster seat. Other seats (e.g., motorized, GT3, sports, whatever) may be different. These seats come equiped with two tabs with holes to which you can attach a bracket that can hold an extinguisher. See the first picture. Ignore Author FlashingBlade Category Carrera (996) - Mods Submitted 05/07/2006 12:19 PM
-
Valentine V1 installation
FlashingBlade replied to smackboy1's topic in 996 Series (Carrera, Carrera 4, Carrera 4S, Targa)
Why not just tap it into the dome light? Use a voltemeter to figure out which wire is switched. See also: http://www.geocities.com/porschecarrera996...v3_document.htm Note, there are several other resources on the web with a description. -
Aftermarket cd changer for 06 Boxster S
FlashingBlade replied to versed's topic in 987-1 Series (Boxster, Boxster S)
Why not use an iPod as "CD" changer? -
C2 Alignment
FlashingBlade replied to mdillian3690's topic in 996 Series (Carrera, Carrera 4, Carrera 4S, Targa)
1) You need all four wheels aligned for best results. 2) Depending on what you want to do with the car, the alignments differ (street only, mild performance, etc). 3) Have a person experienced with P's to look at your tires whether you need alignment. 4) Prices seem to range from ~120$ - 350$, depending on where you go (indy, dealer), though one lucky lister reported a ~60$ price. 5) Choose only an experienced alignment shop that either uses manual tools or the more advanced tools (Hunter 600?). Most regular alignment jigs cannot hold the necessary accuracy or repeatability. The tires for our cars are expensive, and you want to maximize your enjoyment of the vehicle. Story: I recently failed by DE inspection because of excessive rear tire wear. I was referred to an outstanding alignment shop and I was amazed what a difference the alignment made. The car handles dramatically better, without any major sacrifice to regular drivability. If there is interest in this mild street set up, I'll be happy to publish the specs. A second change was to run 32psi front and 36psi rear for the track versus the stock pressures. This worked really, really well! -
Will this fit in a Boxster?
FlashingBlade replied to jhall299's topic in 986 Series (Boxster, Boxster S)
What would be required to add such an item to a 2002 996 with the CDR 220? Thanks.