Welcome to RennTech.org Community, Guest
There are many great features available to you once you register at RennTech.org
You are free to view posts here, but you must log in to reply to existing posts, or to start your own new topic. Like most online communities, there are costs involved to maintain a site like this - so we encourage our members to subscribe or donate. All subscriptions and donations go to the costs operating and maintaining this site. We prefer that guests take part in our community and we offer a lot in return to those willing to join our corner of the Porsche world. This site is 99 percent member supported (less than 1 percent comes from advertising) - so please consider an annual subscription or donation to keep this site running.
Here are some of the features available - once you subscribe RennTech.org
- View Classified Ads
- DIY Tutorials
- Porsche TSB Listings (limited)
- VIN Decoder
- Special Offers
- Paint Codes
- Registry
- Videos System
- View Reviews
- and get rid of this welcome message
It takes just a few minutes to register, and it's quality Porsche information at a low cost.
Contributing Members also get these additional benefits:
(you become a Contributing Member by subscribing or donating money to the operation of this site)
- No ads - advertisements are removed
- Access the Contributors Only Forum
- Contributing Members Only Downloads
- Send attachments with PMs
- All image/file storage limits are substantially increased for all Contributing Members
- Option Codes Lookup
- VIN Option Lookups (limited)


FlashingBlade
-
Posts
89 -
Joined
-
Last visited
Content Type
Profiles
Events
Forums
Exterior Paint Colors
Downloads
Tutorials
Links Directory
Collections
Classifieds
Store
Everything posted by FlashingBlade
-
I personally would not spend too much time on this or agonize about it. Rotors are wearable items, so just get high temp enamel paint from some car store in whatever color suits you. I have used that tape of high temp paint on calipers of other cars with reasonable results. However, with that amount of rust I would certainly try to brush/sand most of it off and then use Naval Jelly (jellified phosphoric acid) to eat the rest of it off before you paint it. Don't bother with primer. Obviously, you DO NOT want any paint on the disc surfaces, and I also would not paint where the rim contacts the hub.
-
Wheel alignment required after first 5000 Km ?
FlashingBlade replied to raman39's topic in 987-1 Series (Boxster, Boxster S)
Funny that this subject came up because my 2002 C2 is in the shop for an alignment. I was showing a lot of inner edge tire wear on the right rear tire. Recommending an alignment is a good money maker for a shop. I'd be especially suspicous if they recommend one without examining the tires first and understanding how you drive the car. In my case it was clear something was going on. However, if you have even or normal wear for that type of car, just let it be. 60$ is a great deal, if they do a good job. Over here the going rate seems to be closer to 150-180US$ at an independent shop (that I would trust) and 300US$ or more at the dealer. You are right that most alignments are straightforward and you can get pretty close with just regular tools and measuring devices. The problem with the shade tree alignment is that for certain settings the springs need to be loaded up with the tires on a movable platform. From the looks of it, P's seem to have more adjustments than most cars, hence the higher price. Many cars, like VWs, have no adjustements for there rear and only toe & sometimes camber for the fronts. By the way, there are few alignment machines that have the necessary accuracy and repeatability to do a correct alignment. One of the better ones is the Hunter 600 (?), the one with the flashy things and camera. Surprisingly, the old fashioned method of using paint on a wheel and a scribe and manual tools is still one of the best ways of aligning a car. -
Left Qtr. Panel
FlashingBlade replied to mcvgums's topic in 996 Series (Carrera, Carrera 4, Carrera 4S, Targa)
Make sure they use the same paint the factory uses. I suspect it's Glazurit. Main issues is that different paint brands use different pigments, and hence fade differently over time. -
Car covers supposedly are one of the better deterrents in both break-ins and preventing other acts of vandalism (and minor door dings). The main reason is that they are pain to deal with (especially if you lock it), slows down the theft, more obvious that someone is messing with the car, and makes it harder to see what's in the car. Of course you'll feel like an idiot covering your car in an underground garage. I generally cover mine at work, or if I need to leave it somewhere for any length of time. I'd love to find one of those car covers that has a junker painted on it.
-
The old recommendation was to wait at least 90 days to have paint cure and gas out. Driving in the rain helps the process, supposedly. However, this was for the solvent based paints, and I don't know whether P's now uses water based paints, clear coats, and what the rules are for those. Best to ask the installer what they recommend.
-
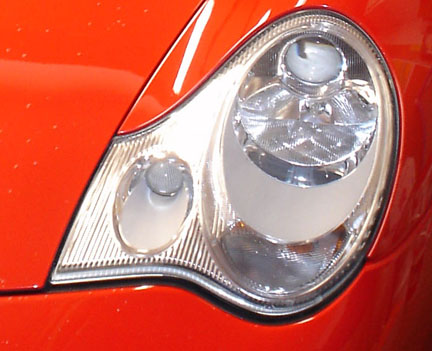
I too have searched for and posted similar questions, and like you have not found a difinitive answer. This is what I know so far: Most of what you see posted is for the pre-2001 cars (where it's called Litronics), not the newer ones (officially called Bi-Xenon). The Bi-Xenon lights have a self levelling feature which requires a different harness and more stuff added to the car. However some claim you don't need the additional instrumentation to enable the self levelling feature. I did see one retrofit posting (Boxter?) where the lack of self levelling caused the lamps to be levelled at different settings but I don't know whether this a common problem. Supposedly the guys at Pelican know what's needed, however they have never responded to my PM, and I have not dug any further. I have also considered a HID blub retrofit using the existing housing (for my US 2002 C2). Such kits cost about 500$ but may not be street legal in the US. There too I have not received any definitive answer. Some claim the lamp is too long and disrupts the beam pattern, others claim that it produces too much glare, but that info is largely based on the old style headlamp housings (or non-P cars) and I have no data on the newer projector type headlamp housing. The stock, post 2001, halogen projector type headlamp has a wider and more sharply cut off beam pattern, more like the European style beam patterns (which looks like _._._/ when you shine it on a wall), and therefore a HID retrofit may actually work just fine. Some also claim HID bulbs get too hot while other claim it's actually cooler than halogen lamps because it consumes 30W vs 55W for halogen. I know of no long term report of a HID retrofit in a post 2001 996. Comments on either a Bi-Xenon or a HID blub retrofit in post 2001 996s would therefore be greatly appreciated. Thanks.
-
I just used my fingers, and started at the top of the horseshoe. It's not on that tight. There are 2 tabs at the top and 1 (2?) tabs on each of the sides. So first pull the top until it's loose (as in 1/4") then pull each of the sides. Gently!
-
I noticed that one of the red crests of one of my wheel caps is missing somehow. The wheel cap crest looks like: http://www.wheelenhancement.com/Images/60s...rstinlplas2.jpg This is for a 2002 C2. I was wondering whether anyone found a touch up paint that would match that particular red? My rennlist search found: http://www.testors.com/catalog_browse.asp?ictNbr=72 but don't know which red is a close match. What I tried so far: o Imola red from a BMW. It's pretty close, but still a bit too bright. http://www.cardata.com/spoilers/Car_Paint_...paint_codes.htm o Dielectric insulation paint (the reddish-brown stuff you see on transformers, PCBs): Too orange. Suggestions welcome. Thanks
-
I was quoted somewhere between 40 and 50$ for a gallon locally, IIRC. But it's also the place where Bill has his 959 serviced...
-
Do a search for ''burning oil smell'' you will see that Pat posted a similar question in Feb 05. Quite a few replies. My car also smells after a drive. I have always assumed that it's small rubber particles from the tires, or whatever the tires pick up from the road, thrown on to the hot mufflers that's causing the smell. Most "regular" cars have their wheel wells shielded. Question now is, do all 996s smell after a drive or only some?
-
PM Sent to Eli. Thanks.
-
Good point. Any comments from anyone who has done a HID retrofit kit? Could the ballast be mounted on the exterior of the lamp housing like the OEM one? Thanks.
-
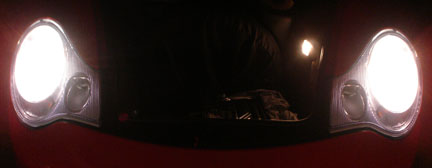
Before you dismiss this post, I have searched this and other news groups for this topic and have not found a definitive answer. Most of what I have found is relevant for pre 02 cars that can be retrofited with the Litronics kit or pertains to retrofitting non projector type headlights. I am looking to improve the lighting on my US 2002 996 C2: 1) What is involved with a stock bi-xenon retrofit? What is the final word on the autoleveling and wiring? 2) Regarding the HID retrofit kits (e.g. http://www.xtralights.com/index.asp?PageAc...PROD&ProdID=14) o What are the long term effects on the lens, mirror and headlamp housing? Any personal experiences? HIDs use 35 Watt bulbs, supposedly produce less heat but output more light in the visible range. o What are the effects on the beam pattern? The HID bulbs are longer and therefore may mess up the beam pattern. What are your experienes? Note: The 02 has the projector type headlight units (see below) and the pattern has a sharp horizontal cut off similar to our Xenon equiped 3 series BMW. The pattern is also much wider compared to typical US style beam patterns. I believe this is the cause of apparent lack of lighting, it's spread out more. When I first got the car I pulled over to see whether the lights were actually working. High beams are fabulous though. I already tried the Sylvania Silverstars and found the improvement underwhelming: Can you tell the difference? Thanks.

-
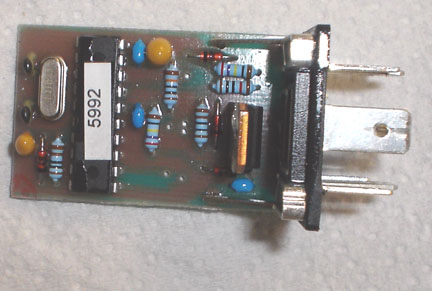
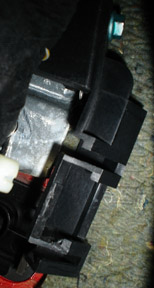
What do you mean by that? 99-04 electronics are all the same. In the early 2002 factory installs of PSE the dash switch was not included, but it is an easy retrofit. The version of the relay (996 618 980 02) installed in my car did not have the circuitry for manual override. I opened up the relay and sure enough, those pins are not connected. Compare the picture below with the -03 version floating in this newsgroup somewhere. I had to buy a new relay to make the switch work.
-
As some of you may recall, I last reported on my saga of installing a PSE override switch for my factory installed PSE (2002 996 C2). I also added a switch to the speed sensor wire as explained in another message. Now I am wondering what is better for the flaps in the muffler. Is it better for these things to be constantly opening and closing as your speed varies (possibly causing more mechanical wear) or leaving the flaps open, possibly causing soot and crud to build up on the flap? As a side note, this little project of adding a muffler override switch uncovered a host of other problems. The vacuum hose on one side had melted and the flap in the other muffler was defective and ratteling around. All the vacuum routings were incorrectly installed to boot. Porsche fixed all of it under warrantee. I'll eventually get this car debugged. Thanks.
-
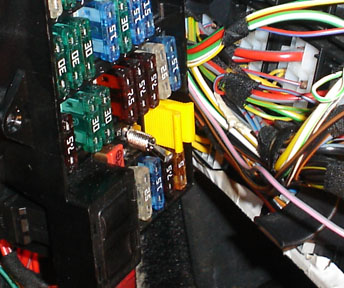
I recently went through this whole process as well. The most elegant though more complex solution is to add a mini toggle switch for the speed sensor. This allows you to switch it to the auto-cut off mode if you so desire. I also found a very convenient location to add the mini-toggle switch: right in an empty slot in the fuse panel. See picture below. I did have to trim the toggle switch lever a bit for the fuse panel to fit. I bought the mini (micro?) toggle switch at Radio Shack. Look for one with two contacts, which makes it easier to fully recess in the empty fuse panel slot as the slot is partiall covered at the end. A couple notes on the PSE relay. The - 02 model has no provisions for a manual switch over ride. For that you need the - 03 model. By the way, solder everything, use heat shrink tubing and then friction tape to be on the safe side. Be careful not to burn any holes...
-
The touch up paint that I got for my 2002 Guards red 996 was a horrible match (way too orrange). Apparently, there are two or more flavors of Guards red, but the parts dept was only able to find one: Guards red, aka, "Indish rot", paint code 80k, part number 911 095 932 20 80 K They claimed no spray paint was available. I prefer spray paint because the touch up stuff gets goopy too quickly. I usually spray the paint in the cap and then use a fine brush to touch up stone chips and small scratches. However, I noticed that the Guards red of the 996 was strickingly similar to the Flash red on my 1992 VW Corrado. So I tried some of the touch up paint of the VW and it was about as close a match as you could wish for. The paint code for Flash Red is LP3G and comes (came?) in both touch up flask (like nail polish) and spray paint. This may save you some money and get a better match to boot. YMMV because paint shades vary by batches.
-
Polishing your exhaust tips
FlashingBlade posted a tutorial in Carrera (996) - Common Fixes and Repairs
This is a summary of how to make your stainless steel exhaust tips look nice and shiny. Applicable cars: most 996, Boxsters, may be others. My exhaust tips were in a sad shape. I tried a variety of metal cleaners, but to no avail until "Oriental Express" provided the correct tip: you need to use some hard core polishing materials. I purchased a variety of 4 and 6" buffing wheels and several polishing compounds and an adapter to mount them on regular drill. I found the supplies made by Daco at ACE Hardware (not meant as an endorsement) but I am sure other stores and brands exist. You'll find all you need in the same section. The bigger wheels with more stitches are better to start of with because they provide more speed and are stiffer to allow you to exert more pressure. For final polishing a smaller wheel may work but 2 larger discs will work as well. You only want to use one type of compound per disc. The polishing compounds, also made by Daco, come in paper wrapped sticks, and resemble hardened wax. These compounds come in a variety of grits, and what seemed to work best for me was to start of with "Chrome" polishing rouge (CR1) to get most of the crud of and then finish with polishing rouge made for softer metals (JR1). I mounted the disc on my drill, and then put the drill in my vice (vise?) ensuring that the cooling ducts were unobstructed. Removing the tips on my 996 was trivial. They are held in place by a single bolt. Remove the bolt and slide the tip off. Next clean of most of the crud of the tip. Put on you ear plugs and your safety glasses and start the drill. Take the CR1 polishing compound and hold it against the spinning disc. Now hold the tip in both hands and hold start polishing the tip. You may want to keep the relative position of the tip and the disc consistent so you don't get any cross hatching. I lined up the axis of the tip orthogonal with the axis of the disc. Hold on tight and wiggle back and forth. I was surprised how much pressure I needed to exert to have the polishing rouge work. It would heat up hot to the touch before it actually did anything. Use more polishing compound once in a while. The CR1 will leave the tip slightly brushed looking. If you want a higher gloss you will want to use the finer grit JR1. Expect this to take 30-60 mins per tip, so it's certainly a labor of love. Next I cleaned it off with Meguire's metal polish (mostly to get the polishing compound off) and then finished of with RejeX (but any wax will probably work fine). Clean tips make a surprising difference! -
Polishing your exhaust tips This is a summary of how to make your stainless steel exhaust tips look nice and shiny. Applicable cars: most 996, Boxsters, may be others. My exhaust tips were in a sad shape. I tried a variety of metal cleaners, but to no avail until "Oriental Express" provided the correct tip: you need to use some hard core polishing materials. I purchased a variety of 4 and 6" buffing wheels and several polishing compounds and an adapter to mount them on regular drill. I found the supplies made by Daco Author FlashingBlade Category Carrera (996) - Common Fixes and Repairs Submitted 12/18/2005 11:10 PM
-
2002 C2 Coupe with PSE Last week the RMS leaked and was replaced, supposedly with the latest generation seal. I also complained about a rattle in the driver's side muffler and they decided to replace it. They also hooked up the vacuum lines to the other muffler which had gotten detached somehow. The car is now significantly quieter and the PSE override switch, which I put in a couple weeks ago, now actually works. I must have driven with this vacuum leak for a while, and apparently a defective muffler. The car sounded like a brassy hot rod with a rattle, now it sounds a lot more civilized. The downside however seems to be that the low end also feels weaker. Before the car would pull like a locomotive from 2k rpm, now power only really comes on above 3k rpm. Mileage also seems to have gotten worse, though only by about 1 mpg (I used to get 19 now 18). I checked to see whether any vacuum lines were detached, but everything seems fine. How could these actions create such an effect? Does a wide open muffler provide that much gain in low end? I can hardly immagine that the new RMS makes any difference. It seems to defy logic, and any thoughts on the matter would be appreciated. Thanks.
-
Topping off Oil
FlashingBlade replied to rcg412's topic in 996 Series (Carrera, Carrera 4, Carrera 4S, Targa)
Is there any danger in overfilling with oil? This being a dry sump system, it would seem to be not as critical as a wet sump system. -
It's a pain, and I am sure there is a special VW tool to do it with. I use a combination of tiny (jewelers?) screwdrivers and needle nose pliers to depress the detents and then slide the spade connectors out. The reason why I say VW is because the connector housing probably has a VW-Audi number on it. The housing costs 5$. Regrettably, I have not found the correct replacement spade connectors to plug into them (as in a part #). If you find out, let us know.
-
Radar Detector
FlashingBlade replied to dsnow's topic in 996 Series (Carrera, Carrera 4, Carrera 4S, Targa)
I would only agree with some of that statement. Laser detectors will most likely tell you to start slowing down so you can stop when the red light comes on. They are pricey, effective, but illegal. At least in California, all devices for jamming electronic speed enforcement devices are illegal. I am having problems parsing that statement, and so I'd like to clarify what I meant and what I know. Laser detectors are not illegal in (most?) of the US. Radar detectors are legal in most of the US except a few locations (DC? Virginia?). Laser jammers, being IR light, are not regulated by the FCC and therefore legal. Radar jammers are RF transmitters regulated by the FCC and therefore illegal. FWIW: http://www.beartraps.com/Blinder/LaserJammerLeagal.htm All forms of detection and ever worse, jamming, are illegal in all (?) of Canada and the Europe Union. Regrettably, I have. Instant on. No cars ahead of me, so no signals to warn me. I was a sitting duck. I did fight it and I did win on the grounds that the change in speed was obscured. I hate to admit that it took me an enormous amount of time (including field research) to find just the right angle (in all possible meanings of the word). Court was interesting. Amazing how poorly prepared people were. I was the only one who had done discovery. Also amazing how the judge tried to manipulate the crowd to change their plea, and left all those who wanted to get the ticket thrown until the very end. Other then saving me a negligible amount of money and lousy insurance rates for a couple of years, it did teach me a lot. I do want to emphasize, that speed enforcement is highly dependent on where you live and directly correlates with how effective a radar/laser detector will be. I have probably been pulled over more frequently by an undercover cop car pacing me on a freeway than by radar/laser in the Western states. East and midwest seem to relie more on radar or laser. -
Radar Detector
FlashingBlade replied to dsnow's topic in 996 Series (Carrera, Carrera 4, Carrera 4S, Targa)
Hmmm, I am not sure I agree with some of the statements of my dear fellow lister, but if that works for him/her, so much the better. It's a myth that the CHP is not allowed to use radar. They are and they do. The main problem is that funds need to be allocated by local communities to buy the equipment, and they typically don't, and secondly that it's often not pratical to use a radar gun on a 6 lane highway with all cars speeding well over 80. I have *never* seen radar enforcement on, for example, the 405 in LA. However, on 395 towards Mammouth watch out! However the lister brings up a good point. Each state has their own peculiar habits on speed enforcement and it is good to be aware of them. If you were a cop, where would you go to catch speeders? At the top of a hill or at the bottom? On a sunny day or rainy day? Near the holidays? There is a semi militant organization called something like the National Motorists Association that has additional tips. Regarding radar detectors, I have both an old Escort and now my 3rd upgraded V1. The V1 is very sensitive, but every one I have had so far have had glitches. The first one just failed after a couple of month. The second one would go off whenever I hit a bump. The current one is paranoid with some intermittent bogey behind me. However, when I turn the unit around, it's still showing a bogey to the rear, even though it's pointing forward. The problem comes and goes. The escort on the other hand, though currently entirely outdated, has been rock steady and consistent. Not sure of their current product line is as robust. So, I figure I'd just throw that in as a counter experience for otherwise an excellent, though bulky unit. The only use a laser detector is, is to tell you that you just got a ticket. You may want to be aware that there are also laser jammers for sale. Pricey, legal and effetive. -
The purpose of this posting is to both ask more questions and to archive some additional tricks for those of you who stumble upon it by a search. Situation: I am retrofitting a 2002 C2 with factory PSE with a PSE switch. All wiring up to the relay is in place. Question: How much attention should I pay to the color of wires because the wiring diagram for the PSE does NOT agree with the wiring colors to my 996 618 980 02 PSE relay (note, the -03 is the current rev). See enclosed picture: 1) Instead of 2 RD/BU wires I have 2 BK/BR wires that go to position 11 in the relay support. This wire is hot whenever the engine is on. I think BU = BLue 2) Instead of a GY/RD wire going to the rear valve, mine is BR/White The others are the same. Should I hook the common of the PSE switch (A4) to the same BK/BR wires the relay is hooked up to, or the RD/BL wire which goes to the common of the PSM switch on the dash? That lead is always hot. Chances are that it does not matter. Trick The relay support holder was an absolute bear to remove. Some of you are luckier. For some reason, two of the four "feet" that supports the door side of the holder were jammed behind the bar for the clip and I could not get enough leverage to slide the panel out. And, yes, I did remember the nut holding the other end. The trick is to simply loosen the bolt that holds that bracket. It a couple of inches above the "feet" and it slides right out. See enc pic. I had to bend the plastic bracket to get it out. Notes: The correct PSE switch numbers are: 996 613 987 10 A05 Black mat switch (for left side of dash) 996 613 988 10 A05 Black mat switch (for right side of dash) The Porsche publication "Exhaust system/Sport Exhaust 06/02 2601 Group 2" has it reversed. Either that, or the supplier randomly applies the left & right on either switch. If you want to be really anal, then you can get OEM tip switch socket make by VW/Audi. The part # is 443 972 995 but it has been superseded with 8N0 971 636 (about $5 at VW and 10$ at Audi. Go figure. Porsche could not look it up). The pin out for the lighting for the tip switches are not all the same. Some use the common A4 and A3, others use A3 & A5. So be aware when you hook things up from neighboring switches. You may want to check it out with a Volt meter first. The trend seems to be that switches with an indicator light use A4 and A3. Here is how to decode the tip switch pin outs. I am sure it's listed somewhere but could not find it. Look at http://www.gagme.com/greg/Boxster/hacks/garageswitch.html (basically look at the rear of the switch with the horizontal male connector on top) A = A3 (upper left) B = A4 (common) C = A4 (upper right) D = A1 (lower center left) E = A2 (lower center right) And of course thanks to Loren and Orient Express for their patience with my questions. Jan I should have labelled the relay support holder bracket picture a bit better. The bolt is in the upper right hand corner of the picture, and the bracket slide out in the direction of the bolt. The slightly mangled black plastic edge is where the relay support slides in.