Welcome to RennTech.org Community, Guest
There are many great features available to you once you register at RennTech.org
You are free to view posts here, but you must log in to reply to existing posts, or to start your own new topic. Like most online communities, there are costs involved to maintain a site like this - so we encourage our members to donate. All donations go to the costs operating and maintaining this site. We prefer that guests take part in our community and we offer a lot in return to those willing to join our corner of the Porsche world. This site is 99 percent member supported (less than 1 percent comes from advertising) - so please consider an annual donation to keep this site running.
Here are some of the features available - once you register at RennTech.org
- View Classified Ads
- DIY Tutorials
- Porsche TSB Listings (limited)
- VIN Decoder
- Special Offers
-
OBD II P-Codes - Paint Codes
- Registry
- Videos System
- View Reviews
- and get rid of this welcome message
It takes just a few minutes to register, and it's FREE
Contributing Members also get these additional benefits:
(you become a Contributing Member by donating money to the operation of this site)
- No ads - advertisements are removed
- Access the Contributors Only Forum
- Contributing Members Only Downloads
- Send attachments with PMs
- All image/file storage limits are substantially increased for all Contributing Members
- Option Codes Lookup
- VIN Option Lookups (limited)

flyingpenguin
-
Posts
296 -
Joined
-
Last visited
-
Days Won
1
Content Type
Profiles
Events
Forums
External Paint Colors
Downloads
Tutorials
Links Directory
Collections
Classifieds
Store
Everything posted by flyingpenguin
-
Bore > Stroke = less low end torque. As a reference, the cylinders of the 3.2 engine have a bore of 85.5 mm and stroke of 78.0 mm. So keep the revs up!
-
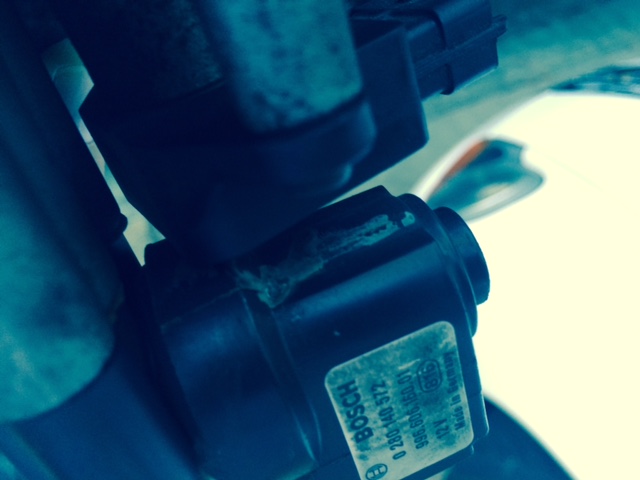
 Concur with JFP. Although I am not a fan of throwing parts at a problem, based on the info provided I would say it is most likely the CPS. The generic part is Bosch 0261210335 and can be had online or at your FOPS for a little over $100. Changing it out is not a major task; with the rear on jack stands and the right rear wheel off, you will need a hex socket (5mm) with a nice long extension (2 feet is good) to undo its bolt. See also: http://forums.pelicanparts.com/boxster-cayman-forum/593099-my99-boxster-crank-position-sensor-diy.html You do not need to remove the tranny, but the pic in this post shows location very well.
 -
Drive axle CV boots - need to buy parts
flyingpenguin replied to flyingpenguin's topic in 986 Series (Boxster, Boxster S)
Thanks Dennis. PET does not have spearate parts for rebuilding the drive axles. Porsche only sells the whole enchilada. At $12.50 shipped each I ordered 4 boot kits from rockauto and look forward to digging into this. Will revert. -
Outer boots on drive shafts are torn, but assume that internals can be saved and only will be needing boots and accompanying hardware. Am seeing several aftermarket parts for around $12-15 with boot, large and small clamps, snap ring and grease. Just wondering whether this fits both in- and outside? If so I can just order 4 in total, R&R the drive shafts, clean and reassemble. Beats the $700-800 per drive shaft for an OEM replacement. Can anyone confirm whether the boots for inside and out are the same?
-
Sounds like you're standing next to a waterfall.. Can't help with that unfortunately. Placement of microphone is important too, so maybe re-record with video and try to improve sound quality and reduce echo-ing.
-
The oil filler tube consists out of 2 parts. Maybe the brittle plastic on the rearmost part broke when you were dealing with the coolant tank. That part is easy to replace. If the front part (that connects to the top of the engine block) then you're in for a bit more fun. Let is know what you find.
-
No prior experience doing this, but could you disassemble the pieces by grinding down the plastic (melted down) rivets, then install metal rivets or screws in their place before re-skinning? This would allow for the individual parts to be reassembled.
-
Adam, As RFM suggested a good cleaning will aid on many fronts. You or your mechanic, or anyone else for that matter, will have a hard time identifying the several leaks as the air turbulence will deposit a mist throughout the engine bay, making it difficult to trace its origin. Gravity also plays a role in spreading any escaping oil. A good engine degreaser applied from the top to a warm engine and a hose down should clean things up quite a bit. An air gun / compressed air is needed to get moisture (including dissolved oil) out of the crevices on top of the block. A second cleaning / drying may be needed after the first round to get is squeaky clean so you can start you quest for elusive oil leaks. A short, hard run should get the oil weeping and allow you to identify the leaks. Good luck.
-
+1. Never tried it with motor in the car but imagine it adds to the fidgety-factor quite a bit. Pretty easy job when engine's out.
-
Hard plastic is likely your chain guides or variocam ramps. Pics?
-
Check racingbrake.com or store.zeckhausen.com. They have the dust boots that you need in case replacement is warranted (ie. torn boots). If you are having difficulty getting the boots around the pucks (the zircon ones), then zeckhausen has a good brake assembly lube that will facilitate this. Getting the caliper off the hub (not necessarily disconnecting the brakelines) will make your job a lot easier. Just be sure to follow correct re-installation procedure of caliper back to the hub..
-
snow tire options?
flyingpenguin replied to jimmythemufflers's topic in 986 Series (Boxster, Boxster S)
Checking on tirerack.com and going down the list of best rated performance / winter snow tires, it is surprising to see that many makes (Michelin, Goodyear and Pirelli) have a limited range of sizes. In fact not a single make has an exact fit for the 17" Boxster rims. The closest you can get is with Dunlop SP Winter Sport 3D's (see here: http://www.tirerack.com/tires/tires.jsp?tireMake=Dunlop&tireModel=SP+Winter+Sport+3D),and the closest size you can get is 215/50R17 @ $147 each for the fronts and 255/45R17 @ $178 each for the rears. You have to add shipping but there's also a rebate out that covers most of that at the time of writing. -
Part# 986.332.024.07 is what you need (at least that's what PET says). There's a few of them on Ebay for decent money.
-
Ebay has quite a few used ones on offer. May be a suitable alternative.. Just search for 986.332.024.07. All around $100.
-
Can you trace back work that was done to engine or gearbox that would have prompted gearbox removal? That's when the drive axles have to come loose (6 bolts on either side). Possibly not torqued properly and worked themselves loose over time.
-
Sticky window seal
flyingpenguin replied to flyingpenguin's topic in 986 Series (Boxster, Boxster S)
Success! But not until after a few tries.. Tried to wiggle the sticky felt tape underneath the outside window seal after cleaning with some brake cleaner (just a little bit on a rag), but even with an extra pair of hands it's impossible to get it nice and straight. Thankfully the roll of tape that I ordered had plentyon it, even after a few failed attempts. Finally got to removing the door card yesterday (I am sure there are DIY's on this or other forums), which then allows you to pull up the inside window seal and leave it dangling from the foremost attachment point (by the side mirror. With the window rolled all the way down, you can now position the felt tape underneath the seal, about a half inch in. After pressing it down along the entire length of the outside seal, there will be a good half inch sticking out that needs to be removed. I figured that scissors could do the job, but the adhesive backing is likely to stick to it. With a razor and steel ruler positioned underneath the felt tape (so kind of inserted under the seal), I managed to score the felt tape along the entire length, and make careful cuts to remove the excess material. Problem solved. No more rubber sticking to the window when rolling it down. Not sure how durable this solution will prove to be, but definitely worth the try. -
PET says that the bumper cover (zee djermans call it a liner) changed from part # 986-505-411-00 to 986-505-411-08/09 or 11 (for the one with park assist) in 2003. Not sure what those changes amounted to, but you would be taking a risk if buying off fleabay. I'd wait out and live with theye sore for a bit till I found the right one (used).. Have you seen this one? http://www.ebay.com/itm/1997-2002-PORSCHE-986-BOXSTER-FACTORY-OEM-REAR-BUMPER-COVER-GRADE-A-98650541101-/271352382398?pt=Motors_Car_Truck_Parts_Accessories&fits=Model%3ABoxster&hash=item3f2ddcc3be&vxp=mtr
-
On a scale of 1 to 10, how confident are you that the shop is capable of doing a good job on your Boxster? Then ask yourself the question how much are you looking forward to dicking around with this until you mess up the gearbox because of improper clutch release? I don't think your issue is easily fixed by consensus forum diagnostics. Just take it to someone that knows these cars.
-
Sticky window seal
flyingpenguin replied to flyingpenguin's topic in 986 Series (Boxster, Boxster S)
That's it! #4 is the correct one and with a pic of the actual part it all starts making sense. At $199 I am inclined to search for some of the hairy stuff as a stick-on tape first though. Will give this a try: http://www.amazon.com/dp/B000QDRRNE/ref=biss_dp_t_asn -
Rubber window seal is sticking when rolling down the driver side window. Rubber grabs the glass, gets folded in / down and puts unnecessary strain on window regulator mechanism, not to mention the terrible squeak. Tried dry lubing the seal with teflon spray (PTFE) to no avail. Upon closer inspection it is obvious that the inner lining (the soft hairy stuff) has worn away at the contact area where it hits the glass. Also, the lube leaves residue on the glass. So, time to replace the rubber seal. PET is unclear as to what part is needed. Any thoughts are welcome. Joost
-
As I already replaced the Crank Position sensor, I am thinking it is a fuel issue. Digging back in memory, it happens only when engine has already ran that day. Cold starts are never an issue. Also ever so rarely, WOT acceleration in the 4000-5000 rpm range results in slight hesitation. Maybe a fuel pressure regulator (only on the non-Egas cars from 97-99). It is not bothering me enough to fix it soon. Have other projects coming up (engine drop on the GT3) :-)
-
Having similar issues. No pattern whatsoever. Once every while it will turn over and take 2-5 secs. to kick in. If you turn the ignition key and let it sit in pos. 1 before cranking, it never fails. Maybe a lazy fuel pump?
-
Gotta love amazon! Drilling the pin out is still worth the try though. The ICV operates on an electromagnetic signal, so not very sophisticated and the both units I fixed this way survived the operation. I have an intake with fixed but working ICV for sale. See here: http://www.renntech.org/forums/topic/47455-garage-sale-many-porsche-parts-available/ Item #15. Make me an offer!
-
Updated P0133 issue need help
flyingpenguin replied to ebbjak's topic in 986 Series (Boxster, Boxster S)
The vacuum hoses are famous for causing air intake leaks throwing this type of code. If you remove the alternator the whole system is much more easily accessible via the service panel behind the seats. -
Opened up the engine bay on my 99 Boxster to verify your issue. The hole in the rubber sleeve on the passenger side should have a piece of vacuum hose (27 in the diagram below) that routes to a Y piece underneath there that connects to the vacuum tank. The hole on the driver side has a vacuum hose (not shown in this diagram) that routes to the fuel pressure regulator right by the AC compressor. As far as your ICV goes. It can be disassembled by removing a hollow pin and then twisting the top off the bottom part. In my case the pin did not survive the operation and was replaced by a phillips screw. Mine had also cracked and a bit of super glue did the job. I'd be surprised if your hunting idle wouldn't disappear when reconnecting the vacuum hose to the fuel regulator though. Keep us posted. Joost