Welcome to RennTech.org Community, Guest
There are many great features available to you once you register at RennTech.org
You are free to view posts here, but you must log in to reply to existing posts, or to start your own new topic. Like most online communities, there are costs involved to maintain a site like this - so we encourage our members to subscribe or donate. All subscriptions and donations go to the costs operating and maintaining this site. We prefer that guests take part in our community and we offer a lot in return to those willing to join our corner of the Porsche world. This site is 99 percent member supported (less than 1 percent comes from advertising) - so please consider an annual subscription or donation to keep this site running.
Here are some of the features available - once you subscribe RennTech.org
- View Classified Ads
- DIY Tutorials
- Porsche TSB Listings (limited)
- VIN Decoder
- Special Offers
- Paint Codes
- Registry
- Videos System
- View Reviews
- and get rid of this welcome message
It takes just a few minutes to register, and it's quality Porsche information at a low cost.
Contributing Members also get these additional benefits:
(you become a Contributing Member by subscribing or donating money to the operation of this site)
- No ads - advertisements are removed
- Access the Contributors Only Forum
- Contributing Members Only Downloads
- Send attachments with PMs
- All image/file storage limits are substantially increased for all Contributing Members
- Option Codes Lookup
- VIN Option Lookups (limited)

Ahsai
-
Posts
2,804 -
Joined
-
Last visited
-
Days Won
11
Content Type
Profiles
Events
Forums
External Paint Colors
Downloads
Tutorials
Links Directory
Collections
Classifieds
Store
Everything posted by Ahsai
-
Part number of these screws
Ahsai replied to Ahsai's topic in 996 Series (Carrera, Carrera 4, Carrera 4S, Targa)
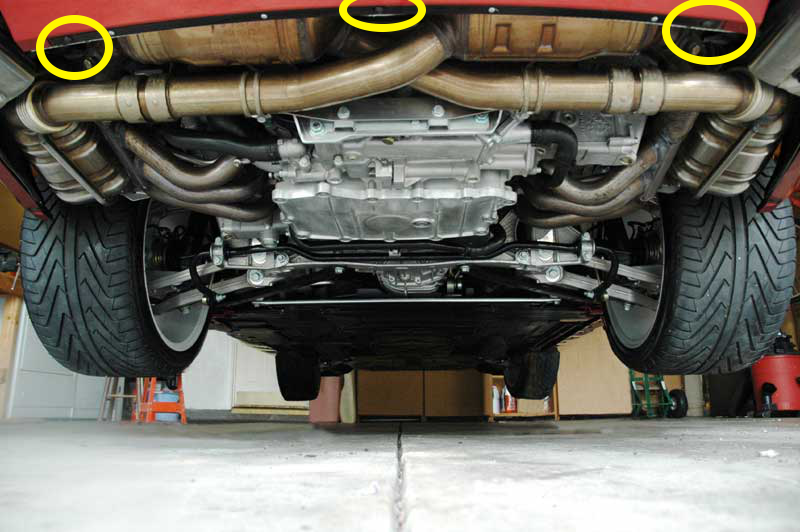
Actually the screws are fixing the center heatshiled #17 to #5 preventimg rattling. The rivets only fix #5 to #1. I couldn't find the screws in the catalog and I just wanted to make sure I didn't miss anything. -
Part number of these screws
Ahsai replied to Ahsai's topic in 996 Series (Carrera, Carrera 4, Carrera 4S, Targa)
I know hence my question :) Thanks for checking Loren. I lost two of them so I'm sure they exist, just not in the parts catalog haha -
Anyone knows the part number of these 3 black screws? 2002 996 c2 [pic taken from Orient Express]

-
Crank but no fire ***SOLVED***
Ahsai replied to txhokie4life's topic in 986 Series (Boxster, Boxster S)
What about transplanting the immo and the DME from the street car to your race car? Also back to the CPS signal, I still wonder if the p-to-p value is too low. Can you check the CPS signal of the street car at the dme for comparison also? -
Crank but no fire ***SOLVED***
Ahsai replied to txhokie4life's topic in 986 Series (Boxster, Boxster S)
Interesting. What's the pin number of that 2v pin? -
CEL - Code is P0455
Ahsai replied to esymonds's topic in 996 Series (Carrera, Carrera 4, Carrera 4S, Targa)
P0430 is bad bank 2 cat P0446 please check this post https://www.renntech.org/forums/topic/36978-code-p0446/ -
Crank but no fire ***SOLVED***
Ahsai replied to txhokie4life's topic in 986 Series (Boxster, Boxster S)
That's a good idea. -
99 boxster tick/tap noise
Ahsai replied to vza's topic in 986 Boxster Convertible Top Issues and Solutions
What are the cam deviation readings and any other pending error codes? Have you checked all the injector electrical connectors (if disconnected before)? -
99 boxster tick/tap noise
Ahsai replied to vza's topic in 986 Boxster Convertible Top Issues and Solutions
What RFM said. I needed almost 10quarts after I rebuilt my engine. -
Crank but no fire ***SOLVED***
Ahsai replied to txhokie4life's topic in 986 Series (Boxster, Boxster S)
Yup, dme is not ready to fire the engine. Hiw about the clutch switch? -
Noise after starting?
Ahsai replied to Porsche_Boxster986's topic in 986 Series (Boxster, Boxster S)
I heard it can be cleaned so you can bet your labor. Or you can just replace it with a brand new Bosch SR0808N for $200. -
Crank but no fire ***SOLVED***
Ahsai replied to txhokie4life's topic in 986 Series (Boxster, Boxster S)
Yes, pin 66 as mentioned in one of my posts above. That will tell you if the DME is ready to crank the starter and start the engine. -
Crank but no fire ***SOLVED***
Ahsai replied to txhokie4life's topic in 986 Series (Boxster, Boxster S)
I thought it was ~8v p-p too but the scope indicates a 10:1 probe is used. Crash/roll sensor makes sense. If no fuel injector firing, there will likely be no sparks too. Can you scan the SRS system for fault codes? -
Crank but no fire ***SOLVED***
Ahsai replied to txhokie4life's topic in 986 Series (Boxster, Boxster S)
Nice meter :) Is that ~60v peak to peak? The cranking speed looks good. The broken tooth signal is there as well. How about cam sensor signal? Your airbag theory sounds interesting. Is the thinking srs issue will make the dme disable the engine? The srs system should talk to the dme on one of the K lines. If I rip out my srs module, I expect the engine should still fire up although I never tried. No sparks either, right? Can't think of why the dme is not firing. If the cam sensors signal is not there, there should be error codes. -
Crank but no fire ***SOLVED***
Ahsai replied to txhokie4life's topic in 986 Series (Boxster, Boxster S)
It's entirely possible you have a wiring issue. There are 3 connections - the sensor plug, the X59 connector in the engine bay and the DME connector. When the senor is unplugged, you may want to check for continuity between the sensor socket and the DME pins. You should also ohm out the sensor. -
Crank but no fire ***SOLVED***
Ahsai replied to txhokie4life's topic in 986 Series (Boxster, Boxster S)
The tech bounce should be obvious. I'd say the needle raises about 1/8"~1/4" from the rest position. -
The M10 long bolt the alternator pivots on should be 34ftlb if it's grade 8.8. It's 48ftlb if it's grade 10.9. No idea about the second bolt on the alternator. The idle pulley M8 should be 17ftlb Note M10 means the shank of the bolt is 10mm in diameter and M8 means 8mm.
-
You need to add distilled water to the coolant to get a 50/50 mix. It IS inlb, which is inch x lb, the proper unit for torque. 90inlb means a force of e.g. 90lb applied at 1inch from the bolt or 1lb applied at 90inches from the bolt, or any combo that multiply to 90inlb.
-
The small bolts on the cover is 7.5ftlb. Best to use an inlb torque wrench set to 90inlb.
-
Sure. 1) See figure 4 here. Yes, a new crush washer would be ideal. Also you may want to use a vacuum tool to refill. 2) No gasket sealer. There should be a metal gasket 99610133150 for that coolant lid/bracket 3) I'll get back to you on this
-
I agree the voltage reading is strange like you explained. I wonder if one of the 2 wires (+5v power and signal) is shorted to +12v somewhere. If you can measure the DME C7 pin (red/violet wire), that would be good. It should be +5v feeding the two cam sensors.
-
New Bosch alternator AL0815N. Btw, best time to diagnose those codes you have while the alternator is out
-
That coolant lid/bracket can be replaced $380 from sunset porsche parts 99710102100 You can alao try to find a used one. Coolant will pour out if you remove the lid without draining the coolant first. Suggest you upgrade to the 997 150A new alternator from Bosch (cheaper).
-
CLUTCH SLAVE CYLINDER...
Ahsai replied to creekman's topic in 996 Series (Carrera, Carrera 4, Carrera 4S, Targa)
May as well replace the pressure plate. Where did that piece of metal come from? -
Use a booster pack or a real lead-acid battery (or hook it up to another car's battery) instead of the battery charger. It takes a few amps to unlock the hood/rear lid. Most battery chargers can't supply. The smart chargers are worse for this purpose because they don't even output power if they detect the battery is too low.