Welcome to RennTech.org Community, Guest
There are many great features available to you once you register at RennTech.org
You are free to view posts here, but you must log in to reply to existing posts, or to start your own new topic. Like most online communities, there are costs involved to maintain a site like this - so we encourage our members to donate. All donations go to the costs operating and maintaining this site. We prefer that guests take part in our community and we offer a lot in return to those willing to join our corner of the Porsche world. This site is 99 percent member supported (less than 1 percent comes from advertising) - so please consider an annual donation to keep this site running.
Here are some of the features available - once you register at RennTech.org
- View Classified Ads
- DIY Tutorials
- Porsche TSB Listings (limited)
- VIN Decoder
- Special Offers
-
OBD II P-Codes - Paint Codes
- Registry
- Videos System
- View Reviews
- and get rid of this welcome message
It takes just a few minutes to register, and it's FREE
Contributing Members also get these additional benefits:
(you become a Contributing Member by donating money to the operation of this site)
- No ads - advertisements are removed
- Access the Contributors Only Forum
- Contributing Members Only Downloads
- Send attachments with PMs
- All image/file storage limits are substantially increased for all Contributing Members
- Option Codes Lookup
- VIN Option Lookups (limited)

Ahsai
-
Posts
2,804 -
Joined
-
Last visited
-
Days Won
10
Content Type
Profiles
Events
Forums
External Paint Colors
Downloads
Tutorials
Links Directory
Collections
Store
Everything posted by Ahsai
-
CEL - Oxygen Sensor and Software Connections Issue
Ahsai replied to JRoser's topic in 986 Series (Boxster, Boxster S)
Could be the MAF over reading the air mass. I only know for 996 3.6L engine, the MAF should read about 17-19kg/hr at idle fully warmed up. For a 3.4L engine, I would expect 16-18kg/hr. Try to search to find the expected reading at both idle and 2500rpm for your car so you can compare those with your own MAF reading. -
Are all the spark plugs tight?
-
New 2000 in the Garage. Things to do!
Ahsai replied to valfam's topic in 996 Series (Carrera, Carrera 4, Carrera 4S, Targa)
I think when ever possible one should use what the OEM uses. the way I look at it. if the OEM part lasted 10 years then I guess I will get another 10 years of a new OEM part. Of course if there is a problem with the OEM part and they aftermarket has a fix for it then go aftermarket. Thanks. I think it's the regulator but I thought it came with the motor.Good you have the right thinking. You had me worried when you mentioned pepboys :)No, the motor is a separate part which is like $400+ I would like to find a local shop to give my business too, I don't like to order everything via the Internet. I need to start looking for a few local shops to buy supplies. I have seen online the prices for the regulator, I will be getting that soon. Oh I have a questions. when I open the passenger side door the glass does not go down the 10MM or so the glass hits the top of the rain channel, could that be caused by the bad regulator? Not sure. Maybe someone else can chime in. I think there's a micro-switch behind the door handle (inside the door) that activatse the lowering feature when the door handle is pulled. At least that's how I think it works. -
New 2000 in the Garage. Things to do!
Ahsai replied to valfam's topic in 996 Series (Carrera, Carrera 4, Carrera 4S, Targa)
I think when ever possible one should use what the OEM uses. the way I look at it. if the OEM part lasted 10 years then I guess I will get another 10 years of a new OEM part. Of course if there is a problem with the OEM part and they aftermarket has a fix for it then go aftermarket. Thanks. I think it's the regulator but I thought it came with the motor.Good you have the right thinking. You had me worried when you mentioned pepboys :)No, the motor is a seperate part which is like $400+ -
New 2000 in the Garage. Things to do!
Ahsai replied to valfam's topic in 996 Series (Carrera, Carrera 4, Carrera 4S, Targa)
I'm a big fan of OE fluids. Antifreeze $30/gal from Sunset Porsche. OE manual transmission fluid 3L not too expensive either. Brake fluid ATE gold 200 is good enough for street driving. Power steering fluid Pentosin CHF 202. Engine oil I like Motul 8100 xcess 5w-40 Re the window, are you sure it's the motor and not the regulator? -
The regulator is about $38 from Pelican parts. However note that there are other parts that are new in a rebuilt alternator e.g. diodes, bearing, etc.
-
Has the fuel filter been replaced? Checked and cleaned the idle stabilizer? Both radiator fans running on both low and high speed? Does the car die when idling and just driving around town? Or the stall or cut out happens even when at speed? Any work done on the flywheel? When you said no codes, did you use Durametric or just a generic OBDII scanner?
-
Stumped, where to start...Electrical?
Ahsai replied to otisdriftwood's topic in 986 Series (Boxster, Boxster S)
On a 986, if pulling up on the handbrake does not illuminate the idiot light on the dashboard, there will be no power to the convertible top mechanism. As the link provided by Ahsai shows, either clean the contacts on the microswitch under the handbrake or replace it. Sometimes if you keep pulling up and down on the handbrake with varying degrees of force, it will free up the switch and the idiot light will go on. When that happens, you will again have power to the top. Regards, Maurice.Ah, that makes a lot of sense, Maurice. So it's a safety feature to make sure the handbrake is on before the car supplies power to the Top. Clever. -
Niceguy, if you're still monitoring this thread, just want to let you know I just replaced my equivalent of your #28 in my car. I had about ~0.5v vdrop on that segment alone @52A. The new cable is thicker than the old one (9.1mm diameter vs 8mm), the vdrop is now only 50mV!! @ 54A load (a/c and low beam ON). It turns out my old cable is very corroded at the starter end where the two segments are joined together and covered by a rubber sleeve. You won't be able to see it until you remove the cable. So I think the latest version of #28 should improve your 0.22v vdrop there.
-
Stumped, where to start...Electrical?
Ahsai replied to otisdriftwood's topic in 986 Series (Boxster, Boxster S)
FYI http://www.renntech.org/forums/topic/31271-handbrake-light-wont-come-on/ -
Stumped, where to start...Electrical?
Ahsai replied to otisdriftwood's topic in 986 Series (Boxster, Boxster S)
On my 996, there's a microswitch benealth the handbrake to detect its position. I would think yours is similar so maybe the connection or that switch is not working. Oh yea, definitely check the battery's health and make sure the battery cables are not loose. It's possible the battery is so low that the ECU got reset which also reset the CEL (but the stored codes remained in teh non-volatile memory). The CEL should come back later when the fault triggering logic is met again (may take multiple drives). -
Stumped, where to start...Electrical?
Ahsai replied to otisdriftwood's topic in 986 Series (Boxster, Boxster S)
How old is your battery? You can get it tested at Autozone or alike. When you said brake indicator on the dash, do you mean the handbrake indicator? -
O-ring part number request
Ahsai replied to Ahsai's topic in 996 Series (Carrera, Carrera 4, Carrera 4S, Targa)
Thanks! Will do. -
O-ring part number request
Ahsai replied to Ahsai's topic in 996 Series (Carrera, Carrera 4, Carrera 4S, Targa)
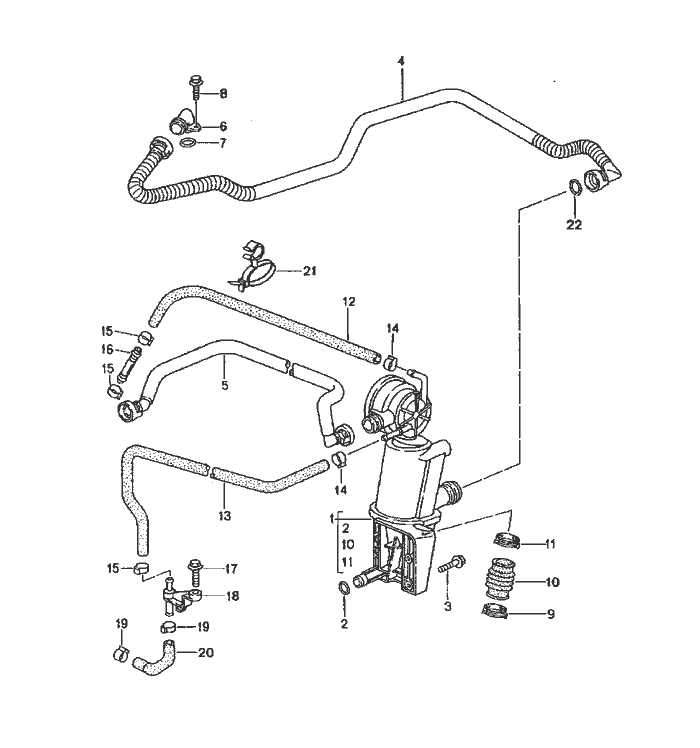
Thanks, Loren. The part you gave is #22 in this diagram. However, what I'm looking for is the o-ring on the left end of #5 (which connects to the throttle body). Do you know if such o-ring is avilable individually or I have to buy the whole #5. I suppose I could replace the o-ring, measure its size and get an equivalant...Thanks.
-
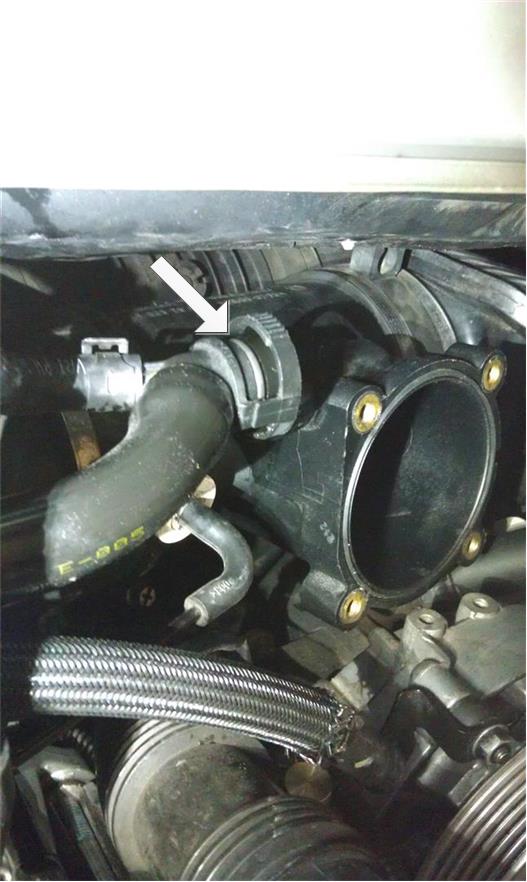
Hi guys, I checked but can't find the part number of this o-ring in the photo. It's the hose connection from the AOS to the throttle body. Any ideas? Mine is a 2003 C2 coupe. Stick shift. Also, the catalogue says the throttle body gasket on its right in the photo is G99611031750 but it's the wrong part! I bought it but it's bigger and thicker. The right part looks like it's this one http://www.autoatlanta.com/results.php?partnumber2=99711031900 , which is however listed only for Carrera 4. Any ideas? TIA
-
Any wire will do since we're measruing voltage and not current. The multimeter has about 10 mega ohm internal resistance when measuring voltage so the extra resistance of the long wires you add to the probes will have no appreciable effect at all. In fact, I prefer thinner wires (gauage #22 or thinner) since they limit the current/damage in case you short them out by mistake. Yes, "V" is voltage. V(x,y) is just a short hand for voltage drop between point x and point y. The above tests seem like a lot but in reality, you should be able to finish all of them in 5 minutes, if that once you have the meter and wires set up. Again wear safety goggles and pay attention to those always LIVE terminals/connections (i.e., A, J, and B+) and not to short those out to the ground side(chassis of the car). Keep in mind there's really no mystery. It's all physics that can be measured and diagnosed. Definitely not worth trading the car in!!
-
Any wire will do since we're measruing voltage and not current. The multimeter has about 10 mega ohm internal resistance when measuring voltage so the extra resistance of the long wires you add to the probes will have no appreciable effect at all. In fact, I prefer thinner wires (gauge #22 or thinner) since they limit the current/damage in case you short them out by mistake. Yes, "V" is voltage. V(x,y) is just a short hand for voltage drop between point x and point y. The above tests seem like a lot but in reality, you should be able to finish all of them in 5 minutes, if that once you have the meter and wires set up. Again wear safety goggles and pay attention to those always LIVE terminals/connections (i.e., A, J, and B+) and not to short those out to the ground side(chassis of the car). Keep in mind there's really no mystery. It's all physics that can be measured and diagnosed. Definitely not worth trading the car in!!
-
Thanks! Hope it will help Dave and others with similar problem as well.
-
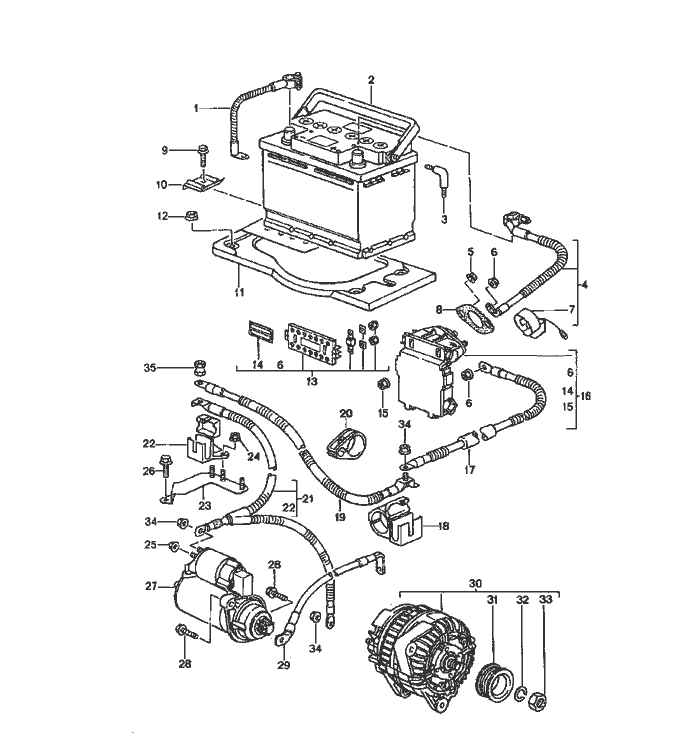
Dave, As Silver said, it should not be too difficult to track down the problem(s). All you need is a $15 multimeter. Run your engine till warm and the low voltage shows up, then let it idle and turn on the a/c and the low beam. The current draw from the alternator should now be ~50A. You can then do the following tests. I drew a diagram with the corresponding parts. Test #1: check voltage drop between point "C" (alternator casing) and "B-" (call that V(C, B-)). Note "B+' and "B-" are the actual battery terminals, not the cable connectors on the terminals. This test shows total voltage lost between the alternator and the battery on the ground side. Expect 0.2v or less. If your ground strap is bad, it will show up in this test. Test #2: check V(A, B+) where "A" = alternator output at the back of the alternator that you can't see (use an inspection mirror) and expect ~0.5v or less. "A" is hard to get to. I fabricated a J-shape hook using a stiff insulated wire and just literally probe it blindly from behind. Wear protective goggles here since you will be close to the drive belt, a hot engine, and the always LIVE "A". This test shows total voltage lost between the alternator and the battery on the power side. Test #3: check V(A, J) and expect ~0.2v. This tests #21, which is the infamous cable that can corrode and Porsche has also revised it. Test #4: check V(J, B+) and expect ~0.3v or less. Test #5: check V(A, C), your alternator output and expect 13.5v or higher. Your problem is gonna show up in one of the tests above.
-
JFP, correct me if I'm wrong but I think 2002 has this diagram instead?
-
Btw, the voltage regulator does compensate for temperature. Higher temp = lower output but nothing as low as what you saw. If when you saw 12.5V, there are not much load like a/c, headlight, etc. It's more likely your alternator/regulator. Anyway, you will need to run those vdrop tests to verify.
-
Have you tried any voltage drop test between the alternator and the battery? There's a recent very long thread here that has excellent info. http://www.renntech.org/forums/topic/44306-my-last-report/ The major suspects are the ground strap, the cable from the alternator output to the starter, and the voltage regulator itself. A few simple quick tests can isolate whether you lost the voltage on the ground side or the power side. Just try to read that thread first.
-
P1675 Porsche fault code 658 - Fault - engine purge fan
Ahsai replied to Silver_TT's topic in 996 TT, 996 TT S, 996 GT2
Yea, you need a DC clamp meter or spend $8 for this which lets you measure up to 50A when putting in series with the load http://www.amazon.com/Amico-Current-Measure-Divider-Shunt/dp/B006Z955M8 You measure the voltage drop across the shunt with your multimeter set to 2V to read the vdrop ( in mV), which is directly proportional to the current. The shunt is calibrated to have 75mV vdrop when 50A is passing through. -
P1675 Porsche fault code 658 - Fault - engine purge fan
Ahsai replied to Silver_TT's topic in 996 TT, 996 TT S, 996 GT2
Well done! -
Please help diagnose shifting problems
Ahsai replied to Xcellr8's topic in 986 Series (Boxster, Boxster S)
You're welcome. Yes, a faulty slave cylinder will cause the exact symptoms and so do other mechanical parts inside like you said. Just start with the simplest, which is bleeding the slave properly to make sure there's no air in it. If that doesn't work, either you throw in a new slave cylinder (and hope that's it) or you remove the transmission to do a full inspection - also a good opportunity to address the IMS/RMS the same time too. Please refer to the DIY tutorial here for 996. It should be similar http://www.renntech.org/forums/tutorials/article/54-brakeclutch-fluid-change-and-bleeding-instructions/ Make sure you start with the brake fluid at MAX before bleeding and with plenty of brake fluid in the bleeder. The clutch fluid has a seperate (and small) partition inside the reservoir seperated from the brake side and it's easy to "bottom out" if fulid supply is interrupted from the bleeder. If not at MAX, you may inadvertantly introduce air in the clutch side when you bleed. I always use a pressure bleeder (per the DIY) and do not know other reliable ways.