Welcome to RennTech.org Community, Guest
There are many great features available to you once you register at RennTech.org
You are free to view posts here, but you must log in to reply to existing posts, or to start your own new topic. Like most online communities, there are costs involved to maintain a site like this - so we encourage our members to subscribe or donate. All subscriptions and donations go to the costs operating and maintaining this site. We prefer that guests take part in our community and we offer a lot in return to those willing to join our corner of the Porsche world. This site is 99 percent member supported (less than 1 percent comes from advertising) - so please consider an annual subscription or donation to keep this site running.
Here are some of the features available - once you subscribe RennTech.org
- View Classified Ads
- DIY Tutorials
- Porsche TSB Listings (limited)
- VIN Decoder
- Special Offers
- Paint Codes
- Registry
- Videos System
- View Reviews
- and get rid of this welcome message
It takes just a few minutes to register, and it's quality Porsche information at a low cost.
Contributing Members also get these additional benefits:
(you become a Contributing Member by subscribing or donating money to the operation of this site)
- No ads - advertisements are removed
- Access the Contributors Only Forum
- Contributing Members Only Downloads
- Send attachments with PMs
- All image/file storage limits are substantially increased for all Contributing Members
- Option Codes Lookup
- VIN Option Lookups (limited)


xmac
-
Posts
178 -
Joined
-
Last visited
-
Days Won
2
Content Type
Profiles
Events
Forums
External Paint Colors
Downloads
Tutorials
Links Directory
Collections
Classifieds
Store
Everything posted by xmac
-
 Feds27, thanks for taking the time to write this up. Alfieboy, can you post some pics of the custom jack? I added the simple plug and jack with no power/charging capability to my CDR220. The only issue I have is that the sound quality is poor and it seems to pick up alternator whine heavily (no power cord involved). I can't complain since now I can listen to my music, but wondering if there is a simple filter or fix for it.
 -
Arghhh, I already cut off a chunk of the white wire as per the DIY. Everything else including wrapping it on the outside and facing the interior was followed, but as the TSB notes, the length is critical. I also replaced the batteries in both keys and got the same result. I threw away the piece I cut weeks ago when I did it never thinking I would need it. The distance definitely improved from 0-2feet up to around 8 feet, but I basically have to be right next to the car to lock/unlock.
-
After performing the remote DIY found here http://www.renntech....9662-made-easy/ I noticed I only marginally improved the remote distance. I searched around and actually read the TSB after the work (shame on me) where it asked to cut 100mm from the end first, THEN measure out 130mm of exposed wiring cutting the black sheathing if necessary to leave the 130mm exposed. The question I have is what is the approximate length of the section that gets cut off is when following the DIY? Is it close to 100mm? Just trying to figure out if I should cut some black sheathing or need to add length to get to the correct length.
-
When you try to turn the A/C on, does the clutch engage? If it is not engaging when you hit the snowflake button, it may just be low on refrigerant. They are typically designed not to allow the clutch to engage if the refrigerant pressure is low. If that is the case, you need to have it serviced.
-
Carbotech Bobcat 1521 Brake Pads
xmac replied to ivass's topic in 996 Series (Carrera, Carrera 4, Carrera 4S, Targa)
I used them on my former WRX. They were the worst fitment I have ever had of brake pads. The backing plates were made with horrible stamping equipment with a very poor finish and pad surfacing. I spent more time filing, shaping, and scraping off the uneven paint on the backing plate to get them to fit the calipers than getting them on the car. The pad thickness was also thicker than stock, so I had to install them without the noise reduction shims. In a word, they are sloppy. I wouldn't buy another set for any car. -
Quick tire size question on 20"
xmac replied to hakkiston's topic in 996 Series (Carrera, Carrera 4, Carrera 4S, Targa)
Assuming you keep the big wheels on the car, the closest diameter matching size that would fit requires a 10" rear wheel is 295/25/20. The 20" wheels really limit the sizes available. The tire I found in that size is Hankook Ventus V12 evo K110, which is not an N-rated tire either. -
Car Drifts To The Right
xmac replied to HalM's topic in 996 Series (Carrera, Carrera 4, Carrera 4S, Targa)
what tires do you have? -
Resurfacing Drilled Rotors
xmac replied to jose's topic in 996 Series (Carrera, Carrera 4, Carrera 4S, Targa)
Go to a place like harbor freight, sears, or even home depot, and buy a set of calipers: take the wheels off the car to expose the caliper, then measure the thickness in the shiny smooth section of the rotor. There will be a small lip near the outer edge of the rotor that will be thicker - don't measure there. Check the thickness compared to the minimums Loren posted (26 mm front and 22 mm rear). -
What is leaking?
xmac replied to Gonzo911's topic in 996 Series (Carrera, Carrera 4, Carrera 4S, Targa)
Take out the air filter box and you should get a better view. It takes all of 3 minutes to do: http://www.renntech.org/forums/tutorials/article/52-air-filter-change-instructions/ It is the opposite side of the reservoir (you are saying right/rear) but you never know what path leaking fluid will travel. -
Cylinder 1,2 and 3 died after engine work
xmac replied to Thoro's topic in 996 Series (Carrera, Carrera 4, Carrera 4S, Targa)
Glad to read that it is back and working again. I did not help but definitely want to learn from this.(It is amazing how much can go wrong with something so simple) Just to be clear was it item #4 or #5 that you had to push back in? -
Resurfacing Drilled Rotors
xmac replied to jose's topic in 996 Series (Carrera, Carrera 4, Carrera 4S, Targa)
It is possible. Some shops won't resurface drilled or slotted rotors, but shop around until you find one that does. Of course they need to be above the minimum thickness. -
Hit a Milestone Yesterday
xmac replied to xmac's topic in 996 Series (Carrera, Carrera 4, Carrera 4S, Targa)
Color code 555 Palladio Metalic (a.k.a. Palladium metallic, Gold, Platinum Bronze, Mirage, light brown ...), C4 factory aerokit with basic interior options, Litronic lights, clear side/corners, 3spoke steering, Sport Design Wheels, MB Quart Speakers/Crossovers and best of all 22,000 miles when I got it. My jaw hurts from the smile I get every time I drive it. -
I hit 25,000 miles last night. I am so happy the previous owner saved the car for me to break in.
-
Yet another coolant problem
xmac replied to bosstucker's topic in 996 Series (Carrera, Carrera 4, Carrera 4S, Targa)
The difference here is that he has to keep adding fluid. Maybe it is just an old revision cap that is not holding pressure. For around $25, worth updating the testing/updating the cap. -
Yet another coolant problem
xmac replied to bosstucker's topic in 996 Series (Carrera, Carrera 4, Carrera 4S, Targa)
I am still a bit perplexed as to what happened at the gas station. Clearly, something overheated but it is hard to believe the problem fixed itself. Follow this link for using a u-view 55000 airlift vacuum fill system (~$120): logray Uview Link Prior to refilling do a rate-of-rise check. This is where you pull a vacuum, close, the ball valve, then let the system sit for a few minutes. If there is no leak, the system will hold at -25. If it does not hold, you will then need to start checking for leaks. One clue if there is a leak, is that coolant dries to a chalky white, so look for that near connections. I just had a thought, maybe a leak in your A/C Heat Exchange (a.k.a. Heater core)? Check this thread out: Heater core replacement -
Posting here since I could not find any other posts on this particular error code P0332. Although there was no CEL present, the Durametric pulled the P0332 error code on my 99 C4 when doing some other checks that would not go away after clearing. After checking this thread, http://www.renntech.org/forums/topic/28652-p0327-porsche-fault-code-210-knock-sensor-1-please-help/ I decided to take the upper intake apart to check the wiring to the knock sensor. I removed the throttle body and upper intake tee. This allows much more room to get to things on top of the block like this knock sensor or oil pressure sender. To my surprise, just like in the other thread, some varmint had chewed through the entire cable wrap and wires to the knock sensor and the lead was making contact with the block. There was just enough wire left to solder on new leads to the connecter, strip the wires on the harness, then solder the connector back onto the wiring harness, seal it with heat shrink tubing, and wrapped it in spiral wrap. I am not sure what makes this particular cable tasty. I took the time to clean inside the upper intake and check for oil suction into the intake. No significant amount of oil was present, buttoned it up and cleared the code again. All in all about a 2 hour job taking my time. I hope this helps someone down the road. Picture below is of a typical knock sensor just to show what the sensor looks like, part# for a 996 is 996 606 125 00 and is about $80-$100. There are two sensors on the engine and very general location found in the "DME sensor" picture inside this DIY: 3.4 liter Engine Parts Locations
-
Low Coolant Light
xmac replied to ALLSPEED's topic in 996 Series (Carrera, Carrera 4, Carrera 4S, Targa)
Get a turkey baster and siphon out some of the coolant and get it back to the MAX level (seam of top/bottom pieces of the reservoir). It doesn't help to overfill the reservoir. If the plastic looks really brownish/yellow in color, it has not been replaced recently. A new/recently replaced one would be milky (opaque) white in color. As for the main problem, I would start with replacing the coolant level sensor. The coolant sensor is only $22 from Suncoast Updated 997... Coolant Sensor. I would replace that with the updated unit. (Part# 99764150300 ) If you decide to replace it, I would also order the new coolant cap that ends in .04 (Part# 99610644704 ) while you are at it - cheap and eassy update. In order to get to the level sensor, it is almost the same as replacing the entire reservoir (just replaced mine this past weekend). If your reservoir is yellow, it doesn't hurt to replace it but it is a pricey part. The cheapest I found it online (Part# 99610614756 ) was Suncoast for $239. I prefer to go to my local Porsche Dealer and get them to price match. Here is a link to a thread with the coolant sensor location and the tank color I am describing: Coolant Reservoir Leak -
Radar detector?
xmac replied to Gyorgy's topic in 996 Series (Carrera, Carrera 4, Carrera 4S, Targa)
It is a bit like asking what is the best oil to use, but... I use an Escort Passport 8500 X50 (wired) but flat cable hidden in A-pillar comes out near rear view mirror for a clean look. It has saved me from several tickets and I do not drive without it. It picks up several miles ahead if there is fairly flat terrain, less with topography. It detects X, K, Ka bands + laser (Ka or laser are most commonly used by CA highway patrol). The 9500 model has GPS built-in with many more bells/whistles that I didn't think was worth it. That said, I convinced a friend of mine to get the Valentine One after reading several good reviews. You definitely have to use common sense and use your wits, but I at least know when I am being monitored. Speedzone is a website with quantitative, supposedly unbiased data: Speedzones.com -
Coolant reservoir bleeder valve clogged?
xmac replied to xmac's topic in 996 Series (Carrera, Carrera 4, Carrera 4S, Targa)
Sorry I didn't clarify in the original post. The problem is that the plunger is pushing significantly beyond where the metal latch would hold it "open" and not letting anything out. For example, if the metal latch normally pulls the plunger up by 1/4", the problem I am seeing is that the plunger by itself is pushing out 1/2" and still not relieving pressure. If I crack open the radiator cap, the pressure drops and the plunger goes back down to the normal down position. -
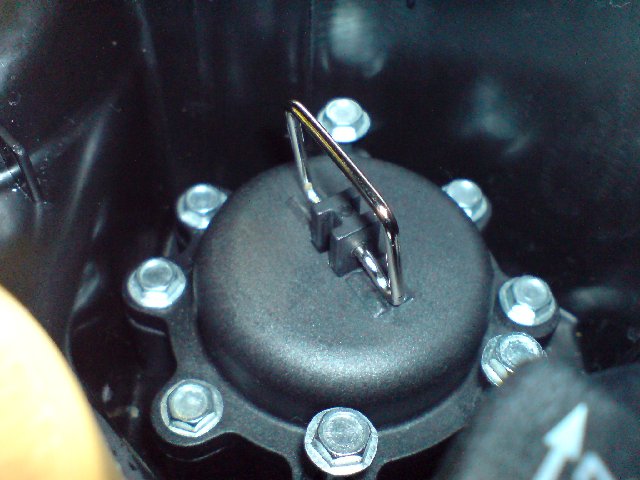
I noticed that when my engine has been warmed up, the bleeder valve on the coolant reservoir pushes outward and does not seem to relieve pressure. The metal latch is floating above the point where you would normally bring it up to "lock" it in place to bleed air out after maintenance. I carefully cracked open the reservoir coolant cap which let lots of air out and the bleeder valve immediately moved back down. The tank was replaced in 2003 so it is not the original. Questions: 1. Isn't the bleeder valve supposed to automatically allow air out even when not locked in the up position? 2. If so, any idea where the bleed point is to see if I can unclog it? I realize I have the option of replacing the bleeder valve only for $80 for a new valve. Looking at it though, it would be almost the same amount of work to replace the valve as it would be the whole tank. Clearly, the tank is holding pressure and not leaking. I attached a closeup of Boxster valve just for illustrative purposes.

-
I've used Autohausaz.com for years and they carry both. On another car, I used to switch between the two so you could tell by the color change that you flushed the entire line. However, as Loren says, it did dye the reservoir, lines, and calipers which after a while made it difficult to tell. I would just stick with the Typ 200: AutohausAZ.com
-
That's funny, this popped up on the front page in the "Recent Post" box and I didn't notice you posted it in April. Thanks for the links as I will be carefully reading them and also for posting all of the pictures. I just picked up my car 3 weeks ago and have barely put 500 miles on it. It only has 22,500 miles on it as the previous owner was saving it for me by not driving it. :) I did the basic oil change and checks and the only thing I plan to tackle soon is the spark plug tubes and diff/tranny fluid change.
-
I would be the first to admit, that I am inclined to do all same work on my '99 C4 - thanks for the list and links. I too would love to do everything on your list but just a word of caution. Take a look and read this March 2011 Sport Aviation Article: EAA Sport Aviation We did some work with Dr. James Ignizio, noted in the article, at a company where I was responsible for maintaining many multi-million dollar pieces of manufacturing equipment. We did find the same results as in most of the research that people cause Waddington Effect (overmaintining) by "fixing" things that might break. That said, I am also in NorCal and if you need a hand I would be happy to help.
-
How to add 12volt accessories.
xmac replied to j3w's topic in 9PA, 9PA1 (Cayenne, Cayenne S, Cayenne Turbo, Cayenne Turbo S)
The factory radio manual is a good starting point. For example, if you look on page 28 of the CDR220 manual, it shows 2 power wires you can use. Socket A, pin 4 shows a "Permanent positive" meaning power stays on with the ignition key out, the other one is Socket A pin 7 is a "Switched Positive" which only powers on when the key is in the accessory position or on. I am not sure which radio you have but I hope that helps point you in the right direction. -
Changing Tire Aspect Ratio
xmac replied to Jerry996's topic in 996 Series (Carrera, Carrera 4, Carrera 4S, Targa)
As much as I would have preferred the Conti's, I ended up going with the Hankook V12 EVO's in 295/30/18 & 225/40/18, should be here next week.