Welcome to RennTech.org Community, Guest
There are many great features available to you once you register at RennTech.org
You are free to view posts here, but you must log in to reply to existing posts, or to start your own new topic. Like most online communities, there are costs involved to maintain a site like this - so we encourage our members to subscribe or donate. All subscriptions and donations go to the costs operating and maintaining this site. We prefer that guests take part in our community and we offer a lot in return to those willing to join our corner of the Porsche world. This site is 99 percent member supported (less than 1 percent comes from advertising) - so please consider an annual subscription or donation to keep this site running.
Here are some of the features available - once you subscribe RennTech.org
- View Classified Ads
- DIY Tutorials
- Porsche TSB Listings (limited)
- VIN Decoder
- Special Offers
- Paint Codes
- Registry
- Videos System
- View Reviews
- and get rid of this welcome message
It takes just a few minutes to register, and it's quality Porsche information at a low cost.
Contributing Members also get these additional benefits:
(you become a Contributing Member by subscribing or donating money to the operation of this site)
- No ads - advertisements are removed
- Access the Contributors Only Forum
- Contributing Members Only Downloads
- Send attachments with PMs
- All image/file storage limits are substantially increased for all Contributing Members
- Option Codes Lookup
- VIN Option Lookups (limited)

DBJoe996
-
Posts
706 -
Joined
-
Last visited
-
Days Won
22
Content Type
Profiles
Events
Forums
External Paint Colors
Downloads
Tutorials
Links Directory
Collections
Classifieds
Store
Everything posted by DBJoe996
-
 ECU Doctors can help if the immobilizer needs waking up. For in the future, they have a waterproof box for the immobilizer. Since the immobilizer sits in a well under the seat, it is most prone to getting wet. If the seat is not responding to fore and aft movements to loosen the floor bolts, let me know. There is another way to get under the drivers seat. Porsche 996 (1999) WWW.ECUDOCTORS.COM Porsche, BMW, Ferrari - We'll make any used ECU work - Send us your damaged ECU and we'll TEST and REPAIR your unit and send it back to you with our 5 YEAR WARRANTY.
 -
If the carpet behind the drivers seat is wet, then surely the carpet UNDER the drivers seat is wet, and that is where the immobilizer/alarm system is. If you can, remove the drivers seat (loosen floor bolts and tip it backwards) and get the immoblizer unit out. Dry it and place it in a canister of dry rice for several days. Remove the carpeting and get it dry. If you can, put a dehumdifier in the car and get it completely dry inside. Shop vac out moisture from the carpeting.
-
This is NOT a part to go cheap on. Only get a real OE Porsche window regulator. I have heard and read many stories about cheap window regulators breaking after less than a year, cables snapping, grinding and so on. No, you cannot finagle a way to tension the cables. It's a Porsche, pony up the cost of the OE Porsche window regulator and be done with this job. I do believe there is a company in Texas that you can send it to for a rebuild with much higher quality parts. I'll see if I can find that info. But you will have to wait out the shipping and rebuilding time.
-
There is a threaded "key" that goes from the door lock to the door latch mechanism. I've detailed some of the work here DIY: 996 Door Latch Replacement [Detailed] - Rennlist - Porsche Discussion Forums RENNLIST.COM 996 Forum - DIY: 996 Door Latch Replacement [Detailed] - If your window does not stay lowered when your door is open, chances are that a switch within the door latch has gone out. This is a detailed procedure to change...
-
Oil capacity
DBJoe996 replied to Citgot's topic in 996 Series (Carrera, Carrera 4, Carrera 4S, Targa)
OE Porsche Manual Transmission oil 75W-90 I have read that other people have tried different brands of 75W-90 and then develop strange shifting and noises. Then they take the car to a Porsche specialist to diagnose the problems. The first thing they do is drain and refill with the Porsche manual transmission oil and the problems go away. You can get some at a Porsche dealer or many of the online Porsche suppliers. -
What are you doing to the door lock? Is it not working? I recently replaced my drivers side door latch mechanism and new handle microswitch. Boy, that was a job!
-
Oil capacity
DBJoe996 replied to Citgot's topic in 996 Series (Carrera, Carrera 4, Carrera 4S, Targa)
My 99 C2 3.4L engine is bone stock. I do my own oil changes. I pull the drain plug and let it drain overnight, then slightly jack up the left rear of the car so the remaining oil that pools in the sump drains out. Put in drain plug. Fill oil filter with oil and install. Then I put in 10.25 quarts of oil, Liqui-Moly 5W-40 Leichtlauf High Tech. Comes in a 5.28 U.S. Quart size (5 L) bottle. I've done this so many times over the years. I always end up right on the full mark before starting the engine. I don't burn off much oil between oil changes. My owners manual says the capacity w/filter is 8.7QT/8.25 L. I find I need more to be at the high mark on the dipstick. The manual also says that the difference between the high and low mark on the dipstick is 1.6 QTS/1.5L. I always keep mine near the high mark. More oil, more oil and cooling capacity. I do not track or run the car hard so I'm not sloshing the oil around. 145K miles, 6 month oil changes, so I must be doing something right. -
One simple thing to try is with the door open (and the window did not drop), push on the top of the glass and see if can be pushed downwards. If yes, bad window regulator. The cable in the window regulator gets old and develops some slack. If not, bad door handle microswitch.
-
Blue loctite...just a drop or two will do. Don't know the torque..just tight plus a pull is what I did.
-
I can confirm that all of the above is correct...triple square XZN bit. Do not try to use a torx bit in there because it will tear it up.
-
Bank 1 VarioCam acutator. The greenish gray material is from an internal O-ring in the variocam actuator. Would also explain the sluggish action on the Bank 1 cam.
-
No, it is not easy. First step is to vacuum/remove all remaining refrigerant. This requires a special machine. Second, you will need to remove the front bumper, wheel, wheel liner and underbody panels. You could have an AC shop do the first step, then DIY the pipe replacement, then go back to the AC shop for a refrigerant recharge.
-
I do my own oil/filter changes. I did run Mobil 1 0W-40 for a long time. Last oil change I changed over to Liqui-Moly Leichtlauf SAE 5W-40 and my engine is so much happier. Seems to run better (seat of the pants) and quieter. The reason was I am at 146K mileage and a bit heavier weight oil seems necessary. It is on the approved Porsche list for our cars. Might ask the dealer about it. I think the Porsche oil released for our cars is a 5W-50.
-
It sounds like you have no oil pressure. Do not run your engine! You need to investigate your engine and lack of oil pressure. What type of oil are you running? When did you last do an oil change? Have you manually pulled the dipstick to check your oil level? What type of oil filter are you running? Have you done anything to your engine lately? This does not sound like a problem with your sender unit....it sounds like your engine is lacking any oil pressure and it will seize if you run it again, or spin the crank bearings, or seize a piston in the cylinder. You must do everything you can to find out what is wrong before running the engine again. Maybe the oil pump hex drive has broken. Maybe the oil pressure relief valve is stuck. Maybe your oil filter is clogged. Maybe your oil pickup tube in the oil sump is clogged with debris.
-
A quick Google search for P1397 got this And you need to check your wiring harness for rodent damage. Depends on where it was sitting for 7 years, but it is entirely possible that something has chewed up your wiring....somewhere.
-
Are you sure about the coolant level? Did you open the cap and check? I agree with the suggestion to replace the coolant expansion tank level sensor. It is outside the coolant tank so you won't lose any coolant. 215F is pretty darn high. How are you getting the car that hot? Are your radiator fans working? Has the thermostat ever been replaced? What mix is your coolant and is it pink (the new type coolant)?
-
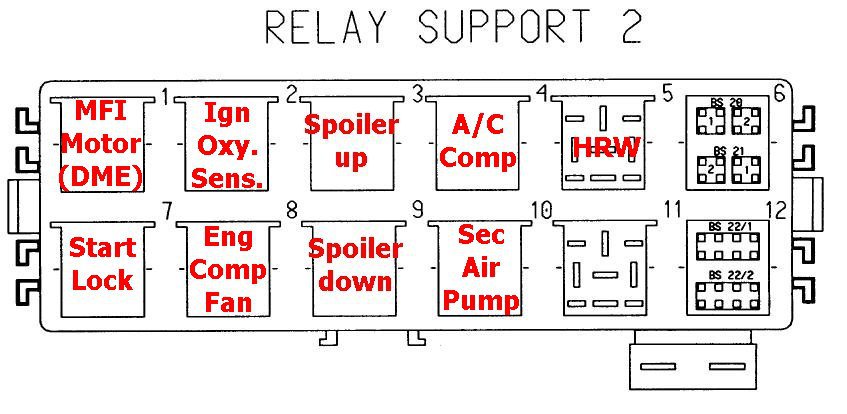
The relay support group 2 in coupe is underneath the carpet on the shelf behind the seats. Not sure where it is in a Cab.

-
Probably bad gas. 5 months is possibly too long for gas to sit without some stabilizer. Might consider flushing out the old gas and getting some new gas in there.
-
Door Microswitches
DBJoe996 replied to jlucas's topic in 996 Series (Carrera, Carrera 4, Carrera 4S, Targa)
Besides all the other microswitches external and internal to the door latch mechanism, there is one microswitch that sits on the top of the door handle hinge that signals when the door handle is pulled. You have to pull the door card off to get to it. Some pretty good information here DIY: 996 Door Latch Replacement [Detailed] - Rennlist - Porsche Discussion Forums RENNLIST.COM 996 Forum - DIY: 996 Door Latch Replacement [Detailed] - If your window does not stay lowered when your door is open, chances are that a switch within the door latch has gone out. This is a detailed procedure to change... -
IMSB Replacement
DBJoe996 replied to Rwtf2008's topic in 996 Series (Carrera, Carrera 4, Carrera 4S, Targa)
Where did you purchase the bearing and tool kit? I would contact the vendor to have them advise you what to do. Also, once the new bearing is extracted it is junk. I know more money to throw at the project, but do yourself a favor and get the LN IMS Solution and be done with it forever. -
No crank, help!
DBJoe996 replied to Michael Vildosola's topic in 996 Series (Carrera, Carrera 4, Carrera 4S, Targa)
What? You are using a wire to ground the starter solenoid and it works to start the motor? Something seems wrong with that. The starter is grounded by virtue that it is bolted to the engine block, which is grounded by a wire near the rear passenger wheel well. There is no separate ground for the solenoid to starter because the solenoid is bolted to the starter. Sorry, something here doesn't make sense. -
03 996 AC and fan Quit working???
DBJoe996 replied to trdking's topic in 996 Series (Carrera, Carrera 4, Carrera 4S, Targa)
How do you know the AC relay is working? Did you take it out and test it? Suggestion - check all the fuses. There are several for AC and climate control system. Look at your fuse diagram inside the fuse panel. What happens if you put the climate control system on Auto and run the temp all the way down? -
E Brake handle grip removal
DBJoe996 replied to Blue 996's topic in 996 Series (Carrera, Carrera 4, Carrera 4S, Targa)
My understanding is that it is glued on and requires a lot of force to pull it off. You could put the base in a vise and pull very very hard to remove. If you have to cut it away, you will destroy it. Might check on replacement cost of the handle. For instance, last time I checked, the center console leather lid was $700. Why are you doing this? -
Mystery AOS hose? Where does it go?
DBJoe996 replied to johnmh's topic in 996 Series (Carrera, Carrera 4, Carrera 4S, Targa)
It is a coolant line and goes back to the T-fitting next to the coolant tank. -
Overheating
DBJoe996 replied to Chris McCrory's topic in 996 Series (Carrera, Carrera 4, Carrera 4S, Targa)
There are multiple functions of the temp gauge light, so to say it came on it could be low coolant level. Check your owners manual for the various conditions that set off the temp gauge light. If the rad fans are operational, then like JFP said, you could have an air pocket. Make sure your coolant level in the expansion tank is full, then manually lift the wire bail thing on the expansion tank and drive several heat/cool cycles to bleed out any air. Turn on the heater full blast as well. That will cycle coolant through the heater core as well.