Welcome to RennTech.org Community, Guest
There are many great features available to you once you register at RennTech.org
You are free to view posts here, but you must log in to reply to existing posts, or to start your own new topic. Like most online communities, there are costs involved to maintain a site like this - so we encourage our members to subscribe or donate. All subscriptions and donations go to the costs operating and maintaining this site. We prefer that guests take part in our community and we offer a lot in return to those willing to join our corner of the Porsche world. This site is 99 percent member supported (less than 1 percent comes from advertising) - so please consider an annual subscription or donation to keep this site running.
Here are some of the features available - once you subscribe RennTech.org
- View Classified Ads
- DIY Tutorials
- Porsche TSB Listings (limited)
- VIN Decoder
- Special Offers
- Paint Codes
- Registry
- Videos System
- View Reviews
- and get rid of this welcome message
It takes just a few minutes to register, and it's quality Porsche information at a low cost.
Contributing Members also get these additional benefits:
(you become a Contributing Member by subscribing or donating money to the operation of this site)
- No ads - advertisements are removed
- Access the Contributors Only Forum
- Contributing Members Only Downloads
- Send attachments with PMs
- All image/file storage limits are substantially increased for all Contributing Members
- Option Codes Lookup
- VIN Option Lookups (limited)


1schoir
-
Posts
2,739 -
Joined
-
Last visited
-
Days Won
9
Content Type
Profiles
Events
Forums
External Paint Colors
Downloads
Tutorials
Links Directory
Collections
Classifieds
Store
Everything posted by 1schoir
-
Gustavo: I meant that you can use the Falken All-Season tires for the winter, whenever the temperature falls below 45 to 50 degrees. Below 45 degrees, summer tires are dangerous. In the early spring, go back to your favorite summer high performance tires. When the weather gets warm enough again in NY, I go back to the summer tires (currently Michelin Pilot Sport Ribs, but may try Bridgestone RE050A Pole Positions next). The most hassle-free way to do this (and to not delay switching over) is to have two sets of rims. One for all season and one for summers. Saves $$ and wear and tear from the installers beating up the rims. Regards, Maurice.
-
is there a way to re-index a working window?
1schoir replied to stumpjumper's topic in 986 Series (Boxster, Boxster S)
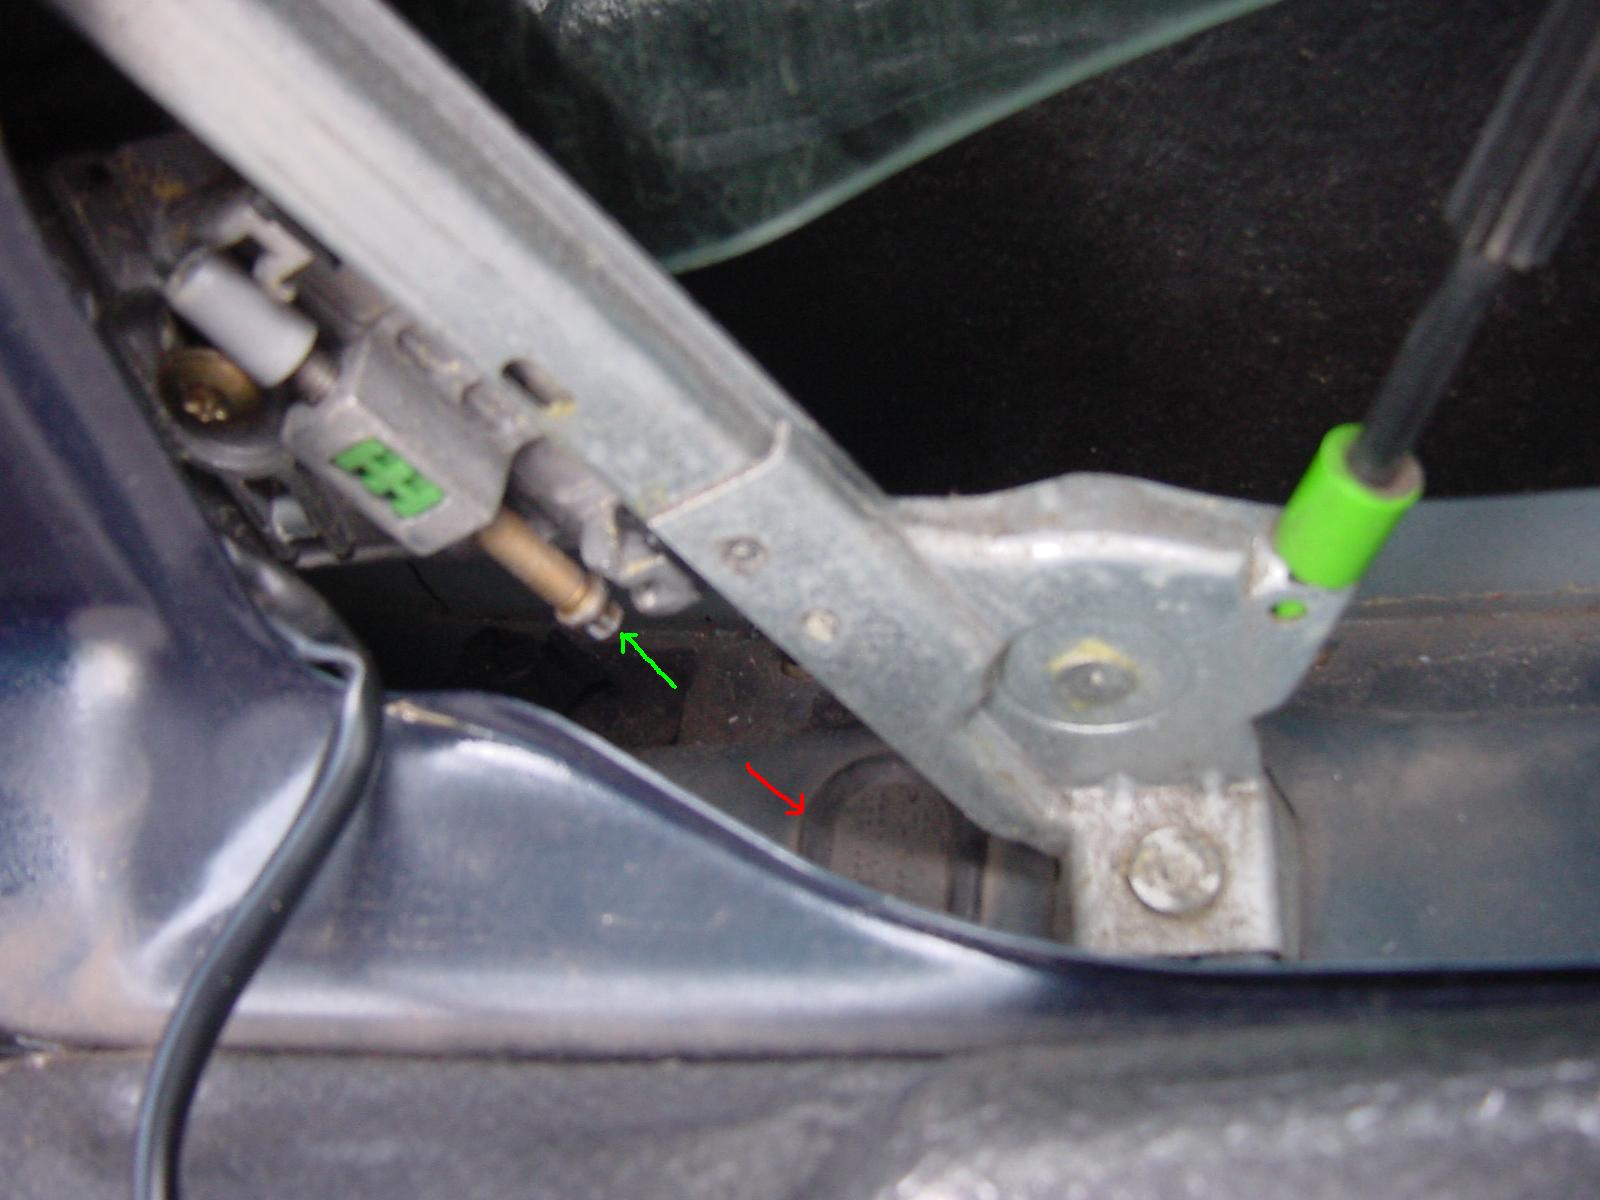
Stump: There is an adjustment that will vertically "raise" the final upper position of the window. You can do a height adjustment on the windows themselves, by means of the adjustment screws that are accessible through the two OUTBOARD rubber plugged holes on the bottom surface of each door. The screws are E36 Torx screws and they give you close to 15mm of adjustment. There are two for each window, one at the front edge, and one at the rear edge, and both are on a slant or angle and not vertical. I've attached a photo that shows the window height adjustment screw (green arrow) and one of the correct rubber plugs to access same (red arrow). Note that the photo shows the drivers' side rearmost of the two legs of the regulator assembly. The forwardmost leg is very similar and is similarly accessible by pulling out the correct (OUTBOARD) rubber plug. The photo also gives you an idea of the angle of attack. When the window is all the way down, the head of the adjustment screw is about 3 inches away from the bottom of the door. If you do the adjusments incrementally, you should be able to get your window to seal completely. Regards, Maurice.
-
Gustavo: If you are looking a for a good all-season tire (i.e., not necessarily a winter ice and snow tire), check out Falken Ziex ZE-912 tires. I bought mine about two weeks ago at Discount Tire Zone. http://www.discounttirezone.com/Falken-Zie...12_c_336-1.html This link shows that Falken makes the 205/55-16 size and DTZ sells them for $74 each. They arrived in two days, even though I chose the least expensive form of shipping. My experience so far is limited to the two weeks I have been driving around on them. They are relatively quiet, and they are excellent in the wet. So far, no snow or ice here on Long Island (hope it stays that way) but I don't plan on doing much driving in snow or ice anyway. Also, a good value for the money. Regards, Maurice.
-
Coolant tank swap out 10 minutes!
1schoir replied to Respirologyrc's topic in 986 Series (Boxster, Boxster S)
Sactown: I don't know if this is how Respirologyrc did it, but there is a way to reach the clamps from inside the trunk. I used this method when I had to replace my coolant tank (MY 97 Boxster). If you pull back the carpeting in the rear trunk, on the firewall behind the engine, you will see a large rubber plug (about 5 inches in diameter), down near the base of the coolant tank and to the left of it (there is a bundle of wires running through the plug). If you pull that plug backwards and off the hole in the firewall, you can see the clamps and reach your hand and/or long needlenose or hose clamp pliers through there to access some of the clamps. A little silicone around the perimeter of that plug helps to squeeze it back in place. It does give you additional access and a good view of what has to be done in there. Regards, Maurice. -
Starter won’t crank (unless I trick it)
1schoir replied to pk2's topic in 986 Series (Boxster, Boxster S)
Fixed It !!!! (Not really sure how though) Poured over the wiring diagrams for hours, figure out where there should be voltages, weren’t there. Made some jumps here and there, got the voltages…still wouldn’t start. Checked all the grounds, O.K. Id had the Motronic computer thing out (checking pin assignments for sc install) couple days before, looked like I’d put it back correctly, took it back out anyway & opened it up, solid state, nothing to do in there but damage. Cleaned all the pins with a wire brush. Plugged the harness connector in and out a few times (helps insure good contacts). Buttoned everything in good. Twisted the key, resigned to the silence I’d heard so much of today…Vaarroooom!!! PK Such pros, not Hemingway but… Nothing, no matter how well crafted, beats the sweet sound of success! I admire your perseverance! Regards, Maurice. -
Loren: Thanks for the info. I will remove the steering wheel and examine those components closely and post results. Regards, Maurice.
-
Changed Spark Plugs And Check Engine Light Came On
1schoir replied to sactown9's topic in 986 Series (Boxster, Boxster S)
Good job, Sactown! Regards, Maurice. -
You might want to add one of those small, cigarette lighter plug-driven air compressors to inflate your tires if necessary. You can get a small, inexpensive one at Harbor Freight Salvage (.com). Regards, Maurice.
-
I believe your year Boxster has the "improved" or updated version of the AOS. Do a search for AOS and you should find a clear explanation of how to identify the difference between the two versions. Here is a link to Mike Focke's Boxster Pages that will explain everything you might ever want to know about the AOS and that also shows you the install procedure and a couple of photos that show the difference between the two versions: http://mike.focke.googlepages.com/airoilseparatorreplacement The early versions are a repair waiting to happen, while the later ones are not as problematic. Regards, Maurice.
-
Well, I have now replaced both seat belt buckles and installed/spliced/soldered all of the "gold plated and greased" leads and the ground leads that come in the "service set belt buckle" on both sides of the car. It was a straightforward procedure once the steps in the TSB were translated into real world language. I've got lots of photos and may do a write up of that procedure when I get some time. The good news is that I have now gotten rid of all the seat belt related fault codes that it was previously exhibiting. :clapping: The bad news is that I still have the Fault Code 21 (ignition circuit driver- Repair Infomation: This code applies to the driver airbag, and the connection between the steering wheel and the airbag) and that after I clear it with the Durametric unit, the airbag light comes back on, along with the code, although now, instead of reappearing instantaneously, there seems to be a lag of 2 seconds before it reappears (could be my imagination). :o Any additional info as to specific points where the driver airbag connections between the steering wheel and airbag would be appreciated. The last time I had it open, I thought there was only one connection between the airbag and the steering wheel. Am I missing something? Regards, Maurice.
-
Congrats! Is the forthcoming 996 going to be silver too? Regards, Maurice.
-
How do you replace oil separator?
1schoir replied to calicoupe's topic in 996 Series (Carrera, Carrera 4, Carrera 4S, Targa)
Isn't that for a Boxster....? Yes, you're right. Sorry about that. The procedure is similar for a 996 but not exactly the same. This is great information. Do you happen to know the diff from 996 vs. boxster? Thanky you. Adam: Check out the following thread regarding AOS replacement on a 996, it has a little more information that might be helpful to you: http://www.renntech.org/forums/index.php?s...c=16272&hl= Regards, Maurice. -
Window has a mind of it's own
1schoir replied to 2Fast996's topic in 996 Series (Carrera, Carrera 4, Carrera 4S, Targa)
i am having almost the same exact problem. however, my window made a grinding noise as it was being raised and lowered. i had to try about six times to get it to close. kind of disappointing with only 6k miles on the clock. taking it to the shop today. i'll let you know what they say. typhon Typhon: In your case, it sounds like your regulator cable fraying, rather that the outer sheath crumpling. Kind of surprising with only 6K miles, though. Keep us posted. Regards, Maurice. -
DIY guide for removing interior plastic pieces?
1schoir replied to panameras's topic in 986 Series (Boxster, Boxster S)
Panameras: The pieces look really good. Thanks for sharing photos. Could you be sure to post photos of the car when everything has been installed? Before and After would be even better. I know how much work it was for you to take everything out in one piece. I also know you will probably enjoy the reassembly process a lot more! Good Luck! Regards, Maurice. -
Harold: There is no need to have the engine running or to have it warmed up to read and to reset a check engine light with the Durametric. All you have to do is plug the USB cable into a USB port on your computer, plug the other end of the Durametric cable into the OBDII port (under the left side of the dash, just above, forward of, and to the left of your left knee if you are sitting in the driver's seat) and just turn the ignition to "ON", without starting the car. Then you select your model and year and go from there. Be sure to make a note of what codes you have before you clear them, although Durametric also keeps a log in one of your computer files for reference. Regards, Maurice.
-
Window bump stops?
1schoir replied to SNaray8442's topic in 996 Series (Carrera, Carrera 4, Carrera 4S, Targa)
Only way to turn the airbag light off is with a PST2, PIWIS, or Durametric tool. Durametric is highly recommended, and reasonably priced for its functions. In my personal experience, customer service and technical support has been first class. Regards, Maurice. -
Disabling Handbrake sensor to Soft Top
1schoir replied to BoXsTeR S's topic in 986 Series (Boxster, Boxster S)
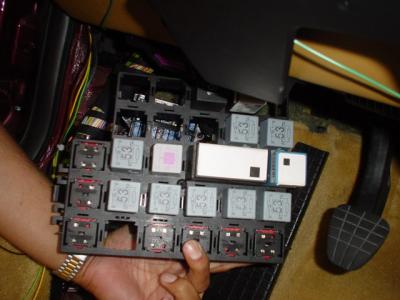
Here is a photo of the location of the (double) relay (a/k/a convertible top control module), just above the fuse panel at the left kickpanel, (beneath the dashboard). Photo is courtesy of Tool Pants: It's the double relay with the small black square, third row up from bottom (no relays in bottom row), second from right. It takes some pulling to get it off the first time. Regards, Maurice.
-
Window has a mind of it's own
1schoir replied to 2Fast996's topic in 996 Series (Carrera, Carrera 4, Carrera 4S, Targa)
Jared: As the window regulators come in different states of readiness (referring to the bump stops only), make sure that yours does not have the TWO bump stops already installed. If it does, just remove the upper one. If you get the extra bump stop parts (rivet or screw, plastic bump stop and little rubber sleeve for the bump stop), just don't install the parts for that one and you will have the correct height for your 996 when the window is at its lowest point. Otherwise it will remain about 1 and 1/2 inches not retracted into the door. Here is a photo of the two bump stops at the base of the forwardmost leg of the regulator. Circled in red is the upper one (that I was in the process of installing for my Boxster, showing the rivet inserted and the bump stop and rubber sleeve on the side). Do not install that one, or remove it if it comes already installed. Circled in green (and marked 996) is the only one that should be present for your correct install. One other point. The link I gave you for the door panel removal is for Boxsters, but it's either exactly the same or very similar for 996's. The only tricky part in removing the door panel without breaking any parts involves the inner door handle cover/surround. I found that to avoid breaking off the tab that almost everyone reports breaking, it helps if you press downwards hard on that part near its rearmost TOP SURFACE and then, after sticking the small screwdriver in from underneath at the front to pull the bottom away slightly, ROTATE that part UP and it will come off without damage. Good Luck, and if you run into any roadblocks or need more photos, let us know. Regards, Maurice.
-
Sign of ignition switch failure ?
1schoir replied to CJ_Boxster's topic in 986 Series (Boxster, Boxster S)
CJ, Mine acted similar before completely failing and leaving me stranded in my 996. I would advise you to replace it asap. There is a great DIY on this site. The switch is very inexpensive. Don't go to the dealer because he will want to replace the entire assembly and charge you $500 +. Gotta love Porsche for that.... Good luck Phillipj CJ: Good sources (read: inexpensive and reliable) are Autohausaz.com and FCP Groton (Connecticut)(860) 445-7340 Part number is 4A0-905-849-B. I ordered two from FCP Groton, received them the next day, all for $32.00, including shipping. I hear that Autohausaz.com is even cheaper. Regards, Maurice. -
Oh boy, my top won't open
1schoir replied to joeboxster97's topic in 986 Boxster Convertible Top Issues and Solutions
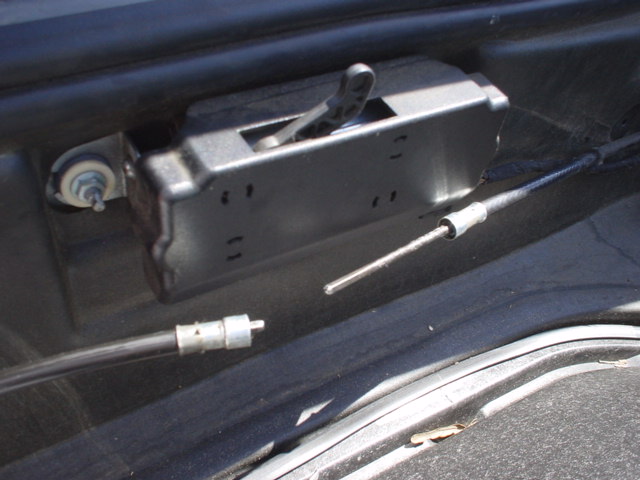
Joe: Okay, you are making progress. It actually may be a good sign that your inner metal cables do not pull out when you tug on them. There are instances where those inner cables break or fray in the middle of the black plastic outer sheath but that doesn't appear to be your case. Also, the fact that you have the textured cables means that you have the later, updated, improved cables and those are less likely to stretch. Here is a photo, courtesy of Tool Pants, that shows both types of cables (old style on left, and new textured style on right). Also, note that the right cable must have broken or frayed inside the sheath, which is why it is sticking out that much. The left cable shows that the inner metal cable is not sticking out far enough. What happens in the case that the inner cable does not stick out by 3/4 of an inch is that the inner metal cable does not engage in the motor's output sleeve, and thus does not turn, which in turn does not turn the transmission and V-lever on that side. Read this thread, which contains this and other photos by Tool Pants: http://www.renntech.org/forums/index.php?s...666&hl=saga What you must do next is to determine whether you have 3/4 of an inch of the inner metal cable sticking out from where the black plastic sheath and its metal ferrule cap ends. If you don't have it on BOTH sides, that will indicate your problem. If you don't have 3/4 of an inch sticking out, you can either buy a new cable (or cables) or, you can perform the minor surgery described by Tool Pants in yet another thread to cut the black plastic sheath back so as to get the correct protrusion of the inner metal cable. If you have the correct 3/4 sticking out on each side, the problem lies either in one of your transmissions or something much more simple and obvious, as follows: Inspect the connections at the front and rear arms of each V-lever to make sure that either your plastic caps (on the end of the rod arms that are connected to the frame of the convertible canvas top) have not "popped off" or have not broken or split apart, or that the black hydraulic pushrods have not somehow popped off the V-lever or their other attachment point on the clamshell (body paint-colored) support arm. Measure how much is sticking out, inspect the above-mentioned parts and report back. Regards, Maurice.
-
Are any of these DVD's still for sale anywhere? Regards, Maurice.
-
Seat Heater Light Won't go Off
1schoir replied to 1schoir's topic in 986 Series (Boxster, Boxster S)
Update: Took the seats out, disconnected and swapped the seat heater control relays between the passenger's side and the driver's side. The passenger's side seat heater control relay was definitely the culprit, as swapping it transferred the problem to the driver's side and the passenger's side now worked fine. That's the good news. The bad news is that the relay, part number 996 618 521 00 costs over $145 with one of the online dealers. Took apart the defective relay, could see nothing obviously wrong with it. For anyone else that may run into a seat heater problem, it's not difficult to take out the relay, once you figure out that you must press the center pin out of the plastic rivet that holds the bracket for the relay in place. I'm going to try to find a less expensive source for the relay. Thanks again to Richard Hamilton. Regards, Maurice. -
Window has a mind of it's own
1schoir replied to 2Fast996's topic in 996 Series (Carrera, Carrera 4, Carrera 4S, Targa)
Although I have not seen the window dropping all the way down problem that you describe, the other part (glass not dropping down the requisite 1/2 inch, although you can hear the window motor turning for a split second) definitely sounds like the classic window regulator problem. From the symptoms that you describe, it's a classic case of stretched, crumpled, or otherwise broken window regulator. If you have tried the window reset procedure and it has not yielded any results, it's 99% sure that you must replace the window regulator to get that magic 1/2 inch drop. (The reset procedure: press window up button until window reaches top, then hold the button for another 5 seconds, do the same with the window in the down position, pressing the down button, etc.) If you must replace the window regulator, it's a very straightforward procedure. Here are some tips to be aware of before proceeding: Four things to keep in mind: 1. Most of the oem replacement regulators come with a small plastic bag of parts that is contained inside the larger plastic bag which encases the regulator. That bag contains a small bump stop that must be attached to the higher of the two bottom square holes on the forwardmost leg (the lower bump stop is for 996/997). 2. Be sure to mark (with a sharpie or similar) the footprint of the old regulator legs where they sit on the bottom (horizontal) surface of the door. That will help you avoid having to later make an adjustment to get the glass in the proper plane (inboard to outboard slant adjustment). 3. Raise the window almost to its uppermost position so that you can access the two torx screws (that must be loosened to release the glass window from its clamping brackets) through the hole provided for that purpose. One in front, one towards the rear, covered by black rubber plugs. 4. Do not clean the two areas near the bottom of each glass window where the clamping brackets are attached to the window. You can use the "dirt marks" as one of the guides as to where the window should be re-attached to the new regulator clamping brackets. The other guide is the forward bottom angled corner of the glass. Here is a link that will help you remove the door panels: http://www.ecoutez.net/boxster/door-panel-removal/ Here is a link that will explain how the regulators go bad (see posts 1,2 & 3 specifically): http://www.renntech.org/forums/inde...showtopic=16269 Good luck! Regards, schoir (Maurice). -
Honda: Check out Mike Focke's Boxster Pages for excellent DIY instructions on replacing the top, with loads of photos at: http://mike.focke.googlepages.com/replacingthetop-adiy So that you don't get delayed once you start, be sure to buy the two clamping rails ahead of time. The plastic ears into which the little black pins push into almost always break when taking them apart. They're relatively cheap (about $12.00 each) and you can always return them if you don't break the original ones. If you run into any roadblocks, shoot me a PM, or post here and I'll provide you with any help I can. Regards, Maurice. Honda: The clamping rails are part numbers 986 561 559 01 and 986 561 560 01 (one left and one right). Also, if you review the DYI in the link I referred you to, you will see that I refer to two black foam strips that are necessary, but I have never been able to find a part number for those two strips. When I replaced my top and added to the write-up, I found the two foam strips in a "kit" that came with my new top. The new top was an original OEM Porsche top that I bought from someone who had to get rid of it. You will see when you peel the aluminum shoulder plates back, that, just above where the top of the windows would be, in that metal channel, there will be crushed remnants of the original foam strips. I think their purpose is for waterproofing, but not sure. I posted photos of the black foam strips in the DIY link, so maybe you can print out the photos and take them to the dealer to get replacements. If all else fails, you can make black foam strips from some weatherstrip material (closed cell foam, about 3/4 to 1 inch wide). Feel free to ask more questions, but I recommend you read and re-read the DIY instructions and look at the photos again. Once you become familiar with what is really involved, you will have that much easier time during the install. Regards, Maurice.
-
Although I have no direct experience with a Tip AOS replacement, I have also read that it is somewhat more difficult. I definitely agree with Cassiebox' method of cutting the bellows to get better access, and with using a worm gear clamp (stainless). Those two tips will save you from lots of aggravation, with the same result. Regards, Maurice.