Welcome to RennTech.org Community, Guest
There are many great features available to you once you register at RennTech.org
You are free to view posts here, but you must log in to reply to existing posts, or to start your own new topic. Like most online communities, there are costs involved to maintain a site like this - so we encourage our members to subscribe or donate. All subscriptions and donations go to the costs operating and maintaining this site. We prefer that guests take part in our community and we offer a lot in return to those willing to join our corner of the Porsche world. This site is 99 percent member supported (less than 1 percent comes from advertising) - so please consider an annual subscription or donation to keep this site running.
Here are some of the features available - once you subscribe RennTech.org
- View Classified Ads
- DIY Tutorials
- Porsche TSB Listings (limited)
- VIN Decoder
- Special Offers
- Paint Codes
- Registry
- Videos System
- View Reviews
- and get rid of this welcome message
It takes just a few minutes to register, and it's quality Porsche information at a low cost.
Contributing Members also get these additional benefits:
(you become a Contributing Member by subscribing or donating money to the operation of this site)
- No ads - advertisements are removed
- Access the Contributors Only Forum
- Contributing Members Only Downloads
- Send attachments with PMs
- All image/file storage limits are substantially increased for all Contributing Members
- Option Codes Lookup
- VIN Option Lookups (limited)


1schoir
-
Posts
2,739 -
Joined
-
Last visited
-
Days Won
9
Content Type
Profiles
Events
Forums
External Paint Colors
Downloads
Tutorials
Links Directory
Collections
Classifieds
Store
Everything posted by 1schoir
-
soft top problem (cord/rope broken)
1schoir replied to mjk001's topic in 987-1 Series (Boxster, Boxster S)
You can use the old one as a template. If it has lost all of its elasticity, make it two inches shorter. If it feels relatively intact and stretches and comes back to its resting size, just use that size to make the new one. Regards, Maurice. -
soft top problem (cord/rope broken)
1schoir replied to mjk001's topic in 987-1 Series (Boxster, Boxster S)
Cuz: The parts diagrams do not show those plastic ears as a separate piece that can be purchased, and, as far as I can tell, those ears don't show up as part of a bigger assembly. If you can't find it anywhere else (junk yard, etc.), let me know as I may have an extra one that I can take off a broken top. I'd have to look to see if that part is actually still there. Regards, Maurice. Thanks for the reply Maurice and sorry for the dealy in responding. I thought as much and will try and track one down as I am going to do some work on the tension string\cable elastic also to stop it happening again as there must of been an issue as it was coming away from the tab on one side each time the roof was raised or lowered. Thanks again! It's a fairly common issue, as is the ropes getting separated from the elastic cord in the middle. IMO, the most permanent solution is to pull out the entire elastic and rope assembly (while leaving a piece of string in the fabric "tube" to follow so that you can pull back the newly fabricated assembly) and replace the elastic with a more robust piece of elastic that is slightly wider, and making sure that there are strong stitches holding the rope on each end of the elastic. Regards, Maurice. -
The straps are the velcro straps that wrap around the round guide bar. Those straps frequently either loose their "velcro action" or, even more frequently get detached from the spot along the edge of the canvas where they are normally sewn in. Not having the velcro straps attached properly will also sometimes cause the cable to fall outside the guide channels. Regards, Maurice.
-
Windows won't go up with top down
1schoir replied to boxster_nut's topic in 986 Series (Boxster, Boxster S)
John: The most likely suspect is one of the two microswitches that are located in the latch receptacle in the windshield frame. Note that the two microswitches are part of one assembly, but each one can fail separately, and in a different manner because of the two different types of switches. There are two microswitches in the latch receptacle assembly. There is one on the left side of the assembly (has a large plunger that juts out when the latch is open). That one controls the 4" window drop that occurs immediately when you pull down the latch to open the top. There is another one on the right side of the assembly, and that is the one that activates the convertible top double relay. To gain access to the microswitch you have to remove the latch plate at the center of the windshield frame. Pop out the two little black plastic "eyes" by carefully prying them off with a very small flat blade screwdriver or borrow one of those "orange sticks" that women use on their fingernails to pry them out. Remove the small torx bolt that you will find under each one of the two eyes. Remove them and then pull down the latch plate carefully until you can see and access the wires for the switch and for the light. Unplug the wires and the latch plate will come off. You will find two fragile retaining clips that attach the switch to the underside of the latch plate. These are easy to break, so use a pair of small needle nose pliers to pull them off, very gently. You can reuse these if you are careful by squeezing the cross sections that are located at the center of the clips until they are flattened. The assembly is part number 986.613.795.02 for your '97 and costs less than $40. Try Sunset Porsche under the "Special Offers" tab at the top of each page here or Suncoast or pelicanparts.com. Regards, Maurice. -
LOL! :cheers: Regards, Maurice.
-
That is unusual, especially if this is the first time that the canvas was being replaced. Tapping new threads in the metal and using the next gauge screws will fix the problem. Make sure that the finger spring on the passenger side is installed such that the upper end of it is pressing against the plastic tab on the slider. If it is not pressing hard, flip the spring around and then re-install it. If it's installed so that it is sitting on the other side of the tab, remove the top torx screw, loosen the bottom one and then you can tilt the top of the spring inboard, pull it forward to the correct side of the tab and re-install the screw that you removed and tighten the other one. Here is a photo that shows the correct installation of the finger spring: If the finger spring is on the wrong side, or if it has lost its "spring", it will not press on the tab on the slider and that will result in the cable falling outside the guide channel when the top closes. Regards, Maurice.

-
+1 to Bar10dah's suggestion. You can try to line up the cardboard strip and the screw holes with an awl before trying to insert the screws. If you have really stripped the screw holes (unlikely that you stripped all of them), you can always use the next thickest gauge screw of the same type and profile. If you need more photos to complete that step than the ones I posted in the DIY, let me know and I'll dig through my photos and send you some more. Regards, Maurice.
-
Another Dreaded IMS Bearing Failure
1schoir replied to michaelwalker123's topic in 987-1 Series (Boxster, Boxster S)
Glad that you have apparently gotten lucky! AFAIK, you cannot buy just the IMS bearing by itself from Porsche as it comes as part of the complete IMS tube as an assembly. As to other preventative work, if the RMS shows any signs of leaking or weeping, it should obviously be replaced with the newer, improved version. Regards, Maurice. -
soft top problem (cord/rope broken)
1schoir replied to mjk001's topic in 987-1 Series (Boxster, Boxster S)
-
soft top problem (cord/rope broken)
1schoir replied to mjk001's topic in 987-1 Series (Boxster, Boxster S)
Cuz: The parts diagrams do not show those plastic ears as a separate piece that can be purchased, and, as far as I can tell, those ears don't show up as part of a bigger assembly. If you can't find it anywhere else (junk yard, etc.), let me know as I may have an extra one that I can take off a broken top. I'd have to look to see if that part is actually still there. Regards, Maurice. -
Jim: LOL! I almost fell out of my chair. Kudos to you...VERY well written description of your experience! :clapping: :clapping: :clapping: Regards, Maurice.
-
Center Radiator Install - Multiple hose leaks!
1schoir replied to sac2dude's topic in 986 Series (Boxster, Boxster S)
Dude: On your first and second photos, it looks to me like you may possibly have located each of those two hose clamps slightly too far away from the respective ends of each of those two hoses. As a result, the hose clamps may be squeezing directly on the "ridge" of each tube. I would try to relocate the clamp in the first photo about 1/4 inch further to the right (as depicted in that photo), and the clamp in the second photo about 3/8 of an inch further to the left. Ideally you want to have the hose clamp just to the outside of the "ridge", not directly ON the ridge. I'm basing my advice on what the photo of the tubes from Precision look like. Try moving those two clamps and see if the leaking stops there. Regards, Maurice. -
Center Radiator Install - Multiple hose leaks!
1schoir replied to sac2dude's topic in 986 Series (Boxster, Boxster S)
To post photos: Go to "More Reply Options" at the bottom right corner of the "Reply to this topic" box. When you get the bigger, more options, box to enter text, go to the bottom left under the box and click on "Choose File"... Once the file loads, click on "Attach this file"... Then, once you see the icon for the file, be sure that your cursor in the text box is where you want the photo to appear and then click on "Post this file". You can then "Preview" your post to see what the photo looks like and where it appears in the text. Regards, Maurice. -
air fan condenser not working
1schoir replied to jose's topic in 996 Series (Carrera, Carrera 4, Carrera 4S, Targa)
Jose: Have you tested each of the two fans by applying 12V to them directly from a spare battery? That would verify that the fan electric motors are okay and that your problem lies elsewhere. Regards, Maurice. -
You can save some money by getting the actual blade cut by a local locksmith. I had it done for less than $20 after giving him my original key to copy the cut pattern from. He was also able to "make a clone" of my key by putting the key with the new head (which contained a "blank" transponder pill) into a cloning device that many locksmiths have. That allowed the new key to open the door lock, turn on the ignition and start the car. The new key did not operate any of the remote functions. Regards, Maurice.
-
Way to go! :clapping: :clapping: :clapping: Regards, Maurice.
-
Replacing the starter on 1999 Boxster
1schoir replied to steveltx's topic in 986 Series (Boxster, Boxster S)
Replacing a starter is definitely a DIY job, doable with moderate mechanical skills. The first time you replace the starter on a 986 should take approximately about 1 to 2 hours. Definitely disconnect the battery before starting to work on or near the starter and on your '99, make sure that you have your radio code before disconnecting the battery. Not sure whether there is a complete DIY here. Regards, Maurice. -
The idiot light that reads "Bring to a Workshop for Service" went on in a 2007 Boxster. Can this light be turned off like a CEL, by Autozone, etc., or does one need a Durametric, PST2 or PIWIS? Also, will a code reader of some kind give details about what specific "service" is needed? Regards, Maurice.
-
Dr.: Go to this link for an explanation and photos that you will find helpful: http://sites.google....frameona'97 Specifically, go to the part I PDF, and read the text at the bottom of page 11 and the top of page 12. For photos, go to the Part II PDF at page 31. You don't have to be an experienced mechanic to make this repair, and, if you have your wife helping you, it will be a piece of cake! :rolleyes: Regards, Maurice.
-
F6I = Flat 6 Innovations : http://www.flat6innovations.com/ Regards, Maurice.
-
How to gain access to roof motor
1schoir replied to cubbyno9's topic in 986 Boxster Convertible Top Issues and Solutions
Craig: Great work! It must have been a nice feeling when the electric motor started to whir again! Here's to some nice sunny days to enjoy with the top down! :cheers: Regards, Maurice. -
How to gain access to roof motor
1schoir replied to cubbyno9's topic in 986 Boxster Convertible Top Issues and Solutions
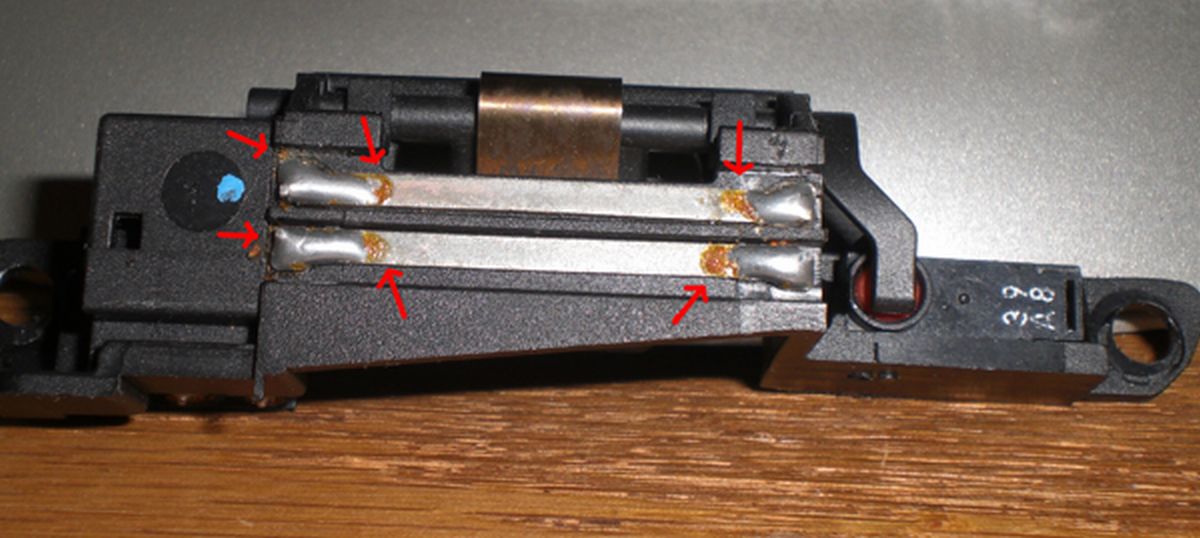
Craig: You are correct that as soon as you release the roof latch, the "convertible top open" icon idiot light should come on at that moment. It will then stay on until either you close the latch again or until it goes through one cycle to the completely open position, after the clamshell closes down on the canvas portion of the top. Your '98 should have the additional microswitch that I mentioned inside the latch assembly...the so-called "parallel strips microswitch". Here is a photo of what it looks like, with red arrows pointing to spots of corrosion in this case (you can also see the plunger microswitch just to the right of the right side of the parallel strips): When the "plunger microswitch" gets deformed, it sometimes has the effect of dropping the windows 4 inches when you hit a pothole. That is not an uncommon occurrence. Be sure to also test the parallel strips microswitch with a multimeter as the cracks (if there are any) are almost impossible to see with the naked eye. Regards, Maurice.
-
How to gain access to roof motor
1schoir replied to cubbyno9's topic in 986 Boxster Convertible Top Issues and Solutions
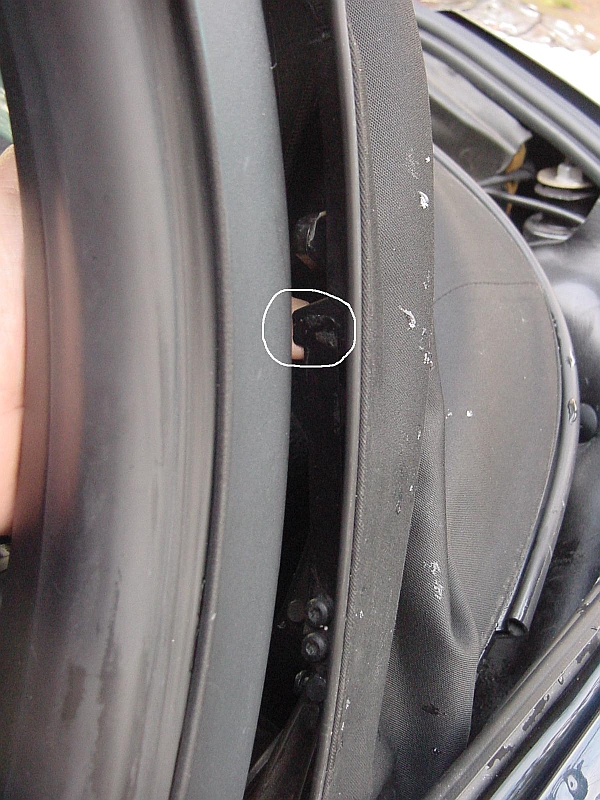
Craig: Although it's possible that your electric motor is faulty or has a dead spot in the armature, I would first check the "other" microswitch that is inside the latch receptacle. Again, assuming that your parking brake light goes on when you pull up on the emergency brake lever, the most likely suspect is one of the two microswitches that are located in the latch receptacle in the windshield frame. There are two microswitches in the latch receptacle assembly. There is one on the left side of the assembly (has a large plunger that juts out when the latch is open). That one controls the 4" window drop that occurs immediately when you pull down the latch to open the top. There is another one on the right side of the assembly, and that is the one that activates the convertible top double relay. My guess is that the latter switch is faulty, even though it may appear to be intact when you visually inspect it, and sometimes even when you test it with a multimeter. Specifically, take a close look at the solder joints where the leads attach to the plug. This can be hard to detect, so check it with a magnifying glass for hairline cracks in the solder joint and for corrosion. If necessary, heat up the connections with a soldering iron and flow a tiny bit of solder onto the suspect joint(s). Believe it or not, the temperature (sun light, A/C blowing on it, etc...) can affect it to the point where the connection is broken and then re-established. To gain access to the microswitch you have to remove the latch plate at the center of the windshield frame. Pop out the two little black plastic "eyes" by carefully prying them off with a very small flat blade screwdriver or borrow one of those "orange sticks" that women use on their fingernails to pry them out. Remove the small torx bolt that you will find under each one of the two eyes. Remove them and then pull down the latch plate carefully until you can see and access the wires for the switch and for the light. Unplug the wires and the latch plate will come off. You will find two fragile retaining clips that attach the switch to the underside of the latch plate. These are easy to break, so use a pair of small needle nose pliers to pull them off, very gently. You can reuse these if you are careful by squeezing the cross sections that are located at the center of the clips until they are flattened. Also double check the two fuses that you mentioned (even if you have already visually checked them) by using a multimeter there as well, as one of them also provides power to the double relay. Keep us posted of any progress. If none of the above pans out, I'll dig up a procedure I wrote up for opening the top when the electric motor is dead. Regards, Maurice. -
Dan: Sorry about that... you are looking at the correct area. The bolt sizes are definitely 13mm and the relevant text starts at the bottom of page 11 (after the parts list) and continues onto page 12, where the first photo of what you are looking for is posted. On page 15, there is another photo of the same area that also has some pertinent text. BTW, you can probably ignore the phillips head screw depicted in the photo as that only applied to very early 986's. You should just be concerned with the three large bolts but double check to make sure there are no phillips head screws that would prevent you from moving the frame in any direction. Also note that it takes a very tiny bit of adjustment back to produce the desired result and that you have to keep the pulling tension on it until you tighten at least one bolt. Regards, Maurice.
-
PST2 Manual
1schoir replied to 1schoir's topic in 996 Series (Carrera, Carrera 4, Carrera 4S, Targa)
Thank you! Regards, Maurice.