Welcome to RennTech.org Community, Guest
There are many great features available to you once you register at RennTech.org
You are free to view posts here, but you must log in to reply to existing posts, or to start your own new topic. Like most online communities, there are costs involved to maintain a site like this - so we encourage our members to subscribe or donate. All subscriptions and donations go to the costs operating and maintaining this site. We prefer that guests take part in our community and we offer a lot in return to those willing to join our corner of the Porsche world. This site is 99 percent member supported (less than 1 percent comes from advertising) - so please consider an annual subscription or donation to keep this site running.
Here are some of the features available - once you subscribe RennTech.org
- View Classified Ads
- DIY Tutorials
- Porsche TSB Listings (limited)
- VIN Decoder
- Special Offers
- Paint Codes
- Registry
- Videos System
- View Reviews
- and get rid of this welcome message
It takes just a few minutes to register, and it's quality Porsche information at a low cost.
Contributing Members also get these additional benefits:
(you become a Contributing Member by subscribing or donating money to the operation of this site)
- No ads - advertisements are removed
- Access the Contributors Only Forum
- Contributing Members Only Downloads
- Send attachments with PMs
- All image/file storage limits are substantially increased for all Contributing Members
- Option Codes Lookup
- VIN Option Lookups (limited)


1schoir
-
Posts
2,739 -
Joined
-
Last visited
-
Days Won
9
Content Type
Profiles
Events
Forums
External Paint Colors
Downloads
Tutorials
Links Directory
Collections
Classifieds
Store
Everything posted by 1schoir
-
Soft top adjustment
1schoir replied to rpee's topic in 986 Boxster Convertible Top Issues and Solutions
Gunman: Operate the top so that the clamshell is only about 3 or 4 inches above the front edge of the rear trunk lid, when viewed from behind the car. If the clamshell is higher on one side than the other, you will have to disconnect the drive cable on that side of the electric motor so that you can synchronize that side with the opposite side. To do that, you have to remove the upside-down U-clip by pulling straight up on the right angle tab that sticks out of its side and then pulling that end of the drive cable outboard and away from the flange that turns it inside the electric motor. Once you have exposed the inner "speedometer type" drive cable on the end of that cable, place it inside the chuck of a cordless drill, set on the LOWEST torque setting. Then, operate the drill while observing the level of the clamshell on the side that you are trying to adjust. You can eyeball it, or use a ruler to measure the distance on each side between the bottom of the clamshell on that side and the top of the front of the rear trunk lid. Once you have the same distance on each side, and the clamshell is then level, you can reconnect the drive cable by placing it inside the drive flange on the side of the electric motor and re-installing the upside-down u-clip to lock it in place. You may have to turn the inner speedometer type drive cable by hand by a sixteenth or an eighth of a turn to get it into the drive flange, but it will go in easily once you get it lined up. Regards, Maurice. -
Strap with elastic loop
1schoir replied to cuz3003's topic in 986 Boxster Convertible Top Issues and Solutions
cuz: jthailer is right on the money with his explanation regarding the velcro strap. The reason that your latch just hits the top of the plexiglass screen when you are retracting the top is because the base of the frame (on both the left and the right side) is not pulled back far enough before you tightened the three bolts on each side. You can loosen the three bolts on each side, then have someone pull the frame back (it will only move a few millimeters at most) while you tighten one of the three bolts on that side. Repeat the procedure for the other side, and then tighten the other two bolts on each side. That should allow your latch to just clear the top of the plexiglass window by a hair. The gap between the clamshell and the rear of the top should also be improved by the above procedure. If the gap still needs a little more adjustment, check the tension "ropes" that run on each side from under the rear main bow down to their anchoring point on the opposite (lower) side of the tension rope. You can adjust the amount of tension that pulls on the rear main bow (as the latch at the windshield pulls in the opposite direction as it is snapped shut) by means of the 14mm adjusting bolt that sits just outboard of the carpeted cover over the engine, down toward the direction of the drain holes. Regards, Maurice. -
Another Oil Leak Thread
1schoir replied to jay abrams's topic in 996 Series (Carrera, Carrera 4, Carrera 4S, Targa)
Jay: Can you trace that hose back to see if it's coming from your power steering pump? Regards, Maurice. -
How to Sync my Convertible Top?
1schoir replied to gunman168's topic in 986 Series (Boxster, Boxster S)
Coleta: I'm guessing Gunman is referring to the finger springs that are located on the B-Pillars. If they lose tension, the cables will fall outside of the channels when closing the top, so they can be inverted to increase the tension. There is a photo and an explanation on Mike Focke's Boxster Pages, here: http://sites.google.com/site/mikefocke2/convertibletopedgedoesnotfallintoguidech Specifically take a look at the section numbered "2." . Regards, Maurice. -
The reason that your windows come part way down when driving (with the top up, I'm sure) is that one of the two microswitches in the roof latch receptacle is being released. If you don't want to replace this microswitch (it gets deformed over time) you can resolve this issue by adding a small spacer on the tip of the metal latch so that you are sure that the microswitch remains depressed, even when gong over big bumps. For the windows going all the way down, check to see if you have moisture or water under the left seat (driver's side in U.S.), near or around the immobiliser that is located there. Also check to see if there is moisture in the foam padding under the carpet behind the seats, especially the left seat. If you do have moisture there, you can remove the immobiliser and take it apart to possibly clean it with isopropyl alcohol. It's important to prevent any corrosion that may result from any moisture in that area. If you do find moisture or water, you must locate the source of the water intrusion. It usually comes in due to clogged drains in the foam drain trays under the V-levers, and sometimes through the door car, when the seal has not been properly installed after a window regulator replacement. In the latter case, the carpet at the bottom of the door card and below the door sill will be wet. Regards, Maurice.
- 1 reply
-
- 1
-

-
Windows Not Working
1schoir replied to CabrioArtie's topic in 996 Series (Carrera, Carrera 4, Carrera 4S, Targa)
If there is an immobiliser under the driver's front seat, check for moisture or water. This is not an uncommon problem with Boxsters when the convertible top drains clog and water enters the cabin and finds its way under the driver's seat. If the 996 has the same immobiliser, it's worth a check. Regards, Maurice. -
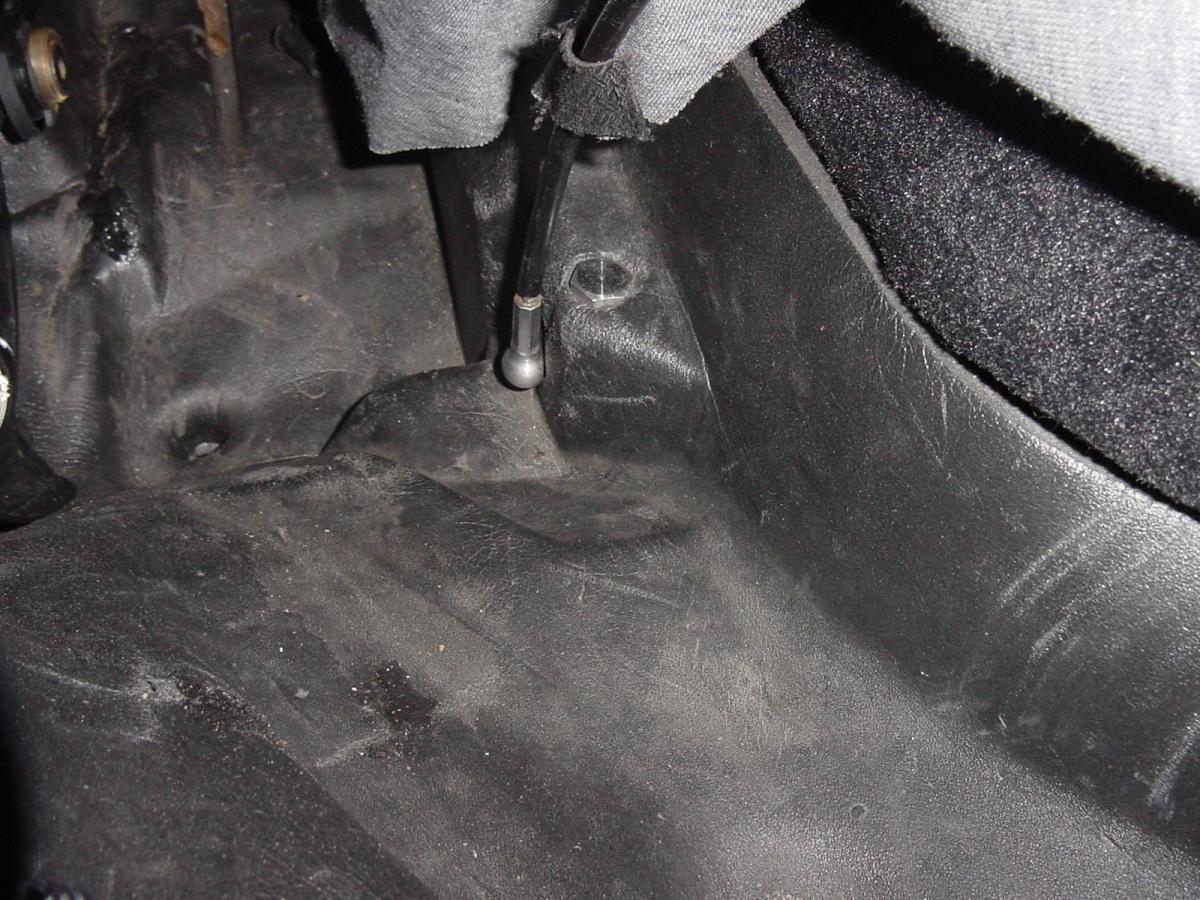
Kudos: 1st: If the canvas part of the top is not moving, but the clamshell is moving, then your plastic ball cups have either popped off or broken apart as they are what pull and push on the B-Pillar part of the convertible top frame. First, unlatch the latch of the convertible top at the top center of the windshield frame. To get the top to open manually, you must disconnect the white (or red if yours are original and have never been replaced) plastic cups at the base of the B-Pillar and the black "hydraulic" pushrods where they connect to the V-levers. Disconnecting the (white or red) plastic ball cups will allow you to operate the convertible top manually. Disconnecting the black "hydraulic" pushrods will allow you to operate the clamshell manually. Here is a diagram of the mechanism, which should help you orient yourself as to what you are looking for: To have a better chance to see the parts that must be disconnected, you will have to pull aside the (vinyl) rain curtain which is hung from the rear main bow of the convertible top frame and attached onto the rear firewall by means of two plastic clips (one all the way to the left and one all the way to the right, on the rear firewall). That curtain is also loosely held in place by yet another set of two cables that are located at the rearmost corners of the (carpet-covered) engine compartment lid (on the car body, not on the lid). That cable is held on to a small metal ball and you must pry each one apart from its metal ball. Here is a photo of the flexible cable that leads to the metal ball (hidden under the metal cup at the bottom of the cable) at the side of the curtain: That particular connection is easy to separate, unlike the black "hydraulic" pushrod. Once you have the curtain's cable separated, you may also have to remove the black plastic cosmetic covers (if someone hasn't removed them already and not replaced them) that are simply clipped onto the arms that support the clamshell. . To access the white (or red) plastic ball cups, sit sideways in the driver's seat with the door open and your feet on the ground. Look down from above the side of the car (just behind where the rear quarter panel meets the rear of the door if the door were closed) and you should be able to see the white (or red) plastic ball cup. Pry that cup off by levering it outboard. You will need a fat screwdriver or pry bar. Then you will have to reach between the roll bar hoops, or possibly reach through them, to get at the connection of the hydraulic push rod to the V-lever. That connection is a real bear, so you will have to apply a great deal of pressure to separate it. Keep in mind that these black "hydraulic" pushrods are actually cylinders that contain one large spring each and that these springs are under tension when the clamshell is completely closed on top of the stowed top. Be careful not to hurt yourself there, but you just have to get the connection apart, again with the red plastic capped tool in the tool kit, a fat screwdriver or, preferably an angled screwdriver-type pry bar. I have also had success using a non-automotive tool called a cat's claw, which is usually used to pull nails. If you absolutely cannot get that joint apart, you could remove the spring clip that holds the opposite end of the black hydraulic pushrod onto the clamshell support arm. Once you have removed that clip, you can press the right angle small round rod outboard until it comes out and away from the hole through which it passes in the clamshell support arm. Once you have the various parts disconnected, DO NOT press the dashboard switch without CAREFULLY marking (and photographing) the position of the V-levers relative to the sides of the body that they are mounted on. Otherwise, it will be much more difficult to re-sychronize the V-levers. Also, be very careful if you decide to operate your top manually because the push rod arms that are normally connected to the steel balls at the base of the B-pillars will be dangling from the V-levers. When they are dangling and you move the convertible top V-levers, those push rod arms can dig into the foam liner and tear it, which will cause leaks into the cabin later on. Those push rod arms can also dig in and prevent the V-levers from turning. 2nd: PM sent with the info on the new plastic ball cups. Regards, Maurice.

-
Torque specs on water pump
1schoir replied to Rapewta's topic in 996 Series (Carrera, Carrera 4, Carrera 4S, Targa)
You're not losing the touch...we all have one of those days once in a while. When you have done it yourself, you never have to worry about whether or not someone took the time to torque each bolt properly, etc... :thumbup: Regards, Maurice. -
How to Sync my Convertible Top?
1schoir replied to gunman168's topic in 986 Series (Boxster, Boxster S)
Gunman: #3 is probably being caused by the velcro straps not being re-fastened when the canvas was being re-installed by the shop. Take a look at this DIY article on Mike Focke's website for photos and details on how to fasten them properly around the round metal tube part of the convertible top frame near the top rear corner of the window (if the window was all the way up): http://sites.google.com/site/mikefocke2/convertibletopedgedoesnotfallintoguidech #4 is being caused by the over-rotation of the V-Levers at the end of each cycle (i.e., completely closed or completely open). In your '97, there is a half-moon gear inside the transmission (one on the left and one on the right side) with 50 teeth. When the gear rotates past the 50th tooth, it is pulled SHARPLY back by the large spring inside the "hydraulic" looking pushrod which is attached to one side of the V-lever. To start the process of re-synching the transmissions, take a look at the part III PDF in the following DIY, specifically the text at the bottom of page 38, and 39, along with the photo at page 39 and follow the measurements there: http://sites.google.com/site/mikefocke2/installinga'03-'04glasstopandframeona'97 Regards, Maurice. -
Window regulator failures
1schoir replied to E Kap's topic in 996 Series (Carrera, Carrera 4, Carrera 4S, Targa)
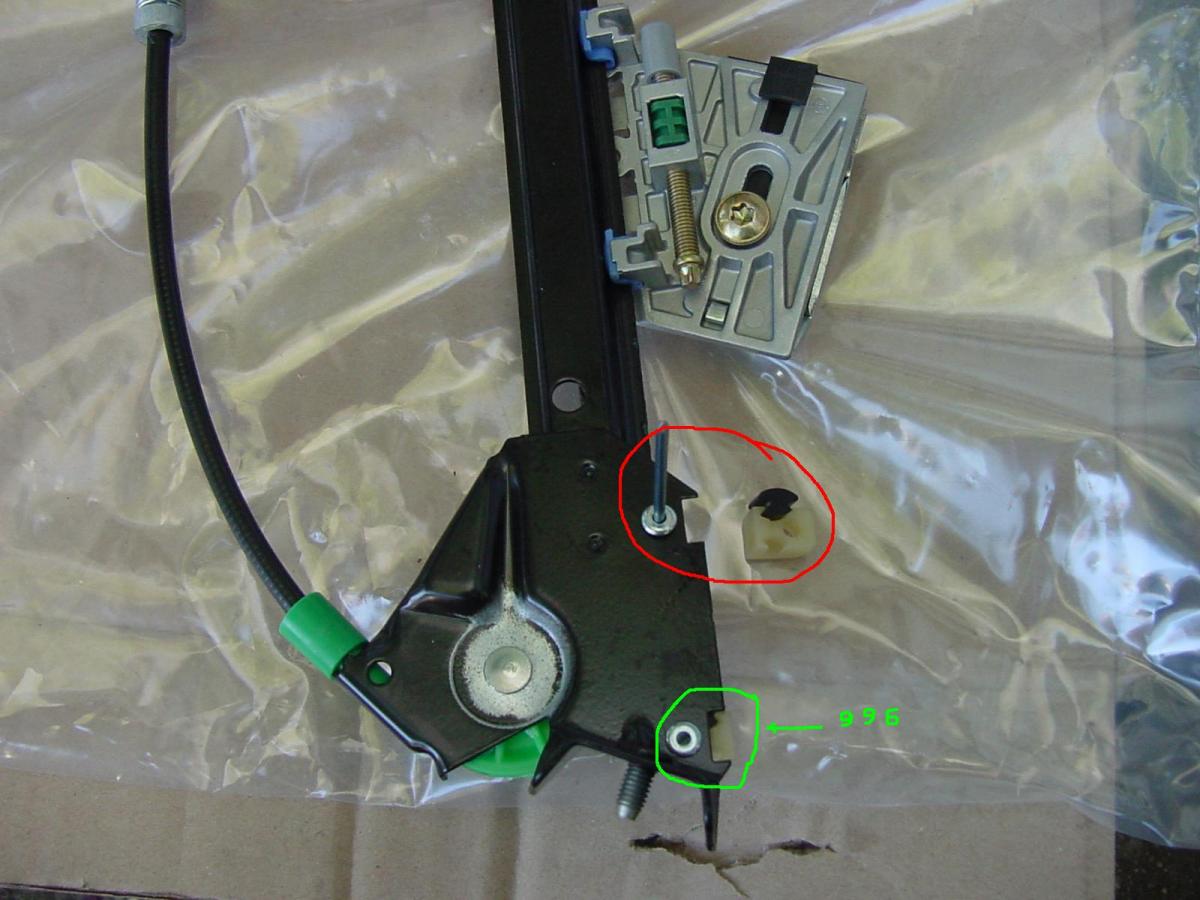
The window regulator part is the same for the 996 and the 986, but there is one difference in the installation which may be causing your window to not go down all the way. There are two slots for a "bump stop" at the very bottom of the forward leg of the window regulator. The slot that is supposed to be used depends on whether the regulator is being installed in a 996 or a Boxster. Installing it in the wrong one could be the cause of your window now rolling down only 95%. Here is a photo showing the two slot locations (click on the photo to enlarge). The red circle is the one where the bump stop should be for Boxsters, the green circle is the one for 996's. The bump stop in this photo has not yet been installed. It's sitting just to the right of the Boxster slot, where it it supposed to be installed with the rivet that is awaiting it in the slot. Regards, Maurice.
-
Here's another guy on 986forum selling his "S" front bumper for $250: http://986forum.com/forums/boxster-parts-sale-wanted/30379-rims-bumpers-exhaust-sale.html Regards, Maurice.
-
Torque specs on water pump
1schoir replied to Rapewta's topic in 996 Series (Carrera, Carrera 4, Carrera 4S, Targa)
The Bentley Manual for the Boxster lists the tightening torque for "coolant pump to crankcase" as 10 Nm or 7 ft/lbs. That is for the 10mm bolts and should be the same for the 996. Regards, Maurice. -
Jeff: There's a guy on 986forum.com who is currently parting out a 2001 Boxster. I don't know whether he still has the front bumper cover, but you could try to e-mail him at : alennazari@hotmail.com He's located in Los Angeles, CA. I bought a part from him and am currently awaiting receipt of it by UPS. Regards, Maurice.
-
PSE (Porsche Sport Exhaust)
1schoir replied to dsnow's topic in 996 Series (Carrera, Carrera 4, Carrera 4S, Targa)
The "default" setting for the PSE is "open all the time", i.e., if there is no vacuum line attached, the baffle remains open (under pressure from the spring which acts on it). On my PSE, which I bought "pre-owned" (LOL!), the sound got much better after repeated bouts of driving with the engine remaining between 4K and 6K A LOT! Before that, we has started to doubt whether the valve was indeed open. Regards, Maurice. -
Maurice, Thanks for your reply. You are correct that the line I described is the AC condensate drain line. And I now believe it does exit through the floor of the car. In any case, it seems in good condition and firmly seated at both ends. The reasons I had thought it might be something other than the AC drain are as follows... I reinstalled the thoroughly dry carpet in the thoroughly dry car. The car then sat, undriven, for over a week, waiting for me to have time to reinstall the center console and put the seats back in. When I was getting ready to reinstall the passenger seat, I slid my hand under the carpet forward of the passenger seat to extricate the wiring harness. That's the only reason I discovered that it was damp under there again. The dampness seems to be localized forward of the passenger seat, so I suspected the drain line I described. The AC was never used during the time while the car sat, but it did rain pretty hard. This leaves me wondering: Could a clogged drain line other than the AC condensate drain cause only the carpet forward of the passenger seat to get wet from underneath? Could water from a hard rain end up in the AC cooling coil compartment, needing to drain through the condensate drain tube? Interested in thoughts and theories as to what my leak problem is. AJ: Although it's not very clear from the factory manual diagram, there are two drain holes for water that may come in at the front of the base of the windshield. The drain holes are located on either side of the battery tray, closer to the rear firewall. If those get clogged (or if the rubber flange on either one of them gets dislodged or distorted), water from rain or from washing the car could end up in the passenger compartment, under the carpet where a passenger's feet would be. There is an explanation and a photograph or two on Mike Focke's Boxster Pages, here: http://sites.google....2/drainsdiagram Regards, Maurice.
-
New convertible top -- problems
1schoir replied to dammad's topic in 996 Series (Carrera, Carrera 4, Carrera 4S, Targa)
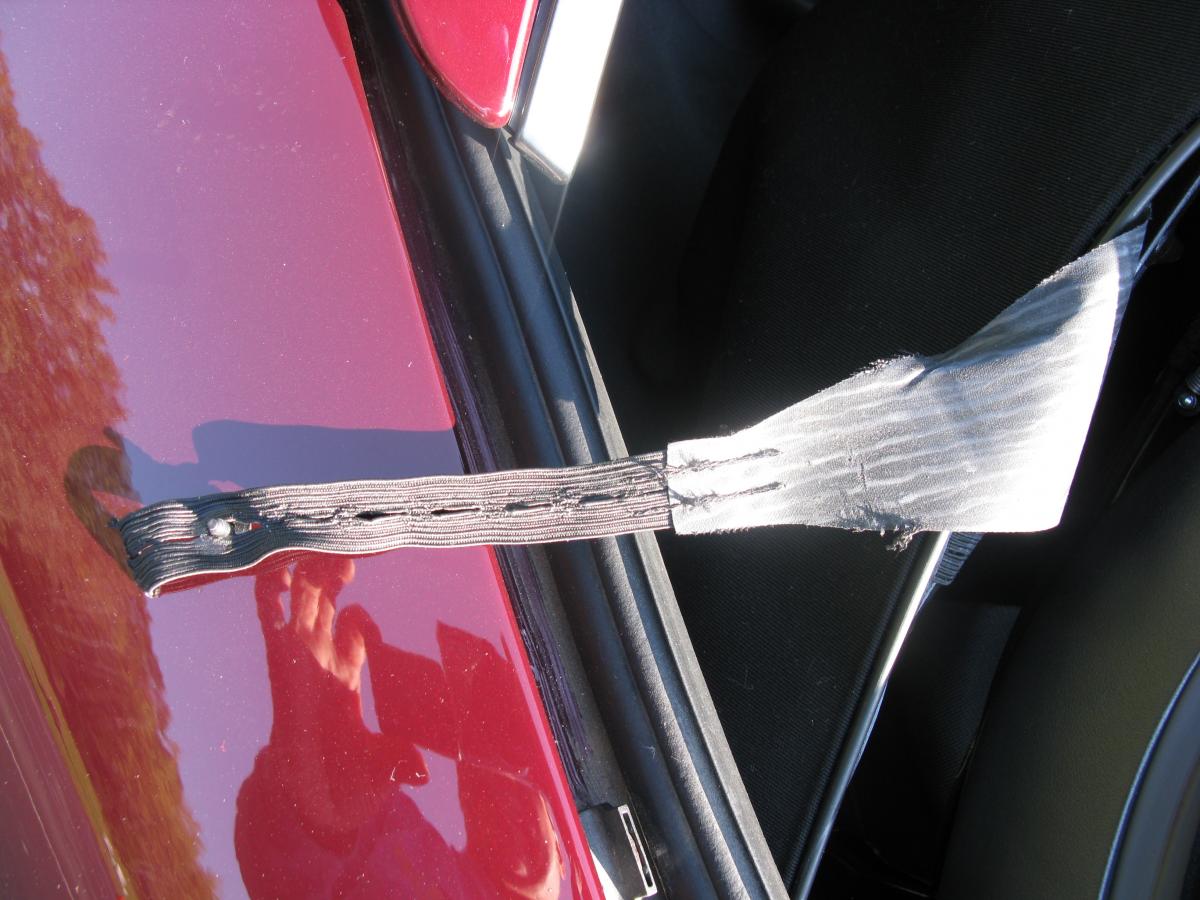
There is an elastic band that does across the width of the top, but it is not tense and does not appear to go around anything. Should the elastic go over some of the arms to stretch it to pull the sides in. I've looked at my manual and cant' see mention of the elastic across the roof, but the manual is not very clear in general. If the convertible top canvas on your 996 is of similar design and construction to that of the later 986's and of the 987's, there are three areas for you to investigate: 1. The "fold-placer" as Porsche calls it. It looks like a shoestring at the left and right edges of the center of the top and has a little bit of an effect in keeping the sides of the top from going out too far. Its main function, however, is to pull in (towards the interior of the cabin) the section of the canvas under which it runs so that the convertible top canvas folds in properly. Think of it as an automated substitute for a "karate chop" in that section of the top when it is opening, so that it finds its proper place by folding along that line (from left to right). This is often seen as a "shoestring" which sticks out of the sides of the top above the middle of the window frame because it tears away from its center band (which is a large elastic band that runs under the canvas). Then there is another "shoestring" attached to the opposite end, and that one can be seen at the opposite end. 2. The velcro-loop straps (two on each side of the convertible top canvas) that are wrapped around on one of the black tubes that make up a part of the convertible top frame mechanism, just aft of where the rear vertical edge of the window would be if it were all the way up. Make sure they are both wrapped around the metal tube and that they are not ripped away from where they are stitched in. 3. There is a triangular "anchor" made of black vinyl fabric material attached to the edge of the canvas near the rear of the base of the B-Pillar frame member (the B-Pillar terminates at its base just aft of the uppermost rear corner of the door, close to where it meets the top of the rear quarter panel). You have to operate the top so that the leading edge is about 18 to 22 inches from the top horizontal part of the windshield frame. Then, look to the rear of the B-Pillar, under or in between the roof liner and the canvas top fabric. You should see the triangular shaped vinyl fabric, with an elastic band attached to it by means of two sets of stitches. That black elastic band should have eyelets or buttonholes along its middle. There should be a T15 torx small screw with washer screwed through one of those buttonholes and into a hole in one of the black metal frame members at the rear (sides) of the convertible top frame. Check to see whether that elastic is actually fastened (maybe the installer forgot to re-install it) by means of that T15 torx screw, and/or whether the buttonhole through which it is fastened leaves that elastic band with too much slack. If the latter is the case, fasten it to another buttonhole further towards the front of that elastic strap (i.e., away from the tip of the triangle where the strap is stitched onto the triangle). That will provide more elastic tension on the sides of the top because it will pull on the vinyl-covered cables, and those cables will in turn be pulled in properly behind the edges of the convertible top edge. Here is a photo of what you are looking for, taken after the T15 screw has been removed and the flap pulled outboard to get a good look at it: If you look closely at the photo, you can see the "indent" in the elastic where the screw and its washer had been pressing the elastic against the metal frame to which it had been fastened. If there is still elasticity in the black band, just try the next hole, thereby effectively making the strap shorter and thus increasing the pull of the strap on the edge of the canvas top. If there is no elasticity left in that black band, it must be replaced, preferably with a 2" wide elastic band, available from fabric or craft stores. Let us know if it is indeed the same design as that of a 987. The photo is from a 2007 Boxster. Regards, Maurice.
-
Thanassis: The "cable falling outside of the guide channel" when the top is almost all the way closed is a common problem, but it has different causes depending on whether yours is a 986, 987, or later 987. On the 986, the most common cause is the tearing or the loosening of the two pairs of velcro straps that are looped around one of the black metal arms near the B-Pillar part of the convertible top frame mechanism. On the 987's it is more commonly caused by the lost elasticity of one of the black fabric elastic straps (with "buttonholes" and attached to a triangular shaped piece of vinyl fabric) that is attached (on each side of the car, below and behind the B-Pillar frame member) to and which pulls on, the (vinyl-sheathed) cable. Take a look at the article on Mike Focke's Boxster Pages for a more in-depth explanation of the causes of this problem on 986's, here: http://sites.google.com/site/mikefocke2/convertibletopedgedoesnotfallintoguidech Regards, Maurice.
-
AJ: From your description and the location of the tube, it sounds like it's probably the drain tube for the water that normally drips from A/C operation. It is supposed to end up outside (underneath) the body of the car. When it gets clogged (or is improperly routed), it will soak the foam under the carpeting. Regards, Maurice.
-
jcam: Apparently, it has something to do with the nutrtitional content of the insulation (starch? carbs? I can't recall) that they use on Porsches (and probably other German cars). NOT Kidding, it was written up in an article, but I can't find it right now. I'll post the link if I find it. Some have come up with very simple, but very effective ways of controlling the population of these rodents. Some photos on PPBB.com IIRC. That reminds me...I've got to go take something for my memory now...::huh: Regards, Maurice.
-
50 to 60 thousand miles and you are right in the "sweet spot". :eek: Sad but true... There is also some "wisdom" out there that says to stay away from aftermarket units because of the impeller material quality. There is a lot of info on that issue on 986forum.com, but a lot of it is geared towards driving sales for a certain purveyor of such wares. Said purveyor shall remain nameless, but definitely do some reading here as well on that issue as you don't want to do that job twice, especially the burping part if you get the Uview unit. Regards, Maurice.
-
Try Amazon.com for that UView vacuum tool, they always have decent prices on it, sometimes less than $100 total. It is identical to the P labeled unit, but without the fancy logo, and it's extremely well made and will pay dividends indefinitely. In other words, that thing really works well and it can stand up to the abuse to which they are subjected. If you doing the water pump, it will save you hours of manual bleeding, etc..., etc... Good Luck! Regards, Maurice.
-
Unless you can get your hands on a used/broken top of the same vintage (i.e., 986 1997 to 2004), your best bet is to try to salvage the parts you have, perhaps by using something like "marinetex" or the "dumdum" stuff they use in body shops to hold things together.... A two-part epoxy would definitely hold that plastic channel as it is not subject to lateral pulls, just straight up when at speed. Its job is to keep the convertible top canvas flat to the top of the convertible top frame and to keep that canvas from flapping around a little. The metal clip can be duplicated with any cold steel or similar material. The old ones usually rust and you can treat the new one with POR-15 or some similar rustproofing product. Take a look at Mike Focke's Boxster Pages, here https://sites.google...cingthetop-adiy , and more specifically at paragraph number 7 in that DIY on replacing the canvas top for more information and photos on that particular little clip. In a pinch, you could also consider using Velcro on the top surface of that second frame bow, and on the underside of the canvas/cloth strip/channel, but you have to consider to not restrict the movement when it's installed. In other words, try to mimic that particular aspect of the fastening "system". AFAIK, Porsche does not sell that little plastic channel nor that little clip by itself. They do sell other small parts for the roof liner, etc., but those are usually parts that were expected to need replacement or for which they have stock for some unexplainable (here) reason. :) Regards, Maurice.
-
The Suncoast page here lists that one as only for Boxster, doesn't mention 996 or 997. That's why I'm asking. I suppose I could fabricate something .... Why I'm at it, can anyone describe to me the logic of preventing raising the rear quarter-windows when the top is down? gnet: Just a guess... It's done so that there is no chance that the convertible top frame, as it unfolds and is raised, does not come up on the wrong side of the windows. Regards, Maurice.
-
JP: I would hate to be the bearer of bad news, especially when the bad news may compound your already existing "not so good news" problem... It appears from the two photos that you have attached that the spring which is attached to the tension cable on the inside of the shoulder plate may have somehow "snuck" out from its resident position under the top and under the shoulder plate (when you have one opened up and can inspect it, it will make perfect sense. If it (the spring at that end of the tension cable) has actually moved from its original position, you are going to have to somehow manoeuver the shoulderplate/spring into their correct positions, which in this case means that the spring cannot be directly exposed or contacting the canvas on any of the facets of its surfaces. You can also try to stick something flat and waterproof in between the sides of the spring and the canvas material itself.... The only other cause I can think of is that (if it is a new cable [and it's not OEM] ), the overall length of the tension cable is too long, and thus causes a bunching of the material at those two spots shown in your photos. If you will go to Mike Focke's website (see above post), you will see the actual measurement of the cable and what its length is supposed to be (as per specs in the factory workshop manual). The other part of the bad news is that your top was not installed taut enough at the forward section of the canvas top... that is what the wrinkles on the second photo show... A bit of good news... it's relatively straightforward (but tedious) to strip the front two sections of the convertible top frame and not difficult to re-install. On Mike Focke's website, you will also see plenty of photos that will familiarize you with the terminology and with the vagaries of that particular part of the installation. When you re-install the front section, just make sure that you apply pulling pressure before pinning its side sections (over the horizontal section of the window frames)to the canvas part and it should improve quyite a bit. Regards, Maurice.
-
I'm sure others here will offer much more specific and subjective information (my perspective is derived from Boxsters), but, if i am not mistaken, one of the major pluses of the Turbo is that the engine is not mass-produced and mass-assembled. As a result, it has had (and should continue to have) none of the bad press and experiences associated with the much-hyped and much feared IMS failures (primarily because it's a total $$ engine failure and not something that can be taken lightly by the average Porsche owner). Although the IMS issues may have been designed out of the M96 engine variants in 2009 (IIRC), the benefit of the more hand-assembled turbo cannot be overemphasized in today's bottom-line seeking corporate entities... Good luck with your new acquisition, and remember, we really, really like photos here! Regards, Maurice.