Welcome to RennTech.org Community, Guest
There are many great features available to you once you register at RennTech.org
You are free to view posts here, but you must log in to reply to existing posts, or to start your own new topic. Like most online communities, there are costs involved to maintain a site like this - so we encourage our members to subscribe or donate. All subscriptions and donations go to the costs operating and maintaining this site. We prefer that guests take part in our community and we offer a lot in return to those willing to join our corner of the Porsche world. This site is 99 percent member supported (less than 1 percent comes from advertising) - so please consider an annual subscription or donation to keep this site running.
Here are some of the features available - once you subscribe RennTech.org
- View Classified Ads
- DIY Tutorials
- Porsche TSB Listings (limited)
- VIN Decoder
- Special Offers
- Paint Codes
- Registry
- Videos System
- View Reviews
- and get rid of this welcome message
It takes just a few minutes to register, and it's quality Porsche information at a low cost.
Contributing Members also get these additional benefits:
(you become a Contributing Member by subscribing or donating money to the operation of this site)
- No ads - advertisements are removed
- Access the Contributors Only Forum
- Contributing Members Only Downloads
- Send attachments with PMs
- All image/file storage limits are substantially increased for all Contributing Members
- Option Codes Lookup
- VIN Option Lookups (limited)


1schoir
-
Posts
2,739 -
Joined
-
Last visited
-
Days Won
9
Content Type
Profiles
Events
Forums
External Paint Colors
Downloads
Tutorials
Links Directory
Collections
Classifieds
Store
Everything posted by 1schoir
-
There have been problems reported with corrosion INSIDE the rubber boot that covers the wires that run from the body to the door, near the upper door hinge, and they have resulted in the symptoms that you describe. Pull that rubber boot off and carefully inspect the wires and connectors there for corrosion or moisture. Regards, Maurice.
-
The wife is about had it with this porsche
1schoir replied to westladog's topic in 986 Series (Boxster, Boxster S)
If you use a jumper wire to connect the two sides of the switch, you cannot avoid the fact that you should only start the car in neutral or with the clutch pedal depressed. Any other method will have the car lurching forward, and it could be catastrophic, so be careful. Regards, Maurice. -
The wife is about had it with this porsche
1schoir replied to westladog's topic in 986 Series (Boxster, Boxster S)
I don't think you can "bump-start" the car with a bad clutch interlock switch. Not sure if it disables the ignition or just the circuit to the starter solenoid. That issue with bunched up carpets under the clutch pedal that "whall" mentions is a fairly common problem, so make absolutely sure that there is nothing restricting the full movement of the clutch pedal. If it annoys you, you can jump the two sides of the switch with a small piece of wire, but then you have to remember to have the clutch depressed or the tranny in neutral so as to avoid having the car lurch forward when you turn the key (like in the old days). The ROW DME program allows the car to be started without having to step on the clutch. Regards, Maurice. -
Replaced AOS, but idling rough
1schoir replied to mkc2bad's topic in 986 Series (Boxster, Boxster S)
Mike: The little accordion-type "rubber hose bit" is the bellows. Double check all of the mechanical connections on both sides of the bellows, and at both ends of the plastic "Y" tube. Also make sure that the AOS is firmly seated against the side of the engine where it is held secure by the two 10mm bolts. Check the connection between the two parts of the oil fill tube (from the bulkhead section to the middle hose) as it may have been disturbed during the AOS install. Regards, Maurice. -
cylinder full of antifreeze
1schoir replied to Marcus52's topic in 996 Series (Carrera, Carrera 4, Carrera 4S, Targa)
Mark: Congratulations on beating the odds in both scenarios! I'm sure that the work that you did has given you immense satisfaction. Thanks for sharing the saga and here's hoping for a fantastic 2011! Regards, Maurice. -
computer going crazy
1schoir replied to Bill083's topic in 987-1 Boxster Convertible Top Issues and Solutions
Bill: Thanks for the kudos. Pat yourself on the back for your perseverance! Your solution should provide you with additional peace of mind. Take some of the $$ you saved and buy some goodies for your Boxster! Regards, Maurice. -
What is the purpose of this part?
1schoir replied to 1schoir's topic in 986 Series (Boxster, Boxster S)
DC: Thanks. I was trying to figure out if the rubber plug had a one-way valve function or something. Apparently it just looks like a sealing rubber cap, as you point out, for the little drain nipple in that corner. When I removed mine on the passenger side to replace it, it was torn up and I didn't have a spare on hand, but I was surprised that only about 8 ounces of coolant drained out the that radiator. Maybe it was because the front of the car was jacked up, about 24 inches off the ground. I made a temporary plug out of a piece of 3/8" fuel line and a cut-down bolt. As soon as I receive the replacement part, I'll install it. Regards, Maurice.
-
Soft top adjustment
1schoir replied to rpee's topic in 986 Boxster Convertible Top Issues and Solutions
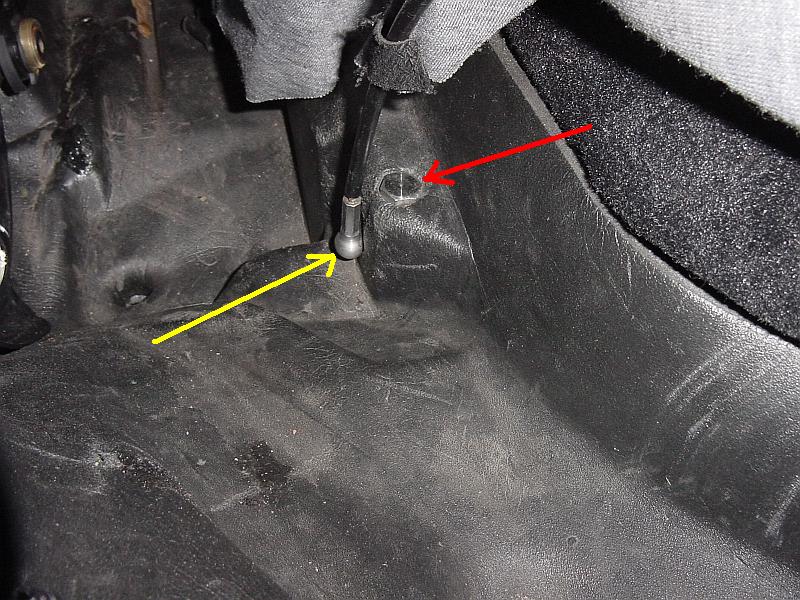
Rpee: If you have a plexiglass windscreen installed between the rollbars, does the latch at the front of the top's frame hit or touch the top edge of the windscreen as you lower the top? If it doesn't touch, the convertible top is most likely okay fore and aft. The top can be adjusted horizontally, but there is only a VERY small amount of movement that will be obtained. You have to loosen the bolts on each side of the convertible frame base (3 on each side, and remove the Phillips head screws [1 or 2] if you find any in that same area). For some photos, take a look at the DIY here: http://sites.google....gthetopandframe Post a couple of photos of how the clamshell sits in relation to the quarter panel and to the rear trunk lid, as it may actually be the clamshell that is out of adjustment. If your clamshell is sitting exactly where it's supposed to be, before going at the three bolts on each side described above, first check that your "tension ropes" are intact and that they are connected. If they are intact and connected, you can adjust the rear main bow of the convertible top frame by turning the 14mm adjusting bolt Counter-clockwise. Here is a photo of where that adjustment bolt is (red arrow), and where the lower end of the tension rope's metal ball cup attaches to the steel ball (yellow arrow) connected to the adjustment mechanism: By turning the bolt CCW, the steel ball will be lowered, and that in turn will pull the rear main bow down and minimize the abrasion. Again, this is if your clamshell is sitting properly and doesn't itself need to be adjusted. Regards, Maurice.
-
This thing looks like a rubber hose/plug/valve and is located on the outside bottom corner of each radiator on a 986. Can anyone tell me what its purpose is? Regards, Maurice.
-
computer going crazy
1schoir replied to Bill083's topic in 987-1 Boxster Convertible Top Issues and Solutions
-
computer going crazy
1schoir replied to Bill083's topic in 987-1 Boxster Convertible Top Issues and Solutions
No bother...we are all here to share information. BTW, , sorry it had to be under such circumstances. You can easily remove the seat with a female torx socket by unscrewing the four bolts that hold the seat rails in place. To access the two in the rear, slide the seat all the way forward, to access the two in the front, slide the seat all the way back. If you don't have a torx socket, in a pinch you can remove those four bolts with a 1/4" drive 10mm good quality socket. 1/4" drive will give you a decent enough fit to get the job done. There is also a large connector under the seat, but if you disconnect that one, make sure that the ignition is off AND that the key is out of the ignition, otherwise you will set off your airbag light, which can then only be turned off with a PIWIS, PST2 or Durametric. Note that (at least on 986's) the cable under the seat is long enough to allow you to pull the seat out and lay it directly next to the door sill, outside the car, possibly elevated on a suitable box or platform. That avoids the difficulty in undoing that large connector, which is a little tricky if you've never done it before and avoids the airbag light problem. For the drains, go to this link for photos and DIY instructions: http://sites.google.com/site/mikefocke2/drainsdiagram Don't put off taking the immobiliser apart and at least drying it out, maybe with some warm air from a hair dryer set on medium. The fact that your Boxster started probably means it hasn't gotten fried, so be pro-active and it might turn into a non-event. Do a search here as I believe some have cleaned the circuit board with isopropyl alcohol or another similar circuit board-friendly solvent. After you are done, you should be able to discern whether "it's all good" if all of your symptoms have disappeared. Be absolutely sure to find out if it's only a matter of clogged drains, as opposed to torn or ripped foam drain trays which sometimes get damaged by a dangling pushrod after one of the plastic ball cups on the end of the pushrod breaks apart or pops off. We can work on that after you take care of the more pressing issue of rescuing the immobilizer. Regards, Maurice. -
computer going crazy
1schoir replied to Bill083's topic in 987-1 Boxster Convertible Top Issues and Solutions
Check to see whether there is any moisture or water under the driver's seat or in the foam padding under the carpet behind the seat. The symptoms you describe sound like your immobiliser may have gotten wet. In some instances, you can take it apart and clean it/dry it with isypropyl alcohol and revive it without any further problems if you get to it soon enough. If there is water intrusion, make sure that you clean out your drains to prevent a repeat occurrence. Regards, Maurice. -
Randy: Take a look at the DIY on Mike Focke's Boxster Pages to get an idea of what is involved in stripping off the old canvas and installing the new one: http://sites.google.com/site/mikefocke2/replacingthetop-adiy If the aftermarket top is correctly sized, it is a straighforward, but time consuming, install. You just need patience and to not cut any corners to end up with a perfect install. Regards, Maurice.
-
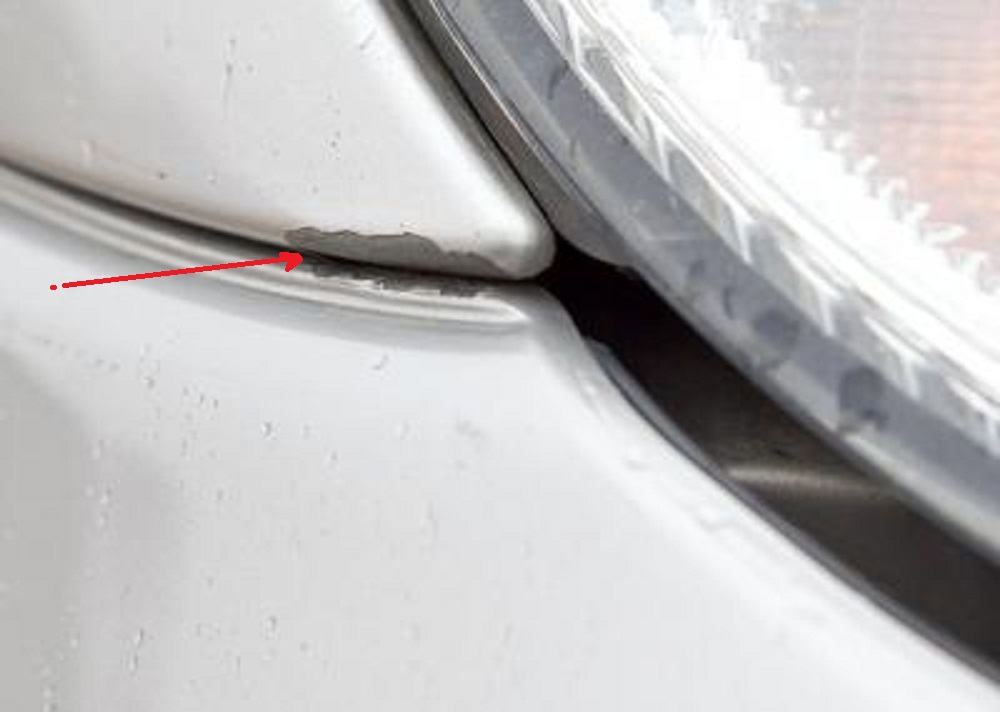
Tool damage or rock chip?
1schoir replied to seanmcr6's topic in 996 Series (Carrera, Carrera 4, Carrera 4S, Targa)
Your second photo shows pretty clearly that this not "rock chip" damage. The area is too wide for it to have been hit by a rock, on both sides (fender and bumper) and to leave those kinds of outlines. If that area has been previously repainted and the surface prep was not proper, it could make the paint pull away from the surface, but, since there is no extensive corrosion on the fender side (and no possibility of rusting on the urethane bumper side), it had to be caused by some mechanical means. Take a look at how the paint has pulled away from the underside of the fender at the left corner (red arrow in this photo), and at the uneven, jagged outline of the missing paint. (You can see it clearly in your photo. My copy of your photo just shows you the area to look at in your second photo). Again, also too much of a coincidence for work to be done in that area and for damage to magically appear at one of the points where the bumper and fender are separated. Regards, Maurice.
-
Tool damage or rock chip?
1schoir replied to seanmcr6's topic in 996 Series (Carrera, Carrera 4, Carrera 4S, Targa)
Sean: Judging from that photo, it's unlikely that it's a rock chip, mostly because there is paint removed on both sides of the "injury". The width of the paint that was removed might indicate that it was caused by one of those flat plastic pry tools or a screwdriver inserted more than once or "moved along" to separate the panels. You may be able to conclusively tell by examining it more closely on the edge towards the underside because if it's caused by a screwdriver or some similar tool, there will usually be small pieces of residue from where the paint cracked off but may still be hanging by a thread. Separate the bumper from the fender and have a closer look at the edges where the clearcoat/topcoat is missing. The fact that they were working on the radiators and had to remove the bumper to gain access to that area makes it a little more likely than not, IMO. Regards, Maurice. Edit: I looked at the photo again, and you can see what I am talking about where the paint is missing on the bumper side of the damage. There are two little areas of "cracked" or "separated" paint where I have placed the two arrows. Take some more high resolution photos for your proof and don't rub those edges off before you show it to the dealer again. You can stop at any auto body shop and show them those two spots and see what they say.
-
Coolant flush with vacuum fill tool
1schoir replied to mtimmy's topic in 996 Series (Carrera, Carrera 4, Carrera 4S, Targa)
Drawing a vacuum a number of times is safe. If you can't get that last gallon out and don't want to mix antifreeze types, you could try to fill the system with plain water and drain it a couple of times, then do the final drain after filling it with distilled water. If it's been drained and refilled with water a few times, you should have diluted the old coolant enough to have no compatibility issues. If the final fill with distilled water leaves one gallon unaccounted for, you can just count that gallon for the level of dilution that you want to reach. Regards, Maurice. -
'06 Boxster window/heated seats
1schoir replied to tfrutchey's topic in 987-1 Series (Boxster, Boxster S)
That is unusual, as that exact procedure is described in the Owner's Manual. This is a longshot, but I cannot imagine anything else that would affect the operation of the windows other than the immobiliser (under the driver's seat). Check for any moisture or dampness under and behind the driver's seat and the thick foam padding under the carpeting. If the immobilizer gets wet, it will also affect the window operation. Regards, Maurice. -
new to forum, new porsche 986 owner
1schoir replied to caballo77's topic in 986 Series (Boxster, Boxster S)
R: If you can remove the oil fill cap with relative ease (and you don't have any blue smoke coming from your exhaust), those are all indications that your AOS is okay. You should remove the tube that runs from the AOS to the air intake and inspect for excessive oil deposits there as a double check. The rubber bellows on the AOS is a common failure point, so you should check that part to see if that is where your oil leak is coming from. Aside from being an indication of low coolant lever, the coolant light slowly flashing can also be an indication of a fault in the engine compartment blower fan. Regards, Maurice. -
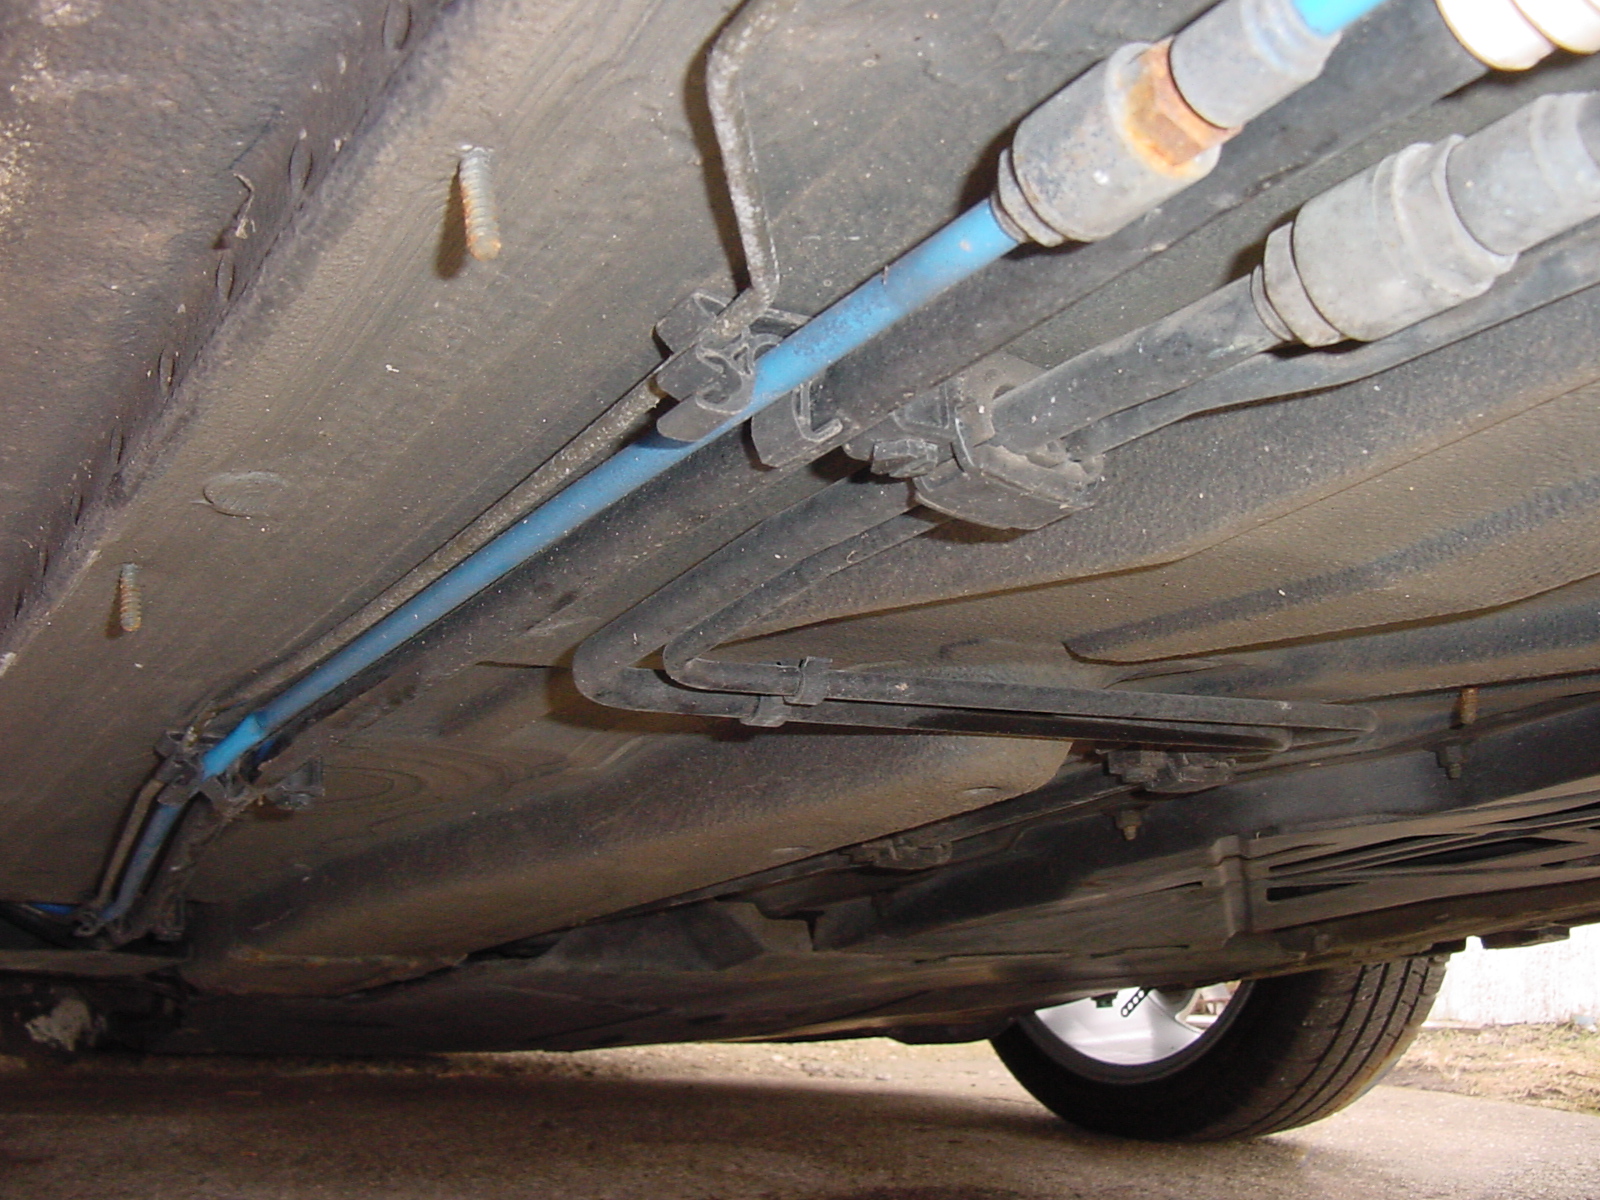
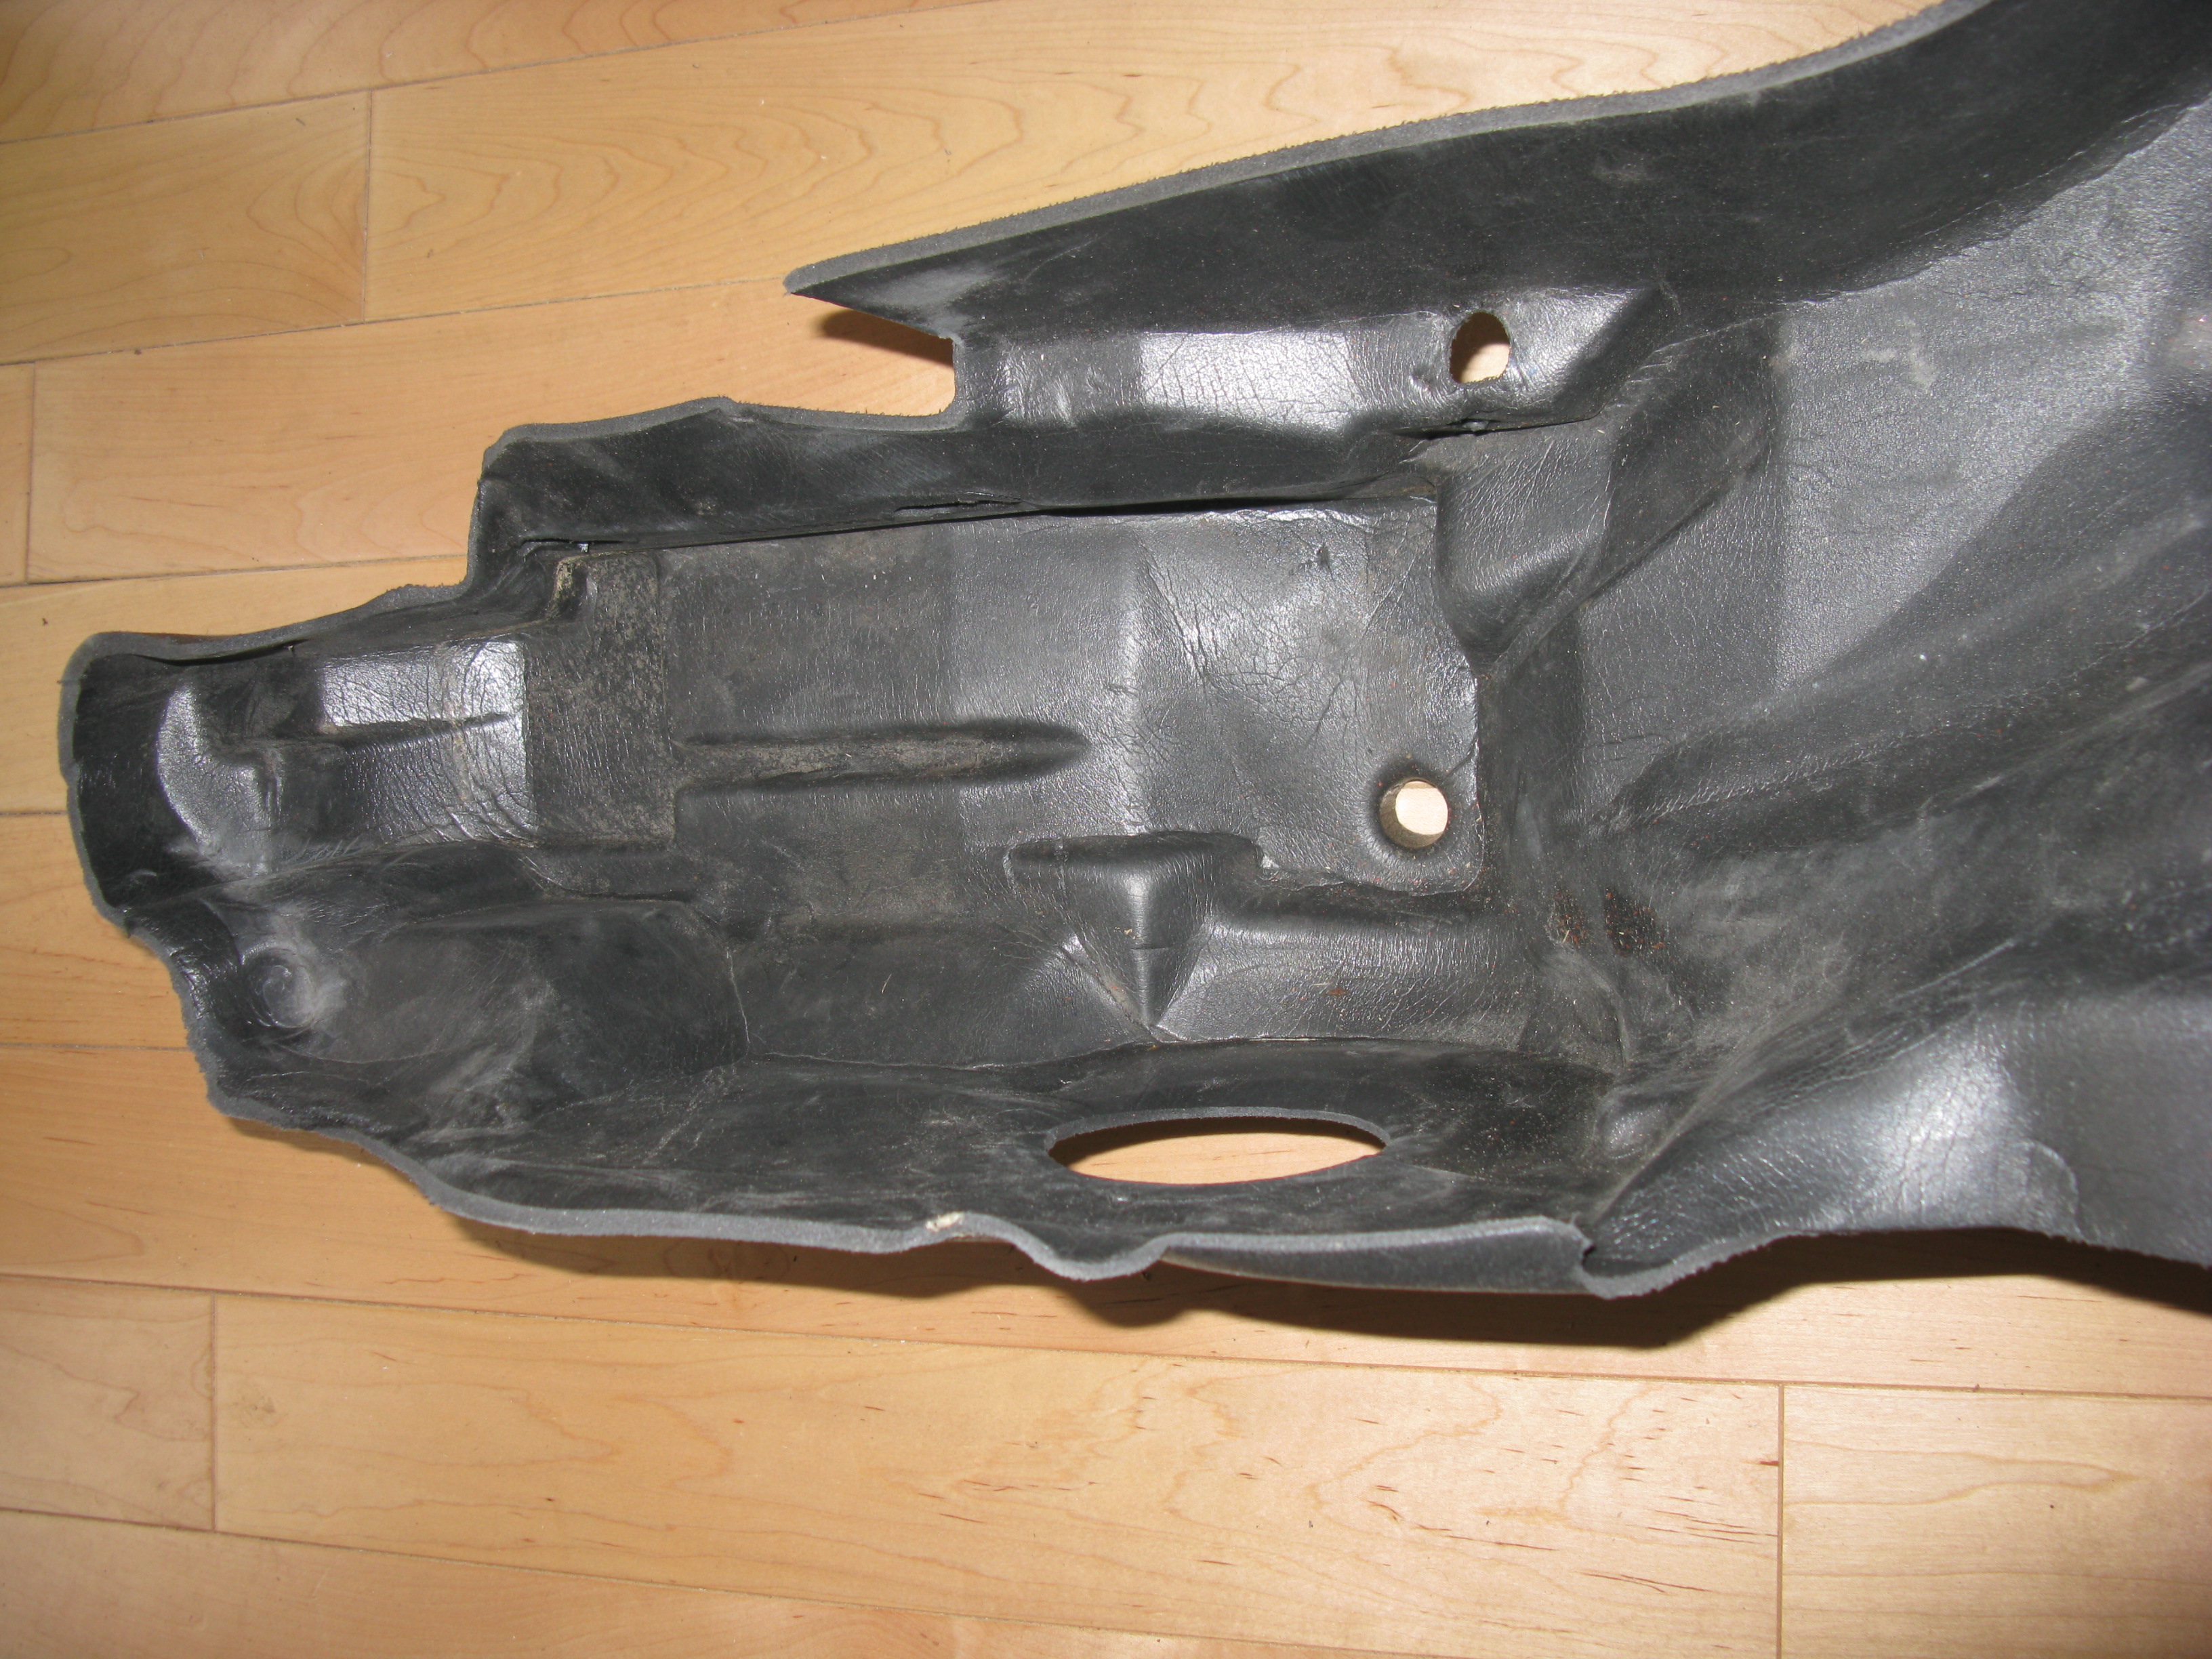
We need a higher resolution photo to make a clear determination, but I can tell you that just about ANY tear or rip, no matter how small can cause major water infiltration into the cabin...it just takes a little longer for all of the water that collects in the drain pain to drain through smaller rips or tears. It has to be 100% waterproof, especially towards the front of the drain trays because any water in the drain pan will be thrown forward whenever you step on the brakes or whenever you may be on a downward incline. After the silicone adhesive sealant has cured, try the test again to see if it has stopped coming into the cabin. If it hasn't, you are going to have to remove, or at least lift up that side of the convertible top frame base. It's not a difficult DIY, and you may not have to remove the other side's base. It's only a matter of three bolts and either 1, 2 or no Phillips screw(s), depending on your year Boxster. Take a look at the instructions starting at the bottom of page 11 and at page 12, and the photo at the bottom of page 12 of the Part I PDF at this link: http://sites.google.com/site/mikefocke2/installinga'03-'04glasstopandframeona'97 Once you take off the three bolts (two of them are circled in red in the photo) and check to see whether there are any phillips screws to remove (blue arrow in the photo), you will be able to lift that side of the base of the top frame enough to be able to inspect the drain tray under it for any other rips or tears. Here is a photo of the forward part of the driver's side drain tray removed from the car so that you can get an idea of what you are looking at: Regards, Maurice.
-
'06 Boxster window/heated seats
1schoir replied to tfrutchey's topic in 987-1 Series (Boxster, Boxster S)
For your windows that won't close properly after loss of battery power, you have to "retrain" them as follows: Close the windows with the rocker switch once. Then press the rocker switch upwards again to store the end position of the windows in the control unit. (Sometimes you have to hold the switch in that position for five seconds depending on your year Boxster, IIRC). Do the same procedure for the fully open position. Let us know how you make out. Regards, Maurice. -
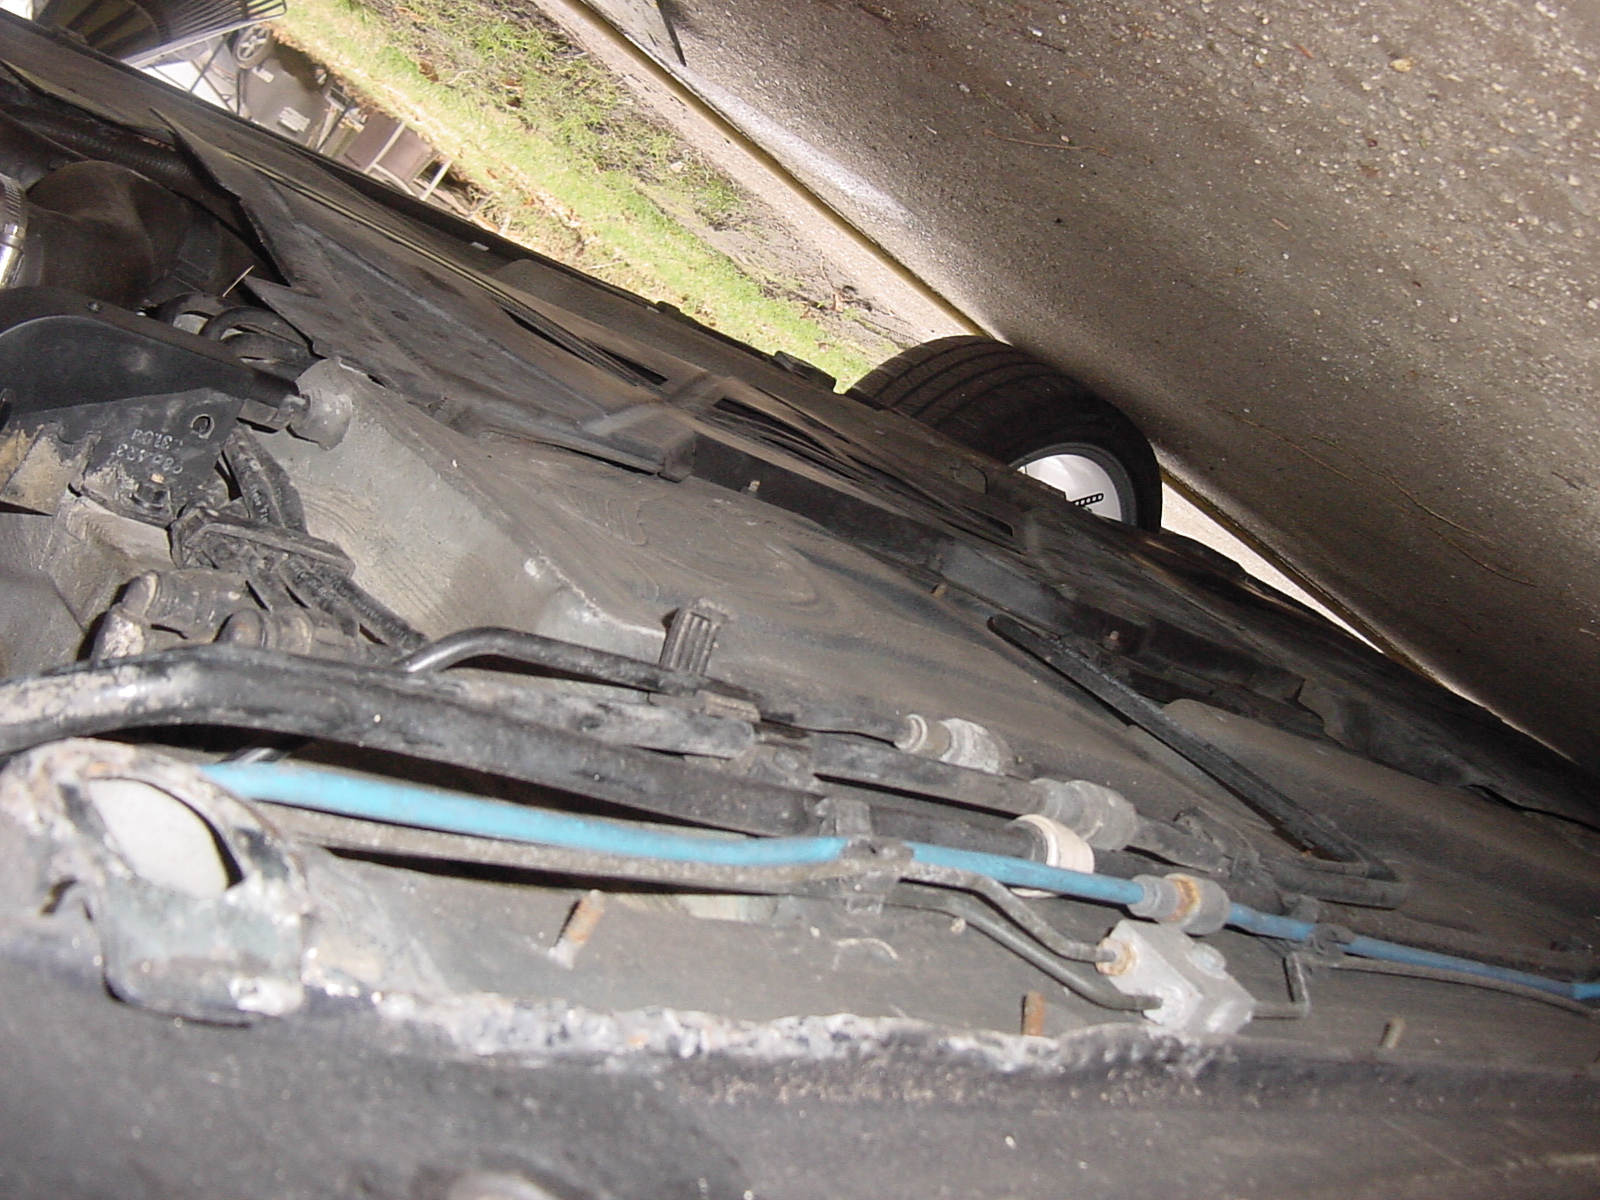
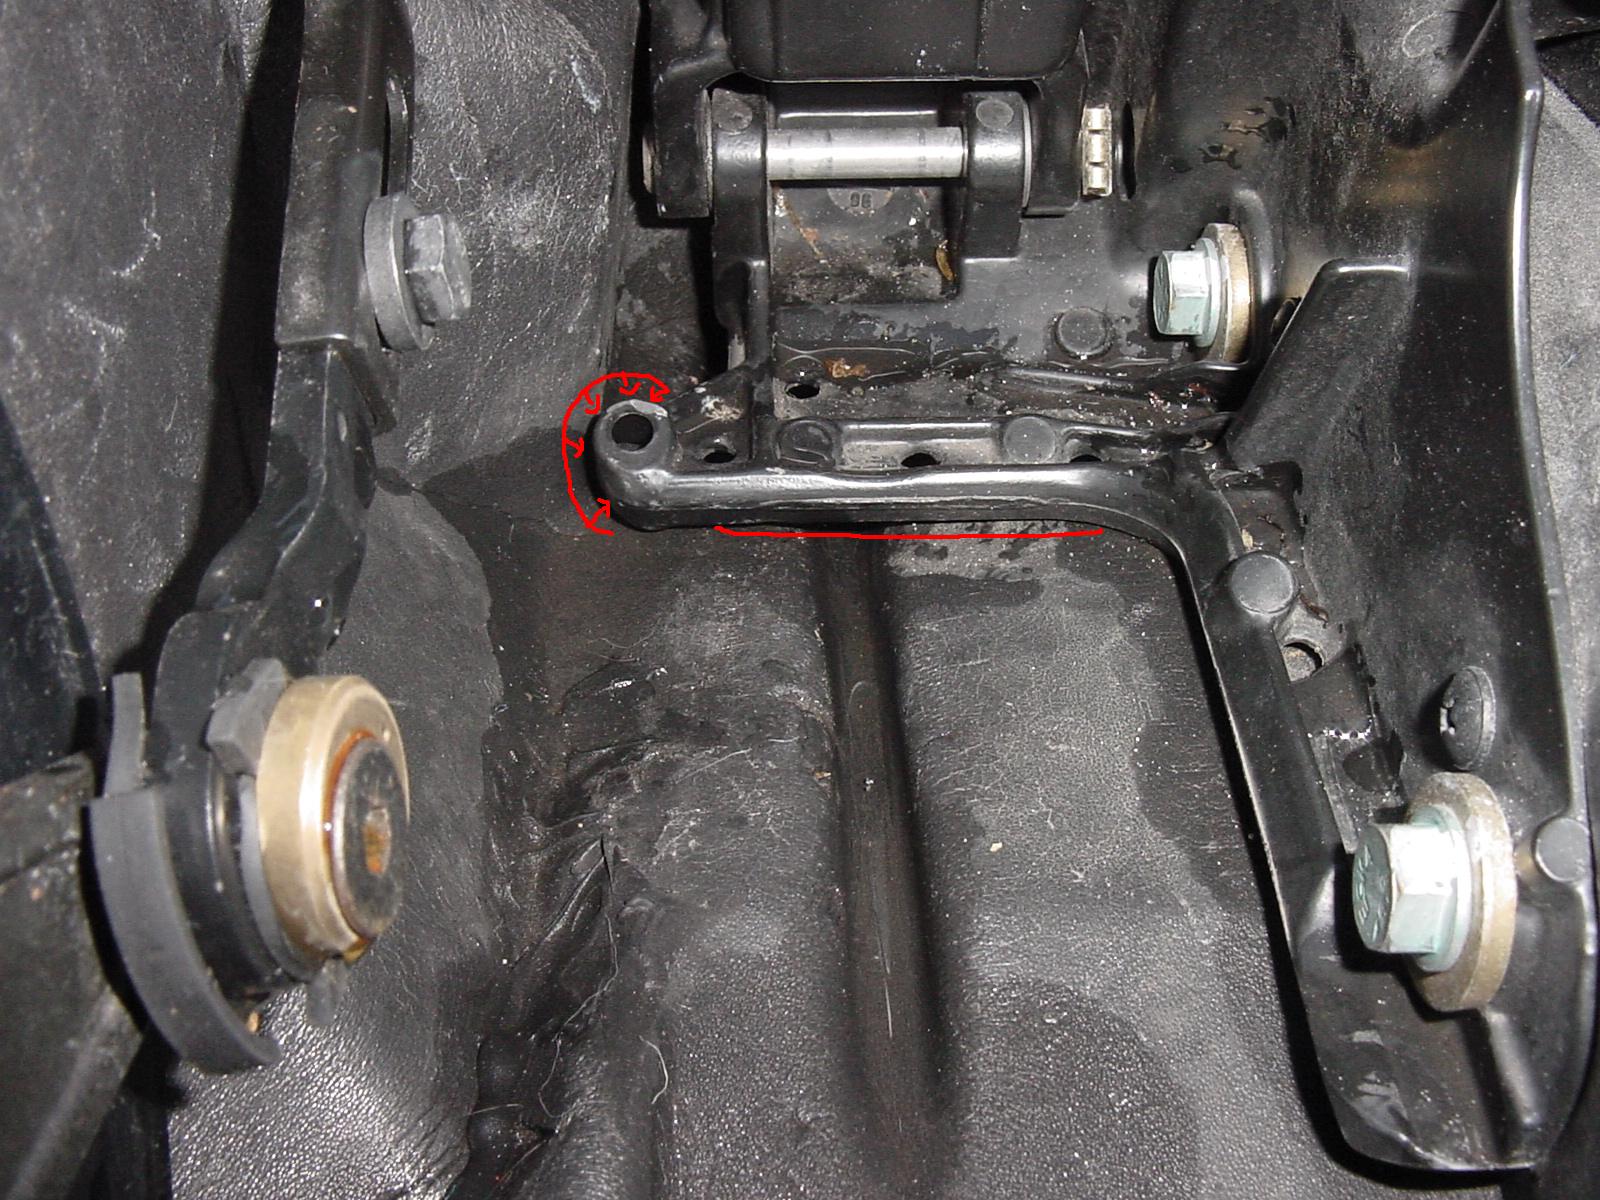
Karned: That little hole in your #4 photo is supposed to be there, as it is an extra drain for water that collects in the U-channel on each side into which the forward parts of the clamshell sit. However, you have to make sure that water drains freely through that hole because it if doesn't, the channel will overflow, and some water could end up over the inboard side of the channel near the front and some of it could end up in the passenger compartment. Pour some water slowly into that channel and see if it drains as quickly as the other side's little hole. To confirm that water is not draining properly through the drain hole in that drain pan, place a pan under the front of the left rear wheel so that you can catch the water that drains out there. Then pour in one measured pint and see if you catch a complete pint in the pan. If you don't you have confirmed that it leaking through some hole or crack in the foam drain tray, OR that it is leaking where the little plastic funnel collects the water under the hole (in your photo #2) in the foam drain tray. You can have a little peek at that little funnel if you remove the V-lever and the thin black plastic disc that protects the foam drain tray as the V-levers turn. Then you can untuck the top outboard edge of the foam drain tray from the sheet metal and carefully pull it up so that you can have a peek under the drain tray. The V-lever bolt is 19mm and is on with loctite, so it take a bit of force to remove. Also, make sure that take careful note of the position of the V-lever's MALE keyway, because it is possible to reinstall it upside down (i.e., 180 degrees off). When you pour the pint of water in, also take a close look at where the base of the convertible top frame sits on top of the foam drain tray. Here is a photo of the places to check under the base of the frame: As you slowly pour water at the base of the frame (where the red lines are), see if the water pools there and then flows towards the rear and into the drain hole. If it disappears under the frame without flowing towards the drain hole, there is a tear or rip under the top frame and you will have to remove at least that side of the frame to make the repair by patching it with Permatex Black Adhesive Silicone Sealant. Also, make sure that your rear vinyl curtain is properly attached to the rear firewall with the two plastic clips as that curtain also directs water to the drains. Once you have verified all of the above, it wouldn't hurt to check your front drains (located on each side of the battery drain tray under the front trunk. As PK says, you cannot be too careful about keeping water away from your immobilizer. !!! Regards, Maurice.
-
I am not sure that it would apply in this case from your description of how the problem originated (i.e., wires behind emergency flasher), but on all of the 986's and 996's, the electrical portion of the ignition switch is a frequent failure point, and it causes some otherwise inexplicable electrical gremlins. Since the part is so inexpensive (about $10, and it's an Audi part, part number 4A0 905 849 B) and relatively easy DIY to replace, it may be worth a shot to eliminate that as a possible source of the problem. Regards, Maurice.
-
stolen part...need name and part number
1schoir replied to westladog's topic in 986 Series Part Number Requests
Package sent. Regards, Maurice. -
Recommendations of wheels for my 986
1schoir replied to Vigor's topic in 986 Series (Boxster, Boxster S)
Corrected post: Wheel Enhancement is in Culver City, CA.... Wheel Dynamics is in Monterey Park, CA. The latter company may have changed its name by now because that story was everywhere, and even ended up on "Jalopnik.com". Regards, Maurice. -
Recommendations of wheels for my 986
1schoir replied to Vigor's topic in 986 Series (Boxster, Boxster S)
The bad experience was with a company with a similar name, but it is NOT the same company as "Wheel Enhancement": http://www.6speedonl...ust-see-19.html See post #273 for one poster's summary of the 19 page thread. The part that disturbed me the most was that the "repairs" were not disclosed. Regards, Maurice.