Welcome to RennTech.org Community, Guest
There are many great features available to you once you register at RennTech.org
You are free to view posts here, but you must log in to reply to existing posts, or to start your own new topic. Like most online communities, there are costs involved to maintain a site like this - so we encourage our members to subscribe or donate. All subscriptions and donations go to the costs operating and maintaining this site. We prefer that guests take part in our community and we offer a lot in return to those willing to join our corner of the Porsche world. This site is 99 percent member supported (less than 1 percent comes from advertising) - so please consider an annual subscription or donation to keep this site running.
Here are some of the features available - once you subscribe RennTech.org
- View Classified Ads
- DIY Tutorials
- Porsche TSB Listings (limited)
- VIN Decoder
- Special Offers
- Paint Codes
- Registry
- Videos System
- View Reviews
- and get rid of this welcome message
It takes just a few minutes to register, and it's quality Porsche information at a low cost.
Contributing Members also get these additional benefits:
(you become a Contributing Member by subscribing or donating money to the operation of this site)
- No ads - advertisements are removed
- Access the Contributors Only Forum
- Contributing Members Only Downloads
- Send attachments with PMs
- All image/file storage limits are substantially increased for all Contributing Members
- Option Codes Lookup
- VIN Option Lookups (limited)

clarksongli
-
Posts
325 -
Joined
-
Last visited
-
Days Won
4
Content Type
Profiles
Events
Forums
External Paint Colors
Downloads
Tutorials
Links Directory
Collections
Classifieds
Store
Everything posted by clarksongli
-
Excessive Tyre Wear
clarksongli replied to LiamD's topic in 9PA, 9PA1 (Cayenne, Cayenne S, Cayenne Turbo, Cayenne Turbo S)
wheel diameter has nothing to do with the tire wear. A soft 19" tire will wear quicker than a 20" hard tire and vice versa. you need to check all of your suspension components and then get an alignment. Abnormal wear is a sign that you are running out of spec on your alignment: 1. too much POSITIVE Camber 2. too much toe IN 3. A combination of the 2. As you well know, the Cayenne is a very heavy car, expect tires to wear, especially with aggresive driving habits. Personally, i have a set of Kumho's on my 20" wheels. The tires wear very well BUT with a severe sacrifice in road noise (traction and performance is equally as good). To make it easier/cheaper, step up to a 275/45/20. Slightly larger diameter, but many many more choices in tires. Finally....rotate your tires...i try to do it as frequent as possible (5-10k) to ensure even tire wear -
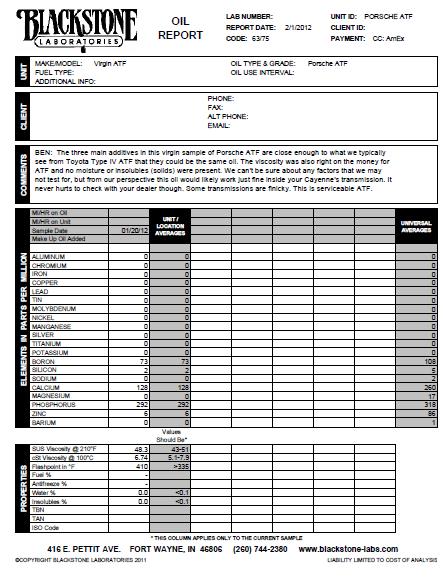
So for everyone that has been discussing Porsche Cayenne ATF....AKA JW3309/LT41171. Porsche PN 000 043 205 28 There has always been debate on Toyota Type IV being the same as the Cayenne ATF. So i sent in VIRGIN SAMPLES to blackstone to get the analysis on additives. The results are shown below: ..........................................Cayenne ATF....................Toyota Type IV Boron.......................................73.........................................84 Calcium...................................128.......................................105 Phosphorous...........................292.......................................271 Zinc...........................................6..........................................11 SUS Viscosity @ 210F.............48.3......................................50.1 cSt Viscosity @ 100C..............6.74......................................7.26 FlashPoint in F........................410.......................................370 Translation.....Both fluids are chemically the same as far as blackstone can see with their equipment. I attached the Porsche ATF slip for reference. VOAs cost $$, but well worth it if it saves cash down the road. I have some diff fluids coming as well for a VOA as well. The flash point requirement is >335C, which both exceed. So save yourself some $$ and buy the ATF from Toyota. 6 bucks at the yota dealer....as apposed to 60+ as the porsche dealer?

-
Cayenne Turbo rear brake pad and rotor DIY
clarksongli posted a tutorial in Cayenne (9PA, 9PA1) - Maintenance
Tools needed: 2 - Jack Stands factory jack or floor jack (not shown) Breaker bar or pipe for tight bolts 1/2" ratchet 3/8" ratchet 4" extension 1/2" drive (roughly) 3" extension 3/8" drive (roughly) 3/8" to 1/4" adapter T-50 Torx bit M16 Triple Square M5 Triple Square 19mm Socket Wheel Lock Socket 5mm Allen key 1.5mm Allen key Pair of pliers or good multitool razor blade or knife Brake Cleaner FLASHLIGHT Optional: a good set of allen keys - obviously mine are craftsman a triple square set - my set comes from here:http://www.germanautoparts.com/Tools/Porsche/Brake+tools a torx bit set - my set comes from here:http://www.harborfreight.com/9-piece-14-and-38-drive-star-bit-set-67914.html Step One: -turn car on and press/hold the air suspension lever in the UP direction until the display shows "Regulation OFF" (service mode) Remove jack point caps on both sides and raise on side SLIGHTLY so the wheel is still touching the ground Step 2 Loosen lugs with the 19mm socket and and wheel lock socket....don't remove them, just break the torque on them so they can be removed with the vehicle up in the air. Step 3: -Raise vehicle so tire is off the ground - Inset jack stand as shown below. Step 4: -Lower vehicle onto the jack stand and remove lugs and wheel -Repeat steps 1-4 for the other side. Step 5: You should now be looking at something similar to this: - Using the T-50 Torx bit and the M5 Triple square, remove both of the bolts on the rotor hat The T-50 is the rotor set screw and the M5 is the parking brake adjuster window - SAVE THESE! Step 6: - place a large allen key in the vent of the rotor as shown - Rotate the rotor until the site hole is lined up with the adjuster knob....This can be difficult to see and you will need a flashlight. Below is the general orientation when the rotor is lined up Step 7: (this is difficult) - insert the large allen key (or screwdriver) into the hole and feel for the toothed adjuster. - you will need to "flick" the teeth so the adjuster turns and relieves tension on the pads. The adjust will become easy to rotate once the pressure as been relieved. - Below is a picture of how the adjuster looks without the rotor. PASSENGER SIDE ROTATES TOWARDS THE BACK OF THE CAR TO LOOSEN, AND THE DRIVER SIDE IS OPPOSITE Step 8: -Disconnect the pad wear sensor by inserting the small allen into the BACK of the connector as shown then pulling the connector loose (wiggle it). Step 9: (This will take some time) Remove cotter pin from pad pin with pliers Using the razor blade or knife, scrape away the crap on the pin. Use your pliers to rotate the pin to access the underside as well. This pin needs to be very clean to be removed, the tolerances on the hole are very tight. Step 10: Drive the pin out using an allen key, or anything that can easily fit through the diameter of the hole This pin should come out easily once the crud is removed. If you find yourself hammering on the pin, stop and go back to cleaning the pin. Press on the pad retainer if needed to remove unwanted tension while removing the pin Step 11: -Slip the pad wear sensor wire out of the caliper slot. An easy way to do this is pull the sheath back and it will come out easily. -Spread the pads open with the end of the 3/8" ratchet, or even with your fingers (it requires force, but should move smoothly with just your hands) Remove pads and spring clip Step 12: Remove the wire grommet from the steel bracket. This isn't necessary but it makes getting to the upper caliper bolt easier as shown below: Step 13: Loosen upper caliper bolt with the M16 triple square -This is where it is helpful to use the extensions and breaker bar (pipe), i was able to drop the handle through the lower control arm and get good leverage from underneath on my back. Repeat Step 13 for the bottom caliper bolt as shown below Step 14: - with both bolts removed, pull caliper up over the rotor and rotate/place onto the control arm. Be careful not to pull very hard or kink any of the lines You can see the caliper position in the background below: Step 15: -Pull old rotor off. It may require some wiggling, but try to pull STRAIGHT out....otherwise the parking brake pads will bind up and prevent the removal. -Install the new rotor and wipe down well with brake cleaner. -reinstall the T-50 retaining bolt (this does not need to be super tight, it is there to simply hold the rotor in place (the clamping force of the lugs take the braking load) Step 16: Adjust the parking brake - line up the window in the new rotor again - rotate the adjust the opposite way until the rotor can no longer be turned by hand - then turn the adjust BACK 6 clicks, and check the disc spins by hand. - Reinstall M5 triple square. Does not need to be super tight, just a window cover bolt. Step 17: Reinstall caliper - Rotate caliper back over new rotor and line up caliper bolts - Install bolts and torque to 166ft/lbs. Or simply very tight (these are grade 12 bolts, with plenty of margin for torque capacity) - Reinstall grommet/cable that was removed in step 12 Step 18: Prepare new pads - Install new pad sensors into pads. The FAT side faces the pad - You can try to remove and reuse the old sensors, but they are difficult to remove, and if the wire has already been broken by the rotor wearing, they are no longer good. - Be sure the pads are properly setup (the wear sensors are staggered in relation to the caliper wire hole. Step 19: Install new pads: - Slide the new pads into the caliper. If they do not fit, you will need to press the pistons in further, use your old pads to do this. - Install the retaining spring clip and retaining pin/cotter pin. - Be sure to route the wear sensor wire through the retaining clip and caliper slot - You should have something that looks like this after: Step 20: - Plug the sensor into the plug shown, you should hear a slight "click" Step 20: - Reinstall wheel and torque lugs to 118ft/lbs - REPEAT STEPS 5-19 FOR THE OTHER SIDE - Remove stands - Lower vehicle - Reinstall jack point covers Step 21: Bedding Prep - Turn on car - Take air suspension out of service mode by hold the lever UP again until "regulation" is turned back on. - pump brakes to engage the rear calipers/pads Step 22: Bedding Pads/rotors Bedding is a procedure in which you both remove contaminants from the pad (scorching) as well as developing a transfer layer of pad material to the rotor. To be performed, it will require about 10 stops ranging in speed and pedal pressure. - Start at 30 MPH and brake hard to 5MPH. - Immediately get back up to 30MPH and repeat with similar force. - Continue to do this and increase speed each time - The top speed you will get to is around 65MPH. The goal is to build heat in the pads and rotors so this transfer layer can form. - Once this procedure is complete (the pads may be smoking and/or brake performance has decreased (heat soaked brakes), continue to drive for 20 minutes AVOIDING STOPPING!! - Once the brakes have cooled back to normal temperature you can stop and park. If you do stop, try to keep off the brakes, otherwise you may bed the pad against the rotor in that one area, creating vibration/pulsation later on. The transfer layer should be uniform, hence not stopping. Step 23: ENJOY! -
Show off your Cayenne
clarksongli replied to nh9095's topic in 9PA, 9PA1 (Cayenne, Cayenne S, Cayenne Turbo, Cayenne Turbo S)
2004 CTT.....my track car/interests are in VW/Audi motors, but this is a good tow rig/daily driver. I'm big into detailing from my car club days -
I hate cross posting....but i want people to spend their money wisely. Here is the post comparing Toyota Type 4 ATF to the OEM Porsche ATF. Long story short, same stuff.....only 6 bucks a quart at the Toyota Dealer. http://www.renntech.org/forums/topic/40735-porsche-cayenne-atf-vs-toyota-type-iv-atf/
-
Spark Plugs
clarksongli replied to tom__w's topic in 9PA, 9PA1 (Cayenne, Cayenne S, Cayenne Turbo, Cayenne Turbo S)
Yeah these things come and go. Unfortunately there has been several "dyno tests" but when you really think about it....there is too much going on during a dyno run that can cause biased data.....too many variables for too little of a gain. I've been building my own race motors for a while now and i don't bother with any of that hype. For a stock motor, just stick with the stockers.....there is nothing additional coming into your motor (air/fuel) so there is no reason you would need a different type of plug. For my track motors, i run much higher boost and timing, and to try and fight predetonation, i run a cooler ranged plug (BK7s) You won't cause any phyiscal harm to your motor by changing plugs(stay in the same heat range)......but you won't ever see/feel any difference.....Sorry -
Just as an fyi too....you can download the ppi online and do it yourself....you honestly wont check/see anything amazing but its a good place to start with any pre owned vehicle. I did it with my ctt....only took me an hour or 2
-
To answer your question about the diff locks.....all three lights will be there.....but unless you have the offroad package.....there will be no rear diff lock. I have a '04 CTT. Both the transfer low and front diff will "light" but i do not have the offroad package, so even though the switch goes back....it does not do anything.
-
They are just over 35lbs. I'm not sure what you're going for.....but a large increase in rotational weight will be significant on acceleration.
-
The oil consumption issue is not oil leaking out of the motor. Although if you have a leak it would be good to fix that. There are two main contributors to the oil consumptions: 1. Turbo motors......because they relay on a fluidized bearing for the wheel shaft.....naturally the sealing ability will break down over time. Considering the temperature cycling and speed of the turbine wheels.....it is expected to start seeing some oil movement with mileage. Generally, the majority of it will be burned off, and you may not notice....but obviously the older you get the worse it will be(eventually too much shaft play will force a turbo rebuild/replacement). 2. 4.8L V8s.........the main consumption in a motor is due to the rings and the sealing surface area. If we look at our motors, we have roughly 85" or ring area to seal. if you compare that to a Honda 4cylinder, they only have about 30". Now you can make a linear assumption of oil consumption, but because rings are not 100% sealing, especially over time.....you have more area to seal against combustion/oil. With that being said, i generally burn about 2 quarts every 6-7k. Considering this motor is over 2.5X the size of most 4cylinders.....law of probability says we will generally burn more oil....which is perfectly normal. Now if you burn a quart every day, there might be something bigger going on. Another point of leakage are the valve stem seals.....unless something mechanically went wrong with your valvetrain, there isn't generally a reason to assume a stem leak though.....only time i have seen an issue is a physical chunk of metal went through the valve or a bent valve which ovalized the guide and seal. The last thing i will leave you with is the VAC system on the cayenne.....we pull vacuum on all of the oiling points to remove vapors and so forth.....the vacuum is pulled by the intake side(low pressure) of the driveside turbo. Over time, that oil vapor builds up and will create some standing oil in the piping.....again not enough to cause noted oil loss....but something to be aware of.
-
I'm sure everyone will chime in, but double check the whole Coolant pipe Pastic/Aluminum issue. Secondly there are a lot of common small issues, which add up to big bucks (mainly because it has a Porsche emblem on it). 1. Cardan Shaft(drive shafts running to the front or rear diff (look for vibration on acceleration) 2. Front diffs sometimes (you will hear a fairly load humming at neutral loaded speeds) 3. Auto Tranny Solenoid (basically if it does erractically HARD downshifts) 4. Battery condition, i actually just had mine crap out on me, but when the battery starts to get older and holds a lower voltage when the car is off.....weird things happen.....i do all my own car work.....and i've never seen a car so sensitive to voltage. i'm sure i can go on and on....i suggest searching too. Don't let the negative comments get you down too much.....when things run right, no one posts about an uneventful day of commuting.....but when some stupid comfort thing goes bad, you hear all about it....so it is a little one sided. You will enjoy the power, handling, and all of the above. Not having bluetooth, keyless/pushbutton start, or decent MPG does sucks a little....but you're driving a turbo cayenne because it's a 5500lb rocketship, not because you want to get good MPG....so keep those things in mind when buying ANY car.....the purpose of you buying a car should determine which features are most important. ENJOY!
-
Offset is fine. They range from 50-60mm, depending on the size of the wheel.
-
Ill upload the viscosity stuff tonight....but it was very similar....ill see if I can do a mobil 1 but finding the lt41171 stuff by me is hard for some reason
-
So for everyone that has been discussing Porsche Cayenne ATF....AKA JW3309/LT41171.Porsche PN 000 043 205 28There has always been debate on Toyota Type IV being the same as the Cayenne ATF. So i sent in VIRGIN SAMPLES to blackstone to get the analysis on additives.The results are shown below:..........................................Cayenne ATF....................Toyota Type IVBoron.......................................73.........................................84Calcium...................................128.......................................105Phosphorous...........................292.......................................271Zinc...........................................6..........................................11SUS Viscosity @ 210F.............48.3......................................50.1cSt Viscosity @ 100C..............6.74......................................7.26FlashPoint in F........................410.......................................370Translation.....Both fluids are chemically the same as far as blackstone can see with their equipment. I attached the Porsche ATF slip for reference. VOAs cost $$, but well worth it if it saves cash down the road. I have some diff fluids coming as well for a VOA as well. The flash point requirement is >335F, which both exceed.So save yourself some $$ and buy the ATF from Toyota.
-
V8 or V8 Turbo....those are the only options in my mind. V6 get's just as bad of gas mileage.... When i was looking to get my Cayenne i decided on a Turbo over the NA V8....same mileage but if i need the extra power i have plenty left. Also, when i was looking i made the decision that i'm buying a Porsche SUV.....if i wanted a slower SUV i wouldn't be looking at a porsche... I have a road legal track car so i have no reason to go fast with the cayenne.....but if/when i want to go, i don't have to think if the V6 can move my 5500lb car down the road. And with the price of Cayenne's dropping quickly, you might as well step up to the larger engines.
-
Anyone know what the 20L price is for the ATF? Or a good place to source it for cheaper.
-
Yeah i was looking at the parts drawings and it lists the Diff as an LSD or non LSD....so i took that as not "true locking"
-
Thanks everyone. I do know there is a pinned thread at the top, but with no real answer to fluids vs. diff properties. The reason i ask about the differential internals is because friction material is much more likely to NOT be compatible than a standard locking differential. I was hoping someone here....maybe Loren, would know if cayennes utilize traditional mechanical lockers, or if we are using the typical clutch type, which are found in almost all "locking diffs" now.
-
Hi, I've been lurking for a while with my 2004 CTT. I love the car and haven't really had many issues other than the normal coolant pipes. I do all my own work, and this is my dail driver, so the work is much more simple than my other cars. I have two, hopefully, basic questions: 1. the Diff "Locks"...are those viscous diffs or truely locking? 2. Because Burmah oil is hard to come by in the states, is there a fluid that is recommended other than the porsche part? i know redline has a gl5 rated fluid, but if there are clutchpacks in the lockers....i would hate to decrease the locking ability of the discs by using a full synthetic oil. I've seen people using M1, Redline MT-90 all the way to 75w-90 GL5, AMSOIL... My theory is if the lockers are truely mechanical, then i won't be as worried with a change in gear oil....but if they do rely on friction discs.....i'll stick with the OEM. TIA
-
I have an 04 CTT, same thing. Unfortunately it is a normal thing....an easy way to stop this from happening is leave the AC ON (set a lower temperature with the fan setting on low). this keeps the AC fan running and keeps temp in the middle. I agree, it makes any normal person nervous to see that needle go past center. I always wondered if they did this for emissions purpose....i know some other companies are doing this now, run the motor slightly hotter, which allows for more leg room in the timing adjustments. as long as your temp goes back to normal during cruising i think you're fine.
-
Heated Seats
clarksongli replied to rifreede's topic in 9PA, 9PA1 (Cayenne, Cayenne S, Cayenne Turbo, Cayenne Turbo S)
grab a volt meter....turn the seat switch on and measure acros the two wires on the CAR SIDE.....if you have voltage, there is a break in the elements in the seat.....if you see no voltage, then you have a wiring issue on the car side. The opposite can be done as well.....disconnect the seat harness, measure RESISTANCE across the heater elements, you should see something in the ohms.....but if you get no number, or a mOhm number, you have a break in the element somewhere. -
i can tell you that there is something wrong with their fluid quoting..... the front and rear diff only takes a liter MAX Same with the transfer case....should only take a liter the next question you should ask yourself is if they have the fluid amounts wrong....what else is wrong? I'd say try to do it yourself....doesn't require many tools, and the pan temperature is very close to fluid temperature in most cases.
-
Should i sell?
clarksongli replied to seafeye's topic in 9PA, 9PA1 (Cayenne, Cayenne S, Cayenne Turbo, Cayenne Turbo S)
+2.....unfortunately owning these cars is sometimes difficult....but hopefully you had done the research to know what you were getting into. when i bought my CTT, i knew the coolant pipes were original (plastic).....sure enough, the week i got the car registered, the main pipe let loose. i do all my own work, so it wasn't an issue, and 500 bucks later in parts, i was back on the road......but i have quirky electrical things every once in a while....and while we paid for a porsche....cheap plastic things still bound to break. if you got a deal on the car, try reselling it for a bit more to cover your issues.....if you bought it at a dealer or something, i'm afraid you will never see a payback trying to resell it. -
i burn about 1 quart every 2500miles......i have a 2004 CTT. with 8 cylinders, it is expected that you will burn some oil.....the scraper rings are not 100% sealing. when you drive in vacuum (not accelerating) the condition become worse.....there is less combustion pressure forcing the rings out to seal on the walls. as for the burning oil on full acceleration....at first i thought it was a bearing seal on one of the turbos, but when i discovered was that on the driver side intercooler (same side as the oil breather) fills with oil over time from the case vapors..... once i emptied mine out, no more black smoke on acceleration.
-
The DWS's are very nice.....I have a set of Kuhmo STX's on right now.....NOT QUIET. BUT they wear well, great wet/dry traction....and run abotu 120 a piece..... for the price i'd take the STX's over the DWS's, but if road noise is a big issue, obviously go with the Conti's.