Welcome to RennTech.org Community, Guest
There are many great features available to you once you register at RennTech.org
You are free to view posts here, but you must log in to reply to existing posts, or to start your own new topic. Like most online communities, there are costs involved to maintain a site like this - so we encourage our members to subscribe or donate. All subscriptions and donations go to the costs operating and maintaining this site. We prefer that guests take part in our community and we offer a lot in return to those willing to join our corner of the Porsche world. This site is 99 percent member supported (less than 1 percent comes from advertising) - so please consider an annual subscription or donation to keep this site running.
Here are some of the features available - once you subscribe RennTech.org
- View Classified Ads
- DIY Tutorials
- Porsche TSB Listings (limited)
- VIN Decoder
- Special Offers
- Paint Codes
- Registry
- Videos System
- View Reviews
- and get rid of this welcome message
It takes just a few minutes to register, and it's quality Porsche information at a low cost.
Contributing Members also get these additional benefits:
(you become a Contributing Member by subscribing or donating money to the operation of this site)
- No ads - advertisements are removed
- Access the Contributors Only Forum
- Contributing Members Only Downloads
- Send attachments with PMs
- All image/file storage limits are substantially increased for all Contributing Members
- Option Codes Lookup
- VIN Option Lookups (limited)


Dharn55
-
Posts
845 -
Joined
-
Last visited
-
Days Won
2
Content Type
Profiles
Events
Forums
Exterior Paint Colors
Downloads
Tutorials
Links Directory
Collections
Classifieds
Store
Everything posted by Dharn55
-
I'm surprised the stealer did not tell you that you needed a new engine, seems to be a standard line. :P
-
Pulling Cams
Dharn55 replied to iornman86's topic in 996 Series (Carrera, Carrera 4, Carrera 4S, Targa)
When I did my head repair I had the same basic experience with the plastic pads on the chain guides, although I only removed the one for the IMS to Cams on the 1-3 side. It showed hardly any wear at 50K. But the pads for the cam advance tensioners were all badly worn, so I replaced them on both heads, about $13 per set, left the others alone. -
Pulling Cams
Dharn55 replied to iornman86's topic in 996 Series (Carrera, Carrera 4, Carrera 4S, Targa)
PM me your email address and I will send you a diagram for the cam holder, some pics and some instructions of marking the cams and for setting the timing without the special tools. -
M96 Rebuild options in Canada
Dharn55 replied to Darqangelle's topic in 996 Series (Carrera, Carrera 4, Carrera 4S, Targa)
Glad to hear it was only a cracked head. Did you repair the head or replace the engine? -
Usually a bad battery, or just a drained battery. For some reason I have never had good luck trying to jump mine from another car. But when I have had this problem either charging the battery or putting in a new one has done the trick.
-
996 Convertible Top Light
Dharn55 replied to Sand996's topic in 996 Series (Carrera, Carrera 4, Carrera 4S, Targa)
According to the Durametric website the latest version of the software will recalibrate the top. However, I don't know if you need the "professional" version or if the "enthusiast" version will do this. I have read that the enthusiast version will not do coding. -
Wheel offset and width question
Dharn55 replied to doug davis's topic in 996 Series (Carrera, Carrera 4, Carrera 4S, Targa)
Rears offsets are way off for a NB 996, may be from a Boxster. The difference between the standard 65 offset and the 47 of the one you are considering means the rims are moved out 18 mm. However the wheels are also 9" instead of 10" so you might get away with it. Go here http://1010tires.com/WheelOffsetCalculator.asp and use this offset calculator to see how the new rims will compare with the old rims. -
2000 996 170,000 Miles
Dharn55 replied to fredkhaz's topic in 996 Series (Carrera, Carrera 4, Carrera 4S, Targa)
Congratulations!!!!!!!!! You have my unending envy. I hope that with my cracked head/intermix now fixed (happened at 50K) I will also see that sort of total mileage, wouldn't that be nice. -
2002 C4 Hardtop Adjustment
Dharn55 replied to bobbybailey's topic in 996 Series (Carrera, Carrera 4, Carrera 4S, Targa)
The gap is normal, but you do want to make sure you have matching hardware on the top and the car. The older style hardware had little prongs on the side of the hardware on the top, the new style has screw like threads. You need matching hardware in the car or it won't tighten properly. -
Starter Problem?
Dharn55 replied to Dharn55's topic in 996 Series (Carrera, Carrera 4, Carrera 4S, Targa)
Sold the newer one, still have the original starter. Not sure if you want that one, works but it is old. -
It is pretty easily accessible. Just jack up the passenger side of the car, put in a jack stand and take off the rear wheel. The strap is then visible.
-
What sealant
Dharn55 replied to achillies's topic in 996 Series (Carrera, Carrera 4, Carrera 4S, Targa)
Here are links to the specs for Loctite 5900 and the Permatex Copper that I have been using. Loctite 5900 http://www.rshughes.com/images/products/do...RWxTnQdHZsw.pdf Permatex Copper http://www.permatex.com/documents/tds/Automotive/81878.pdf Both are Oxime silicone, different in color, I think the Permetex actually has a higher termp rating. Loctite 5970 is slightly different, here is the spec for it http://www.loctite.cc/template/ying/pdf/docs/5970-EN.PDF it is Alkoxy silicone whatever that is. My manuals show Drei Bond 1209 or Loctite 5900, no reference to Loctite 5970. -
What sealant
Dharn55 replied to achillies's topic in 996 Series (Carrera, Carrera 4, Carrera 4S, Targa)
Porsche says Drei Bond or Loctite. I used Permatex Copper, same basic formula. You can also get Drei Bond at the VW dealer for about 2/3's the Porsche price. One of the most important things is not to use too much. The 1.5MM bead that the manual specs is more than enough. What you see that squishes out on the outside when you tighten the oil pan shows about how much is squishing out on the inside. On this inside this can break off and get sucked up into the intake. I have see pictures of intake in 996's almost completely blocked with pieces of sealant. It is a common mistake to put too much sealant on, thinking the more the better, but it can lead to serious problems. -
Specs for Valve Job
Dharn55 replied to txhokie4life's topic in 996 Series (Carrera, Carrera 4, Carrera 4S, Targa)
Try John Edwards at Costa Mesa R&D (www.engine-machining.com). He fixed the crack in my cylinder head and did a valve job at the same time. Don't know that he did a three angle, but he does lots of mods on these engines so he would probably know the specs. -
P1276 Engine Code
Dharn55 replied to gmorris552's topic in 996 Series (Carrera, Carrera 4, Carrera 4S, Targa)
P1128 is Fuel Injector cylinder #4 and P1130 is Fuel Injector cylinder #5. Not sure why you thought Not sure why this made you think the cats were bad. P1276 is the Oxygen sendor before that cat on bank 2 (4-6 side so it includes cylinders 4 & 5). Did you check the connections/plugs for this sensor, or the wires. I damaged the wires on one of my sensors, happened to be the same one, and had to replace the sensor to get rid of hte code. Actually, I could clear the code with my Durametric, but it would come back in less than 100 miles. I am betting it is the sensor. -
G96 Transaxle Rebuild
Dharn55 replied to flyingpenguin's topic in 996 Series (Carrera, Carrera 4, Carrera 4S, Targa)
Remember the old saying "If it ain't broke, don't fix it." Lots of these gearboxes go for many more miles than yours has on it. Is there a specific issue or problem that you have with yours that would make you consider a rebuild? -
Coolant Hose leak...
Dharn55 replied to ultramens's topic in 996 Series (Carrera, Carrera 4, Carrera 4S, Targa)
If you look closely at the picture you can see that he has both the original spring type clamp and a screw type hose clamp on the hose at the water pump. Remove the old spring clamp, you only need one clamp. Once the old clamp is removed the new screw type clamp will fit fine. -
I did mine a few years ago. Still function as side markers, then blink alternately with the turn signals. I will try to find the DIY, not sure where I got it.
-
The cost of the tow when the thing goes and you are stuck on the side of the road will go along way towards paying for the water pump.
-
2003 C4S Oil Pressure Sending unit
Dharn55 replied to goldgun's topic in 996 Series (Carrera, Carrera 4, Carrera 4S, Targa)
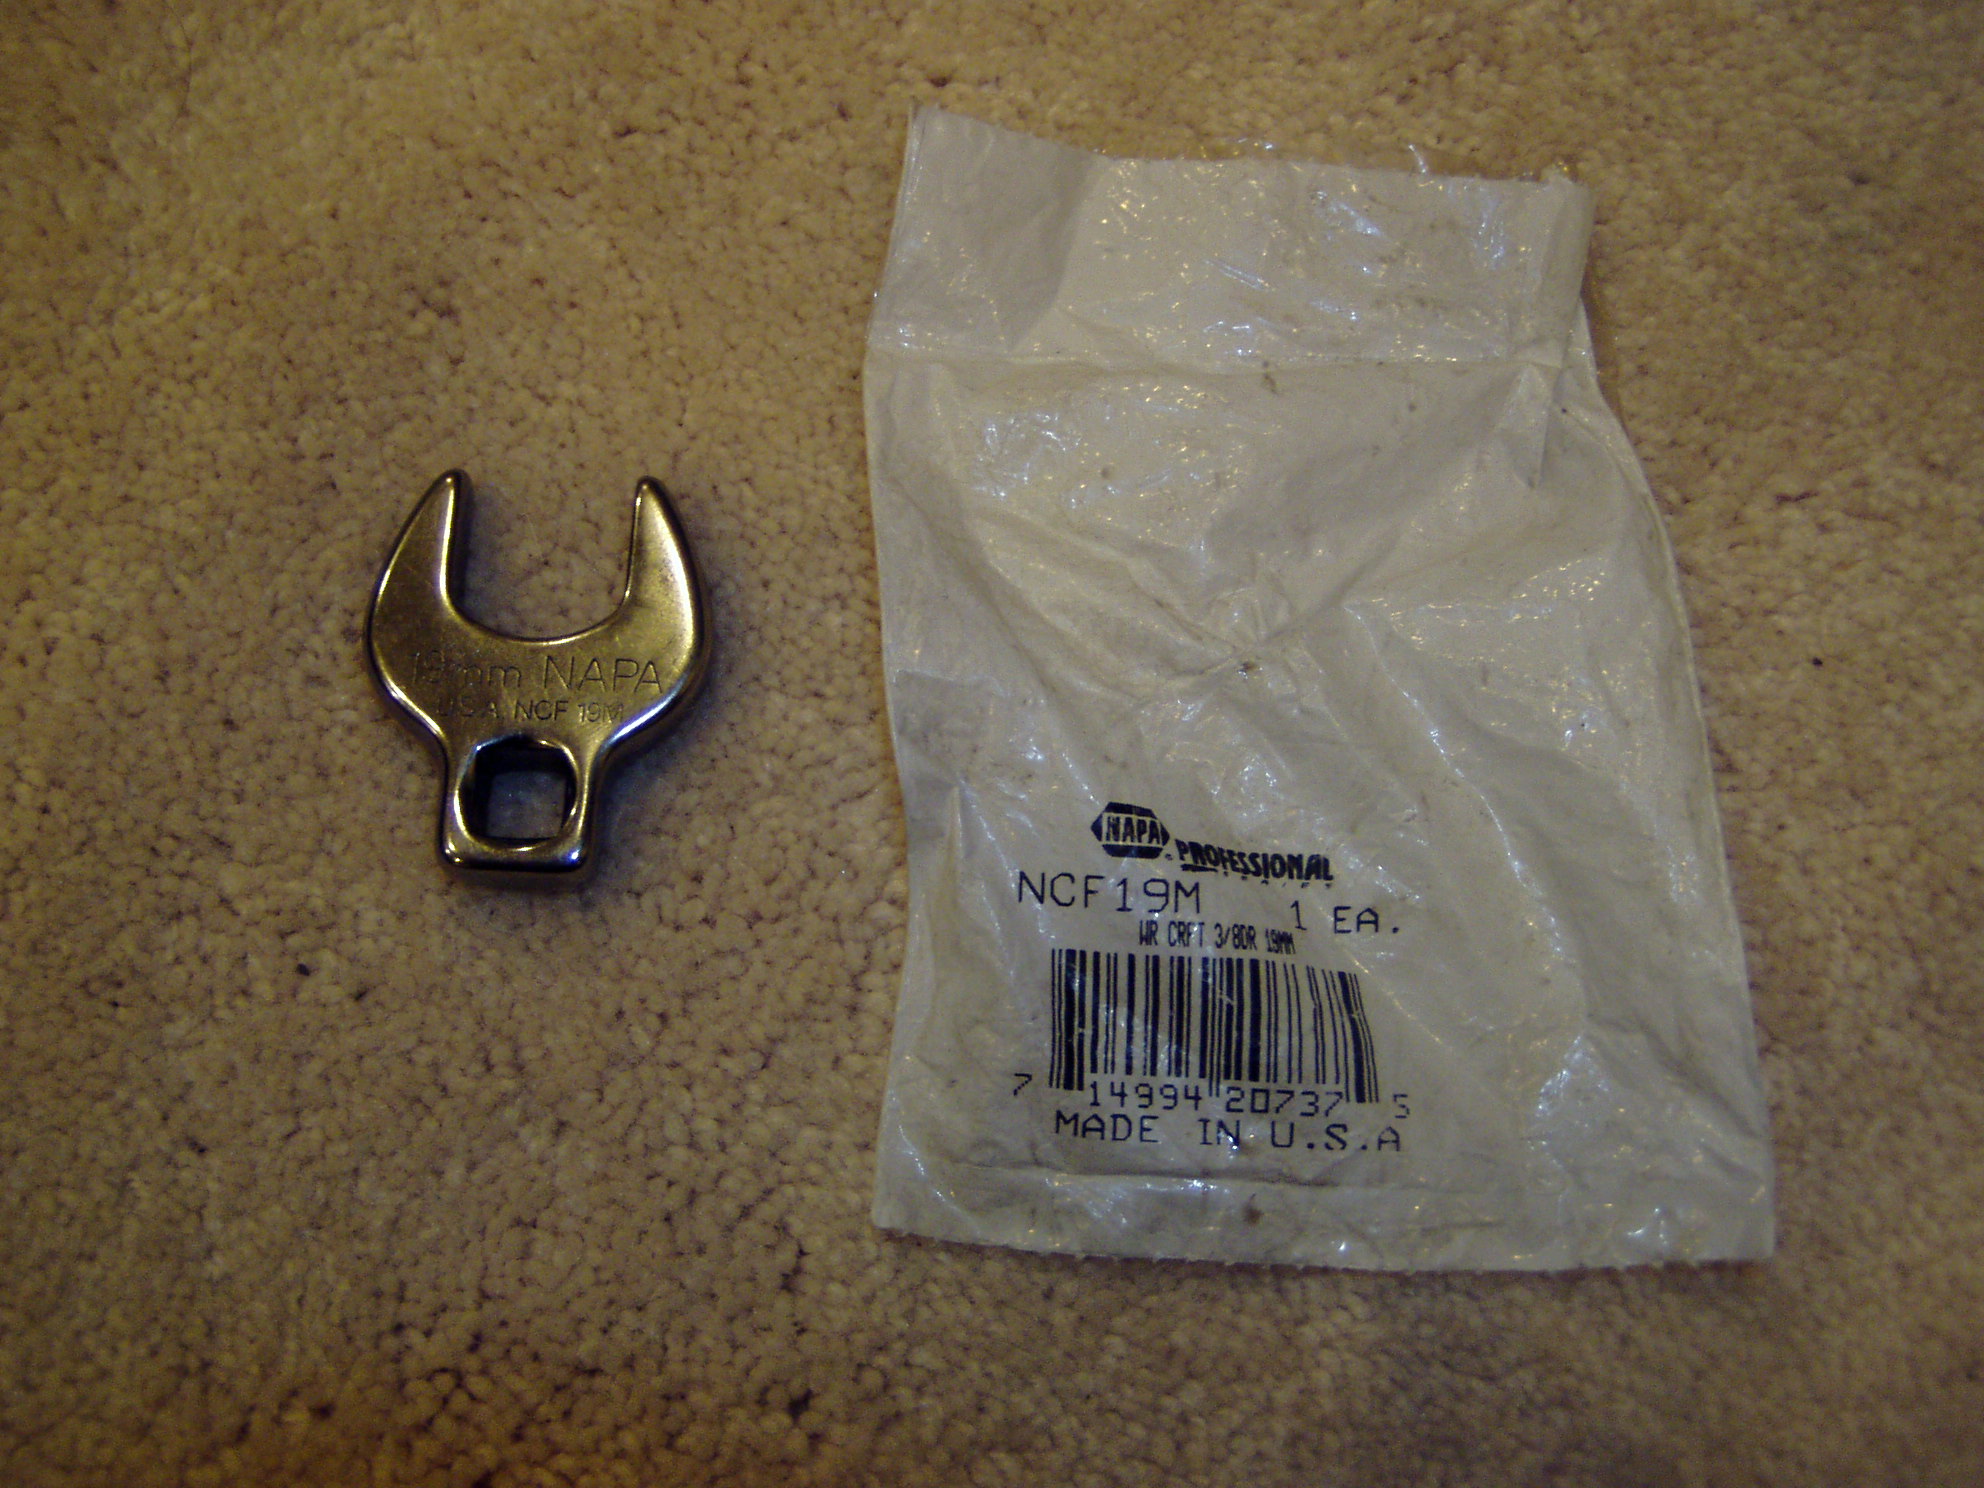
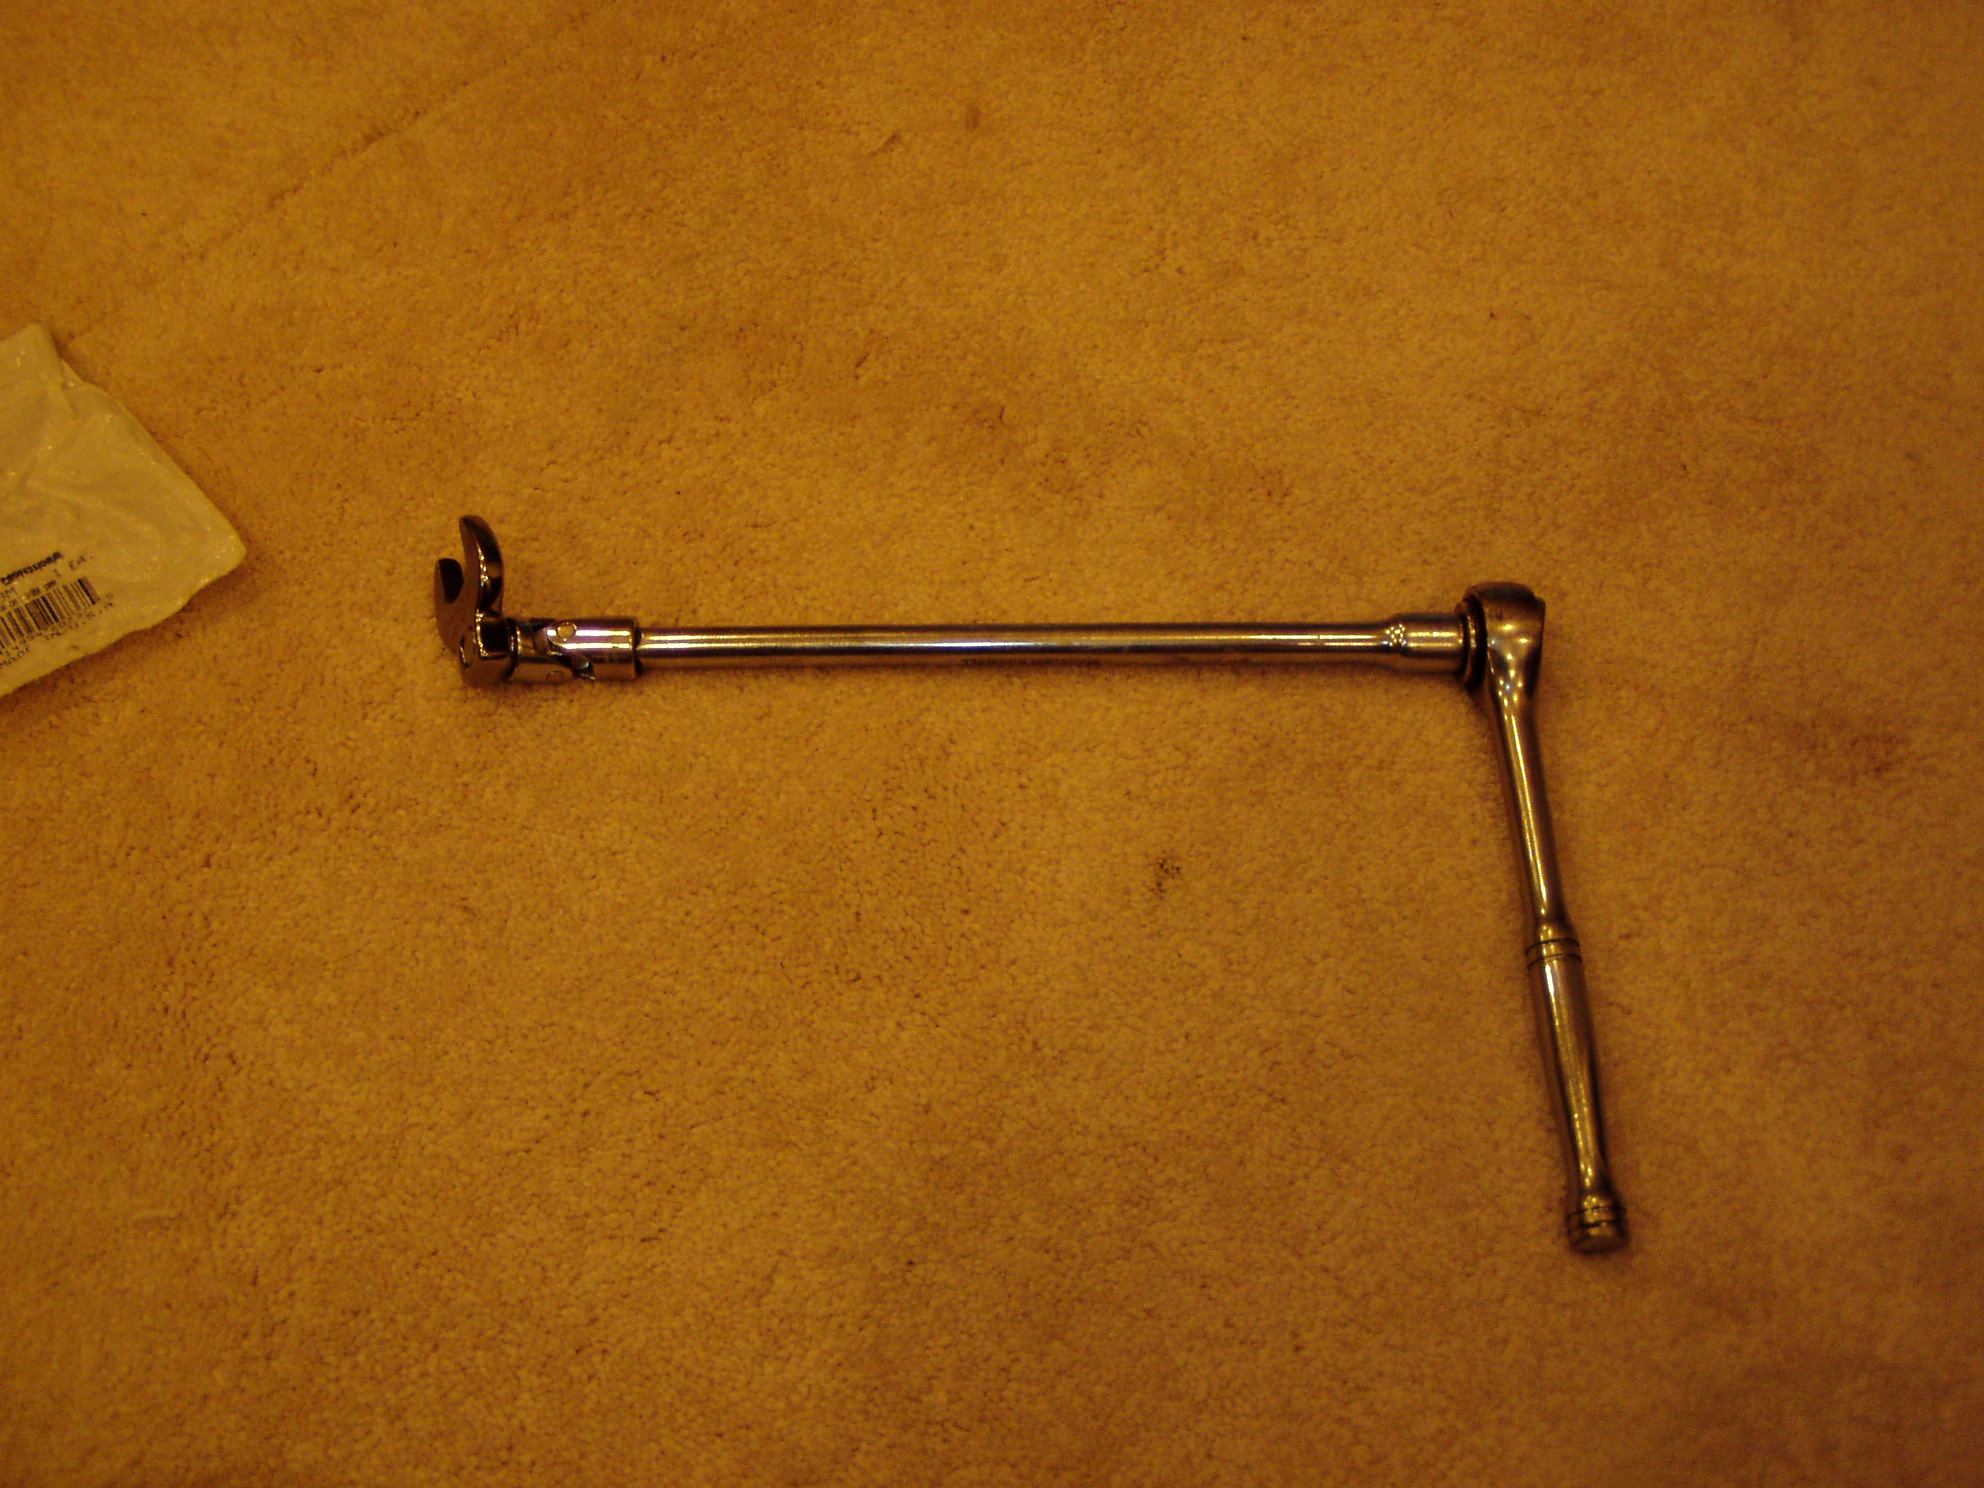
Here is the tools that makes this simple. A 19mm Crowfoot wrench. Use this with a 3/8" universal, extension and socket wrench and the removal is simple. Jack up the car, put in a jackstand, remove rear right wheel, slide the crows foot wrench in from the bottom, you need the universal to get the wrench on due to the angles around the spark plug shield. A little twist on the socket wrench and it loosens right up. the just spin it out from the top, spin the new one on and tighten it down with the crowfoot. Really easy and fast. Got the crowfoot at NAPA, here is a link http://www.napaonline.com/NOLPPSE/(S...cf19m&Ntk=Part Number&N=0&Nty=1&D=ncf19m&Dn=0&Dk=1&Dp=3 Probably available from other sources. Made the job incredibly easy.
-
When I had the engine out of my 2000 C4 to fix the intermix problem (cracked head) the new tool for extracting the dual row bearing was not yet available. I did the check of the bearing described, and replaced the flange/seal with the newer style, and removed the outer seal on the bearing. The bearing did not appear to have any problems. Actually the last time I had the engine out the tool was available, but I was struggling with an oil pressure problem and did not want to spend the $600 for the updated bearing not knowing if I was going to solve the other problem. I have now solved it and kink of wish I did the bearing upgrade. Next time I have the engine or trans out I think I will defintely do the upgrade. The $600 is notheing compared to the cost of an engine.
-
The original clutch disk part number for a 2002 is 993.116.013.06. The superceded part number (shown here on Renntech's price list) is 997.116.013.10, so it would appear that the disk they used is the right one. Many 996.xxx.xxx.xx part numbers have been superceded to 997.xxx.xxx.xx
-
Here is a Grey interior if you are willing to change, no seats though http://cgi.ebay.com/ebaymotors/996-911-POR...sQ5fAccessories
-
Keep an eye on Ebay. On a regular basis you see interior parts, usually in black as this is the most common color. Sometines you see a whole interior from someone who is stripping the car for the track. Good Luck!
-
74 lbs to the cross member, 56lbs to the wheel carrier. As a note, the service manual says there are two styles of control arms, and both the control arms on a car must be of the same style. location Thread Tightening torque Nm (ftlb.) Carrier side section/cross member Carrier side section to body M12 x 1.5 110 (81) Studs for carrier side section to body only screw-in torque M12 x 1.5 46 (34) Cross member at rear to carrier side section M12 x 1.5 110(81) Cross member at front to carrier side section M10 x 1.5 65 (48) Brake hose holder to carrier side section M6 10 (7.5) Diagonal brace to body M10 x 1.5 65 (48) Diagonal brace to cross member M12 x 1.5 110 (81) Diagonal brace to carrier side section (collar nut) M10 x 1.5 23 (17) Axle strut Control arm 2 (toe controlarm) to wheel carrier M12 x 1.5 75 (56) to cross member (toe eccentric) M12 x 1.5 100 (74) Control arm (lower control arm) to carrier side section (camber eccentric) M12 x 1.5 100 (74) to wheel carrier M12 x 1.5 75 (56) Diagonal control arm to control arm M14 x 1.5 160 (118) to carrier side section M14 x 1.5 180 (133) Control arm 3 and control arm 4 (upper control arms) to carrier side section M12 x 1.5 110 (81) to wheel carrier M12 x 1.5 110 (81) Note When replacing tie rods, pay close attention to the correct allocation. Install only identical tie rods - version A or B ~ on a vehicle. For a detailed explanation - distinguishing characteristics and Part No. - refer to "Tierod replacement" (after installation). Tie rod replacement Only tie rods with harder rubber mounts (optimised tie rods with spherical mounts) - version (8) - are still available from the Parts Service. Introduction of the optimised tie rods in the current model year 1999 (X) in some cases I but generally from model year 2000 (Y). Part No. of the optimised tie rod: 996.331.045.10. These tie rods may be retrofitted - but only in pairs. In general, the following applies: Only tie rods (toe control arms) of the same version - A or B - may be installed in a vehicle. In the case of replacement, replace both tie rods if necessary (install version B). Visual distinguishing characteristics between tie rod versions A and B: The cast number (refer to Fig. 292_99 and text below the illustration). The metal bushing of the rubber mount. On version A, the metal bushing of the rubber mount is flush with the tie rod. On version B, the metal bushing of the rubber mount projects slightly - by approx. 1 mm - at both sides (arrow). A - Tie rods without spherical mount Part No. 996.331.045.06/07 /08 Cast No. 996.331.245.06/07/08 292_99 B - Tie rods with the spherical mount (optimised tie rods with harder rubber mount). Part No. 996.331.045.10 Cast No. * 996.331.245.10 (current)or Cast No. '" 996.331.245.08 3 (the 3 was stamped at the end of the cast number in order to distinguish it (arrow) and was additionally provided with a blue dot in this area). On tie rod version B, the metal bushing of the rubber mount projects slightly - by approx. 1 mm - at both sides (arrow). 42 Sorry, I would post the diagrams, but for some reason I can only cut and paste the text from my service manual.