Welcome to RennTech.org Community, Guest
There are many great features available to you once you register at RennTech.org
You are free to view posts here, but you must log in to reply to existing posts, or to start your own new topic. Like most online communities, there are costs involved to maintain a site like this - so we encourage our members to subscribe or donate. All subscriptions and donations go to the costs operating and maintaining this site. We prefer that guests take part in our community and we offer a lot in return to those willing to join our corner of the Porsche world. This site is 99 percent member supported (less than 1 percent comes from advertising) - so please consider an annual subscription or donation to keep this site running.
Here are some of the features available - once you subscribe RennTech.org
- View Classified Ads
- DIY Tutorials
- Porsche TSB Listings (limited)
- VIN Decoder
- Special Offers
- Paint Codes
- Registry
- Videos System
- View Reviews
- and get rid of this welcome message
It takes just a few minutes to register, and it's quality Porsche information at a low cost.
Contributing Members also get these additional benefits:
(you become a Contributing Member by subscribing or donating money to the operation of this site)
- No ads - advertisements are removed
- Access the Contributors Only Forum
- Contributing Members Only Downloads
- Send attachments with PMs
- All image/file storage limits are substantially increased for all Contributing Members
- Option Codes Lookup
- VIN Option Lookups (limited)


ciaka
-
Posts
469 -
Joined
-
Last visited
-
Days Won
16
Content Type
Profiles
Events
Forums
Exterior Paint Colors
Downloads
Tutorials
Links Directory
Collections
Classifieds
Store
Everything posted by ciaka
-
How hard is it to replace the ac compressor and dryer on this car as DIY? So I have been given the news, my hi side ac service port was leaking and over time reduced the charge to make the ac stop working. Removed cap, noticed it leaking slowly (audible). Went to the shop and had the valve replaced, but during inspection, they said that they noticed the clutch is burnet out on the compressor due to the low charge. Now, I am faced with repairs for this. My choices are: - indie shop (who says about 700 for ac comp, 80 for dryer, and about 600 for work including flush) - dealer - not even thinking about it - DIY - remove ac compressor, replace dryer, and then have indie shop flush and recharge system same day afterwards - is this a viable option? When went to indie shop, they replaced service valve, pulled vacuum and stated there are no more leaks. then put in 134A into lines to appropriate amount. Then said the compressor failed to engage and mechanics told me they can see the melted clutch parts. Then they pulled the fluid out stating the low side service port was leaking slowly, but since ac is bad, it would need dryer replacement too anyways. So they have my fluid that I already paid for, but all I need is to have AC compressor replaced along with the dryer. My question is though, once I replace compressor, would I be better off to give them the dryer to replace? or should I just replace dryer and then drive to them to service (flush, recharge)? What is in your opinion the way to go here?
-
A shop recently told me that there are 3 versions of AC compressor for Cayenne my year (05 CTT). The 3.2L, the 4.5L and the 4.5L turbo. However, when I called the dealer, they told me that there are only 2 versions of a/c compressor for this year: The 3.2L and the 4.5L, and the 4.5L went into any of the submodels of the car for that year. Can someone help confirm what is true?
-
do you know if there is a special a/c compressor for the 4.5 Turbo engine, then another for the non turbo 4.5, and another for the 3.8L version? A shop told me there is a turbo version of the compressor, but dealer told me there is only the 3.8L and 4.5L versions, with the 4.5L version fitting any of the models of the cayenne. Would love to know real answer for this.
-
Does the cayenne have a switch somewhere that will automatically turn on the ac compressor when the line pressure is low? I just discovered that my hi pressure port was leaking. Background story: AC stopped working (started blowing warm air only no matter what settings I had), so I popped off the cover and undid the cap. Then as I stand there, hears a small hiss coming out of the hi pressure port connector. Tried to see if it can be reseated but nothing works. Connected ac gauges and read about 120psi on high side. The low side read about 120 PSI or so as well (to my knowledge with AC off both sides equalize so you can have a reading like that on low side). Soooo, trying to decide if I should do this myself or drop off at mechanic. My choices are: 1. DIY (buy hi port connector, replace, pull vacuum, repressurize) 2. Drop off at dealer - will they charge a lot to do vacuum pull + recharge + replace of connector? 3. Drop off at indie shop to do same. How hard is the part to get. Autozone/Adv Au/prts do not have this and looks different from their connections anyway. Seems dealer part. Have the gauges and can get the evacuator no problem, but wonder about the connector availability. Repressurizing is a breeze as I have the charts for ambient temp + Hi & Lo side mins/Max values. Should I give it a crack or take to deal/indie due to low charges for this?
-
What I am referring to is this wiring shown in the pic...the wiring that goes from each bulb, into the connector marked in the pic, which in turn plugs into the harness connector on the car side, when you install the headlight. The wiring in the headlight is brittle and is flaking off due to heat I presume. Wanted to know if there is a replacement part for the wiring, or if I need to buy entire headlight.

-
Need Advice on Brakes
ciaka replied to bigfoot68's topic in 9PA, 9PA1 (Cayenne, Cayenne S, Cayenne Turbo, Cayenne Turbo S)
My recommendations for you would be: 1. If you think you have spare $500 or so, go with a known indie shop to do this for you. They will charge you a lot of $$$ to do something that anyone who can turn a screwdriver can do easily, given some time. 2. If you would prefer to save yourself the money, go to step 3. 3. Get familiar with the parts involved in rotor/pad brake replacement (really, only have rotors, pads, sensors, several bolts/screws - less that half dozen for each wheel). 4. Get familiar with what tools you would need to do this job floor jack to lift each wheel as you do the job socket + wrench to undo wheels triple square socket/star tool to undo 2 screws on rear rotor - plus socket wrench to help in the process socket to undo pads hardware + calipers brake clean spray paper towels gloves to keep your hands a little cleaner when handling tires some needle nose pliers if needed, thin screwdriver (if doing rear rotors, to align some holes and to set rear brake) flash light 5. Set some time aside (1 day) to not rush and do each wheel on your time schedule - recommend doing in pairs if not have enough time to do all 4 together 6. Find DIY article on here for rotor/pad DIY 7. Find and buy replacement parts...for front, will likely cost you about $350 for rotors and pads - if you get ceramic they will not squeak, but will work better when heated up - initial bite not as good. Sensors will be another $25/pair - replace them as the old ones will be used and brittle even if not ground down....will spare you aggravation of taking car apart and then having to put it back to wait for new sensors to arrive. 8. Study parts you bought to make sure you know what needs to be replaced 9. Do the DIY! It is one of the easiest things one can do on any car, and gives you an insight into how it all works. You get to know the mechanics, understand how things need to work together for proper function, and will allow you to detect when the car is not performing the way it should, if something goes wrong in that part of the car. This is the part where you 'get in tune or get to feel the car'. Trust me, it is well worth knowing this. After you do the DIY, your brakes will not squeal, and you will have some extra money to spend on something else, or to buy your wife/GF a present. Let us know which way you will go, we will cheer you on to do this on your own if you need a confidence boost. -
Does anyone know if there is a part to help replace the headlight connector inside the headlight after it is removed from the car? It is the connector to which all the wires go from bulbs. Same connector that mates with the other half inside the car, when you slide the headlight back into place. Been trying to see if there is a replacement part or if this is part of the entire headlight assembly (would be dumb though).
-
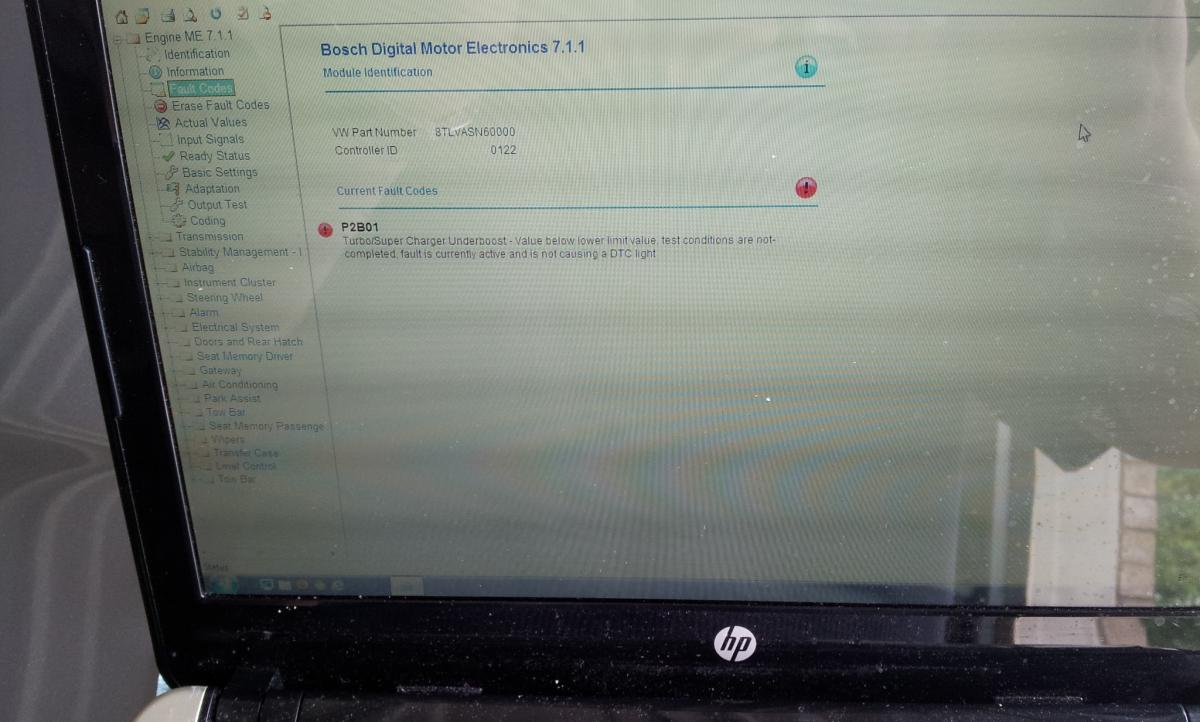
Turbo Boost Pressure down?
ciaka replied to ciaka's topic in 9PA, 9PA1 (Cayenne, Cayenne S, Cayenne Turbo, Cayenne Turbo S)
Have questions: 1. are the 'recirculating air valves' the diverter valves in the PDF? 2. Which items in the pics are the ones to check connections for? Trying to understand the layout here....apologies for noobness. Should my boost pressure in cluster at WOT be pointing to .8bar in typical scenario? Mine is pointing to .6 approx, then lowering to about .4 (I believe due to gearing/rpm range change). Just checked some vids I have and it appears boost was at .8 at WOT, holding well into the acceleration cycle, whereas now, goes to .6 and lowers pretty soon to about .4.
-
Turbo Boost Pressure down?
ciaka replied to ciaka's topic in 9PA, 9PA1 (Cayenne, Cayenne S, Cayenne Turbo, Cayenne Turbo S)
Have cleared and monitored. Got error back again but it is P0299, under boost. I would greatly appreciate if someone could take time to explain parts in question, where they are under hood, how connected and best way to test. Again, much appreciated. -
Updated info: I seem to have fixed my PCM issues, but still will be looking for info on upgrading to aftermarket. Unbelievably, I unplugged all connections and replugged them all but the fiber connection. No audio (as expected). Brought the FO conn. near the transceiver on back of head unit, and audio was fine...so were all other functions, nothing rebooting, etc. Clicked it in gently as the last connection. No issues since. Happy, but we will see how long this lasts....still contemplating doing install if it fails again. Did a whole bunch of reading and got the below info... So far have the following to get ahead of any install. Feel free to complement this list to ensure it is complete: 1. Pioneer AVIC-Z150BH (best price found was $830 shipped) 2. Cayenne Double DIN Dash Kit (best price I found was $69 shipped from eBay 3. Nav-TV MOST-HUR kit - CLICK HERE FOR INFO- best price found $500 4. Metra Axxess ASWC Steering Wheel Control Interface - best price found $45 eBay 5. USB cable for my Android Phone (or for iPhone if you have it) - best price $50 for iPhone. Not sure if need a special cable or if a normal miniUSB to USB cable will be ok. 6. Back up camera ....saw something like this- $35 shipped #1 will give me dvd/cd/gps/blue tooth/interface to cell - S GS2, etc #2 will give proper finish to the install (to look OEM) #3 will allow to keep the oem amplifier, oem speakers and wiring. Just plug in the cables from car (harness) into module and plug in cables from new head unit into module (at least that is what I assume based on reading) #4 will allow to continue use of steering wheel controls after install #5 will allow to connect my Galaxy S2 to the head unit and use via the display on unit, or BT connect for sons/vid, etc #6 will give ability to have rear facing backup camera to see stuff behind the car when reversing. ..this will be my fall back plan so I do not forget that one day when the PCM fails again (maybe).
-
Turbo Boost Pressure down?
ciaka replied to ciaka's topic in 9PA, 9PA1 (Cayenne, Cayenne S, Cayenne Turbo, Cayenne Turbo S)
If anyone can show a diagt Ram of area that is affected, would greatly appreciate it too. -
Turbo Boost Pressure down?
ciaka replied to ciaka's topic in 9PA, 9PA1 (Cayenne, Cayenne S, Cayenne Turbo, Cayenne Turbo S)
Can you tell me which hoses/clamps to start with? Are they the hoses/clamps that go away from the t-shaped plastic tube at intake? Where do they go from there? Trying to get a good idea of the area to PD. Also, would this have anything to do with fuses I was pulling shed doing PD of my PCM? I ended pulling momentarily all fuses in inside of driver door, including the two orange ones...just bringing this up in case it may be related. -
So I was working on my headlight (corner light was out). The light kept off for a while. Decided to crank out the durametric.Scanned for errors and noticed that there is a turbo charger underboost error. Never PDd turbos before. Easy? Hard on this car? Here is a pic of the actual error in Durametric:Error: P2B01 Next clip is a vid of the boost pressure I see when in accerleration from stop and from rolling 55mph, to show the boost needle vs speed/rpm. Hope someone can comment if normal....does not feel like it since I was able to see the full .8 bar on the needle from what I remember. Given the error, there is something amiss for sure. Here are my questions:1. From the did, pic and info, do I have a problem that needs looking into?2. Where do I start now? Have of done any turbo PD, so want to understand where the areas of interest/possible issues are first.3. Provided that there is something in need of replace, what would be parts/part numbers that would be first candidates to change?4. Can someone show me what areas of interest are from a diagram, etc? Would like to know better where in car these parts are and how difficult they are to access (for example, to verify hoses, seals, tubes - which ones and where are they to verify)?Appreciate any help you can give. UPDATE (May 26): WTF - I decided to go to Durametric and download/install their latest version of the Durametric SW. My old one was v.6.2.1.2 Beta from June 2012. The latest version I installed today is v.6.3.1.7 Official Release. After I connected the car, noticed that I was not getting the underboost error. Cleared the error from this module. Tried again, same, no errors at all. Cleared ALL faults from all modules. Went for a drive and out of the community, with PSM off just floored it to see if the error will come back. On the way back home, did same - hard acceleration. When came home, connected again to the newest Durametric. NO FAULTS. No turbo charger fault of any kind. So I am stumped. Could it be the sw was using wrong parameters? Based on the vid, is it expected to see boot at this level? I am no longer 100% confident that I saw .8 bar on boost gauge, but I think it could be due to what I am observing. Those of you in the know, please let me know your views. THANKS!!
-
Now you got me curious...time to open the sucker up...
-
Dyno procedure for Cayenne
ciaka replied to ultra's topic in 9PA, 9PA1 (Cayenne, Cayenne S, Cayenne Turbo, Cayenne Turbo S)
Can you do us a favor and give us update on any gains after BMC filter add, and any gains after ipd plenum add?There has been some discussions about how much gain each makes, and your plan may help provide answers to this. Thanks in advance. -
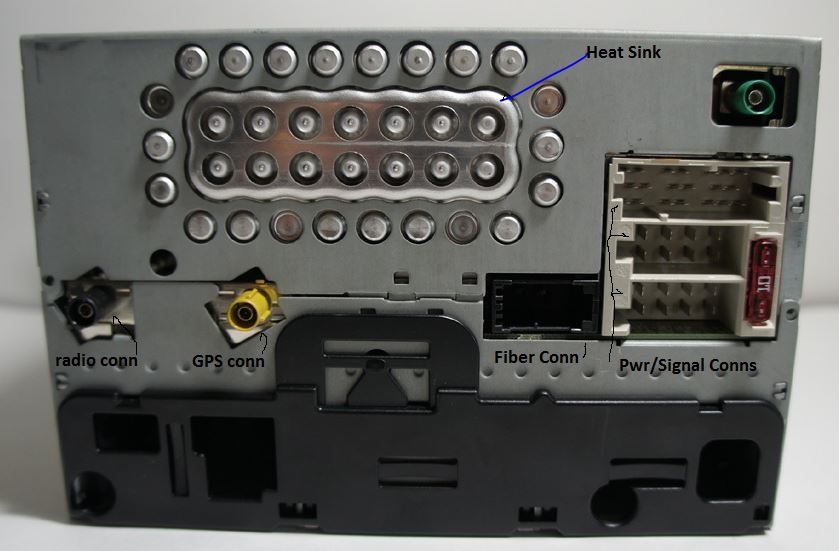
When I removed the PCM, noticed that the heat sink the metal part on rear of the unit that the voltage regulators connect to, was getting really hot. Didnt happen to notice any cooling fans in the unit. If you look at the pic, the heat sink is the only thing I noticed. Do not remember a fan inside, is there?
-
My system is acting up and while I am trying to find root cause, I wonder if you can help me get info on what today seems to be a good way to go when replacing the factory setup. My car is 05 CTT with Bose option fiber optic cable I would like to retain use of steering wheel controls. Would like to know: 1. Make/model of unit that will give touch GPS, radio/cd/dvd/bluetooth, connection to my android phone, etc 2. Name of kit that will make a clean face install (if needed) - to look good 3. any kit that will be needed for retain of use of steering wheel controls 4. anything else that I would need with the unit if choosing to go this way. Not looking for latest/gratest, as I do not have 2K to play with. So cheaper is good, good balance being best. Maybe between 600-800 or cheaper if possible. Looking as much as possible to be plug N play (with fiber connections) Really appreciate your help in advance.
-
It is on my 05 CTT with Bose system (fiber optic connector to radio). So I was driving the other day and just happen to break on the hard side, and noticed that the radio unit reset itself (screen went black, then Porsche logo came on, then back to radio). It did that a couple times. Got home, removed the radio (which was hot). Unplugged the wires in rear of the unit. Left as is (had something to do). Later, plug it all together, and all seems fine. For about a week. Today, driving to a friend, same thing, radio reboots itself. See the Porsche white background with logo, then sometimes to to radio, and sometimes goes blank again. Since then, nothing seems to work. When unplugged, noticed unit was very hot again (the heat sink in rear and the chassis too). When made the car quiet, noticed that there was an amp or something else from the rear of the car, I could hear a fan spun up trying to cool whatever it was that was running. When I unplugged the connector paired with the fiber optic connector the fan on whatever piece of hardware stops running after about 5 seconds. Towards the end of troubleshooting, noticed that when the connector is plugged in, the fan is not running when I become quiet (but that could be due to the unit not being hot yet). Resets itself many times if left alone. When I press the 1+4+8 buttons to reset, it will, but sometimes will go blank until I reset again. sometimes press the power button to turn it on, it will, but when radio comes on, I can only work the controls for about 2 seconds (enough to change station or volume a bit). After I do the one thing I can, the buttons will not work. Have to reset the unit again. Then back to square 1. Either buttons do not work, or will for just a short time again just like earlier. So now, ended up disconnecting that connector (which cuts the power off to the unit). Hoping someone on here can give tips to do PD and hopefully resolve this issue. Thanks in advance.
-
Fuel filter?
ciaka replied to Papagut's topic in 9PA, 9PA1 (Cayenne, Cayenne S, Cayenne Turbo, Cayenne Turbo S)
Are there DIY articles for this job? Wondering about mine, although I have little over 70k miles on my clock. -
np. hope the vids help show the differences.
-
anyone? anyone? Of those who switched to Toyota T-IV ATF for tranny fluid replacement, how many miles have you driven since, and have you experienced any issues or warnings (anything of note)?Would be greatly beneficial to others who have been monitoring this. Thanks.
-
brake booster faulty
ciaka replied to TopGun2000's topic in 9PA, 9PA1 (Cayenne, Cayenne S, Cayenne Turbo, Cayenne Turbo S)
Is there a fuse for the brake booster? I thought there was one, probably under the hood, under the cover near the brake fluid (driver side). Check the manual and look at the fuses to make sure not blown (although you did say it worked on/off which would not be in line with blown fuse). Just another place to check. Relay would make sense though, if getting stuck sometimes. -
done all the vids now. Hope it provides a decent comparison to those looking into the parts as possibilities for upgrades. Let me know what you think, if this customized SR1 exhaust was worth it in your view.
-
This was installed on an 05CTT. Over the last couple days I was busy putting in the Leistung secondary cat bypass pipes, as well as the SR1 exhaust. The SR1 exhaust has been modified per my input by Rob, so if you are ordering the typical stock design, it will not sound just like this one does. I made some pics of this exhaust in another thread, showing dimensions, and if you are interested, I can give you more details so that you can communicate with Rob about exactly what you want. This thread will have the different videos that I wanted to shoot to make a good side by side comparison of the resulting sound modification. I will be uploading these as I happen to make them, so if you are interested, check back and look at the initial post, I will be editing to add other videos as I go. I started with near stock 05 CTT, only having KN Filters installed. Comparisons were made against that setup. I will have: KN filter / KN+2nd cat / KN+2nd CAT+SR1 - IDLING - INSIDE sound KN filter / KN+2nd cat / KN+2nd CAT+SR1 - IDLING - OUTSIDE sound KN filter / KN+2nd cat / KN+2nd CAT+SR1 - NORMAL DRIVING - INSIDE sound KN filter / KN+2nd cat / KN+2nd CAT+SR1 - NORMAL DRIVING - OUTSIDE sound KN filter / KN+2nd cat / KN+2nd CAT+SR1 - HARD ACCELERATION - INSIDE sound KN filter / KN+2nd cat / KN+2nd CAT+SR1 - HARD ACCELERATION - OUTSIDE sound Hope that if you are considering the Leistung products, this will help you make up your mind. IMO, I am sooo glad I did this. Here we go - Here are the Vids: 1. KN filter / KN+2nd cat / KN+2nd CAT+SR1 - IDLING - INSIDE SOUNDS - 2. KN filter / KN+2nd cat / KN+2nd CAT+SR1 - IDLING - OUTSIDE SOUNDS - 3. KN filter / KN+2nd cat / KN+2nd CAT+SR1 - NORMAL DRIVING - INSIDE SOUNDS - 4. KN filter / KN+2nd cat / KN+2nd CAT+SR1 - NORMAL DRIVING - OUTSIDE SOUNDS - 5. KN filter / KN+2nd cat / KN+2nd CAT+SR1 - HARD ACCELERATION - INSIDE SOUNDS - 6. KN filter / KN+2nd cat / KN+2nd CAT+SR1 - HARD ACCELERATION - OUTSIDE SOUNDS - DONE.
-
yup, that's the first thing I would do, reseat connections. let us know how that goes.