Welcome to RennTech.org Community, Guest
There are many great features available to you once you register at RennTech.org
You are free to view posts here, but you must log in to reply to existing posts, or to start your own new topic. Like most online communities, there are costs involved to maintain a site like this - so we encourage our members to donate. All donations go to the costs operating and maintaining this site. We prefer that guests take part in our community and we offer a lot in return to those willing to join our corner of the Porsche world. This site is 99 percent member supported (less than 1 percent comes from advertising) - so please consider an annual donation to keep this site running.
Here are some of the features available - once you register at RennTech.org
- View Classified Ads
- DIY Tutorials
- Porsche TSB Listings (limited)
- VIN Decoder
- Special Offers
-
OBD II P-Codes - Paint Codes
- Registry
- Videos System
- View Reviews
- and get rid of this welcome message
It takes just a few minutes to register, and it's FREE
Contributing Members also get these additional benefits:
(you become a Contributing Member by donating money to the operation of this site)
- No ads - advertisements are removed
- Access the Contributors Only Forum
- Contributing Members Only Downloads
- Send attachments with PMs
- All image/file storage limits are substantially increased for all Contributing Members
- Option Codes Lookup
- VIN Option Lookups (limited)


Hilux2400
-
Posts
458 -
Joined
-
Last visited
-
Days Won
1
Content Type
Profiles
Events
Forums
External Paint Colors
Downloads
Tutorials
Links Directory
Collections
Store
Everything posted by Hilux2400
-
Clutch Warning Signs
Hilux2400 replied to Wausau 911's topic in 996 Series (Carrera, Carrera 4, Carrera 4S, Targa)
The first noticeable sign of a clutch slipping is in high gear under heavy load on an incline when you need max power. The revs will increase but they won't be matched by the road speed. When this happens just ease off and build up speed gradually and try and use lower gears to get you home. Also to extend clutch wear don't slip the clutch when waiting at halts on an incline, don't start in a high gear and try and match engine speed to road speed when changing down. In other words don't drop the clutch in a low gear and expect the engine to take the load to slow the car down. The last is a killer as the engine is required to speed up immediately and often at a rate that exceeds its ability to speed up under normal fuel delivery. H -
I have connected my front trunk release to some nylon cord that I have routed to the right front indicator recess. I have wrapped the end of the cord around the indicator drain plug. It's easy to pop the light out and find the cord and then just pull the release. I have left the engine cover release cord in its original location under the left rear light group. It's easy to get to this by just opening a gap with a plastic comb and pulling the end of the release cord out with a piece of bent wire that I keep in the glove compartment. I have covered the hooked end in heat shrink to avoid scratching the bodywork. I have also checked that the fuel cap release wire is in working order. It's in the door jamb. H
-
odd lug nut torque question
Hilux2400 replied to cdb's topic in 996 Series (Carrera, Carrera 4, Carrera 4S, Targa)
I have noticed that in one of the tyre fitting shops that I have used that the fitter did not tighten up the nut with the anti theft bolt to full torque. I asked him about this and he told be that on some cars the anti theft bolt was prone to head failure with the head rounding off. On my Porsche wheel nuts I do all five up to full torque. H -
Wheel Spacer Question
Hilux2400 replied to slackc's topic in 996 Series (Carrera, Carrera 4, Carrera 4S, Targa)
I have a 996 2003 Carrera 2. The standard offset for an 8J front is 50mm and for a 10J rear it's 65 without any spacers. I have tried 10J rears with an offset of 47 and they stuck out from the rear arches. The front will tolerate a width of up to 8.5J with an offset of between 50/52mm but an 8.5J is not in the handbook. If you look in your handbook it will tell you the correct wheel size options for both 17" and 18" wheels with various widths and offsets. With tyre widths it is important to get the profile right so that the rolling circumference of both front and back match as close as possible. For example: 265/35 on the back match 225/40 on the front. Once again refer to the handbook. H -
I would definitely check the battery connections. If they work lose when the engine is running there is no resistance in circuit to quell voltage highs from the alternator. The result can be a fried ECU. I have had a similar problem to the one you mention with the car not starting, but in my case it would not crank when very hot. It was not a Porsche, but a different make. I traced the problem to a female spade connector on the starter motor. When it was hot it had insufficient clench to deliver a signal to the starter solenoid. I know your problem is not cranking, but not starting. In order to start there must be a spark and the delivery of a spark depends on the supplied voltage. Now if the battery terminal is slack when it's hot there will be a high resistance which in turn decreases voltage. First check the battery terminals are tight. Next check the voltage at the terminals by touching the lead posts with a voltmeter. Next check the voltage on the outside of the terminal clamps. Next check the voltage at the jump start point in the engine compartment. All three of these should have almost the same reading, although the one at the jump start will be slightly less. These three would be good starting points. Next check the voltage when the engine is being cranked. If it's below 9v I would say it's unlikely to start and you have a bad connection somewhere. H
-
I have just bought a huge 110 Amp Exide battery for a Merc that I own. It has a 4 year guarantee and it was fitted at my local auto electricians. Total cost £110. The fitting costs was £20 as it buried at the back of the engine compartment. I just think that $306 that you paid is outrageous. Fitting a battery to my 996 would take me about 10 mins max. H
-
Digital Speed View
Hilux2400 replied to Hilux2400's topic in 996 Series (Carrera, Carrera 4, Carrera 4S, Targa)
Thank you for your reply Loren. The layout that is shown for the 2001 car is the one I remember and the later 2003 layout matches my car. I thought at first my memory was playing tricks. With my OBC there is a type of speed warning that allows a max peed to be selected and when that speed is exceeded the OBC shows just the max speed reading with an accompanying bleep. It would be great if the OBC could show a continually variable form to match the current speed of the vehicle and then bleep at the appropriate time. However, if that facility is not there I am not going to get it. Thanks for your help and good wishes to you all. H -
My 2003 996 Carrera 2 has a trip computer in the bottom of the central rev counter. The speed is displayed digitally at the bottom of the speedometer on the left. The trip computer is controlled from a stalk on the steering column. The trip computer displays various stuff such as: mpg, av speed, temperature, remaining fuel. Is it possible to set the trip computer to show current speed? It shows most other things, but whatever I try I cannot get current speed. It would be useful to display current speed here as it is easily viewed. I remember driving a Carrera 996 in about 1999 and then there was a digital speed readout at the bottom of the rev counter. However, I can't remember if this car had a trip computer. Thanks H
-
Did mine yesterday.

-
Rear Trunk Emergency Cable Not Working?
Hilux2400 replied to willos's topic in 986 Series (Boxster, Boxster S)
I asked a similar question here some months back as I did not know about the cable. The answer is here: http://www.renntech.org/forums/topic/43532-996-engine-cover-release-wire/ This what the cable looks like and I have now taped mine under the light fitting. It doesn't take much force when pulled horizontally, but I have noticed that it helps to press the trunk cover down slightly at the same time. H -
This might seem basic, but for my 911 the instructions in the manual are for the left headlight where the tool requires to be turned anticlockwise when looking outwards from the middle of the vehicle. The method for the right light is a mirror image requiring the tool be turned clockwise when looking outwards from the middle of the vehicle. Maybe this comparison is the same for your vehicle. H
-
tapping on start up
Hilux2400 replied to patgas's topic in 996 Series (Carrera, Carrera 4, Carrera 4S, Targa)
I too have had this noise occasionally on a cold start. I put it down to hydraulic tappets as it was a similar noise I used to have in a VW. It's a bit frightening at first especially when the car is started next to a wall and the driver's window is open as the reflected sound amplifies the effect. It normally goes away after a short period. H -
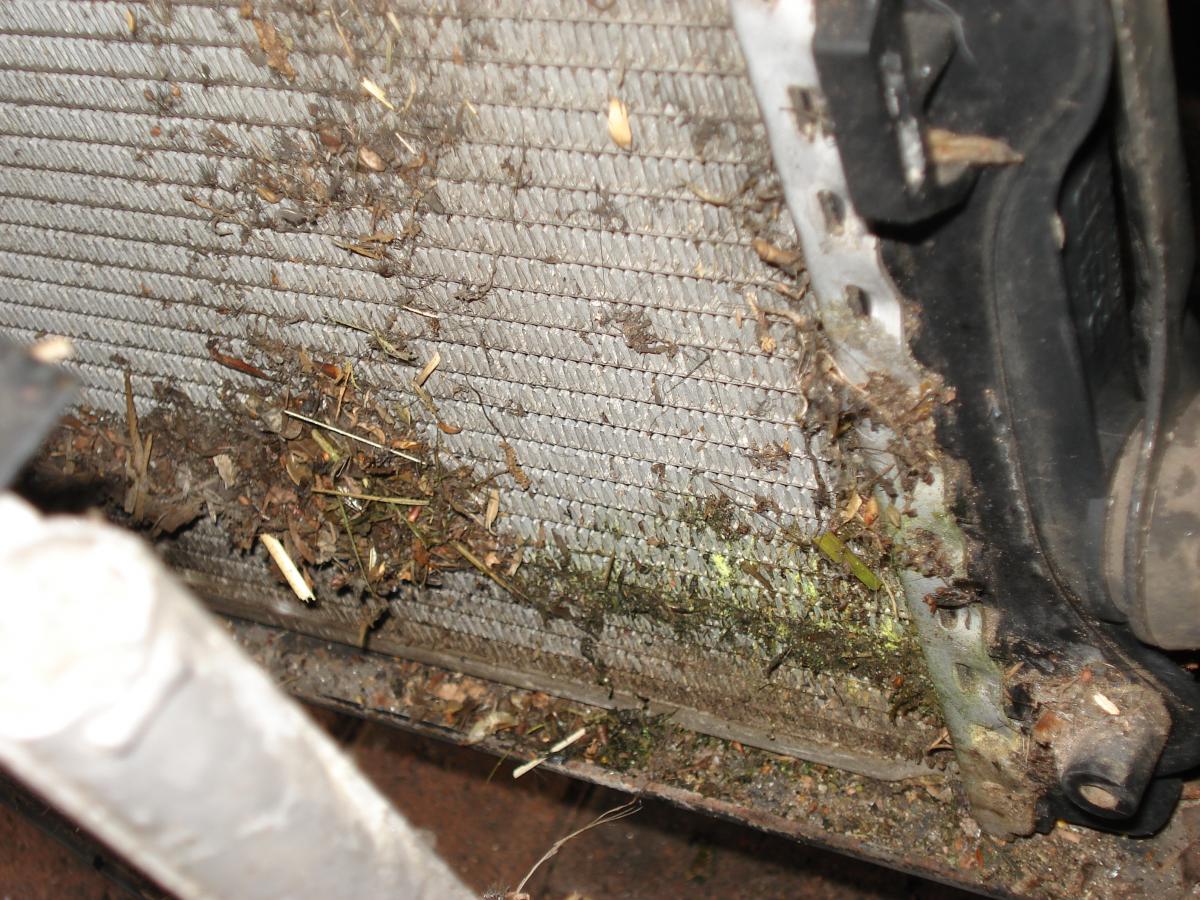
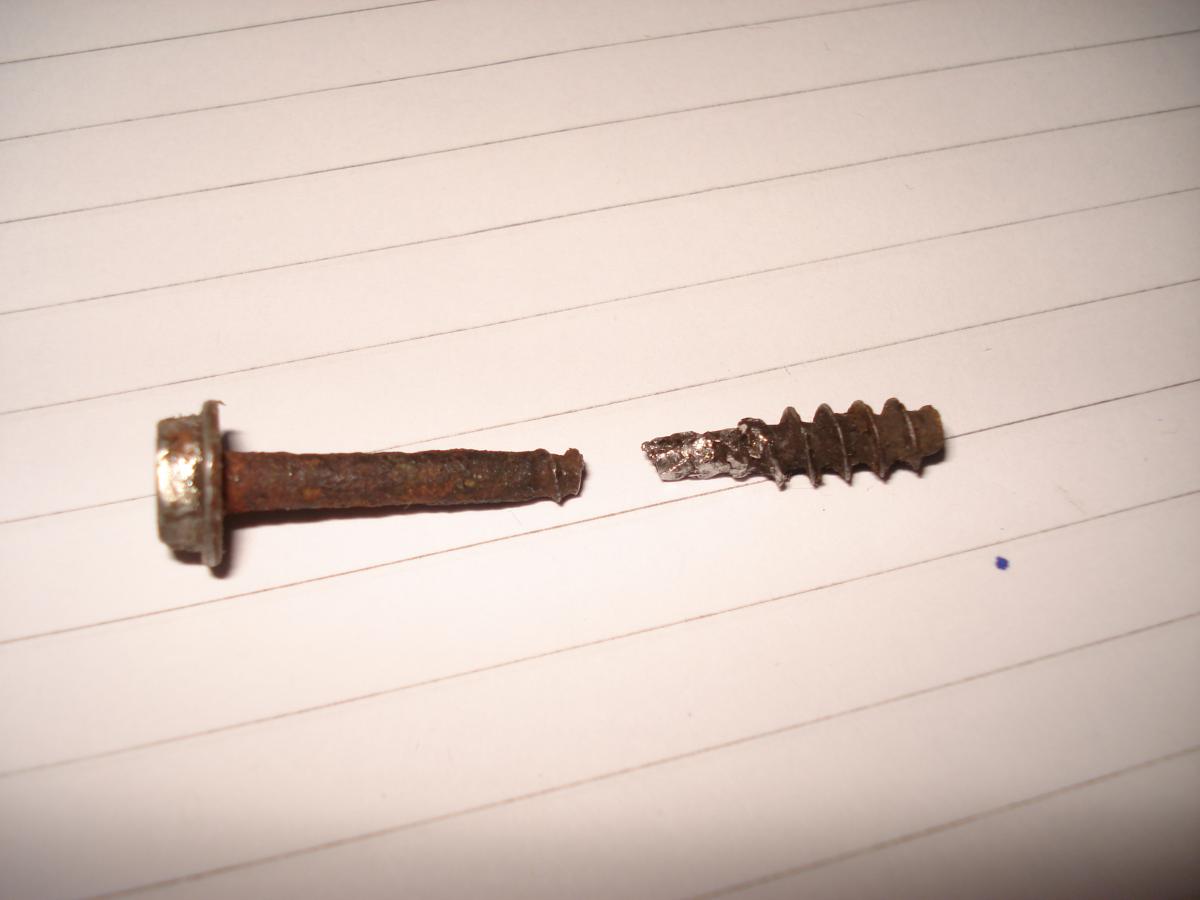
To continue with the thread I thought I would have a look at the bleeder valve. Even though I have bought a new tank, the existing tank looks pretty new for a 10 year old car. I took off the SAI pump and the air intake and this allowed me to slip the header tank over to get at all the screws on the bleed valve. 7 of the screws came out OK and were as new but the 8th, where the leak was, was feeling slender. I tried to unscrew it but it snapped off leaving a stub. The screws had rotted so there had been a leak here for some time. At this stage I was able to remove the valve and separate it. It seals with two "O" rings which were in good condition. I soaked the stub of the screw in penetrating oil and left it for an hour. I then eased it out with a self grip wrench. I "borrowed" one of the screws from the new header and replaced the bleed valve. I lubricated the "O" rings with silicon spray. Things seems to be OK so with a bit of luck I won't have to replace the header tank just yet. H
-
Coolant leak
Hilux2400 replied to SteveMeckman's topic in 996 Series (Carrera, Carrera 4, Carrera 4S, Targa)
You need to pressurise the system when it's cold. The leak will then show up. The workshop manual says it should hold 1.5bar (22psi) but I think that's a bit high. I pressurised mine to 10psi to find a leak. I did a temporary fix and it held at 10 so I have left it for now until I change the header tank relief valve. I bought a pressure tester that will do VW's as the cap on my 996 is the same as some of the older VW models. H -
I have decided to change the coolant tank after discovering a small leak in the pressure relief valve housing. I can see that there is not much space and know that I'll need to remove the SAI motor and the main air intake. On reading various posts I see that lowering the engine is a good option for getting extra space around the tank. I have had a look around the engine bay and it seems that most stuff will come down an inch or two with the engine when the two rear mounting nuts are released from the studs. I am hoping this will give me enough space to get the tank both out and in. My questions are: 1. I will take the hoses and level wire off the coolant tank before I lower the engine, so are there any other hoses or pipes that are likely to have any bodywork ties that will become over stretched or broken as a result of this lowering? 2. Will lowering the engine give sufficient space? I have heard that some people also take off the fuel supply line. I am not intending to drain the cooling system. I will just empty the coolant header with a siphon tube, leaving most of the coolant in the system. Look forward to replies. H
-
I have now bought a new tank and will fit it when the weather improves. At present the cooling system is holding 10psi with no loss, so with a bit of luck it will be OK for a while. H
-
Well I think there is a lot of sense in that suggestion as a new tank does come with a new pressure release valve. Also, there are quite a few postings about fractured tanks. Perhaps I had better think more carefully on how to proceed as I don't want to end up doing the job twice.H
-
Thanks for the reply and on reading around for other info I see that broken screws here are a known problem. I think my best option is to get a S/H replacement tank and valve as back up. I will then remove the tank from the car and drill the top off the offending stuck screws which will enable me to remove the valve and leave a screw shaft in place. At least with a screw shaft that I can clamp I will have a better chance of getting in out of the header tank surface. H
-
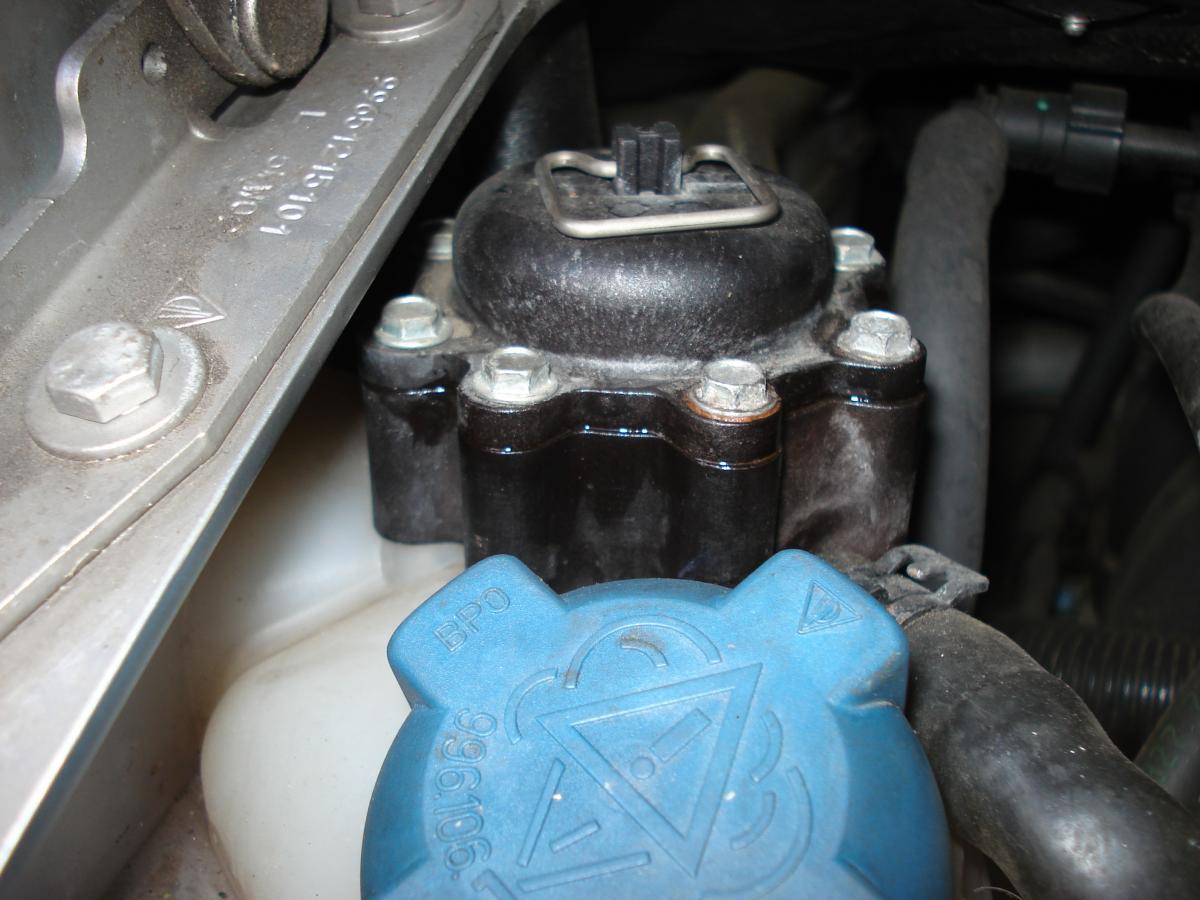
I have a small coolant leak from the interface on the bleeder valve housing. I have tightened up a few of the bolts by a half turn, which has reduced the leak, but there is one bolt that is obviously stuck and I am afraid to turn it in case it shears. I have tried a gentle nudge in both directions, but I just don't want to chance my luck. Does anyone have any bright ideas? The offending bolt is the one with a slight reddish tint on the washer. It is difficult, if not impossible, to get the all the bolts out from the housing without removing the header tank which will also require the SAI pump to be removed. Thanks for reading. H .
-
These can be repaired if the potentiometer wire has failed near the end. Strip off a few turns and re-solder. Then reseal the wires onto the board with varnish. I did a similar repair to a TR3A fuel gauge in 1969. H
-
Expansion tank cap
Hilux2400 replied to Hilux2400's topic in 996 Series (Carrera, Carrera 4, Carrera 4S, Targa)
Thanks for the advice. I have looked at these sets, but they are fairly expensive in the UK owing to postage costs. I figured the VW cap would be similar, so I will check at my local dealership. The reason I asked this question is that quite a few of the testers I have seen have adaptors for VW's but do not mention Porsche. So if they are the same a VW kit should be OK. Thanks H -
I want to buy a kit for pressure testing the cooling system on my 911/996 2003 model 3.6 C2. I can't find a kit that includes a cap for a Porsche, but several that have adaptors for VW's. Are VW expansion tank caps interchangeable with Porsche caps? H
-
Thanks Loren
-
Thank you all - that's great advice. I have read the tutorial on throttle body cleaning and I am apprehensive about moving the butterfly manually in case I damage the throttle body stepper motor. Is it OK to move it manually, providing the ignition is off? I have also been looking at plug changes and the conclusion I have come to is that the easiest path is to take off the silencers. From what I can see on the car, and from what I have read, silencer removal is pretty straightforward. There is always the chance that when removing the three nuts from the silencer studs that the studs might shear off. However, new studs can easily be welded back on in replacement. Are there detachable sparking plug sleeves, sealed with "O" rings, on the 996 2003 3.6litre models? H
-
Thanks Darrin I know about the window re-set in the manual. However, I have seen somewhere a post that gives lots of info on various re-sets and I just can't find it. Regards H