Welcome to RennTech.org Community, Guest
There are many great features available to you once you register at RennTech.org
You are free to view posts here, but you must log in to reply to existing posts, or to start your own new topic. Like most online communities, there are costs involved to maintain a site like this - so we encourage our members to subscribe or donate. All subscriptions and donations go to the costs operating and maintaining this site. We prefer that guests take part in our community and we offer a lot in return to those willing to join our corner of the Porsche world. This site is 99 percent member supported (less than 1 percent comes from advertising) - so please consider an annual subscription or donation to keep this site running.
Here are some of the features available - once you subscribe RennTech.org
- View Classified Ads
- DIY Tutorials
- Porsche TSB Listings (limited)
- VIN Decoder
- Special Offers
- Paint Codes
- Registry
- Videos System
- View Reviews
- and get rid of this welcome message
It takes just a few minutes to register, and it's quality Porsche information at a low cost.
Contributing Members also get these additional benefits:
(you become a Contributing Member by subscribing or donating money to the operation of this site)
- No ads - advertisements are removed
- Access the Contributors Only Forum
- Contributing Members Only Downloads
- Send attachments with PMs
- All image/file storage limits are substantially increased for all Contributing Members
- Option Codes Lookup
- VIN Option Lookups (limited)


tac27
-
Posts
104 -
Joined
-
Last visited
About tac27

- Birthday 11/06/1966
Recent Profile Visitors


tac27's Achievements
Member (1/1)
2
Reputation
-
High mile role call
tac27 replied to violaGT3's topic in 996 Series (Carrera, Carrera 4, Carrera 4S, Targa)
If you dont plan to do the rebuild yourself I recommend Jake Raby at http://www.flat6innovations.com/ or Don Weaver at https://www.ebsracing.com/ -
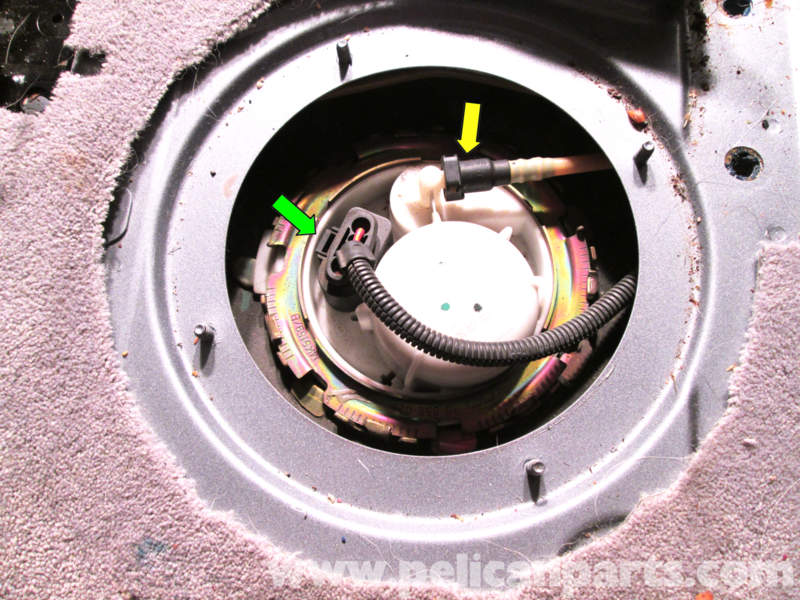
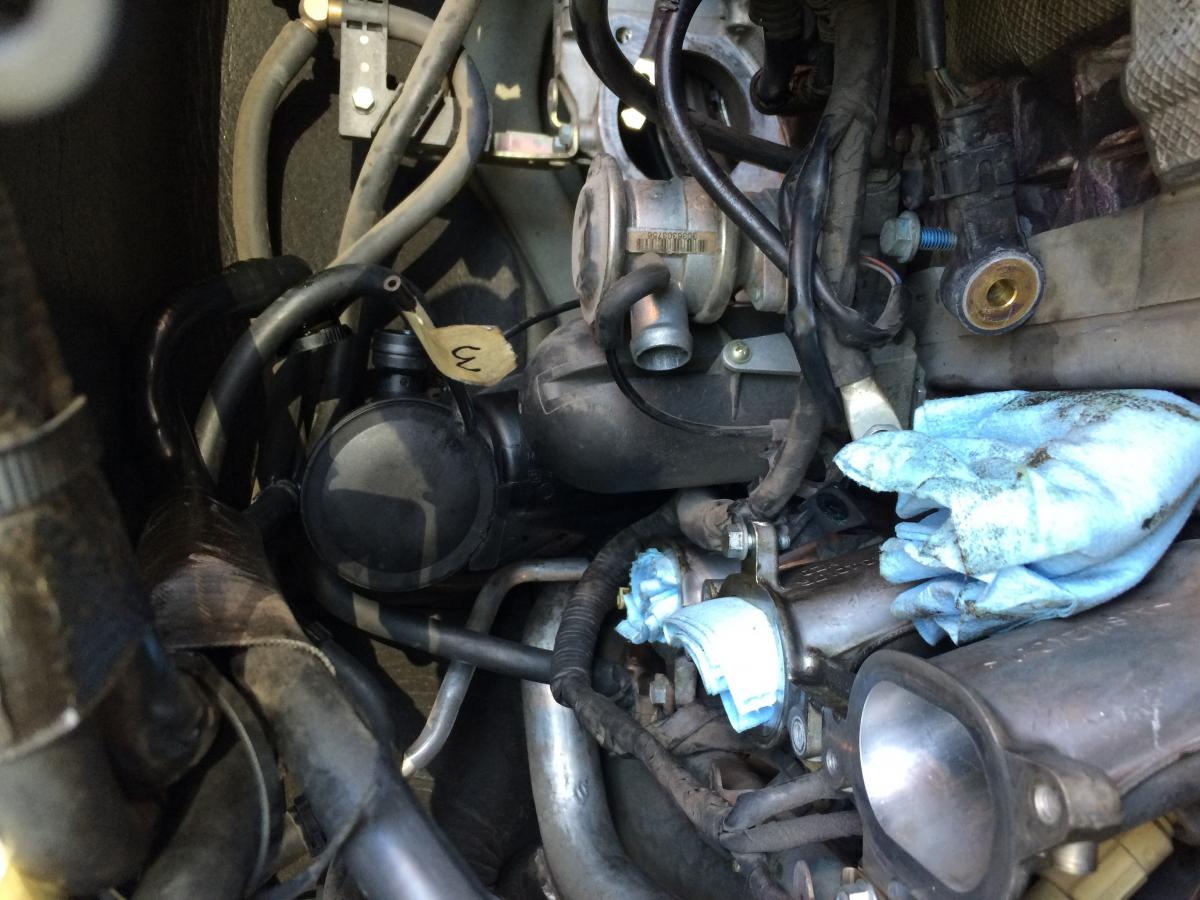
I am looking for the black electrical connection that is shown by the green arrow in the photo. The tab that secures the connection to the male side molded onto the top of the fuel filter snapped right off as I applied pressure to take it off. Thanks in advance to anyone who knows part number and where I can get it. It looks like a standard connection with a release that can be taken off and another put back on the wires. This is on a 2008 Cayenne base model with a V6.

-
Cayenne Battery Replacement with Pictures
tac27 replied to VIPNiSS's topic in DIY Articles - Cayenne - Maintenance
all of the pictures are gone along with most of the instruction -
High mile role call
tac27 replied to violaGT3's topic in 996 Series (Carrera, Carrera 4, Carrera 4S, Targa)
182k miles on '03 before the IMS failed late last fall. It was not the IMS that failed but the installation was incorrectly completed. So really ask around if the shop/mechanic has the experience and certification he claims to have..... -
Finaly found something on Google: An online supplier list a conversion kit that has the brackets, hoses, bolts.
-
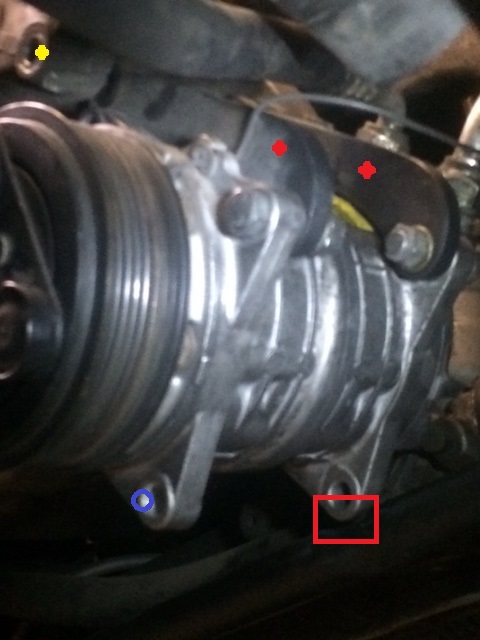
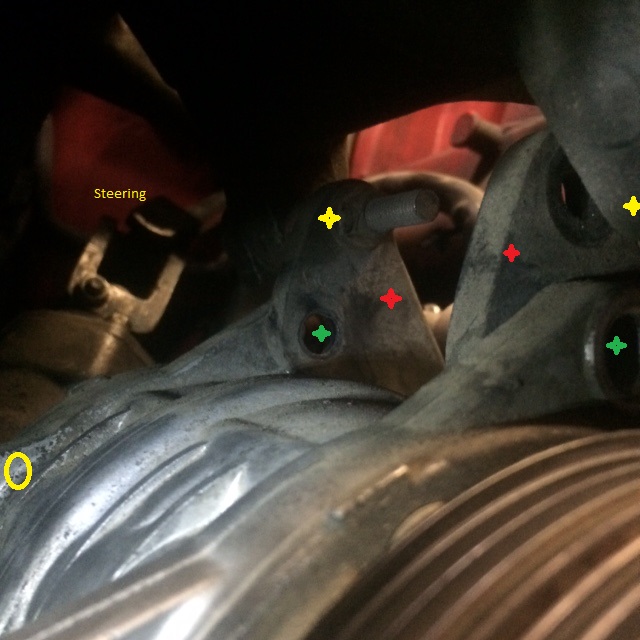
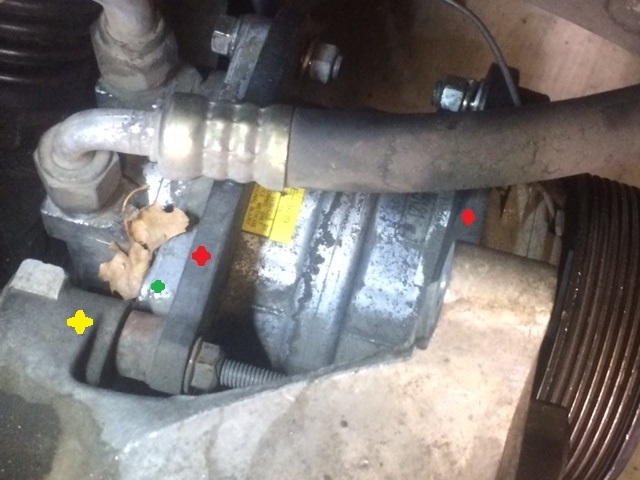
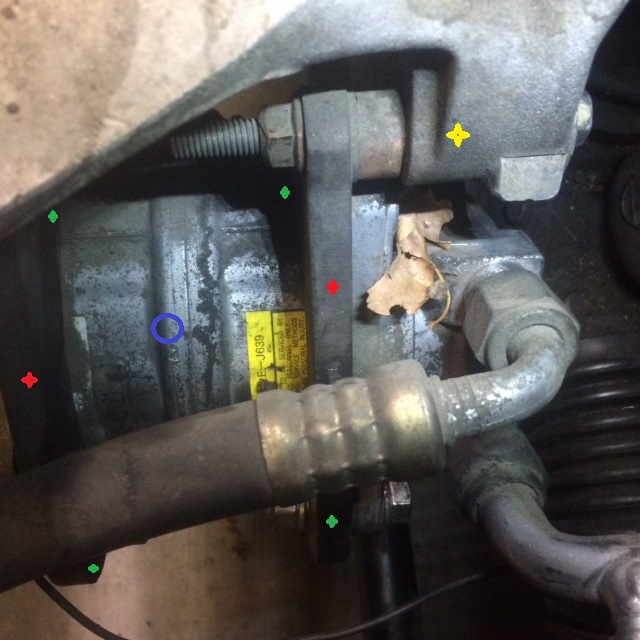
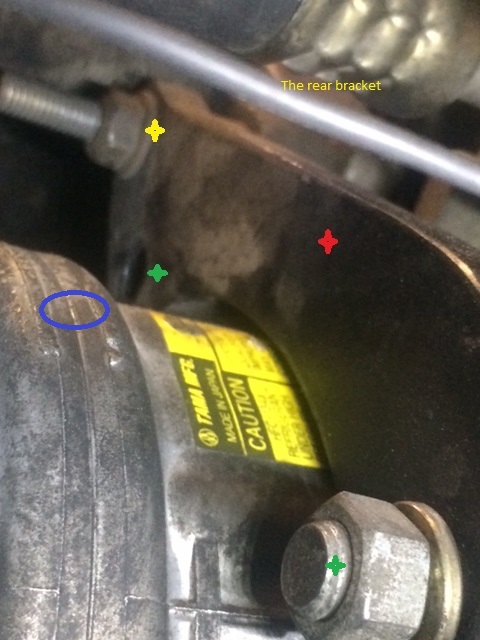
1987 2.5L base 944 coupe: Wondering if anyone has seen this type of install for an A/C compressor- In May the Las Vegas Region PCA (LVRPCA) arranged for members to receive an assessment of their car compliments of Trophy Performance. After getting the car on the lift and raised the first thing the mechanic pointed out to me was, "I don't know what that A/C compressor is supposed to go into, but it isn't a Porsche 944." Another mechanic confirmed his observation. The accessory drive belt (crank pulley, AC, alternator) is also longer than the OEM belt and about 1/3 the width. The compressor has four sets of 'ear-lobes' compared to the two sets of an OEM compressor*. The AC lines also install at the rear of the compressor, rather than in between the two upper ear-lobes. Rather than mount the two upper ear-lobes to the points an OEM compressor would mount, it is instead mounted to two brackets (two bolts per bracket), which is in turn mounted to the normal mounting position of an OEM. I've attached some pictures: -Red 'star-dots' locate the extra mounting brackets -Green locate where the non-standard compressor mounted to the extra brackets -Yellow show the mounting position of a OEM compressor -Blue shows where the tensioning bar mounts on the lower ear lobe. -A red square shows where one of the ear lobes rest on the sway bar (torsion bar?) and has began rubbing a divot in it -A yellow circle shows the ear lobe that was ground down. I am assuming this was an attempt to pivot the compressor toward the engine block to allow the fitting of the drive belt. Because of the inclusion of the two mounting brackets, it won't work with a correct belt. Instead they used a much longer belt that is also approximately 1/3 less the width of a correct belt. -Blue circle marks where the AC lines mount on an OEM compressor So has anyone ever seen something similar to this 'customization'? I'm really curios if this was an aftermarket kit that was once offered for the 944. Tim Las Vegas *or an aftermarket OEM equivalent.
-
3.6 engine tear down
tac27 replied to AWDGuy's topic in 996 Series (Carrera, Carrera 4, Carrera 4S, Targa)
I took that course last February. Jake and Tony are great instructors, the professional techs taking the course were all very patient with us 'enthusiast, and the facility is really, really cool. Jake mentioned something about getting a book out about rebuilding. Hoping he gets it published soon. -
Here's another "I did it!" success post! Many thanks to: Hobbes for the original DIY AOS post; to Ahsai for his post ('MkII AOS DIY Sanity Check') regarding the procedural differences for the MkII engine; and the many other users who have posted about their AOS replacement experience . Especially thanks to Loren et al who created and maintian this resource! If it hasn't already been done, I would suggest that the link to Ahsai's post be added to the Hobbes original DIY post. The search function didnt return Ahsai's MkII post; it was just 'blind-luck' that I found it while wandering through other post.
-
New AOS failed out of the box. Possible?
tac27 replied to Ahsai's topic in 996 Series (Carrera, Carrera 4, Carrera 4S, Targa)
Thanks Ahsai! -
New AOS failed out of the box. Possible?
tac27 replied to Ahsai's topic in 996 Series (Carrera, Carrera 4, Carrera 4S, Targa)
Ahsai,, I also have a 2003 C2 (a Cabriolet). I am experiencing a challenging removal of the final bolt of the upper air intake. It seems that the round face of the AOS sits directly above the bolt head. Can you please share how you removed that bolt? And to clarify, my AOS is the newer part that does not have a bellows. I see too that the older AOS that has the bellows has two bolts that are horizontal into the block; the newer AOS has two mounting bolts that are positioned vertically into the block. -
Cranking Not Starting?
tac27 replied to MPSIII's topic in 996 Series (Carrera, Carrera 4, Carrera 4S, Targa)
lakeview: I learned the same thing about the Bentley manual.....Somewhere in this forum I did find a post about using a voltmeter to test the crankshaft sensor; sorry I don't remember where I found it. But I did pull the sensor and it was not in the range it should be. I replaced the sensor and the car then started. It took a couple of attempts, I guess the fuel system needed to prime or recharge. -
Cranking Not Starting?
tac27 replied to MPSIII's topic in 996 Series (Carrera, Carrera 4, Carrera 4S, Targa)
Replaced the crankshaft sensor. Car now starts. -
Cranking Not Starting?
tac27 replied to MPSIII's topic in 996 Series (Carrera, Carrera 4, Carrera 4S, Targa)
Odd coincidence, I'm experiencing a similar issue. On the drive home from work on Monday the car ran fine, no issues. When I went to start up this morning, it will crank but will not start. I hooked up the Durametric and found there were no codes. When I ran the 'Short test all modules' under the 'Function' tab it did its thing and returned these values. 21 W lead (DME Immobilizer) 49 K lead 60 Control locking limit position lock not reached 54 Radio receiver defective 33 Interior sensor faulty 18 Pressure sensor lumbar open circuit I have been looking through both the Bentley book and this site, but I'm having difficulty finding these numbers listed. Could any of these, especially the DME immobilizer, cause the problem? Thank you, Tim Post edit: I searched all of the terms, both singularly and as a whole (i.e. "21" and "21 W Lead DME Immobilizer)" and didn't get any returns either in the 996 forum or under the DIY OB II fault text code for my car/DME/engine. I did find a post by 'Dahrn55' posted on June 7, 2009 (I would post a link to it but I don't know how) that he talked about the same issue with Loren. They discovered that it was a faulty crank shaft position sensor. Dahrn55 had additional P codes that led Loren to believe it was the sensor which I am not getting when I run the Durametric scan. I would prefer not 'throwing parts at it' until it starts working again, so any advice would be appreciated. -
Oil pressure fluctuation
tac27 replied to royp4's topic in 996 Series (Carrera, Carrera 4, Carrera 4S, Targa)
I replace that part every year when the summer temps break into the triple digits; usually late June or early July.